1. NIVA gearbox seals:
-Oil seal for the input shaft of the gearbox (gearbox) NIVA-2121, -21213, -21214, -2131, -2123:
Catalogue number: 2101-1701043
oil seal dimensions: 28x47x8mm
- Seal of the secondary shaft of the gearbox (shank) VAZ-2121, -21213, -21214, -2131, -2123:
Catalogue number: 2101-1701210
oil seal dimensions: 32x56x11mm
2 . NIVA front axle oil seals:
-Oil seal for the front axle gearbox NIVA- 2121,-21213,-21214,- 2123,-2120
catalog number: 2121-2302052
Dimensions: 35.8 x 68 x 11mm
-Drive seal -2121,-21213,-21214,-2131,-2123, universal (without direction)
Catalog number: 2123-2303120 / 121 2 pcs.
seal dimensions: 57.15 x 40 x 9mm
But it is better to install seals with a notch (left, right):
Left drive oil seal -2121,-21213,-21214,- 2123
Catalog number: 21213-2301035 1 piece.
Oil seal dimensions: 57.15 x 40 x 9mm
Right drive oil seal -2121,-21213,-21214,-2123
Catalog number: 21213-2301034 1 piece.
Oil seal dimensions: 57.15 x 40 x 9mm
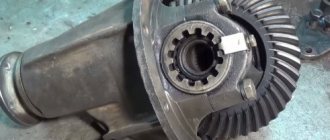
3. Transfer Case Seals 3pcs:
2 identical oil seals are installed on the valve:
catalog number: 2101-2402052-01 (this is the rear axle gearbox seal on the VAZ-2101 and NIVA-2121 of right rotation),
one is installed on the drive shaft of the RK:
(in the lower diagram), the second is on the front shaft of the RK differential (see the upper diagram - highlighted in red)
Dimensions of these seals in mm: 35.8 x 68 x 10(12) 2 pcs.
An oil seal is installed on the rear shaft of the RK differential - this is the 3rd oil seal (highlighted in blue in the top diagram)
with catalog number: 2121-2302052 left rotation 1 pc.
Dimensions in mm: 35.8 x 68 x 11(12)
4. Rear axle gear oil seal :
catalog number: 2101-2402052-01 (rear axle gearbox VAZ-2101) 1 pc.
5. Axle shaft seals for Chevy NIVA-2123:
NIVA oil seals
1. NIVA gearbox seals:
-Oil seal for the input shaft of the gearbox (gearbox) NIVA-2121, -21213, -21214, -2131, -2123:
Catalogue number: 2101-1701043
oil seal dimensions: 28x47x8mm
- Seal of the secondary shaft of the gearbox (shank) VAZ-2121, -21213, -21214, -2131, -2123:
Catalogue number: 2101-1701210
oil seal dimensions: 32x56x11mm
2 . NIVA front axle oil seals:
-Oil seal for the front axle gearbox NIVA- 2121,-21213,-21214,- 2123,-2120
catalog number: 2121-2302052
-Drive seal -2121,-21213,-21214,-2131,-2123, universal (without direction)
Catalog number: 2123-2303120 / 121 2 pcs.
seal dimensions: 57.15 x 40 x 9mm
But it is better to install seals with a notch (left, right):
Left drive oil seal -2121,-21213,-21214,- 2123
Catalog number: 21213-2301035 1 piece.
Oil seal dimensions: 57.15 x 40 x 9mm
Right drive oil seal -2121,-21213,-21214,-2123
Catalog number: 21213-2301034 1 piece.
Oil seal dimensions: 57.15 x 40 x 9mm
3. Transfer Case Seals 3pcs:
2 identical oil seals are installed on the valve:
catalog number: 2101-2402052-01 (this is the rear axle gearbox seal on the VAZ-2101 and NIVA-2121 of right rotation),
one is installed on the drive shaft of the RK:
(in the lower diagram), the second is on the front shaft of the RK differential (see the upper diagram - highlighted in red)
Dimensions of these seals in mm: 35.8 x 68 x 10(12) 2 pcs.
An oil seal is installed on the rear shaft of the RK differential - this is the 3rd oil seal (highlighted in blue in the top diagram)
with catalog number: 2121-2302052 left rotation 1 pc.
Dimensions in mm: 35.8 x 68 x 11(12)
4. Rear axle gear oil seal :
catalog number: 2101-2402052-01 (rear axle gearbox VAZ-2101) 1 pc.
5. Axle shaft seals for Chevy NIVA-2123:
Seals for VAZ-2110 drives of right and left rotation are installed
catalog numbers of oil seals: 2110-2301034 right - 1 piece
gland dimensions in mm: 57 x 35 x 9
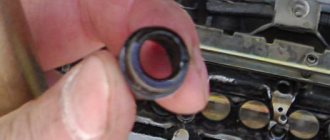
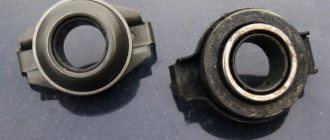
In the photo: VAZ-2123 axle seals (BRT) red-left, black-right.
The arrow on the oil seal indicates the direction of rotation of the shaft (when the vehicle is moving forward).
Source
Basic parameters of factory parts for repair
Main technical indicators of the unit: diameter and length of the axle, number and length of the spline belt, type of bearings and sealing seals. These indicators are determined by the design features of the system and the calculated traction forces under comparable operating conditions at the time of design and production.
Often, under the influence of large loads, deformation of the axle shafts occurs, premature wear and jamming of the support ball bearings occurs, deformation and fatigue wear of the sealing seals, followed by leakage of transmission oil from the axle.
Factories producing spare parts for the domestic automotive industry are constantly striving to improve manufactured vehicle components and assemblies. They regularly offer consumers a newer, more reliable, more modern product.
Let's consider the technical parameters of the drive elements of the rear axle of an SUV.
Half shaft
Main characteristics:
- Catalog number: 21230-2403069-00, 21230240306900, 2123-2403069.
- Length: 760 mm.
- Diameter for oil seal: 35 mm
- Weight: 8.4 kg.
- Manufacturer: AvtoVAZ
- Average market prices: 6900 rubles.
Existing analogues:
- axle shaft, standard size for VAZ 2121 Chevrolet Niva, average price 3,400 rubles;
- Russian, the average price is 3900 rubles.
Rolling ball bearings
- Catalog number: 2121-2403080. Designation - GPZ - V76-180508AK2US9.
- Manufacturing index: 180508, 62208-2RS
- Manufacturer: AVTOVAZ
- Average market prices: 400 rubles;
- Inner diameter - 40 mm;
- Outer diameter - 80 mm;
- Width - 23 mm;
- Weight - 440g;
- Rated rotation speed - 5600 rpm.
Foreign bearing manufacturers - NSK, SKF, SNR. Average price from 600 rubles.
Oil seals
- Catalog number: 21100-2301034-00-0 - left and 21100-2301035-00-0 - right.
- Overall dimensions: 35x57x9 mm.
- Manufacturer: AVTOVAZ.
- Average market prices: 45-60 rubles.
Existing alternatives:
- CV joint drive oil seal 2110.08 “RT” universal, manufacturer RUZINOTEHNIKA;
- axle drive seal VAZ-2110-2112, 2123 right/left (35x57x9), manufacturer General Motors.
It is also worth noting the German manufacturer Corteco. This company produces a wide range of oil seals for the VAZ-2123.
Ready-made repair kits
On the spare parts market you can also purchase a ready-made repair kit for servicing the rear axle shafts of the VAZ-2123.
The repair kit for the rear axle shaft of the VAZ 2123 Chevy Niva from ESPRA consists of bearing 2121-2403080, sealing oil seal 2110-2301034 and locking ring 2123-2403084. The average price of such a set is 690 - 890 rubles.
Interesting! Some Niva owners prefer to purchase ready-made kits from one manufacturer, considering this to be a kind of guarantee of the compatibility of the parts being replaced.
When to change the seal
Replacing the axle seal is not tied to a specific mileage, but is done in connection with the following defects:
- Transmission oil leakage from the rear axle of a Chevrolet Niva. It is characterized by the appearance of oil stains on the brake casing and the “stocking” on the side where the axle shaft seal has lost its seal.
- In case of accidental damage to the seal when replacing the axle bearing. Happens when a part is pulled out of its socket.
A distinction should be made between transmission oil leakage from the axle seal on either side of the rear beam and from the gearbox shank where the driveshaft is secured. In the second case, greasy stains and dirt cover the rear axle gear housing, located in the middle.
If for various reasons you need to replace the axle bearing, then you should also change the oil seal at the same time. This will save you from having to disassemble the unit again due to leakage of the old part. The part costs mere pennies, its catalog number for the Chevrolet Niva is 2110-2301034 (right) and 2110-2301035 (left), and the overall dimensions are as follows:
- outer diameter - 57 mm;
- width - 9 mm;
- The diameter of the hole along the protruding rubber (or silicone) edge is 35 mm.
The catalog number and dimensions of the O-ring of the Niva VAZ 21214 axle shaft are identical. In addition to the oil seal itself, transmission oil will be needed to replenish the lost amount in the gearbox. TAD17I brand oil is considered “native” for all types of VAZ gearboxes.
What tool is required for the job?
- Screwdriver Set
- A set of keys
- Hammer
- The key is not just a torque wrench
Once the tool is prepared, you can begin to work by performing the following series of actions:
- Lower the parking brake all the way down
- Drain the oil from the rear axle gearbox
- Both axle shafts are removed
- Disconnect the cardan drive from the flange drive gear
- Unscrew the nut that secures the flange
- Let's take it off
- Using a screwdriver, remove the old oil seal
- Lubricate the outer edge of the new oil seal and install it in place using a mandrel of suitable diameter.
- Screw the nut and washer into place
At this point, the work on replacing the oil seal on the Chevrolet Niva can be considered completed. The removed parts are installed in the reverse order of removal. If difficulties arise during the replacement, then it is better to contact a specialized service, where specialists will carry out the replacement.
This is interesting: Replacing windshield wiper blades Chevrolet Lacetti 2004 - 2013
When to change bearings on Chevrolet Niva axle shafts
Since our car is often operated in very difficult conditions, the loads on the bearings are very high. In addition to loads, the bearing may be subject to moisture attack when the axle shaft seal fails . At the same time, oil may begin to leak from the rear axle housing. As a result, the bearing is poorly lubricated and the grease is washed out over time.
A crunching sound from the rear wheel indicates a wheel bearing failure.
The most obvious symptom of bearing failure will be increased noise at any speed. In more severe cases, both radial and axial play may be observed.
The factory allows axial clearance of the axle shaft of no more than 0.7 mm , but most often the axle shaft will indicate the destruction of the bearing with strong noise and crackling.
At the first symptoms of a bearing failure, you need to start replacing it.
Numbers and articles
Fortunately, the axle bearing is not the most scarce part. It is one of the most popular of the 500 series of single-row bearings and is produced by a huge number of factories in the CIS, as well as in many European countries. Its industrial index is 180508 , the index of its foreign analogues is 62208-2RS . Automobile factory article number - 2121-2403080 .
Rear axle axle shaft of unloaded type VAZ 21213-2123 modernized 22 splines VolgaAvtoProm
- Description
- Characteristics
- Reviews 4
New! Upgraded design! 22 slots!
We offer you a collapsible rear axle shaft of the unloaded type 24 splines VolgaAvtoProm , developed on the basis of modern hub units for foreign cars (HUB-III), is a collapsible unit, which includes a closed double-row ball bearing.
Now the axle shaft is divided into two separate parts: the hub and the shaft, which allows for a number of significant advantages over the “standard” standard axle shaft.
The factory hub assembly of the rear axle shaft of the VAZ 2121-2123 is created using the so-called “zero” generation bearing.
The disadvantages of the standard design are:
- Low reliability (average mileage under moderate load is about 30,000 km)
- The need to drain the oil when repairing the axle shaft.
- The possibility of the axle shaft retaining ring being pressed out during operation.
- Availability of special tool for repair.
- Possibility of unpressing the retaining ring while moving, which can lead to an emergency.
We offer you the 3rd generation hub Rear wheel drive, developed on the basis of modern hub units for foreign cars (HUB-III):
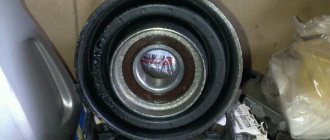
- The hub is a single and dismountable unit, which integrates a double-row closed-type ball bearing DAC 39720037 (Craft Bearings) from the front hub of DAEWOO Nexia, Lanos, OPEL Vectra. Bearing dimensions 72x39x37 mm ;
- Lightweight design : The axle shaft is now divided into two separate parts - the hub and the shaft , which allows the weight of the vehicle to be distributed over the hub and bearing;
- Increased reliability of the unit due to the use of alloy steel and modern heat treatment methods (at a moderate load of 80,000 km or more);
- Increased resistance to lateral loads;
- High maintainability and ease of replacement. ( when replacing a bearing, it is not necessary to heat the lock ring, which is seated “hot”, which greatly simplifies repairs in a service station);
- No need for maintenance or adjustment during the entire life of the unit.
- The bearing used is widespread and can be purchased at any auto parts store for foreign cars.
The recommended tightening torque for the wheel bearing is 22 kgf*m or 215.7 H*m (in the factory design, the necessary tightening of the wheel bearing has already been made.)
The manufacturer guarantees the operating life of the unit for 6 months, subject to proper installation and operation.
Attention. Before installation, be sure to check the geometry of the rear axle stocking. A “bent” axle will lead to accelerated wear of the axle shaft and bearing failure.
- Includes 2 axle shafts , technical data sheet, packaging - hard cardboard box.
- The weight of one reinforced, unloaded axle shaft for the Niva and Chevrolet Niva assembly is 9.0 kg, the weight of the set is 18.0 kg.
- Two axle models are available: 2123 - for vehicles equipped with a standard axle model 21213-2123,
- 2123ABS - For vehicles with anti-lock brakes,
- 2121 - for old-style 2121 cars with a “short” axle.
Information on standard (factory) axle shafts for Niva and Chevrolet Niva of all modifications (22 splines)
! Wide axle - rear axle beam Niva 213 (21213-2401010) and Chevrolet Niva 2123 (2123-2401010) - are essentially the same, differ in the mounting of shock absorbers (which are like a house in the Niva) and brake pipes. Length 1350 mm. Locking ring 2123 (2123-2403084 regular or with teeth 2123-2403084-10 for ABS), oil seals 2110 left and right (2110-2301034 and 2110-2301035). The oil seal size is 35x57x9.
The axle shaft Niva (21213-2403069) and Chevy Niva (2123-2403069) - it’s long, it’s also a new model - 760 mm. The axle shafts themselves are the same; the assembly differs in the bolts that secure the axle shaft to the axle. (M10x60 for 2123 and M10x50 for 213)
It is possible to send cash on delivery to all regions of Russia.
- Shaft
- Thrust ring
- Bearing shell
- Double row ball bearing DAC 39720037 Size 39x72x37 (Craft Bearings)
- Hub
- Oil seal (2121-3103038)
- Oil seal (2101-2402052)
- Retaining ring
Links to tests of modernized axle shafts in severe conditions:
Preparation and disassembly
To independently remove a leaking rear axle oil seal on a Niva Chevrolet, you will need the following tools:
- standard set of wrenches;
- slotted screwdriver and wheel wrench;
- jack;
- hammer;
- wooden stand;
- cloth gloves.
Never neglect gloves when repairing a car: they will protect your hands from damage due to accidental impacts. The height of the wooden stand should be enough to support the rear axle with the wheel removed and the shock absorber unscrewed, otherwise oil will leak from it.
Before removing the old seal, you will have to disassemble the rear hub assembly and remove the axle shaft. Disassembly is carried out in the following sequence:
- Place the car on a level surface and secure it with wheel chocks. Make sure the handbrake is turned off.
- Loosen the wheel nuts, jack up the car and remove the wheel.
- Clean the rear axle flange that protrudes beyond the brake drum from rust. Additionally, you can treat this area with WD-40 lubricant.
- Unscrew the 2 bolts securing the drum with a 12 mm wrench, then gently tap with a hammer to move it out of place.
- The drum is removed in 2 ways: by squeezing it out with the same bolts, screwed into other holes, or by knocking it with a hammer through a piece of wood. The methods can be combined, just be careful not to damage the edge of the drum with the blows.
- After dismantling, clean the seat on the axle shaft again to make the drum easier to remove.
The next step is unscrewing and removing the axle shaft. In the VAZ 2131 Niva Chevrolet, 4 bolts securing it are held on the other side by a bracket holding the shock absorber.
Hub repair: popular mistakes and misconceptions
Connoisseurs of tuned cars are often able to make radical changes to their cars. And few restrictions exist for them. Owners of Niva Chevrolet are no exception. Tuning fans also took a look at the design of the front hub assembly. Often on online forums in discussions you can find advice (and even corresponding training videos) about replacing the bearing using a hub mechanism that has a steering knuckle from a VAZ 2121 car, since it is believed that this design is better in terms of reliability.
However, this is a misconception. Yes, tightening will occur without any difficulties, but this will make it impossible to adjust the camber of the front wheel of the car. The fact is that each fist has distinct differences in size and axial angles. But much more stupid are the tips that require turning the hub and shaft on a lathe.
Repairs such as replacing a wheel bearing in a field can be done independently without much difficulty. Wheel bearings on the VAZ 2121 and Chevrolet Niva have a very short resource due to the suspension design, compared to other all-wheel drive vehicles, therefore, these parts need to be given increased attention in order to identify the fault in time.
Replacing a wheel bearing in the field does not involve anything complicated if you follow the instructions strictly. Anyone, even a novice car owner, can cope with such repairs. Not all vases have wheel bearings changed the same way. The design of the Niva car hub differs from the design of other VAZ models, so the process of replacing the bearing will also have its differences.
Symptoms and identification of a worn wheel bearing
When the life of the hub bearing is running out, a hum is clearly audible when driving, this is the main sign. If you listen, you can understand which direction this hum is coming from. When driving at low speeds, it is not too noticeable, and it can easily be confused with noise from rubber, but as speed increases, the hum increases, which is reminiscent of flying in an airplane. You can’t drive with a humming bearing, because soon it may simply break into pieces, and this implies a lot of other problems.
If there is an assumption that the bearing has exhausted its service life, then you can check this with the car parked. To do this, you need to jack up the wheel whose bearing is suspected and pull the wheel vertically with your hands. If there is play, then the bearing is most likely to blame.
And also interesting: Do-it-yourself Niva suspension lift. How to lift the front and rear suspension of a Niva car?
Necessary tools for work
- Jack and supports. To replace the front bearing, you need to lift both wheels, otherwise the stabilizer will interfere, pinching the suspension elements;
- Wrench for unscrewing wheel nuts;
- Flathead screwdriver. To remove the protective cap;
- Head 27;
- Locksmith's beard. To straighten the collar of the hub nut;
- Hammer;
- Wrenches for 10, 17, 19 and 22;
- Chisel and wooden spacer. To avoid damaging other parts when knocking out;
- Vise;
- A piece of pipe for pressing in bearing retaining rings.
Bearing replacement process
- Loosen the nuts on the wheel where replacement is planned and jack up both wheels of the axle. Remove the desired wheel;
- We dismantle the caliper and guide. To avoid damaging the brake hose, we tie the caliper to the upper arm with wire;
- Having removed the protective cap, use a 27mm head to unscrew the hub bearing nut and remove the conical bushing;
- Using a chisel, unbend the locking plate of the front and rear lever mounting nuts. Using a 19mm wrench, unscrew the front and rear nuts securing the lever. After this, remove the locking plate;
- When the lever is released, it must be moved away from the steering knuckle, freeing the brake hose;
- Disconnect the ball joints (upper and lower) from the lever;
- Now you can remove the entire steering knuckle assembly, along with the ball joints and the brake disc, by removing it from the CV joint splines;
- Separate the steering knuckle from the hub with the brake disc. If the parts do not separate freely, then we clamp the fist in a vice and, using a soft metal drift or chisel, through a spacer from wood, knock out the hub with the brake disc;
- Next, pull out the bolts securing the lever and knock down the protective ring with a chisel;
- Using a 10mm wrench, unscrew the bolt that secures the casing and remove the casing itself;
- We hold the fist in a vice and, using a flat-head screwdriver, pry up and remove the wheel bearing seal. There is a metal ring behind the oil seal, we also remove it;
- The next step is to remove the inner ring of the outer bearing assembly from the well. Next, we also remove the oil seal, metal ring and inner bearing ring assembly;
- Using a punch and a hammer, we knock out the metal rings of the outer and inner bearings. At this point, dismantling is considered complete.
After cleaning the well from old grease, you can proceed to installing a new bearing. Replacing a wheel bearing in a field occurs in the reverse order; it is only important not to forget to fill it with fresh Litol 24 grease and, after installing the steering knuckle on the car, adjust the clearance in the bearings.
Thematic materials:
What happens if you pour gasoline into a diesel engine? Car engine cooling system What malfunctions prohibit the use of a car Orion on-board computers Pressure reduction valves, selection and operation issues Installation of additional headlights Reviews: Chrysler engine on a Gazelle Electronic speedometers for a car
103583
Axle shaft seal
Axle shaft seal
Post by plantain » 04 Jun 2011, 16:48
Re: Axle shaft seal
Post by rv3dll » 05 Jun 2011, 11:11
Re: Axle shaft seal
Post by plantain » 05 Jun 2011, 16:59
Re: Axle shaft seal
Post by Spiteful critic » 05 Jun 2011, 19:48
Re: Axle shaft seal
Post by plantain » Jun 06, 2011, 12:24 pm
Re: Axle shaft seal
Post by Spiteful critic » Jun 06, 2011, 2:01 p.m.
Re: Axle shaft seal
Post by smbmax » May 31, 2012, 08:13
Re: Axle shaft seal
Post by Anton » May 31, 2012, 08:38
Most likely your bridge stocking is bent. Or wear of the axle shaft in the part of contact with the oil seal.
Re: Axle shaft seal
Posted by doc Brown » 31 May 2012, 09:09
Re: Axle shaft seal
Post by Pavl0 » 02 Jul 2013, 17:08
Re: Axle shaft seal
Post by Vovchik » 02 Jul 2013, 17:23
Re: Axle shaft seal
Post by doc Brown » 02 Jul 2013, 17:58
Re: Axle shaft seal
Posted by ayax » Mar 12, 2014 2:03 pm
Re: Axle shaft seal
Post by Serg548 » Apr 06, 2014, 07:02
Good day everyone! I also changed the axle shaft seals on my NIVKA a week ago. On the right it was leaking, it was an infection, the disk was already covered in fuel oil. I changed both. The next day the right side started leaking again. I didn’t take it apart right away, I drove it for a couple of days and it calmed down. So far everything is dry.
Added after 13 minutes 57 seconds: Maxim, the breather is very easy to clean, you can press it, twist its cap, you can remove it (unscrew it) and blow it out with a pump. Or just buy and install a new one. I don't think it's worth much.
Required tools for replacement
To work you will need:
- Keys for "13" and "24".
- Screwdriver.
- Hammer.
- Torque wrench.
First of all, it is necessary to determine the cause of the oil leak.
Before starting work on replacing the oil seal, you should make sure that the cause of the leak is not the breather . To do this, you need to check the amount of oil leakage by moving the breather cap in different directions. You should first check the amount of oil in the bridge and add it. After this, the oil filler plug should also be crimped.
If the work will be carried out on a pit, then the bridge must be hung and placed on supports.
Then you need to start the engine and engage 4th gear . The speedometer reading should be within 100 kilometers per hour. In this position, the machine should work for 10–15 minutes (engine temperature 80 degrees ). 5 drops of oil leak out during the test , then the oil seal must be changed.
Installing a New Seal
After removing the axle shaft, the metal shield where the brake pads are attached will remain hanging on the copper pipe with the fluid, so it should be fixed by inserting the 2 upper bolts back into the holes. Then follow the instructions:
- Remove the thick rubber gasket from the rear axle flange.
- Pull out the old oil seal by prying it with a screwdriver or pliers. Clean the seat and wipe with a rag.
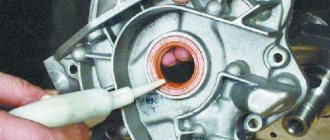
- Lightly lubricate the new seal with transmission oil and insert it into the socket of the Niva rear axle as evenly as possible.
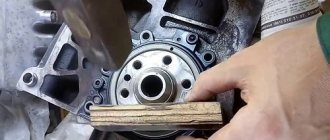
- Using a round pipe adapter, press the oil seal into the socket with light blows of a hammer. You can use an old seal as an additional attachment.
At the end of the procedure, you must thoroughly wipe all parts free of oil - the brake cylinder, pads, drum and metal shield. Before reassembling, it would be a good idea to check the axle bearing for wear and grease. Wear is indicated by difficulty turning, binding, or slight noise. If you discover a malfunction, take the axle shaft to the nearest car service center; you will not be able to replace the bearing without special equipment.
To check the grease inside the bearing, you need to pry the plastic covering the rollers with an awl and remove it. Then add thick Litol-type lubricant inside and put the plastic in place, and then begin assembly.
At the end, it is important to check the oil level in the rear axle gearbox of the Chevrolet Niva. The test is carried out on a fully assembled car, standing on a level area. The filler plug is unscrewed from the gearbox housing, after which the oil level is determined visually or using a thin wooden stick. If there is a shortage, you need to insert a hose of a suitable diameter into the filler neck with a watering can at the end, where the lubricant is poured. It is more convenient to top up with an assistant: you control the level, and the assistant gradually adds oil.
Most Chevrolet Niva owners, due to the simplicity of the design, can independently repair their car. This is especially true for a large number of consumables, including those in the chassis of the car. One of the parts that requires periodic replacement is the Chevrolet Niva front axle oil seal. The need for repairs arises when an oil leak occurs from the axle housing and a knocking noise occurs. The main cause of grease leakage is due to a clogged breather.
It is necessary to monitor at what stage the oil leak occurs. If, after intensive movement, while the gearbox is still hot, and after it cools down, it stops, then it is necessary to clean the breather. It may be clogged with dirt, which prevents the heated air from escaping outside. Therefore, it is possible to squeeze out fluid from the gearbox, even if the gaskets are in good condition.
If the breather is working properly, but oil still comes out, then most likely you will need to replace the cover gaskets and o-rings. Typically, the design of the front axle provides for the presence of three rings: an oil seal located on the axis of the drive gear, axle bearings and oil seals for the right and left drive - the axle shaft hinge.
How to install a new oil seal
When the axle shaft is removed from the car, the nearby metal shield used to mount the pads will be essentially loose. It will only be held in place by a thin copper tube filled with brake fluid. To prevent the latter from breaking, the shield must be temporarily secured with a pair of previously unscrewed bolts.
Removing and installing the oil seal is done as follows:
- remove the gasket from the bridge flange (do not tear it, although it is thick, it is still rubber);
- remove the damaged oil seal - pick it up with a flat screwdriver;
- thoroughly clean the area where it previously stood with a cotton, lint-free cloth;
- Before installation, the new seal must be wiped with oil (necessarily with transmission oil);
- place the element in the socket and make sure there is no distortion;
- Press it in with a piece of pipe so that the rubber is not damaged - place the old oil seal on top of it.
Now it is important to thoroughly clean all removed elements from dirt and oil. It is absolutely unacceptable to leave traces of grease on brake parts:
- drum;
- cylinder;
- pads;
- shield
If only the oil seal was changed on the Chevrolet, then it is advisable to inspect the axle bearing as well. The part is checked for wear, lack of play and presence of grease on the rollers. If an element breaks soon, then it:
- rotates tightly;
- makes noise;
- rattles when shaken.
Please note that you cannot replace the bearing yourself. This operation will be performed for you at a car service center. You can only check if there is lubricant inside. To do this, carefully lift the plastic plug covering the rollers and look inside. In the absence or its obvious insufficiency, ordinary Litol is laid. The plastic ring is then placed in place.
Now you can assemble the knot. Follow all steps described in the instructions in reverse order.
Finally, be sure to check how much oil is left in the gearbox of your Chevrolet. To do this, lower the car onto its wheels and make sure it is level. Then:
- find the neck plug on the casing;
- turn it inside out;
- take a look inside.
If there is not enough lubricant, add it using a hose and funnel. It is better to do the work with a partner - one will add oil, and the other will monitor its level.
Search
14.3 Removing the axle shaft and replacing the oil seal
We send and remove the rear wheel. Remove the rear brake pads (see "Replacing the rear brake pads" )
Using a "14" socket with an extension through one of the two large holes in the axle flange, loosen the four bolts securing the plate axle and brake shield to the rear axle beam flange.
Remove the bolts along with spring washers.
Hold the brake shield so that it does not hang on the brake cylinder tube and lower it slightly.
. and use a Phillips screwdriver to remove the two screws that secure the brake shield to the axle (on the back of the shield).
If these screws cannot be removed, see Method Two. remove the axle shaft (bottom).
To prevent the brake shield from hanging on the brake line, we pass an M8 bolt through one of its top mounting holes and insert it into the corresponding hole on the beam flange.
Replacement Tips
Most people, along with replacing the oil seal, also change the transmission oil. If you are one of them, you should find out which lubricant you need to use, since mixing different types of oil is not recommended. This may lead to operational problems. Therefore, if you are not sure what fluid to fill in, flush the system before replacing.
Before replacing the fluid, it is better to drain it; if this is not possible, then raise the side where the replacement will take place higher, this way you can avoid lubricant leakage. In any case, after the work is done, you need to add oil.
To summarize, we can conclude that the problem occurs sooner or later for all owners of this car, since the rear axle of this model is weak. As we can see from the material given above, replacing a part is not such a complicated procedure and can be done independently, and it can be done in an hour.
Source
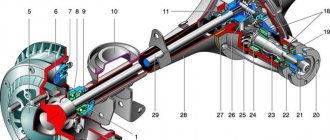
Front axle structure.
To replace the oil seal, it is not necessary to dismantle the front axle. When replacing oil seals yourself, it is not recommended to use a lift; it is better to carry out the work on an inspection pit or overpass. The rear wheels must be secured with supports. The gearbox and transfer case levers must be adjusted to the neutral position. When using a jack, it is better to hang the front part on special supports.
First, the replacement area is cleaned of drips and traces of technical fluids. After this, the crankcase plug is unscrewed and the oil in the gearbox is drained into a special container. After this, the plug is installed in place.
To carry out the replacement, you need to stock up on the following set of tools:
- set of socket wrenches and hexagons
- hammer and pry bar
- Screwdriver Set
- puller with two or three legs
- pipe sections equal to the diameter of the seals
- Liquid for removing oil residues, such as kerosene
- metal mesh
- rags
DELIVERY
SDEK Courier service. We send the order to your city to a convenient pick-up point. Special low rates for our online store.
RUSSIAN POST Traditional delivery to any location in Russia to a post office. Special low rates for our online store in regional centers.
Delivery costs are not included in the price of the product and depend on the destination and weight of the parcel. We inform you about the delivery rate after placing your order (before payment). Shipping cost calculator.
Replacing the oil seal on the drive gear drive, main steps
- it is necessary to unscrew the bolts holding the flange, remove the cardan shaft from the gearbox
- disconnect the CV joint housing from the drive.
- you need to connect a dynamometer and determine at what moment the rotation begins. To do this, rotate the flange mount until the gears begin to move.
- bolts are screwed into adjacent holes
- Between the bolts there is a pry bar, with the help of which the flange is kept from turning.
- After this, you can remove the flange along with the washer using a universal puller.
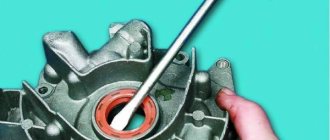
- The oil seal from the bridge gear is replaced with a new original spare part. The sealing ring must be lubricated with grease or lithol.
- After this, it is necessary to press the ring using a pipe of a suitable diameter.
- The flange fits onto the spline connection.
- The cardan shaft is installed in place.
Replacement: step-by-step instructions
First, unscrew the bolts securing the cardan to the flange and hang the cardan shaft under the bottom. After this, you need to measure the torque of the shank using a dynamometer or canter. To do this, wind a cord around the flange, tie its end to the measuring device and pull. Memorize or write down the force at which the shank begins to rotate. This will come in handy when assembling the unit.
- Hold the flange with a wrench and unscrew the fastening nut.
Install a new oil seal and moisten its seal with transmission oil.
- Carefully slide the shank onto the slots and insert into place.
Tighten the nut with a torque wrench with a force of 12-15 kgf.
The work takes no more than two hours. After replacing the oil seal, especially if it had to be changed due to oil leakage, it is necessary to check the transmission level in the gearbox.
Replacing the Chevrolet Niva front axle oil seal.
- First you need to remove one or two drives, depending on where replacement is needed.
- After this you need to remove the locking ring
- Using a hammer, knock out the bearing. If you have problems with removal, you can use WD-40 lubricant
- The cover is removed, the old oil seal is knocked out using a pipe.
- The installation site is lubricated and a new O-ring is installed.
Hello! Most Chevy owners service the unpretentious units of this popular car themselves. During intensive use, you often have to change consumables, especially in the chassis. I will tell you about this type of service, such as replacing the front axle oil seal of a NIVA Chevrolet. The replacement operation is carried out when oil leaks from the axle housing. A clogged breather causes lubricant to squeeze out.
If grease drips immediately after stopping (while the gearbox is hot), and then the flow stops, the breather must be cleaned. When it is clogged with dirt, the heated air is not released outside during movement. Under pressure, the working fluid of the gearbox will be squeezed out even through serviceable gaskets and seals.
If the breather is in order, but oil still leaks, you will have to replace damaged cover gaskets or O-rings. of them in the front axle, and they are different:
The oil seal that seals the drive gear axis is located at the rear of the axle, at the location where the front propeller shaft is attached. Oil seals for the right and left drive (inner axle joint).
ATTENTION! The left and right oil seals are not the same; they have a direction of rotation. This must be taken into account when purchasing. The direction of rotation of the wheel when moving forward is indicated by the arrow. If the oil is installed incorrectly, the removable notches will drive the lubricant out.
Reasons for accelerated wear
The service life of the part is greatly reduced in the following cases:
- The gearbox breather is clogged. Under air pressure, oil is squeezed out through the cuff, breaking the internal stiffener.
- The universal joint flange nut is not tightened correctly. Backlash or increased friction leads to rapid wear of the oil seal.
- The transmission oil contains aggressive additives.
- The rubber of the cuff was exposed to chemicals from the road surface.
- The gearbox overheats due to poor quality or lack of lubrication.
The oil seal can also be damaged if a hard object gets between it and the shaft. It could be a splintered gear tooth, a piece of a retaining ring, or simply sand that accidentally got into the oil.