Removing the axle shaft and replacing the oil seal
We hang and remove the rear wheel. Remove the rear brake pads (see Replacing the rear brake pads).
Using a 17mm spanner, unscrew the four nuts on the bolts securing the axle shaft to the beam flange.
Use a slotted screwdriver to bend the locking plates of the axle shaft mounting bolts...
...and remove the bolts.
We fix the wheel with the reverse side on the axle shaft by tightening three nuts several turns.
Holding the wheel, we move it with a jerk...
...and remove the axle shaft assembly with the bearing mounting plate, bearing and locking ring.
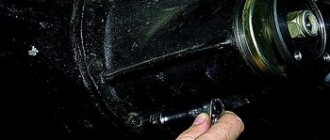
We take out the rubber sealing ring of the beam flange.
We insert two bolts into the holes of the brake shield and the rear axle beam so that the shield does not hang on the brake pipe.
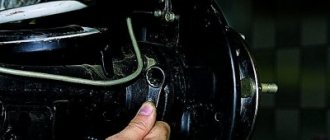
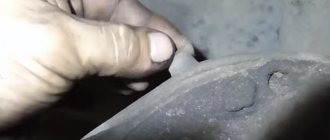
We pry off the oil seal using sliding pliers...
Using a tool head of a suitable size with an extension (or a piece of pipe), we press in a new oil seal.
If the axle shaft is deformed, its splines are worn out, or the bearing is worn out, we replace the axle shaft with a new one complete with bearing and locking ring (it is not recommended to replace the bearing or locking ring yourself). Install the axle shaft in reverse order. Check the oil level in the rear axle and add if necessary.
17.3. Removing the axle shaft and replacing the oil seal
We hang and remove the rear wheel. Remove the rear brake pads (see Replacing the rear brake pads).
Using a 17mm spanner, unscrew the four nuts on the bolts securing the axle shaft to the beam flange.
Use a slotted screwdriver to bend the locking plates of the axle shaft mounting bolts...
...and remove the bolts.
We fix the wheel with the reverse side on the axle shaft by tightening three nuts several turns.
Holding the wheel, we move it with a jerk...
...and remove the axle shaft assembly with the bearing mounting plate, bearing and locking ring.
We take out the rubber sealing ring of the beam flange.
We insert two bolts into the holes of the brake shield and the rear axle beam so that the shield does not hang on the brake pipe.
We pry off the oil seal using sliding pliers...
Using a tool head of a suitable size with an extension (or a piece of pipe), we press in a new oil seal.
If the axle shaft is deformed, its splines are worn out, or the bearing is worn out, we replace the axle shaft with a new one complete with bearing and locking ring (it is not recommended to replace the bearing or locking ring yourself). Install the axle shaft in reverse order. Check the oil level in the rear axle and add if necessary.
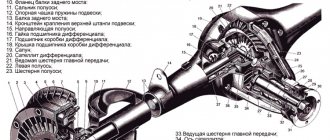
Checking the technical condition and repairing the axle shaft
After dismantling the axle shaft, you need to check its condition and the condition of the parts included in the axle shaft kit. You need to make sure that:
— the ball bearing is not worn out or damaged; if the axial clearance in it exceeds 0.7 mm, replace the bearing;
— the locking ring and bearing have not been displaced relative to the original fit; if the inner ring of the bearing rotates relative to the seat of the axle shaft, replace the locking ring;
— the bearing mounting plate and the oil deflector are not damaged;
— the axle shaft is not deformed and the seating surfaces are not damaged; The runout of the axle shaft, measured at the centers on the journal under the oil seal, should not exceed 0.08 mm.
When to change the seal
Replacing the axle seal is not tied to a specific mileage, but is done in connection with the following defects:
- Transmission oil leakage from the rear axle of a Chevrolet Niva. It is characterized by the appearance of oil stains on the brake casing and the “stocking” on the side where the axle shaft seal has lost its seal.
- In case of accidental damage to the seal when replacing the axle bearing. Happens when a part is pulled out of its socket.
A distinction should be made between transmission oil leakage from the axle seal on either side of the rear beam and from the gearbox shank where the driveshaft is secured. In the second case, greasy stains and dirt cover the rear axle gear housing, located in the middle.
- outer diameter - 57 mm;
- width - 9 mm;
- The diameter of the hole along the protruding rubber (or silicone) edge is 35 mm.
NIVA oil seals
1. NIVA gearbox seals:
-Oil seal for the input shaft of the gearbox (gearbox) NIVA-2121, -21213, -21214, -2131, -2123:
Catalogue number: 2101-1701043
oil seal dimensions: 28x47x8mm
- Seal of the secondary shaft of the gearbox (shank) VAZ-2121, -21213, -21214, -2131, -2123:
Catalogue number: 2101-1701210
oil seal dimensions: 32x56x11mm
2 . NIVA front axle oil seals:
-Oil seal for the front axle gearbox NIVA- 2121,-21213,-21214,- 2123,-2120
catalog number: 2121-2302052
-Drive seal -2121,-21213,-21214,-2131,-2123, universal (without direction)
Catalog number: 2123-2303120 / 121 2 pcs.
seal dimensions: 57.15 x 40 x 9mm
But it is better to install seals with a notch (left, right):
Left drive oil seal -2121,-21213,-21214,- 2123
Catalog number: 21213-2301035 1 piece.
Oil seal dimensions: 57.15 x 40 x 9mm
Right drive oil seal -2121,-21213,-21214,-2123
Catalog number: 21213-2301034 1 piece.
Oil seal dimensions: 57.15 x 40 x 9mm
3. Transfer Case Seals 3pcs:
2 identical oil seals are installed on the valve:
catalog number: 2101-2402052-01 (this is the rear axle gearbox seal on the VAZ-2101 and NIVA-2121 of right rotation),
one is installed on the drive shaft of the RK:
(in the lower diagram), the second is on the front shaft of the RK differential (see the upper diagram - highlighted in red)
Dimensions of these seals in mm: 35.8 x 68 x 10(12) 2 pcs.
An oil seal is installed on the rear shaft of the RK differential - this is the 3rd oil seal (highlighted in blue in the top diagram)
with catalog number: 2121-2302052 left rotation 1 pc.
Dimensions in mm: 35.8 x 68 x 11(12)
4. Rear axle gear oil seal :
catalog number: 2101-2402052-01 (rear axle gearbox VAZ-2101) 1 pc.
5. Axle shaft seals for Chevy NIVA-2123:
Seals for VAZ-2110 drives of right and left rotation are installed
catalog numbers of oil seals: 2110-2301034 right - 1 piece
gland dimensions in mm: 57 x 35 x 9
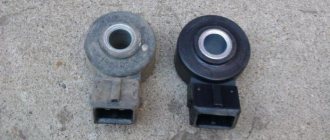
In the photo: VAZ-2123 axle seals (BRT) red-left, black-right.
The arrow on the oil seal indicates the direction of rotation of the shaft (when the vehicle is moving forward).
Source
Preparation and disassembly
To independently remove a leaking rear axle oil seal on a Niva Chevrolet, you will need the following tools:
- standard set of wrenches;
- slotted screwdriver and wheel wrench;
- jack;
- hammer;
- wooden stand;
- cloth gloves.
This is interesting: Deceptive tricks used by tire service workers
Never neglect gloves when repairing a car: they will protect your hands from damage due to accidental impacts. The height of the wooden stand should be enough to support the rear axle with the wheel removed and the shock absorber unscrewed, otherwise oil will leak from it.
Before removing the old seal, you will have to disassemble the rear hub assembly and remove the axle shaft. Disassembly is carried out in the following sequence:
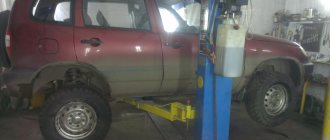
- Place the car on a level surface and secure it with wheel chocks. Make sure the handbrake is turned off.
- Loosen the wheel nuts, jack up the car and remove the wheel.
- Clean the rear axle flange that protrudes beyond the brake drum from rust. Additionally, you can treat this area with WD-40 lubricant.
- Unscrew the 2 bolts securing the drum with a 12 mm wrench, then gently tap with a hammer to move it out of place.
- The drum is removed in 2 ways: by squeezing it out with the same bolts, screwed into other holes, or by knocking it with a hammer through a piece of wood. The methods can be combined, just be careful not to damage the edge of the drum with the blows.
- After dismantling, clean the seat on the axle shaft again to make the drum easier to remove.
The next step is unscrewing and removing the axle shaft. In the VAZ 2131 Niva Chevrolet, 4 bolts securing it are held on the other side by a bracket holding the shock absorber.
After unscrewing the bolts, the shock absorber will no longer hold the rear axle, and the spring will push it down, causing oil to flow.
To avoid this, you need to first adjust the stand by jacking the car higher. The rear axle “stocking” must rest with a slope in the other direction so that the oil does not leak out.
The 4 bolts holding the rear axle shaft are unscrewed with a 17 mm wrench. Pay attention to the growers: they should not get lost in the brake mechanism. If you ignore the loss of the groover and install a new one, then the old one will subsequently get between the block and the drum while driving and the wheel will jam.
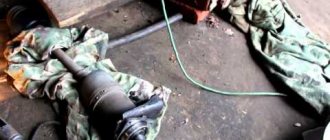
After unscrewing the bolts, with a sharp movement, remove the axle shaft with the bearing from the cage. If this fails, attach the wheel to the studs with 3 nuts and try to pull it. The last option is to use a special inertial puller for removal. There is also a popular method: tie the axle shaft with a rope to an iron garage door and hit it with a hammer to knock it out of the cage. But for this you need to carefully park the car closer to the gate.
Useful tips
Many drivers combine oil seal replacement and transmission oil change. If you decide to do the same, then it makes sense to find out what type of lubricant is used in your case. It is not recommended to mix different types of oils. This will lead to performance problems. If it is necessary to change the type of lubricant, it is recommended to first flush the system.
When removing the axle shaft, oil will begin to flow out. Therefore, it is better to drain it in advance. If you do not want to change the lubricant, then you need to take measures against its leakage. To do this, simply raise the side of the car from which you are changing the oil seal higher. This way you will avoid lubricant leakage. But, in any case, there is a risk of lubricant leakage. Be sure to add a new portion of oil after all work has been completed.
When reinstalling the brake drum, pay attention to its condition. Often there is a development along the shoulder. It should be removed using a regular file. This simple action will significantly improve braking.
Installing a New Seal
After removing the axle shaft, the metal shield where the brake pads are attached will remain hanging on the copper pipe with the fluid, so it should be fixed by inserting the 2 upper bolts back into the holes. Then follow the instructions:
- Remove the thick rubber gasket from the rear axle flange.
- Pull out the old oil seal by prying it with a screwdriver or pliers. Clean the seat and wipe with a rag.
- Lightly lubricate the new seal with transmission oil and insert it into the socket of the Niva rear axle as evenly as possible.
- Using a round pipe adapter, press the oil seal into the socket with light blows of a hammer. You can use an old seal as an additional attachment.
At the end of the procedure, you must thoroughly wipe all parts free of oil - the brake cylinder, pads, drum and metal shield. Before reassembling, it would be a good idea to check the axle bearing for wear and grease. Wear is indicated by difficulty turning, binding, or slight noise. If you discover a malfunction, take the axle shaft to the nearest car service center; you will not be able to replace the bearing without special equipment.
This is interesting: Adjusting the rear axle of a UAZ
To check the grease inside the bearing, you need to pry the plastic covering the rollers with an awl and remove it. Then add thick Litol-type lubricant inside and put the plastic in place, and then begin assembly.
At the end, it is important to check the oil level in the rear axle gearbox of the Chevrolet Niva. The test is carried out on a fully assembled car, standing on a level area. The filler plug is unscrewed from the gearbox housing, after which the oil level is determined visually or using a thin wooden stick. If there is a shortage, you need to insert a hose of a suitable diameter into the filler neck with a watering can at the end, where the lubricant is poured. It is more convenient to top up with an assistant: you control the level, and the assistant gradually adds oil.
How to determine when it's time to change?
Under the influence of temperature and aggressive substances contained in the oil, the elastic cuffs become rigid. Rotating shafts gradually wear out rubber or silicone. As a result, the connection loses its tightness. This manifests itself in the form of oil leaks. If there is severe wear after parking, you can find oil drops under the car in the area of the gearbox.
If the input shaft seal is damaged, lubricant leaks onto the clutch disc. As a result, the oil begins to burn, as evidenced by a characteristic odor. In this case, the clutch may slip under heavy load.
Important! Seal wear is also indicated by a drop in oil level. In this case, the parts must be replaced with new ones.
Article, size and manufacturers of reinforced cuffs
Initially, oil seals with an outer diameter of 68 and an inner diameter of 35.8 mm were installed in the transfer case. two types:
- 2121-2302052 — one oil seal. A similar part is installed on the drive gear of the front axle;
- 2101-2402052-01 — two oil seals in the Republic of Kazakhstan. The same part is located on the drive gear side of the rear axle.
The installation of different seals is explained by the different directions of rotation of the drive shafts.
Useful! Nowadays oil seals with article number 2123-1802120-12 are installed in the RC and axles of the Niva Chevrolet. They are designed for shaft rotation both clockwise and counterclockwise.
Spare parts from the Balakovo plant (Rosteco) are popular. According to reviews from Chevrolet Niva owners, they are characterized by high wear resistance at an affordable price.
How to replace the drive gear seal of the rear axle VAZ-2121
The cuff can be replaced without removing the gearbox from the car. To do this, after hanging the rear axle, drain the oil from the crankcase, remove the wheels and brake drums, disengage the axle shafts from the differential gears (see the article on removing axle shafts - “Replacing the axle shafts”). We disconnect the driveshaft from the drive gear flange (see the article - “Removing and installing the driveshaft”) and move it to the side.
1. Using a dynamometer, turn the drive gear clockwise by the flange mounting nut and determine the moment of resistance to gear rotation.
2. There is one more way to determine the moment.
We tightly wind a strong thread around the neck of the flange in several turns and attach a dynamometer to it (to put it simply, a hand scale).
The force at which the flange begins to rotate uniformly, multiplied by the journal radius, will give the value of the desired moment. We write down its value.
3. Having inserted two bolts into the holes of the flange and holding it from turning with a mounting blade, use a 24mm wrench to unscrew the nut
4. Remove the flange from the splines of the main gear drive shaft.
5. If the flange sits tightly on the shaft splines, then use a hammer with a plastic striker to knock the flange off the splines.
7. Lubricate the seating surface of the cuff with Litol-24 grease and lightly hit it with a hammer through a piece of pipe of a suitable diameter to press in a new cuff.
8. Install the flange and washer on the drive gear. Holding the flange, we tighten the nut of its fastening to a torque of 118-255 Nm (12-26 kgf.m), periodically checking the moment of resistance to rotation of the drive gear (by turning the gear clockwise with a dynamometer).
If the initially measured moment of resistance to rotation was not lower than 59.0 Nm
(6 kgf m), then the new moment should be 9.8–19.6 Nm (1–2 kgf m) greater than this value. If the initial torque was less than 59.0 Nm (6 kgf.m), then tighten the flange mounting nut until a torque resistance to rotation of 59.0–88.0 Nm (6–9 kgf.m) is reached, without exceeding the tightening torque 118–255 Nm (12–26 kgf.m). If, when tightening the nut, the moment of resistance to rotation of the drive gear exceeds 88.0 Nm (9 kgf m), which indicates an excessive preload of the bearings, replace the gearbox spacer and carry out the adjustment again.
We carry out further assembly and installation of units in the reverse order.