Removal (replacement), disassembly, repair of rear axle gearbox
We remove the gearbox to replace it, repair it, or replace the rear axle beam.
We hang up the rear axle. Drain the oil from the rear axle housing (see here).
We disconnect the rear propeller shaft from the rear axle gearbox flange (see here).
Holding the gearbox housing, use a 12mm head to unscrew the eight bolts securing it to the rear axle beam. |
|
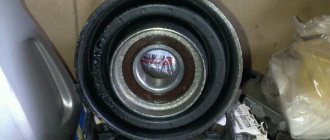
Replacing the rear wheel bearing Niva 21214
We hang the rear of the car on tripods, remove the rear wheel and brake drum.
Use a jack to lift the disassembled edge of the rear axle beam so that after removing the axle shaft, oil does not spill out
We remove the brake pads from the side of the axle shaft being removed (see the article - “Replacing the brake pads”).
Using a 17 wrench, unscrew the four nuts securing the axle shaft to the beam flange.
Use a screwdriver to bend the locking plates of the axle shaft bolts
We attach an impact puller to the axle shaft flange and knock the axle shaft out of the beam
If there is no puller, then fix the wheel with the reverse side on the axle shaft, tighten three nuts several turns
Holding the wheel, jerk the axle shaft
We take out the rubber sealing ring of the beam flange
We insert two bolts into the holes of the brake shield and the rear axle beam so that the shield does not hang on the brake pipe
We pry off the oil seal using sliding pliers
Use a socket of a suitable size with an extension or a piece of pipe to press in a new oil seal.
Install the axle shaft in reverse order. Check the oil level in the rear axle and add if necessary.
Bearing failure in the front hub of VAZ cars is considered a chronic disease. This is especially pronounced in Niva models due to operation in difficult conditions. Self-repair is quite accessible to car owners. And this must be done immediately, otherwise the trip is fraught with an accident with a rollover.
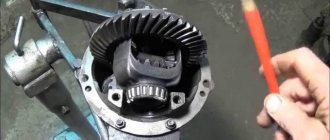
Disassembling the rear axle gearbox
Before removing, clean the gearbox from dirt. We install the dismantled gearbox on a workbench.
Using a 10" wrench, unscrew the bolt securing the locking plate of the adjusting nut of the right bearing of the differential box...
|
|
|
|
|
Similarly, remove the cover, remove the adjusting nut and remove the outer ring of the left bearing of the differential box.
If we do not change the differential box bearings, then we mark their outer rings so as not to mix them up during assembly.
Remove the differential box assembly with the main drive driven gear, inner rings, cages and bearing rollers.
|
|
|
|
We remove the oil seal from the gearbox housing socket (see here).
...and the front bearing inner ring with cage and rollers.
|
. Use a puller to compress the inner ring of the differential box bearing. |
If there is no puller, insert a chisel between the end of the inner bearing ring and the differential box.
By striking the chisel, we move the inner ring of the bearing.
|
|
Similarly, we press the inner ring of the other bearing.
Clamping the differential box in a vice with soft metal jaws,...
...using a 17mm spanner, unscrew the eight bolts securing the driven gear to the differential box.
|
|
|
When assembling the differential, lubricate the axle gears with support washers and satellites with transmission oil and install them in the differential box. We rotate the satellites and axle gears so as to align the axis of rotation of the satellites with the axis of the holes in the differential box, and insert the axis of the satellites. The axial clearance of each axle gear should not exceed 0.1 mm. If the gap is increased, we replace the axle gear support washers with new ones of greater thickness. The moment of resistance to rotation of the differential gears should not exceed 14.7 N.m (1.5 kgf.m) - the gears are turned by hand. Check the ease of rotation of the differential gears. |
|
Similarly, press in the outer ring of the rear bearing.
The correct position of the drive gear relative to the driven gear is ensured by selecting the thickness of the adjusting ring installed between the end of the drive gear and the inner ring of the rear bearing. When replacing the main gearbox pair or drive gear bearings, select an adjusting ring. To do this, we make a device from an old drive gear: we weld a plate 80 mm long to the gear and grind the plate to a size of 50–0.02 mm relative to the end of the gear (the plane of contact of the adjusting ring).
A device made from an old drive gear.
We grind (or use fine sandpaper) the place where the rear bearing is installed on the drive gear so that the inner race of the bearing is installed in a sliding fit. We install the inner ring of the rear bearing with a separator and rollers on the manufactured device and insert the device into the crankcase. Then we install the front bearing inner ring with the cage and rollers and the drive gear flange. Turning the gear by the flange to correctly install the bearing rollers, tighten the flange mounting nut to a torque of 7.9–9.8 N.m (0.8–1.0 kgf.m).
We fix the crankcase on the workbench so that its mating plane is horizontal. We install the pattern ruler in the bearing bed with its edge so that the contact of the bed ruler occurs along the line.
Using a set of flat feeler gauges, we determine the size of the gap between the ruler and the device plate.
The thickness of the adjusting ring is determined by the difference between the gap and the deviation from the nominal position of the new gear (taking into account the sign of the deviation).
The deviation from the nominal position is marked (in hundredths of a millimeter with plus or minus signs) on the conical part of the gear shank.
For example, the measured gap is 2.90 mm, and the deviation from the nominal position is marked on the gear -15. We convert the deviation into millimeters: –15 x 0.01 = –0.15.
The required thickness of the adjusting ring will be: 2.90–(–0.15) = 3.05 mm.
We install the adjusting ring of the required thickness on the new drive gear. We remove the device from the gearbox housing and remove the inner rings of the front and rear bearings with cages and rollers.
Using a suitable piece of pipe, press the inner ring of the rear bearing with the cage and rollers onto the new drive gear.
We insert the drive gear into the gearbox housing. We install a new spacer sleeve, the inner ring of the front bearing with a separator and rollers, and an oil deflector. Having lubricated the working edge of the new oil seal with Litol-24 grease, we press it into the crankcase socket. Install the drive gear flange.
Having locked the flange, we gradually tighten the nut securing it with a torque wrench to a torque of 118 N.m (12 kgf.m).
We control the preload of the drive gear bearings with a dynamometer.
...periodically checking the moment of resistance of the bearings to the rotation of the drive gear.
If the moment of resistance to rotation is less than 157 N.cm (16 kgf.cm) - for new bearings, and for bearings after 30 km - less than 39.2 N.cm (4 kgf.cm), then tighten the flange mounting nut, not exceeding the tightening torque. After this, we again check the moment of resistance to rotation of the drive gear.
If the moment of resistance turns out to be more than 197 N.cm (20 kgf.cm) for new bearings, and for run-in bearings - more than 59.0 N.cm (6 kgf.cm), then the preload of the bearings is exceeded.
In this case, it is necessary to replace the excessively deformed spacer with a new one and reassemble and adjust.
We install the differential assembly with bearings and adjusting nuts into the gearbox housing so that they come into contact with the outer rings of the bearings. Tighten the bearing cap bolts to the required torque.
We make a special wrench from a steel plate 49.5 mm wide and 3–4 mm thick for tightening the adjusting nuts.
We adjust the lateral clearance in the meshing of the main gears and preload the differential box bearings simultaneously, in several stages.
Using a caliper we measure the distance between the bearing caps.
We tighten the left adjusting nut (from the side of the driven gear) until the gap in the meshing of the main gear gears is completely eliminated.
We tighten the right nut until it stops and tighten it by 1-2 teeth of the nut.
By tightening the left nut, we set the required lateral clearance of 0.08–0.13 mm in the meshing of the main gears.
With this gap, when rocking the driven gear, with our fingers we feel minimal play in the meshing of the gears, accompanied by a slight knock of tooth on tooth. When the nuts are tightened, the differential box bearing caps diverge and the distance between them increases.
To set the preload of the differential box bearings, tighten both bearing adjusting nuts sequentially and evenly until the distance between the covers is 0.15–0.20 mm. Having established the preload of the bearings, we finally check the lateral clearance in the meshing of the main gears, which should not change. For this,…
...slowly turning the driven gear three turns, using your fingers to control the play in the meshing of each pair of teeth.
If the gap in the mesh is larger than required (0.08-0.13 mm), then by rotating the adjusting nuts we bring the driven gear closer to the drive gear or move it away if the gap is smaller. In order to maintain the set preload of the bearings, we move the driven gear by tightening one of the adjusting nuts and loosening the other by the same angle.
After adjustment, install the locking plates of the adjusting nuts and secure them with bolts.
Video
Source
Lateral clearance in GP and differential bearing preload
In accordance with the instructions, the lateral clearance and preload of the bearings are adjusted using tool A.95688/R.
In its absence, a caliper of a suitable size will perform the specified role.
To ensure the required preload, fix the distance relative to the bearing caps at the beginning of tightening and at the end. The required difference between the values is 0.2 mm.
The side clearance is adjusted by bringing the driven gear closer to the drive gear until it disappears. Initially, one of the nuts is in a loose position, the other (working) is tightened. After eliminating the gap, gradually tighten the attached nut until the jaws of the caliper move apart by 0.1 mm. The backlash adjustment stops when a slight knocking sound of the teeth appears. Next, both nuts are tightened evenly to a distance of 0.2 mm. The correctness of the work is indicated by uniform play in any position of the gears.
Repair of the front axle gearbox Niva 2121
The VAZ Niva 2121 (21213, etc.) has both drive axles, which allows the car to efficiently overcome off-road conditions or muddy roads. Engine power is transmitted to each wheel through gearboxes. Niva has two of them: rear driven and front driven/steered.
These nodes are considered one of the most “painful”. If the car is actively used in extreme conditions, the first breakdown will occur at approximately 100,000 km. The modern market and service offer to immediately buy a new node. However, repairs are quite accessible with your own hands.
Useful video
After assembly, the bearing clearances should be carefully adjusted.
Experts recommend replacing it with a two-row modification, if possible. You will have to bore the hub for installation, but the service life of the unit increases significantly. Repairing the front hub of Niva 2121 is quite simple if you follow the diagram. All about the Niva Chevrolet axle bearing
A car from the jeep class has all-wheel drive on all 4 wheels. This mechanism determines the presence of a rear axle
, which is designed to transmit torque from the gearbox to the driving rear wheels.
The rotation of the wheels is ensured by the presence of gears and axle shafts in the bridge. The axle shaft is connected to the wheel and sets it in motion. But why do you need an axle bearing in the axle? Because the topic of the article is called axle bearing
, it will be discussed specifically about it further.
Let's take a closer look at this mechanism in the design of the rear axle , its purpose, design (size, number, etc.), malfunctions and the replacement process.
To consolidate the abilities, a video is posted at the bottom of the material, in which you can visually study the procedure for substitution. Replacement kit for cars with abs
New reviews about car services (repair of axle gearbox vaz lada 2121) in Moscow
Excellent service - the specialists are all Russian, the prices are very reasonable, I am satisfied.
It was November 8, 2022, a diagnostic of the spar was required, they checked it quickly, found a little rust, sanded it down, treated it with a converter, coated it with anti-corrosive and painted it on top in body color, excellent quality, price was great.
A disregard for clients, in general, this is more a problem of the administration than of the craftsmen. In general, be prepared for rudeness
They don’t know how to serve what is stated here
Definition of failure
A broken gearbox, like any other component, has specific signs of a defect. A competent auto mechanic can easily determine even the specific type of problem. An ordinary car owner should also know these signs so as not to spend money on car services. An audible way to determine gearbox damage:
- You should choose a road with the highest quality surface without traffic. You need to gradually accelerate to 90 km/h and brake smoothly. At this time, record the appearance of extraneous noise. Repeat the acceleration to 90 km/h, turn off the engine and listen while rolling. If the sound is different, then a breakdown is quite possible.
- Put the car on the hand (parking) brake, start the engine and gradually increase the speed in neutral gear. If the noises match the first test, then the gearbox is most likely normal.
A more accurate determination of the malfunction is possible on the lift when the wheels rotate freely. This method is best known to specialists from services. Using it requires experience and an understanding of what you need to hear.
Device
The rear axle of the Niva is equipped with a gearbox with hypoid gears, which form the main gear. The driven gear secures the differential housing. All elements of the unit are protected by a sealed crankcase filled with transmission fluid.
Thanks to the hypoid connection, the axis rotates. Silent operation of the main gear is ensured by the smooth operation of teeth located at forty-five degrees. The decrease in angular velocity occurs due to the fact that the driven and driving gears have a different number of teeth.
The driven gear and the differential housing are interconnected and consist of a pair of satellites (thanks to them, force is transmitted to the axis that is least loaded), a housing, axle shafts and gears, thanks to all these parts the drive is provided. In order to provide the rotating parts with support points and reduce the friction force, a special rolling bearing is installed in the gearbox. The gearbox is also equipped with axle shaft bearings and a pair of differential housing bearings, as well as the main drive. The crankcase consists of two parts that are attached to each other, and to prevent lubricating fluid from leaking through the connection, a special gasket is installed.
If you do not monitor the condition of the transmission and do not service it in a timely manner, it may fail. The main signs that there is a problem are oil leaks and the appearance of extraneous noise while driving. In the first case, the problem is solved by replacing the seals and gaskets; in the latter case, it is necessary to carry out diagnostics and, based on this, solve the problem. It is recommended to change the transmission oil every 40,000 kilometers; this is the only way to guarantee the normal operation of all the key elements of this system.
Bearing faults
Failure of an axle bearing can result in a wheel seizing on the road, which is dangerous. Axle shaft Niva 21213 replace the axle shaft bearing seal (damaged ones can be replaced. It’s good if the speed of the moving car is low and somewhere outside the city, but Niva Chevrolet
It can be used not only at low speeds and off-road. Therefore, it is very important to monitor such an important part and replace it prematurely.
Types of differential lock
In the standard configuration of the Chevrolet Niva, only a center differential lock is provided.
To improve the car’s off-road performance, owners install a rear axle with two types of differentials:
- With forced locking, which is actuated by a mechanical, pneumatic or electromagnetic system.
- Self-locking. Various units are used, the differential in which is locked when there is a large difference in the speed of rotation of the axles, or is locked by default, and unlocked when the speed increases.
The differential lock allows you to overcome mud, snow drifts or other difficult sections of the road. However, it must be turned off on asphalt and at high speeds. Otherwise, the load on the axle shafts and gears increases, tire wear accelerates and the likelihood of skidding increases.
Purpose of marking
Each gearbox at NIVU has a specific marking:
- 2101, 2102 (not produced);
- 2103 with gear ratio Z=4.1, which means 10 teeth on the drive gear, 41 teeth are placed on the driven gear;
- 2106 with a gear ratio Z=3.9, i.e. 11 teeth on the drive gear, 43 teeth on the driven gear.
DETAILS: Instructions for removing the front and rear bumpers on a Niva Chevrolet
Marking 2103 indicates that these are higher-speed gearboxes, and 2106 – more traction ones.
Gearbox for Niva
When replacing one of the units, you need to pay attention to the meaning of the gear ratios: they must be the same for the front and rear axles. If the gear ratios are different, the wheel axles rotate at different speeds. One gearbox breaks quickly.
The markings of the front and rear components of the NIVA vehicle must match and have the same gear ratios. If units marked 2101, 2102 were previously installed, replacing it with a part with a different marking (2103, 2106), then both gearboxes must be replaced.
The rear axle gearbox oil seal (REA) is a lip seal located in the mechanism housing on the installation side of the bevel gear bearings. The main function of the oil seal is to ensure the tightness of the gearbox, eliminating the leakage of lubricant located in the rear axle housing.
Causes of wear
The lip seal of any vehicle component wears out over time, losing its properties. One reason is physical wear and tear. But the oil seal can also be damaged by the aggressive influence of oil on it, for example, when using low-quality lubricant. In addition, the oil seal itself may be initially defective.
If the oil has barely come out, then there is no need to rush to replace the cuff, but you need to periodically monitor the condition of the element and, if a leak occurs, make repairs.
Signs of wear
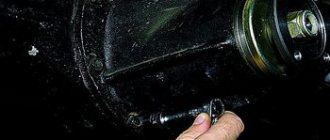
The main sign of a worn VAZ 2121 shank oil seal is the presence of oil leaks on the rear axle in the area where the REM flange is located. To identify a faulty element, it is enough to drive the car into an inspection hole or overpass, or simply crawl under the car. If the cuff is worn heavily, then after a long period of parking an oil puddle will form under the rear axle. If you neglect to timely replace the rear gear oil seal, this will lead to increased wear of the internal elements of the mechanism due to lack of lubrication and their subsequent failure.
Replacing the cuff
If the lip seal has become unusable, it only needs to be replaced, since the element is non-repairable (rubber ages over time and cannot be restored). To replace the oil seal, you need to know the size of the element:
- outer diameter 68 mm;
- internal diameter 35.8 mm;
- height 12 mm.
To carry out repairs, you will need to prepare the following list of tools:
- key to 13;
- 24mm head and knob;
- hexagon 12;
- powerful slotted screwdriver;
- hammer;
- dynamometer and torque wrench;
- container for draining oil.
The process of replacing the shank oil seal is carried out with the rear axle hanging and is carried out as follows:
- Unscrew the rear axle housing plug and drain the lubricant into a prepared container.
- We unscrew the fastening bolts of the rear cardan to the RZM flange, move the shaft to the side and secure it with wire to the longitudinal link of the bridge.
- Using a dynamometer, we determine the moment of resistance to gear rotation by turning the flange nut clockwise.
- To hold the flange, insert the cardan bolts into the holes and screw the nuts onto them.
- We place a mounting spatula or screwdriver between the bolts and unscrew the nut with a socket and wrench.
- Remove the nut and washer from the shank.
- We dismantle the flange itself by hitting it with a hammer through a wooden adapter.
- To remove the oil seal, hook it with a screwdriver and remove it.
- We apply Litol-24 to the working edge of the new cuff, after which we mount the part into the crankcase using a suitable attachment.
- We put the flange and washer in place and tighten the nut with a torque wrench with a torque of 117–255 N*m (12–26 kgf*m), using a dynamometer to control the moment of resistance of the bearings to turning the drive gear. If during the initial measurement of the moment of resistance the value was at least 6 kgf*cm, then when re-tightening it is necessary to increase it by 1-2 kgf*cm. If initially the value was 6 kgf*cm, then we achieve a torque of 6-9 kgf*cm. At the same time, the tightening torque should not exceed 12-26 kgf*m. If, while tightening the nut, the moment of resistance exceeds 9 kgf*cm, the spacer sleeve on the bevel gear will need to be replaced.
- After the adjustment work, we install all the elements in the reverse order.
Video: replacing the shank seal of a classic Niva
Replacing the RZM oil seal on a VAZ 2121, when the corresponding signs appear, is, although not a complicated procedure, but necessary. Even a novice car enthusiast can perform the repair by reading the step-by-step instructions and preparing the necessary tools.
Similar articles:
There are no similar articles on the topic, but there will be some soon.
Chassis features
The VAZ Niva 2121 (21213, etc.) has both drive axles, which allows the car to efficiently overcome off-road conditions or muddy roads. Engine power is transmitted to each wheel through gearboxes. Niva has two of them: rear driven and front driven/steered.
These nodes are considered one of the most “painful”. If the car is actively used in extreme conditions, the first breakdown will occur at approximately 100,000 km. The modern market and service offer to immediately buy a new node. However, repairs are quite accessible with your own hands.
The main gear drive gear is integral with the shaft (shank) and is installed in the neck of the gearbox on two tapered bearings. The outer rings of the bearings are pressed into the neck seats, and the inner rings are put on the shank. A spacer sleeve is installed between the inner rings.
As the shank nut is tightened, the bushing deforms, providing constant preload to the bearings. The preload of the bearings is controlled by the turning moment of the drive gear. No other parts are installed.
The turning torque of the drive gear must be within the limits:
— For new bearings: 157-197 Ncm. — For bearings after a run of 30 km or more: 39-59 Ncm.
In this case, the shank nut is tightened to a torque of 118-255 Nm, periodically checking the rotation of the drive gear. If the specified turning torque has already been reached and the nut tightening force is less than 118 Nm, the spacer sleeve must be replaced with a new one. Because the old one is too deformed. Replacement of the bushing is also necessary in the case when the turning torque is higher than permissible (due to inattention during tightening).
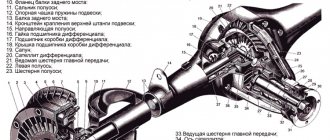
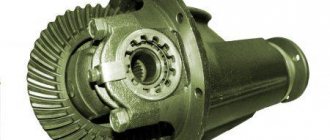
Rear axle of VAZ-21213 Lada Niva and VAZ-21214 Lada 4x4 in section.
If the main pair or pinion bearings are replaced, the shim thickness must be re-selected. It is mounted on the shaft between the drive gear and the inner race of the large bearing.
The driven gear of the main gear is attached to the differential box flange with special bolts without washers. These bolts cannot be replaced with any others. The differential box rotates in two tapered bearings. Their preload, as well as the gap between the teeth of the main gear gears, is adjusted by nuts screwed into split bearing beds.
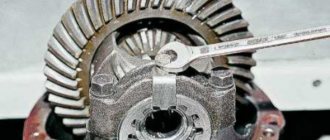
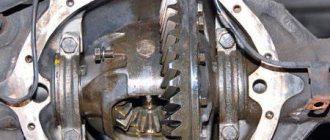
View of the rear axle of the VAZ-21213 Lada Niva and VAZ-21214 Lada 4x4 from the gearbox side. The rear axle drive shaft has been removed.
Name and catalog numbers of components and parts of the rear axle VAZ-21213 Lada Niva, VAZ-21214, VAZ-21214-10, VAZ-21214-20 Lada 4x4, VAZ-2131-01 and VAZ-2131-41.
The side gears are installed in cylindrical sockets of the differential box and rest on it through support washers. These washers are selected in thickness so that the gap between the teeth of the satellites and semi-axial gears is in the range of 0.0-0.1 mm. The satellites are installed on an axle with constant engagement with the semi-axial gears. The axis has spiral grooves for supplying lubricant to the rubbing surfaces.
The axle shaft rests at one end on a single-row ball bearing (with protective washers and a lifetime supply of lubricant) installed in the rear axle beam socket. And the other (splined) end enters the side gear. The inner ring of the bearing is fixed to the axle shaft by a locking ring installed with an interference fit (shrink fit). The outer ring of the bearing is fixed by a plate, which, together with the oil deflector and brake shield, is secured with four bolts and nuts to the rear axle beam.
The exits of the axle shafts from the beam are sealed with oil seals. If the oil seals are leaking, oil is discharged through the oil deflector to the outside of the brake shield. This way it doesn't get on the brake pads. The oil seal installed in the neck of the gearbox runs along the surface of the flange. An oil deflector is installed between the bearing and the flange.
Oil leakage from under the self-locking flange nut (the same nut adjusts the bearing preload) indicates that it is loose. Operating the vehicle with the gearbox nut loose can lead to its breakdown. To equalize the pressure outside and inside the rear axle housing, a breather is used. It is located on the rear axle beam above the gearbox. At each maintenance check that the breather cap is not stuck.
Front axle VAZ-21213 Lada Niva and VAZ-21214 Lada 4x4, device, design.
The main parts of the front axle of the VAZ-21213 Lada Niva and VAZ-21214 Lada 4x4, the differential, final drive gears and gear bearings, do not differ from the corresponding parts of the rear axle. The dimensions of the mating parts, control and adjustment operations are also the same.
Front axle of VAZ-21213 Lada Niva and VAZ-21214 Lada 4x4 in section.
Name and catalog numbers of components and parts of the front axle VAZ-21213 Lada Niva, VAZ-21214, VAZ-21214-10, VAZ-21214-20 Lada 4x4, VAZ-2131-01 and VAZ-2131-41.
The front axle gear housing is closed from the bottom and front with covers sealed with gaskets. The semi-axial gears are splined and connected to the housings of the internal hinges of the front wheel drives. Each of the two housings is supported by a single row ball bearing mounted in the gear housing.
The bearings are closed with caps secured to three studs and sealed with cardboard gaskets. Together with the right cover, the front axle bracket is attached to the gearbox. A breather is pressed into the upper right part of the gearbox housing.
Transmission oil used in the front and rear axles of the VAZ-21213 Lada Niva and VAZ-21214 Lada 4x4.
1.15 liters of transmission oil are poured into the front axle housing. In the rear axle of VAZ-21213 Lada Niva and VAZ-21214 Lada 4x4 - 1.3 liters of transmission oil. Almost to the bottom edge of the filler hole. Gear oil quality class according to API GL-5 with viscosity 80W90 or 85W90. Transmission oil in the front and rear axle gearboxes must be replaced every 40,000 kilometers.
Drive gear adjustment
To carry out the operation, use the original device A.95690, mandrel A.70184 or an analogue made according to the drawing.
The crankcase mating plane is positioned so that it assumes a horizontal position. Then an absolutely flat metal rod is installed on the bearing bed. The distance from the bar to the mandrel is measured by inserting the adjusting rings from the set into the gap under the bar in increments of 0.05. The measured value (crankcase base) is consistent with the correction applied to the drive gear. When assembling the unit, it is recommended to abandon the standard spacer sleeve to prevent repeated repairs. Instead, a non-deformable steel bushing 48 mm long is suitable (with a margin, shorten if necessary).
During turning, the parts control the force when turning the gear (should be 157–196 Ncm); for used bearings, a torque of 39.2–58.8 Ncm is valid. The use of a proprietary dynamometer 02.7812.9501 is not necessary.
Acceptable accuracy will be provided by a household steelyard. When working with it, you should wind one end of a 1 m long cord around the flange, and secure the other end to the scales. By pulling the device in a perpendicular direction, fix the turning torque. So, new bearings should provide 7-9 kg, and with mileage - 2-3 kg.
The process involves replacing the support washers with new ones - thicker than before. There are 7 standard sizes to choose from in increments of 0.05 mm within the range of 1.8-2.1 mm. Washer material – bronze or steel. In this case, the gears are installed tightly, but can be turned manually.