Driving at high speeds with broken universal joint crosspieces does not go without consequences. The rear axle gearbox on the classic and Niva is designed in such a way that when the car moves forward, the shank seems to be unscrewed from the engagement of the main pair. The drive gear of the main pair (also known as the shank) rotates on two bearings: front and rear. The distance between them is elastically fixed by the pretension created by the spacer sleeve when the shank nut is tightened. The vibration of the cardan, transmitted to the rear axle gearbox, gradually unscrews the shank nut. Radial play appears in the shank - especially on the front bearing, because When moving forward, the shank is unscrewed from the joint of the main pair and the front bearing is freed for play. Radial play wobbles the unfixed spacer sleeve and oil flinger washer, gnawing out metal fragments that fall into the tapered bearing. After the fragments cut patterns on the rollers and bearing race, noise begins, which continues even after tightening the shank nut or replacing the spacer. In theory, in such cases, repair of the rear axle gearbox is required. Repair with complete disassembly, troubleshooting and assembly. The last stage is not performed by anyone in a city of millions at a reasonable price. Everyone just replaces the gearbox with a new one and moves on.
Replacing the front shank bearing.
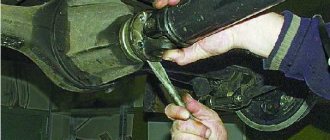
I decided to go a different route. Replace the front tapered shank bearing without disassembling the gearbox. I calculated the distance between the shank and the front bearing race, which was exactly 13 mm. It is necessary to select a puller into this distance, the clamping tab of which can squeeze through. We searched for a long time at the service station, but found a puller with a suitable jaw width size - 13 mm. Only the puller was external, but we managed to twist the legs for internal removal. We started working with this tool.
The flanges were uncoupled. We tightened the nut, took out the bearing, bushing and washer.
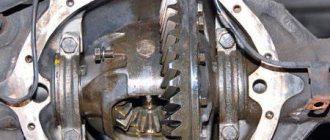
Now all that’s left to do is pull out the outer race of the front shank bearing.
For a long time they tried to squeeze in 2 puller legs. Somehow I managed to do it right, right in the butt.
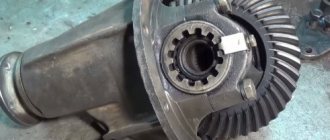
Next, the puller mechanics calmly pulled out the outer race.
Using a soft metal cage and a hammer, a new outer bearing race was pressed into place.
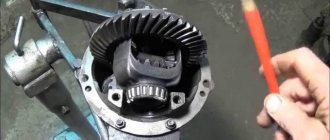
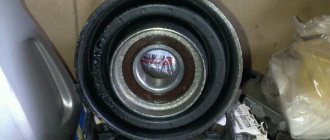
Front bearing wear.
I washed and wiped the removed bearing. I examined it carefully. The bearing was exactly the same as the one I purchased for replacement.
As expected, the impact of the chips did not go unnoticed.
Rear axle gearbox repair - main faults
- Rear axle gearbox repair - main faults
- 1. Why does the rear axle gearbox fail?
- 2. Repair of the rear axle gearbox - we change the part ourselves
- 3. How is the rear axle gearbox adjusted?
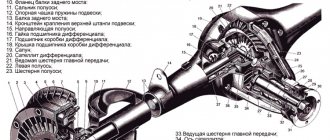
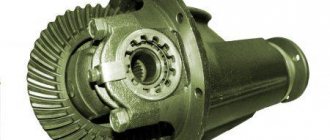
The rear axle is a unit of a vehicle (both wheeled and tracked), which connects the rear wheels along one axis. The wheeled (in our case) rear axle serves as a support for the rear of the car. By means of a suspension, the rear axle is attached to the frame of the car. Sometimes it happens that the rear axle is attached to the body supporting the frame.
The rear axle gearbox consists of several units. The main components are: main gear and differential. The main gear is the mechanism by which the gear ratio of the vehicle transmission is increased. The definition of this device, what it affects and how the given gearbox is serviced are the main issues that will be discussed below.
Can't you spoil the porridge with oil?
Oil is poured into the axle housing up to the lower edge of the filler hole, in the position when the axle is installed and secured to the vehicle. You should not fill oil above this level, since a larger volume significantly increases power loss when the gears rotate and provokes leaks.
Lubrication of gearbox parts occurs as follows. The lower part of the driven wheel and differential are constantly immersed in an oil bath. When the car moves, they rotate, alternately wetting with oil all the teeth of the main gear and differential gears. The differential bearings and the rear pinion bearing are lubricated in the same way. In addition, the teeth of the driven wheel spray oil abundantly, creating “oil mist” in the crankcase. The least amount of oil when splashed goes to the front, most distant, bearing of the drive gear. To lubricate it, a channel is made in the upper part of the crankcase, where, under the influence of centrifugal force, oil is thrown from the outer circumference of the driven wheel. The higher the rotation speed, the more oil enters the channel. This channel leads into the cavity between the bearings of the drive gear, passes through the bearings and returns to the bridge beam. To drain oil from the flange side of the drive gear, there is an oil drain channel in the crankcase. The bearings, due to the conical shape of the rollers, have a pronounced pumping effect, so the flow of oil that flows from the front bearing directly to the oil seal can be quite significant - more than one liter per minute. It is not easy to withstand such pressure, so an oil-removing washer is installed immediately behind the bearing, in front of the oil seal. It slows down the flow rate, but there is still a gap between it and the crankcase through which the oil flows to the oil seal. Therefore, the tightness of the drive gear oil seal is a constant concern for axle designers and manufacturers.
The amount of oil supplied to the oil seal depends on the speed of rotation of the driven wheel of the final drive
But the lack of oil supplied to the oil seal is no less, and perhaps even more harmful to its “health”, because with dry friction against the surface of the flange, no matter how smooth it may be in appearance, the working edge of the oil seal will wear out very quickly, and a gap will form between it and the shaft, through which not only oil can flow out, but also water can flow in if you need to cross a ford or just a deep puddle in a heavy downpour. And water in oil is a very quick “death” for gears and bearings.
Why does the rear axle gearbox fail?
To answer all the above questions in detail, you need to familiarize yourself with the design of the gearbox itself. This unit consists of the two above-mentioned parts. The main gears are divided into single and double, which have one and two gear pairs in order to transmit engine torque to the wheels of the car.
Double gears (main gears) are of two types. Central double gears have a simple design, a large gear ratio and, at the same time, a significantly greater load on the elements of the entire system. Staggered double gears are more complex in design, but are nonetheless more compact and efficient, allowing the vehicle to have greater ground clearance.
Single main gears are:
1. Conical. The gears are located perpendicular to each other. This is why the entire structure takes up a relatively large amount of space. Nevertheless, the design is justified by its high efficiency.
2. Cylindrical. In this type, the gears are located in the same plane. This is what provides the potential for development towards maximum efficiency. The gear ratio in this type ranges from 3.5 to 4.2.
3. Worm-type. This type is less noisy and even more compact. However, the efficiency is quite low, and the manufacture of this type of main gear itself is quite difficult.
4. Hypoid. This type of single final drive is quite lightweight and, in comparison with its counterparts, even smaller in size. It also transmits engine force to the bridge itself much more reliably. However, of all the above types of gears, it has the most average efficiency.
A differential is a mechanism that is responsible for distributing torque between the drive axles and the drive wheels. The differential is an assistant when the car slides and slips. This is possible using different wheel speeds.
If the shaft flies from its intended place, it can easily destroy the entire gearbox housing. In addition, a frequent cause of breakdown can be simple neglect of oil, which was not poured into the rear axle gearbox on time. It would be more correct to say that the problem will be untimely oil renewal or its complete absence. It is important to know that the transmission oil should be changed at least every 35 thousand km of the vehicle.
Main malfunctions in the operation of the VAZ 2106 hub connection
This unit of a VAZ model car consists of two stamped casings, which are welded into a hollow beam, and an axle gearbox. The standard drive structure of the 2106 model is as follows: a gearbox containing a main gear with a drive pair of gears and a differential is attached to a yoke. When, while driving, unusual sounds are heard from the rear wheel pair: a booming noise or the rear axle (rear axle) is humming, then immediate repair or replacement of the part that has become unusable is required. Malfunctions of the parts of this unit are caused, in addition to humming, by heating outside the housing, the element “jams”.
Among the reasons why the bridge hums or howls, the main ones are highlighted.
| Diagnostics | Necessary actions |
| Worn bearings of the differential axle gearbox or violation of preload, loose fit. | Replacement of bearings, spacer sleeve, preload adjustment is required. |
| Wear of the teeth of the main gear gears, violation of the gap in the meshing on the side, or the appearance of scoring on the teeth. | Replacing the gear and adjusting the gap will help. |
| Lack of oil or insufficient tire pressure. | It is necessary to carry out the appropriate work. |
| Loose wheel mounts. | Bolts need tightening. |
| Cardan transmission unbalanced. | It needs to be balanced (it is better to contact professionals) or it needs to be replaced. |
| Gearbox failure. | Partial repair or complete replacement of the unit. |
| Other malfunctions of the unit: “knocking” when moving or engaging a gear. | Problems with the differential - they will need to be fixed. |
| Leakage of lubricant from the gearbox. | You should check the integrity of the gasket of the axle shaft or drive gear, whether the breather is clogged, and the condition of the unit seals. |
Repair of the rear axle gearbox - we change the part ourselves
A malfunction of the rear axle gearbox is very easy to notice. The problem is identified during sudden braking, turning, or sudden acceleration of the vehicle. This type of problem is characterized by the presence of strong noise in the area where the rear axle is located.
Repairing the rear axle gearbox itself is a fairly simple process, even for doing it yourself. An initially necessary aspect will be to drain the transmission oil directly from the rear axle gearbox. The propeller shaft must be disconnected while the oil itself drains from the housing. After this, you need to dismantle the axle shafts. To do this, it is necessary to remove the brake drums and rear wheels.
After this procedure, you need to unscrew the bolts securing the bridge with the gearbox. If a new gearbox is installed, you need to use sealant and a cardboard gasket. After all of the above, you need to pour oil directly into the gearbox. The gearbox flange itself must be firmly attached to its place along with the bearings.
The device and design of the rear axle gearbox itself is not so complicated. In addition, the hypoid type is found on almost all rear-wheel drive cars. There is one particular difficulty, which is that there may be a problem with rust when removing the brake drums, and the metal itself can be pressed very hard in some places. However, some sheer human power and some tools will easily fix the above problem.
If a car enthusiast decides to independently purchase a new rear axle gearbox, then during the purchase itself he should pay attention to the fact that the price that sellers ask for the same models of gearboxes can be almost polar. The entire difference between these numbers will be just two letters OP, which means general verification.
In turn, this means that when checking the factory, a defect was detected in the device. In this case, the entire mechanism is sent for refurbishment, and is now sold at a reduced price. That is why you should only contact reliable official suppliers of parts for your car.
About the consequences of untimely “treatment”
And just as a runny nose can lead to serious problems in the body, even some kind of meningitis, oil leaking from the bridge can lead to serious “diseases” of the drive axle: overheating and jamming of bearings, scuffing on the surface of the gear teeth of the main pair, their rapid wear, increased noise and other troubles, including jamming of the main gear itself. Therefore, if you discover severe oiling in the area of the drive flange, or, even worse, an oil stain on the ground under the gearbox, you should not delay the “operation”. However, if “well, I can’t go on sick leave right now,” then by regularly monitoring and replenishing the oil level in the gearbox, the car can be operated for some time without any special consequences for the health of the bridge.
How is the rear axle gearbox adjusted?
Adjustment of the rear axle gearbox should be carried out in certain cases when the gearbox itself has a characteristic hum, which can be heard already at speeds of 30 km per hour. The reason for this may arise due to the huge and constant loads of the vehicle. Also, problems can occur due to constant driving with trailers or normal damage to the car’s mechanics. That is why the next scenario should be a visual inspection of the entire unit.
First you need to remove all the elements of the rear axle gearbox: flanges and seals, satellites along with axles, bearings. These elements must be removed, and if one or more of them wears out, a complete replacement with a new part is necessary. How all the parts should initially look can be determined in the vehicle’s operating manual. If we talk about domestically produced cars, then replacing all the parts of this device will be inexpensive.
After all the parts have been checked individually, everything has been replaced and is considered to be in good working order, you need to put the gearbox back together. The drive gear must go first; it is accompanied by an adjustment washer, a flange and a spacer sleeve with bearings. After this, you need to tighten the nut, but with a certain force. You can use a special wrench with a built-in dynamometer for this. If you don’t have this at hand, you will have to use a measuring lever with a steelyard all the time.
Thus, every millimeter of lever travel will need to be accompanied by a constant measurement of pressure using gasoline on it. This is a rather troublesome process, so caution and accuracy are paramount here. The nut itself should be tightened to one Newton. The flange will remain motionless. It needs to be secured with a special key with spacers, which ideally fits the grooves of this flange.
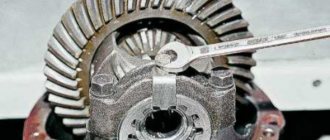
After all the work done, you need to put the driven gear in its original location, that is, in the differential housing itself, after which you need to tighten all the necessary bolts. Right now the direct and long-awaited adjustment of the backlash will begin. After all the parts have been installed and all the nuts have been tightened to the minimum stop, you need to turn the driven gear.
After this, you need to see if it has a slight backlash. In order to determine this, you need to rock it from one side to the other. There should be some play, but it should be small. Thus, this backlash is a kind of reserve that is required to heat the gearbox during direct movement in order to avoid bursting of parts.
After all the above procedures, you need to check the distance between those bolts that should hold the nuts, which, in turn, were recently tightened. To do this, you need to use a caliper, as accurate numbers are required. After the distance has been measured, it is necessary to tighten the nuts on the other side of the plane. It is advisable to do this by the same amount.
Afterwards, you need to measure the distance between the bolts. It should have changed by one and a half to two millimeters. If everything turns out this way, then you need to check the gear for play. It should be noted that it should remain the same as we recently configured it. That's it, the adjustment is complete.
Subscribe to our feeds on Facebook, Vkontakte and Instagram: all the most interesting automotive events in one place.
Rear axle gearbox repair
The rear axle gearbox is one of the most important elements of the car, which is directly involved in its movement . Of course, when comparing domestic VAZ, GAZ and other cars with imported ones, you can find a lot of differences, but the general operating principle is the same. There is a main gear, that part of the mechanism to which the cardan is attached and called the shank, and a differential. On VAZ cars it consists of just a pair of gears that are connected to axle shafts, but the situation with foreign cars is completely different. For example, on Opel Omega cars only transmission mechanisms are installed, and CV joints are attached to them. Thus, it turns out that there is no bridge as such. In this regard, its design becomes much more complicated. But this provides advantages in driving comfort and reduced noise in the chassis.
This is interesting: Selection of Bilstein shock absorbers for a car
Rear axle gearbox
Surgery or therapy?
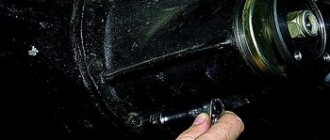
So, our “wounded” axle is leaking oil around the drive gear flange, and we are ready to save it. But first, as is usual with serious doctors, you need to figure out the cause of the “disease.” How does an appointment with a local therapist usually begin? Of course, from measuring temperature and pressure. You may be surprised, but when starting to repair a bridge, we should also remember these physical characteristics. And that's why. During operation, the drive axle gets quite hot - the temperature in the crankcase can reach 80 degrees Celsius. And since, ideally, the axle housing is a sealed container, along with heating in a confined space, the pressure also increases. This is the law of physics. The increased pressure additionally loads all the seals and gaskets of the bridge, breaking out where, for some reason, there is less resistance. This is often the drive gear seal, which is subject to the most intense friction. To reduce pressure, a valve (breather) is installed on the axle housing, which releases excess pressure. Therefore, the first thing you need to start diagnosing a leak is by checking the functionality and cleaning the breather from dirt. The valve cap should rotate freely. When you lightly press the cap from above, it should move freely and return to its original state when the load is removed.
If cleaning the breather does not help, and the leak continues, it’s time to prepare “surgical instruments”. In our case, a regular plumbing kit will be enough, although it would be nice to grab another skein of thread and a hand balance scale (dynamometer) with a good scale.
Main reasons for failure
The rear axle gearbox consists of a large number of spare parts, the failure of any of which can lead to its failure:
- One of the most common reasons for this is constant increased loads, for example, towing trailers and other heavy vehicles. This constantly creates a large load on all elements.
- One of the equally common problems that appears after 5–6 years of vehicle operation is the appearance of play in the crosspieces. This occurs due to constant impacts and shocks arising from unregulated ignition and increased engine detonation. Therefore, during repairs, attention is paid to all elements of the chassis. And it doesn’t end with replacing the transmission mechanism.
- And it should be remembered that if the rear axle gearbox is empty and there is no oil in it, this can lead to it jamming, the teeth on the gears may break, or steel parts may burst due to overheating. Therefore, to avoid such troubles, always check the presence of lubricant.
- There is another type of malfunction that can only appear after many years of operation. In this case, the whole point is in the production of bearings located in the so-called stockings, part of the bridge housing in which the shafts rotate. Which, as a result, can lead to bending of the shafts, then destruction of the gears. And this will thereby lead to the rear axle gearbox becoming unsuitable for repair.
Rear axle gear parts
The rear axle gearbox installed on VAZ vehicles has two main elements:
The main gear can be of two types:
In turn, double transmission can be of two varieties:
The central one is a rather simple design with a large gear ratio, but at the same time high loads are created on all transmission elements. The spaced one is a more complex unit, but the load on all components of the device is evenly distributed, it is more compact and the vehicle’s ground clearance can be increased. Thanks to these advantages, their service life increases several times. But due to the reduced gear ratio, not all car enthusiasts prefer them, so they have to choose based on their priorities. If the car is equipped for fast driving, then it is better to use a rear gearbox with the first gear option. If the car will work as a tractor, then the second option is better. In turn, single gear is divided into the following types:
- Cylindrical, the gears are located in the same plane, which ensures a maximum transmission ratio that ranges from 3.5 to 4.2.
- Conical, perpendicular arrangement of gears relative to each other due to which the housing is enlarged, but at the same time a very high efficiency is achieved.
- Hypoid, a lightweight option with a convenient arrangement of components, has the lowest efficiency of all the above mentioned ones.
- Worm drives are the most complex mechanical units, which are difficult to manufacture and rent, and at the same time have the lowest efficiency.
So, having dealt with the main gear, let's move on to the second part that makes up the rear gearbox - the differential. It is a more complex mechanism that transmits and distributes torque between the drive wheels and drives the second axle via a cardan.
DIY repair
Rear axle gearbox repair
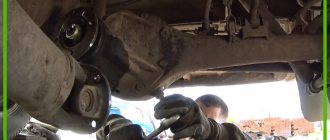
Repairing the rear axle gearbox is not very complicated and does not require specialized knowledge, but before disassembling and reassembling it is better to familiarize yourself with the technical documentation. Before starting all work, it is necessary to raise the rear of the car so that the wheels are free and the gear is in neutral. Next, you need to unscrew the plug to drain the lubricant, and while it flows out, proceed to remove the cardan. When raised, you can freely scroll it in order to unscrew the 4 bolts that secure the shank. But before disconnecting, it is necessary to put a mark on the shank of the transmission mechanism and on the cardan, because it is screwed in only one of 4 positions.
Repairing leaks
If the shank is always wet from grease, then the gearbox seal most likely needs to be replaced. To do this, just disconnect the cardan. Next, you need to unscrew the drive gear nut and remove the flange from its shaft. Under it there is an oil seal, which can be removed using a thin but hard tool, slightly picking. Then use a clean rag to remove all the old grease and evenly press in the new oil seal and put on the flange. The hook must be clamped with the required force, which should be 1 Newton.
If the shank is dry, and the source of the leak is the junction of the transmission unit with the bridge, then it is necessary to replace the cardboard gasket; for this it is necessary and sufficient to unscrew the gearbox itself. Here a 12mm socket wrench will help you, with which you need to unscrew 8 bolts. After removing the mechanism, it is necessary to thoroughly clean the contacting surfaces of dirt and old gasket and carefully put on a new one, lubricated with sealant. The bolts are tightened thoroughly, but not to the point of stripping the threads. A new lubricant TAD-17, GL-5 or TM5-18 is poured.
Next, align the driveshaft shank with the flange at the mark and tighten it using new nuts, because they have plastic retaining rings that are disposable.
Adjustment of the rear axle gearbox consists only of the main gear hook, which is attached to the shank, so, as a rule, there is no problem with it. The only problem is the application of a force of 1 N and how to measure it.
The entire repair of the rear axle gearbox usually takes little time, because there is nothing complicated.
Replacement procedure
Before proceeding with dismantling the gearbox, drain all oil from it.
Remember - never reuse old grease. In order to free the rear axle, put the car in neutral.
- raise the rear with a jack;
- The cardan joint, carefully held with a pry bar (so that it does not turn during the process), is disconnected from the drive gear;
- unscrew the 4 nuts securing it;
- taking a flat screwdriver, disconnect the flange;
- the cardan is suspended on a rope, secured to the bottom of the car;
- twist the nut that secures the drive gear;
- remove the washer;
- the flange itself is dismantled;
- turn off the brakes and unscrew the wheels.
Replacing the rear axle gearbox seal on a VAZ 2101-VAZ 2107
Welcome! Rear axle gear oil seal - in general, oil seals serve for a long time, but if they are of poor quality, or if they are not installed correctly, or ultimately if the oil is poorly filled, then their life is immediately shortened, previously (and still) data things were called oil seals, but by the new name they are rubber cuffs, but rarely does anyone say this, and it’s not customary, thanks to this unit, engineers ensure oil containment in the steering mechanism, in the engine and in other places, the oil seal can also serve to contain diesel fuel and water and thanks to it, by the way, dust and dirt do not get into the mechanism they close.
Note! To replace the oil seal on a car, you don’t need much, the most important thing is: Stock up on all kinds of wrenches, also screwdrivers, and if you have torque wrenches, then it’s generally good (Thanks to these wrenches, the tightening torque of the bolts can be set correctly, just if you don’t tighten the bolts while driving they can get unscrewed, and re-tightening won’t lead to anything good) take them too, you’ll also need to stock up on a mounting blade and a torque gauge, but that’s if you don’t have a single torque wrench!
Summary:
Where is the rear axle gearbox seal located? You won’t see it that easily, firstly you will need to crawl under the car from below, you will see the driveshaft (Many people call the driveshaft, but this is not the correct name, since the driveshaft consists of shafts and in this case the term driveshaft, means any part of the cardan transmission) with the rear shaft it will be connected to the rear axle gearbox, namely to the rear flange of the gearbox (indicated by the blue arrow) it will be connected using four bolts (On the flange, see the photo below, the slots for the rear cardan mounting bolts are visible, for clarity, one of the slots is indicated by a green arrow) and the flange itself is secured by a healthy nut, which is indicated by a red arrow, so you will need to disconnect the rear driveshaft (As you read the article, we will explain to you how to do this) and hang it, then the same Unscrew the healthy nut and, using a hammer or a special puller, remove the rear gearbox flange, which is indicated by the red arrow. After removal, you will see the picture shown in the small photo, namely the same oil seal that you are going to replace, it is also indicated by the red arrow.
When do you need to change the rear axle gear oil seal? You yourself will most likely only understand this when all the oil from the gearbox leaks out through this oil seal, in general, when this oil seal wears out through it, the oil that is in the gearbox begins to leak out, you can only notice leaks if you look under the car more often or in the case when all the oil is leaks from the gearbox, then there will be a strong hum from behind and vibrations may still occur, usually not very noticeable, so if you have already begun to hear a stronger sound from the rear of the car, then stop somewhere and touch the gearbox with your hand (in winter, not very convenient, since the roads are dirty and the gearbox immediately gets dirty and the oil is not so easy to feel) if you find oil on it, it means it is leaking somewhere, if in the place where the oil seal is installed (see photo above), then the oil seal must be replaced, Oil may also leak from the gearbox if the drain plug is not tightened properly, so check its condition too.
Note! If you find just fogging on the gearbox (smudges may also appear at first), then you don’t need to climb into it, you only need to climb into it if you find drops of oil on the gearbox, this will already indicate 100% that there is oil leaking somewhere, besides this there is also a breather on the gearbox (it is indicated by an arrow in photo 1) thanks to it, all the excess pressure that is created in the gearbox comes out and if it is clogged, then the excess pressure will not come out of it, but will come out through the seals and other weak points. therefore, if you changed the rear axle gearbox seal and after a short time this seal started to leak again, then check the functionality of the breather, to do this, grab it with your hand (namely its cover) as shown in photo 2 and move the cover in different directions , everything should press and move without jamming, otherwise replace the breather with a new one (how to do this is shown in one of the videos at the very bottom), if the breather cap moves normally but oil still oozes through the oil seal, then remove the breather (It is turned out using a wrench by the thread which is indicated by the red arrow in the second photo) and clean it (You can clean it with any carburetor cleaning liquid, you can also rinse it thoroughly in gasoline and then blow it off with compressed air to remove all dust and dirt), after cleaning, install it in place by wrapping it in the gearbox and after a while (After 30 kilometers) climb under the car and check whether the oil is leaking through the gearbox seal; if it is leaking, change the breather or change the seal as it is faulty or incorrectly installed!
This is interesting: Comparative characteristics of 16 and 8 valve engines
How to replace the rear axle gearbox seal on a VAZ 2101-VAZ 2107?
Removal: 1) At the beginning of the operation, you will need to drain all the oil in the gearbox, because if it is not drained, then when you remove the oil seal, it will simply pour out through that place, if you do not know how to drain the oil, then in this case, read the article entitled : “Changing the oil in the rear axle gearbox on a VAZ.”
2) Now, in the place shown in the photo below, insert a screwdriver and unscrew the same four bolts securing the rear propeller shaft to the gearbox flange, and then disconnect the shaft and bring it by any means (you can use a rope to the muffler, but only look if the car If you have it warmed up, then the muffler will be very hot, so don’t get burned on it, and a weak rope may also not withstand the heat, by the way), we also wanted to explain to you that instead of a screwdriver you can use a mounting blade, all this is done because the driveshaft can be rotated with a screwdriver or Using a mounting blade, you seem to secure it from rotation and normally unscrew the bolts securing the rear propeller shaft to the gearbox flange.
3) Then you will need to determine the moment of resistance to turning the drive gear of the rear axle gearbox, this moment can be determined using a dynamometer or a torque wrench, the photo below shows two test cases, namely, to check the dynamometer you will need another strong rope, wrap it around the flange as shown in photo 1 (The first time, wind a little, just two turns and that’s enough) and after that, connect a dynamometer to the end of the rope and start winding the rope with it, when winding the flange should begin to slowly rotate, you write down this force that is needed to move it from place from the readings of the device and with this force, when you install everything in its place and watch that the flange rotates in the same way, if you do not have a dynamometer, then pick up a torque wrench whose measuring range will be approximately up to 147 N cm (15 kgf cm) and using it to tighten the flange fastening nut, find the force with which it is screwed and with the same force you will screw the same nut when reassembling all the parts.
Note! If you don’t have these devices, then you can pick up a marker and use it to make two marks (One on the flange itself, and the other on the nuts), as you can see in the photo below, the marks are all made and they are relative to each other, You can do this too, but just don’t draw anything on the edges of the nut; it’s better to make a mark (Indicated by a blue arrow), otherwise if you draw on the edges, when you unscrew it, you may tear off the thread a little and after that you won’t see any marks!
4) Next, take the wrench and socket head in your hands and with their help unscrew the central nut securing the gearbox flange, but just do not forget to lock the flange so that it does not rotate on its own when you unscrew the nut, and you can lock it using the special wrench that you need will make it yourself (it is made from a piece of tube and two bolts, shown in more detail in a small photo), after making the key, lock the flange with it as shown in the photo and completely unscrew the nut securing this flange and remove it after which.
Note! If you made marks, then count how many turns the nut makes relative to the mark on the flange, that is, you unscrew the nut; there is a mark on it and on the flange too, so if this mark passes through the mark on the flange 20 times and only after that the nut is removed, then in this case, when you put everything back together, tighten the nut in exactly the same way exactly 20 turns and at the end align its mark with the mark on the flange!
5) Next, remove the flange itself (indicated by the blue arrow), when the nut is removed, you can remove it with a special puller (indicated by the red arrow) which is sold in car dealerships, or from the reverse side, gently tap the flange with a hammer through a wooden spacer (a board for example) and so on remove the flange from the gearbox.
6) Now you will need to take a screwdriver or a wrench (a wrench is used in the photo below), and using the tools inside as shown in the photo, pry up the oil seal and remove it from the hole in which it is installed.
Note! When the oil seal is removed, wipe the place where it was installed from dirt with a hoe; for clarity, in the photo below this place has already been cleaned and where it needs to be cleaned is shown with arrows!
Installation: 1. Before installing a new oil seal, its working surface (indicated by the red arrow) that will go into the hole must be lubricated with Litol-24 grease.
2. After lubrication, install the new oil seal in its place and hammer it in through the mandrel (indicated by the red arrow). Firstly, the mandrel must be of a suitable diameter and you must hit it along the edges of the oil seal (the edge is indicated by the blue arrow) and you need to hit it until the oil seal enters to a depth of 1.7-2 mm from the end of the gearbox (the end is indicated by a green arrow), this distance can be very well checked with a vernier caliper or you can also try with a small ruler.
Note! For such a mandrel, you can use different things, for example, a faulty bearing can be taken of a suitable diameter or a piece of pipe can be found anywhere, etc.!
3. Now lubricate the working surface of the oil seal from the inside with clean oil and apply grease to the flange as shown in photo 2 so that, firstly, the flange is more easily pressed into the oil seal, and secondly, additional lubrication will not hurt.
4. And in conclusion, we note that install all the parts removed in their places in the reverse order, but just don’t forget about the tightening torque of the flange fastening nut, or if you drew marks, then strictly everything must be removed according to them, if you tighten this nut, then the gearbox bearing will be subject to greater force and therefore you will soon have to disassemble the gearbox to repair it; in addition to the bearing, the spacer sleeve will also be deformed; in general, retightening will not lead to anything good, so be careful.
Note! For more details on how to tighten the nut securing the gearbox flange, see the video below, all this is explained in detail and a couple more words are said about the spacer sleeve, namely where it is located, as well as about its deformation and a couple more good tips are there !
Additional video clip: For information on how to replace the gearbox drive gear oil seal, see the video below, in which everything is clearly and clearly explained.
Note! If you want to see information about the same breather that is wrapped in the gearbox, then watch the video below, in which everything is explained briefly but in detail!
Rear axle gear shank
The shank oil seal is one of the elements of the rear axle on VAZ-2107 vehicles. In general, it has a long service life, but incorrect installation, installation of low-quality parts or wear can lead to a leak in the area of the drive gear shank of the gearbox. The malfunction can be easily diagnosed if oil drops suddenly appear on the outer part of the gearbox housing.
If there are any, the shank oil seal needs to be replaced (see video below). If there are no drops, and the gear housing is covered with a thin oily film, then there is no need to install a new oil seal.
Please note that the replacement process requires certain qualifications from the performer. In case of gross errors, the gearbox may need to be disassembled and repaired, and this work can only be done in a workshop.
How to remove the rear axle oil seal
To replace the shank oil seal on a VAZ-2107, stock up on a torque wrench and a two-jaw puller.
The algorithm of actions is as follows:
- Drive the VAZ-2107 to a place convenient for performing work (this can be a hole or an overpass).
- Drain the lubricant from the rear axle.
- Separate the driveshaft from the drive gear flange.
- Pull the handbrake lever all the way up. This ensures that the machine is secured while the repair is being carried out.
Use a twenty-four socket wrench to remove the mounting nut holding the shank flange. The flange can be secured without applying the handbrake. To do this, insert the bolts into the holes in the drive gear flange. Then hold the flange to prevent twisting and use a tool (such as a pry bar) to tighten the flange retaining nut.
After that, do the following:
- Take a two-jaw puller and, with its help, press out the shank flange. Your task is to remove it from the splines of the drive gear. If you're lucky, you'll be able to tighten the part manually, without using a special tool.
- Remove the washer from the shank, as well as the flange with the dirt deflector.
- Pry up the oil seal using a screwdriver, then remove it from the gearbox housing.
Diagnostics
It should be noted that identifying the problem is quite easy. First of all, when driving, an increased howl begins, emanating from the rear axle. If you do not pay attention to this point, then after a while grinding and cracking may begin. As the speed increases, the sound increases significantly.
A fairly strong backlash appears. You can identify it by jacking up and shaking the wheel. It is recommended to check both wheels. After all, it is very problematic to determine by ear whether 1 wheel is howling or 2. In some cases, balls may fall out of the bearing. The most serious problem may be a wheel jam. This happens when the bearing is completely destroyed. If this happens while driving, an accident may occur. Monitor the condition of the bearings in the axle shafts carefully.