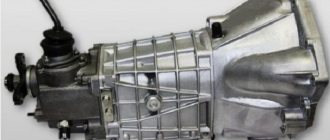
The gearbox is one of the most important components of a car, the smooth operation of which determines the durability and reliability of the car. If it becomes necessary to remove the gearbox to replace it or carry out repair work, you should be sure that in this case it is impossible to do without dismantling the gearbox, since removing the gearbox is a rather complex and time-consuming process, especially if it is performed for the first time. Replacing or repairing a gearbox at a service station is an expensive undertaking, so many owners of VAZ-2107 cars prefer to carry out this work themselves. What should a car owner know who will remove the G7 gearbox for the first time without outside help?
- Fastening the VAZ-2107 gearbox
Video: how to remove and replace the VAZ-2107 gearbox cushions
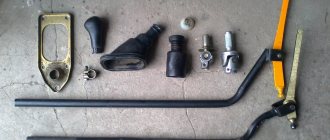
- What tools will you need?
- Clutch disc alignment
Video: removing and installing the VAZ-2107 gearbox control lever
Removing the manual transmission
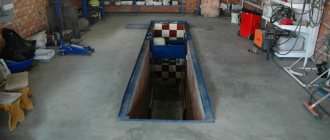
In any case, in order to repair the VAZ-2107 gearbox, you will need to remove it from the car. And in order to do this, you need to drive the car onto an inspection hole or overpass.
The first step is to remove the rod from the gear shift lever. After this, you need to use a screwdriver to unscrew the screws of the cover that covers the hole in the floor of the car body. At this point, the work inside the cabin is completed; all subsequent removal steps are carried out from below the car.
While under the car you need to:
- Remove the exhaust pipe;
- Then the starter is unscrewed and removed from the flywheel housing;
- The driveshaft is disconnected from the gearbox.
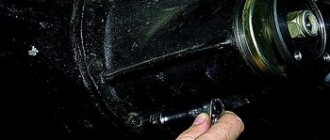
To make it easier to remove the box, you need to disconnect the cross member of the rear engine mount and the speedometer drive cable.
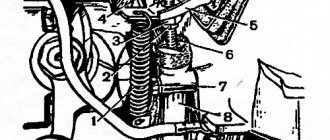
Next, the clutch hydraulic cylinder is disconnected from the gearbox. It is important that when disconnecting the cylinder, you do not accidentally remove the hydraulic hose from it.
After this, you need to unscrew the bolts that secure the clutch housing cover (10 wrench). Next, they begin to directly remove the box, and since its weight is significant, you need to install a reliable support under it.
Then, using a socket wrench, unscrew the bolts that secure the clutch housing to the engine. Now, in order to remove the box, you need to carefully move it back, gradually removing the input shaft from the hub of the clutch driven disc.
This must be done carefully to prevent the driven disk from moving, otherwise it will be difficult to install the box in place. In principle, the removal work has been completed, and the VAZ-2107 gearbox can be repaired.
Also read - Automatic transmission repair, repair features.
Intermediate shaft
Designed to transmit a certain amount of torque from primary to secondary. Rotates on bearings 2, 22 and 19. The gears are integral with the shaft. In the same block, gears of the fifth speed 18 and rear 20 are installed. The latter is installed on a separate shaft 21, connected to the secondary one on splines.
To fill the VAZ 2107 gearbox with oil, there is a special hole 11 on the left side of the housing, which is closed with a plug. The bottom of the case is closed with a steel lid, which is secured with ten nuts. All connections between the lids and the box body are sealed with special gaskets that prevent oil leakage. The bearings of the primary, secondary and intermediate shafts are sealed with seals that prevent oil from leaking out of the transmission pan.
The filling volume of oil for the VAZ 2107 gearbox is approximately 1.6 liters. Some car enthusiasts prefer to fill oil through the top, at the place where the handle is inserted into the gearbox. This method is much simpler than the standard one, since the handle is located in the interior and access to it is not difficult, which cannot be said about the filler hole.
Gear shifting is controlled by a set of forks that are driven by a handle. The structure and main details of the gear shift mechanism are clearly illustrated by the following diagram.
Here numbers 1, 2 and 16 indicate the gear shift forks: third and fourth, first and second, rear and fifth, respectively. Numbers 5, 7 and 9 indicate the rods of the corresponding forks, which are driven by handle 8, located in the interior of the VAZ 2107 car.
The operating diagram of the switching mechanism is as follows: when handle 8 changes its position, its hinge engages with a recess on one of the rods, the other end of which is rigidly coupled to the fork with a bolt 3. The fork, in turn, fits into a groove on the corresponding front gear (16 , 23, 24, 25) or intermediate (20) reverse. Thus, handle 8 ensures the movement of the fork and a certain gear of the secondary shaft is engaged with the corresponding intermediate gear. In this case, the torque transmission chain is closed, the secondary shaft begins to rotate at a speed corresponding to the gear ratio of the gears currently engaged. When the reverse gear is engaged, unlike the others, the handle is “recessed” down when moving.
As you can see, the design of the VAZ 2107 gearbox is quite complex, so it is not recommended to repair it without having the appropriate skills. It is better to entrust this matter to specialists.
Disassembling the box
Increased noise of the gearbox can be caused by wear or failure of its shaft bearings, as well as significant wear of gears and synchronizers. To determine what is causing the increased noise, you will need to disassemble it.
This work is quite complex technologically, and if the car owner is not confident in his abilities, then it is better to contact a specialized service station, otherwise in the future, incorrect assembly can lead to more significant consequences, or to the fact that the gearbox will not work.
But, if you decided to repair the VAZ-2107 gearbox yourself, then this will require a set of keys and sockets, a powerful screwdriver, and pullers for removing bearings.
Operating procedure.
First of all, unscrew the nuts that secure the shift lever housing and remove the lever from the box.
Then the exhaust pipe mounting bracket is removed. After this, the bolts securing the rear and bottom covers of the box are unscrewed. This will be enough to visually determine the condition of the gears and synchronizers.
If significant wear is noticed, then most likely the reason for the increased noise in them. But it is also worth checking the box shafts for axial displacement. If there is one, then the bearings are also very worn and require replacement.
To carry out work to replace worn parts, a complete disassembly of the gearbox will be required. To do this, first remove the back cover by unscrewing the nut securing it, access to which is possible after removing the bottom cover.
To make it easier to remove, you will need to move the 1st-2nd gear slider down. Then, lightly tapping the lid, remove it from the studs.
To gain access to the 5th gear and reverse bearing, you need to press out the plug. After which the 5th and reverse gear block is removed.
Using a puller, the bearing and the secondary shaft oil seal are carefully removed from the cover housing. If they show signs of noticeable wear, they are replaced with new ones.
Signs of the need to replace (repair) the VAZ 2107 gearbox
- Increased noise and vibration in the unit.
- Difficulty shifting or spontaneous gear disengagement.
- Oil leak from gearbox.
- Wheel lock.
- No rotation of the cardan when the gear is engaged and the engine is running.
To eliminate most problems, a complete replacement of the gearbox is not required, but repairs require its removal and installation.
List of required tools
- A set of wrenches (preferably heads with cardan joints) for 10, 13, 19 mm.
- Screwdriver and pliers.
- A long block that can be used to support the box (alternatively, a short strong block and a jack).
Further disassembly
To further disassemble the box, the clutch housing is disconnected from it. This will allow access to the front cover seal of the box. If oil leakage is noticed, the oil seal must be replaced.
Next, unscrew the front cover bearing bolt, the gear block bolt and the intermediate shaft mounting bolt. After which the plate is unscrewed, under which there are springs and slider clamps.
The springs and retainers are also removed, it is important to note which spring was in which socket, since the spring for 5th gear and reverse is slightly longer.
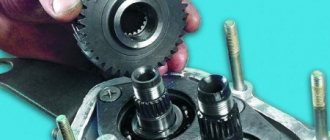
After these procedures, the gear block is removed. But before that, you need to remember the location of the spacer rings. First, the 5th gear gears are removed along with the shift rod. In most cases, gears have travel stops in the form of locking rings; they must be removed carefully.
Then the rear bearing of the intermediate shaft is removed and this shaft is removed from the housing. After this, the slider responsible for engaging 3rd and 4th gears is removed from the body, having previously unscrewed the bolt securing the shift fork from it.
In the same way, the 1st and 2nd gear slider is removed. When removing them, it is important not to lose the locking blocks located in the box housing.
Having finished with the sliders, you can remove the input shaft. The next step is to remove the locking plate, behind which is the secondary shaft bearing.
After removing it, it will be possible to remove the secondary shaft. Disassembly is complete.
Secondary shaft
It is a continuation of the primary in space. It contains gears of the first (23), second (24) and third (25) gears, which move freely and in certain positions engage with the corresponding gears of the intermediate shaft 1. All gears have different diameters, which ensures a change in the amount of transmitted torque .
The secondary shaft rotates on bearings 9, 11 and 12. The first of them is roller, installed in the primary shaft, the rest are pressed into the crankcase and the rear cover, respectively.
Increased noise
After disassembly, you need to troubleshoot the box parts. If severe wear of the gear teeth is noticed, they must be replaced. It is better to replace gears one by one. So as not to confuse the gears.
Many gears have retaining rings. Synchronizers also undergo the same troubleshooting. If they notice even slight wear or damage, they are replaced.
Particular attention should be paid to the condition of the bearings. They should not have any play or the appearance of deep treadmills of balls.
Although, even if the bearing looks good on the outside, it is better to replace it. This eliminates the possibility of noise occurring after the box is assembled.
Spontaneous speed shutdown
If the repair of the VAZ-2107 gearbox is associated with the spontaneous shutdown of any gear, then in this case the sliders and clamps need close attention.
It is necessary to inspect the condition of the fastener seats. If the edges of the seats are heavily worn, then the sliders need to be replaced.
Another method of restoring seats is used by some craftsmen. To do this, a layer of metal is applied to the seats using a welding machine. And then, using a grinder, new seats are cut out in the applied metal.
The method is quite simple, but not very effective, since the applied metal is softer in structure, which means it will wear out much faster.
It is advisable to replace the clamps during repairs, as well as the springs that press them to the slides.
This is done because the springs are constantly pressed and shrink over time, which is why they do not create the required force on the clamps.
REPAIR
The VAZ 2107 has a 5-speed gearbox, which, despite the comparative simplicity of its design, can become unusable for reasons classic for manual transmissions:
- wear and tear due to natural reasons: high mileage, irregular operation and depletion of the service life of components, weather conditions not meeting the desired ones, and as a result - a decrease in service life, etc.;
- non-compliance of the working fluid with standards suitable for normal operation of the transmission;
- non-original spare parts included in the box;
- damage to the gearbox housing due to mechanical impact;
When it comes to the gearbox, even if it is a Zhiguli, the best option would be to entrust diagnostics and maintenance to specialists at a service station. Fortunately, repairing it will not cost too much, except in rare cases that require a complete replacement of the entire mechanism, when it would be more advisable to purchase the same new car.
Difficulty switching
The reasons for difficult gear shifting may be severe contamination of the lever linkage or jamming of the sliders.
In order to determine the cause of this malfunction, you need to take the shift lever housing and check if there is any jamming when the lever moves. If there is one, you need to establish the cause and eliminate it.
If the lever in the body moves without much effort, then the reason is in the sliders. After removing them from the gearbox housing, you need to carefully inspect them. Usually, in places where the sliders jam, marks remain in the form of abrasions and scratches.
Then you need to inspect the seats of the slides for the presence of particles that cause jamming. Alternatively, there may be a slight bend in the slider itself. In this case, the slider is replaced.
Gearbox seals and their replacement
Oil seals in any mechanism where they exist act as gaskets. In this case, they are designed to seal the holes from which the primary and secondary shafts come out. Previously, oil seals were cast from rubber.
Currently made from modern composite materials, more resistant to temperature changes and aggressive environments.
Input shaft oil seal
The oil seal, which is installed on the input shaft, has the following dimensions:
- • outer diameter – 47 mm;
- • internal diameter – 28 mm;
- • width – 8 mm;
- • weight – 20 grams.
It is installed in the shaft output hole in the clutch housing and serves to prevent lubricant from flowing through the shaft.
There is no difficulty in replacing the oil seal, but the gearbox will have to be removed.
The order of work to change the oil seal is as follows:
- Remove the clutch cover from the gearbox.
- Remove the release bearing and clutch fork.
- Remove the used oil seal by picking it up with a screwdriver or knife.
- Clean the place where the oil seal was located and wipe it dry.
- Install the new oil seal in its original place.
- Replace all the parts that were removed from the box in reverse order.
Secondary shaft oil seal
The oil seal, which is installed on the secondary shaft, is larger and has dimensions:
- outer diameter – 56 mm;
- internal diameter – 32 mm;
- width – 10 mm;
- weight – 10 grams.
It is installed at the output of the secondary shaft at the rear of the box.
The order of work to change the oil seal is as follows.
- Unscrew the nut securing the flange, having previously secured it.
- Remove the centering metal ring from the shaft.
- Remove the flange and washer using a puller.
- Pull out the old oil seal using a tool.
- Clean and wash the seal area.
- Install a new oil seal.
Tips that will help you not think about replacing a manual transmission for a long time
Despite its relatively high reliability, a manual transmission requires compliance with certain operating rules. This is necessary for the long service life of the unit and its uninterrupted operation throughout its entire life.
- Driving style. Jerky acceleration at high speeds contributes to the failure of not only the manual transmission, but also the car engine. Therefore, gears should be changed smoothly, in accordance with the current speed. This ensures comfortable and dynamic transmission of torque from the engine to the wheels, reducing wear on the engine and gearbox by reducing the load.
- Timely maintenance of manual transmission. Transmission oil is changed at least once every 3 years or every 40-50 thousand kilometers (for some car models this interval is increased). The period for replacing the fluid is set by the manufacturer and is indicated in the operating manual for the specific vehicle.
- Quality of transmission fluids and spare parts. Changing the oil of a manual transmission and repairing this unit are performed quite rarely. Therefore, you should not skimp on purchasing high-quality spare parts and recommended fluids.
- Timely maintenance. It is advisable to check the transmission fluid level every six months of operation or upon reaching 15 thousand kilometers after the previous check. If necessary, oil should be added to the required level. If the car is used in extreme conditions or the driving style is quite aggressive, the period between checks can be shortened.
By following these simple rules, you will ensure long-term operation of your car's manual transmission. Moreover, unlike an automatic transmission, a manual transmission is not so demanding in maintenance.
Causes and symptoms of bearing failure in manual transmissions
Bearing units in a manual transmission perform the function of rolling bearings, therefore, if the rolling bearing is faulty, there will be difficult rotation of the elements, an imbalance will appear, as well as radial and axial runout, backlash, noise, and knocking.
– The bearing hums, the noise increases when the clutch is disengaged; – Difficulty switching speeds; – Spontaneous transmission shutdown; – A knocking noise is heard when pressing the clutch pedal.
- Expiration of product service life;
- Poor quality ball bearing;
- Wear or runout;
- Aggressive driving style and gear shifting;
- Insufficient amount of lubricant or its absence;
- Dirt or abrasive particles getting inside the ball bearing;
- Malfunction of adjacent components (releaser, clutch, secondary or intermediate axle).
After removing the axle from the axle, you need to make sure that the part is faulty. To do this, check the ease of rotation of the part, and also do a visual inspection, namely, the presence of damage to the rings, cage, as well as defects in the raceway. If the product is in good condition, it is advisable to take measurements of the axial clearance and radial clearance, as shown in the video.
Video: “How the VAZ 2107 input shaft bearing hums”
Video: “Bearing play in the input shaft of the VAZ 2107 gearbox”