02/02/2022 1,757 Electrical
Author: Victor
Immo on Lada Priora and other cars is an additional security feature that blocks the engine when an attempt is made to steal the car. You can disable the immobilizer on a Priora if it malfunctions, either with or without the help of a lineman, by reprogramming the ECM system device.
[Hide]
How to activate the immobilizer on Priora
If activation or training of the standard immobilizer was not carried out at a car dealership for some reason, you can do everything yourself. It's not that difficult if you follow a series of steps step by step. First you need to know what is included in the kit of each immobilizer - this is the anti-theft device itself and 3 keys. Two of them are black - working keys. One red one is educational. This key is used to activate or train the device.
To find out how to activate the immobilizer, you can try using the instructions. However, the instructions from the standard immobilizer for the Lada Priora describe the activation process in general terms, which is not entirely clear and detailed for a person who is going to activate the device for the first time. Therefore, each learning step and what it should lead to will be described below in detail, so that the error can be immediately identified. The main thing is to do everything step by step.
Two types of keys
Before activating the immobilizer, you need to make sure that the car doors are closed. Now turn on the ignition using the training key. It should run for at least 6 seconds. Turn off the ignition. If everything is done correctly, the lamp will blink during the entire activation time. If the lamp suddenly stops flashing, it means that an error has been made, there is a breakdown, or the time frame for the procedure has been violated. The lamp is an indicator of correct activation.
During the time the lamp beeps, you need to turn on the ignition using the working key. You will be able to hear the sounds emitted by the buzzer. There should be 3 of them. If they are not followed, it means that the training is not going well.
After 3 signals have sounded, you need to wait a little more (about 6 seconds) until the signal is given 2 more times. If there were no signals, you should check the immobilizer for damage or find out if it was trained with another key. When 2 beeps sound, the ignition must be turned off. If the owner is going to train not one, but several keys, then similar procedures must be repeated with each of them.
After making sure that the light is still blinking, remove the working key from the ignition switch. Then the training key is inserted into it and the ignition is turned on. If there were no errors, the buzzer will again give 3 signals confirming the correct activation. Once the sounds have been heard, there is no need to turn off the ignition. After 6 sec. the buzzer gives 2 more signals, which confirm that everything is going correctly.
Now you need to turn off the ignition again, but leave the learning key in the lock. After the same 6 seconds. after turning off the ignition, the buzzer should emit 1 signal. The signal lamp flickers approximately 2 times more frequently. If any of these actions did not occur, then an error was made during activation, and the entire procedure will have to start again.
If everything is done as needed, then there is only one step left until the end of the immobilizer training. While the light is flashing rapidly, you need to turn on the ignition with the learning key. After a few seconds it should be turned off again. After about 5 seconds. after the ignition has been turned off, the light will stop flashing and the buzzer should emit 3 beeps. It may happen that all this happens even when the ignition is turned on. There's nothing wrong with that.
Internal organization
Next, you need to turn off the ignition and do not turn it on for at least 10 seconds. After this, the alarm and emergency light should turn on. Training is over! Sometimes, after training, it happens that the immobilizer and controller lose synchronization in executing commands. In this case, they should be synchronized. To do this, you need to turn on the engine ignition with a trained key. Most likely, the light will indicate an error by blinking rapidly. In this case, you must turn off the ignition for 10 seconds. When you turn it on again, the ignition should turn on without any signal from the light bulb. If the light starts to light continuously, it means that a mistake was made in the training and will have to be repeated.
Disabling locks using the service button in the cabin
If there are no signs of unintentional activation of engine start interlocks, you can try to unlock the engine using the service mode. This mode is called Valet and is used to transfer the system to service mode. To activate, you need to insert the key into the ignition, turn on the ignition and then turn it off.
After this, you need to hold the service mode activation button for about 10-20 seconds. The result will be a notification using a special short signal, after which the signal lamp (indicator light, LED) will be constantly on. This method means disabling all security functions, which may also mean removing the engine locks. We add that after fixing the problem, it is necessary to activate the security functions of the alarm again.
How to activate the immobilizer?
The process of turning on the blocking device is usually carried out at the factory when the car is released. If the immobilizer has been replaced, the consumer will need to independently activate the system.
Step-by-step instruction
The activation procedure is performed as follows:
- All car doors are locked. The ignition is activated using the key used for learning. After this, you must wait at least six seconds.
- Then the ignition in the car is turned off. The indicator on the control panel should begin to blink quickly, at least five times in one second. This is normal and blinking occurs throughout the learning process. Once it stops, it will report incorrect actions taken during the task. Perhaps the consumer has exceeded the time interval or there is a problem with the blocking device.
- The key is removed from the ignition switch.
- Within six seconds, while the indicator is blinking, you must install the working element in the lock. The ignition is activated. If the actions are performed correctly, the beeper will emit three sound pulses.
- With the ignition activated, you need to wait about six more seconds. During this time, the beeper should produce two signals. If this does not happen, and the indicator on the control panel stops blinking, then the ignition is turned off and the procedure is carried out again. If the situation repeats, you need to diagnose the device; there may be problems with it. The reason may be that the key being used was trained with a different engine lock.
- The ignition is deactivated.
- If it is necessary to learn a second key, the procedure is repeated. Only the new element is used for activation. If this is not necessary, then while the indicator blinks for six seconds, the old key is removed from the lock and a new one is installed in it. The ignition is activated. If the actions are performed correctly, the beeper will emit three sound pulses.
- Then two more beeps will sound, this should happen within six seconds.
- The ignition is turned off and the key cannot be removed from the lock. Approximately six seconds after the system is turned off, another beep will sound, after which the indicator light will blink at high speed. If there is no audible warning and the light does not blink, the ignition system is turned off and the procedure is repeated. If the problem recurs, this indicates a malfunction of the engine lock or that the key does not fit the immobilizer.
- During the next six seconds, while the indicator is blinking quickly, you must activate the ignition using the key. After 2-3 seconds it turns off.
- Then, within five seconds of deactivation, the beeper will emit three warnings and the indicator light will stop blinking. In this case, the ignition cannot be turned off for 10 seconds. Depending on the model of the locking device, sound signals may sound immediately when the ignition is activated. Then the system still needs to be turned off. The successful completion of the task will be indicated by the activation of a light alarm.
Photo gallery
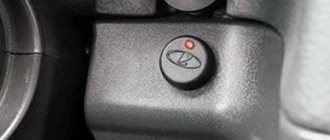
If this indicator is present on the dashboard, the immo does not work. The disappearance of the icon indicates successful activation of the device
Engine blocking with car alarm
If there are installed anti-theft systems, electrical equipment is responsible for blocking the engine start. Immobilizers or car alarms may be faulty and cause constant or occasional failures during operation.
It should be added that the severity of the problem will depend not on the specific model or brand of car, but on the complexity of the installed anti-theft security system.
Accidental activation of the engine lock function
First of all, carefully study the displayed icons on the alarm key fob. A common cause of blocking is accidental activation of additional functions. It is also necessary to monitor the readings of the LED indicator light (if equipped) in the vehicle interior, which serves as a light indicator of the alarm status. Flashing LED lamps in most cases indicate that the anti-theft function of the immobilizer is activated in the menu.
If, after turning the key in the lock and turning on the ignition, the warning lamp blinks frequently (for example, the StarLine car alarm) before starting the engine, and a pictogram with the inscription “immo” is displayed on the key fob itself:
- One way to solve the problem is to remove the key from the lock, after which you just need to press the button to open the central door lock on the key fob.
- You can also get out of the car, set the alarm to security mode, then disarm it and then start the engine.
In other words, you need to make sure that the alarm operates in the normal mode that is familiar to the owner. Up to 30% of cases of engine start blocking by alarms occur due to accidental changes in program settings. The driver’s task is to disable all unnecessary functions in the settings.
Using the StarLine alarm as an example, let us note that this system has the option of “two-stage” unlocking. Activation of the function may occur accidentally; a separate icon will light up on the key fob screen. To turn it off, you must hold down button 3 on the key fob. The key fob will emit two beeps, after which button 3 is pressed once again. Then button 1 is pressed for a few seconds, then the security functions are removed;
How it works and what blocks it
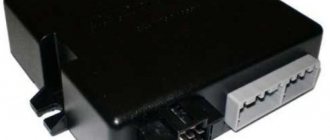
The immobilizer on Priora is designed to prevent theft of a vehicle by intruders. It consists of the following parts:
- APS unit, structurally combined with electrical package.
- A sensor, the presence of a key with a “native” chip in the form of a pumping loop wound around the ignition switch.
- Connecting wires for signal transmission.
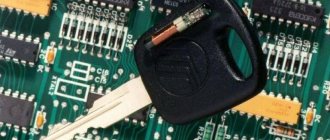
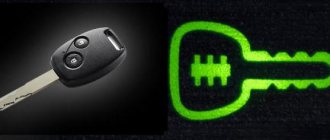
- Keys with transponder.
When purchasing a car, the owner is given a special key with a red insert, which contains a chip that allows you to train working keys, and 2 working keys with programmable chips. The training key must be kept at home, because it gives access to setting up keys that the APS will consider “native”.
After activating the immobilizer and learning the working keys, the car can be started. But, only if the anti-theft unit “sees” the key with the transponder and a code is written in the chip that matches the information stored in the non-volatile memory of the APS.
In Priora, the immobilizer works as follows:
- When the working key is turned in the ignition switch cell, a voltage pulse is applied to an inductive coil wound around the lock, which excites electromagnetic oscillations in space.
- The switch contains an inductance in which the current strength changes, which allows it to receive a pulse from the pump loop.
- The capacitance is charged, supplying power to the chip with the code.
- The chip generates a return pulse, which is emitted into space and received by the pump loop.
- The signal enters the APS, where the codes stored in the block’s memory and the received codes are compared.
- If the data matches, the anti-theft device does not interfere with the operation of the engine ECU. If the codes do not match, the APS goes into protective mode, transmitting a signal to the ECU, which blocks power to the fuel pump, starter and ignition of the car.
Bypass immo using crawler
You can bypass the engine blocker by breaking the conductors. To complete the task, you will need to dismantle the protective cover on the steering column, which is secured with two self-tapping screws.
After this, the following is done:
- There are two thin cables going to the ignition switch; either of them (green or white insulation) must be cut.
- Then you need to connect a two-wire loop from the break point to the bypass module.
- This element is connected instead of an inductive loop. Then the chip is installed. It is installed in the standard key. The lineman is connected to the anti-theft installation.
If it is necessary to disable the security system, the loop contacts must be closed. The use of special Starline bypass modules is allowed. The device model VR-03 can function with any anti-theft systems.
Loading …
How to disable the blocker on Priora?
To independently remove and turn off the system, you will need a K-Line class adapter. It will need to be connected to the computer and the blocker itself. You must first download software to change the firmware on your PC.
The procedure may differ depending on the board in the installed immobilizer - M73 or M74.
Step-by-step instruction
A guide that will allow you to remove immo on the M73:
- The Openbox program is installed on your computer or laptop. The blocking device is connected to the PC. The utility starts and the standard EEPROM firmware is read.
- Data about the installed software is saved in the computer's memory. They will be needed in case the removal procedure fails.
- Then the HxD file editor is downloaded and installed. The downloaded firmware opens on the computer. At the very beginning of the text you need to add a line that consists of the characters FF. The changes are saved.
- The edited file is loaded into the memory of the microprocessor module. It is possible to use ready-made software options; you can search for them on the Internet.
- The module is then disconnected from the computer and installed on the car.
If the Priora uses a January 7.2 microprocessor unit, then to disable the immo, you need to assemble a circuit that has a positive cable switch.
After this, the procedure is performed as follows:
- ChipLoader software is downloaded and installed on the PC. The program version must be 1.97.7 or higher.
- The utility is launched and the required type of microprocessor module is selected in the main window.
- The unit itself is connected to the computer. The main program window opens, where you need to select the connection setup option.
- Basic firmware data is downloaded from the Eeprom memory card.
- Then you need to click on the “remove immobilizer” button. This will cause the utility to automatically adjust the basic parameters in the memory file.
- Then the software closes. The module is disconnected from the computer and installed back on the car.
The Xilvlik channel talked about the process of disabling the standard blocking device.
If the car is equipped with an immobilizer with an M74 board, then the shutdown procedure is as follows:
- The battery in the vehicle is disconnected. The block with wires is disconnected from the microprocessor unit.
- A cable harness made according to the diagram shown in the photo is connected to the device. It is recommended to use a double switch. This will allow voltage to be applied to the device in stages.
- The circuit is connected to the battery and to the PC using a VAG-COM cable.
- The first button of the switch is activated, with its help an impulse is sent to allow the programming procedure to be carried out.
- The WinFlash program runs on your computer or laptop. A settings window opens where you need to select the module type. The information transmission speed parameter is also indicated here. When performing a task, it is recommended to specify a minimum value.
- The second button is activated. Then a message about the start of communication with the module will appear in the main window of the utility.
- The standard software of the blocking device is saved, and the Eeprom memory is changed to a new one. The flashing procedure will take some time.
- If the process is completed, the program is turned off and the device and wiring are disconnected.
- The unit is then connected back to the vehicle. After this, it will be necessary to adapt the zero voltage of the throttle valve. To accomplish the task, you need to accelerate to about 4 thousand revolutions per minute, and then slow down the engine several times. The second speed is used. You need to brake to about 1 thousand rpm.
Photo gallery
Circuit for disabling the blocker
Reading the Eeprom Memory File
Removing immo information from the firmware
Diagram for connecting a module with an M74 board
Video about self-diagnosis through the tidy (instrument panel) on a VAZ-2112
It is recommended to carry out diagnostics and flashing of the ECU with the on-board PC removed.
Now let's decipher the codes of all ECU error codes that can pop up when connecting the car's on-board computer to a laptop or tablet PC: 0102 - Low signal level of the mass air flow sensor 0103 - High signal level of the mass air flow sensor 0112 - Low level of the intake air temperature sensor 0113 - High Intake air temperature sensor level 0115 - Incorrect coolant temperature sensor signal 0116 - Incorrect coolant temperature sensor signal
How to read errors?
There are two options for diagnosing a VAZ car - testing using the instrument panel and using a computer. The second option is considered more accurate, but its implementation will require a special program and a cable for connecting to the diagnostic connector.
Checking using a computer is done like this:
Diagnostics using the dashboard is performed as follows:
Video: diagnosing a VAZ using the dashboard
P0500 - a malfunction in the sensor that is responsible for speed. When the last digit is 6, the speed is low, and when 7 is high. At 11 the regulator is broken, and at 60 the voltage is low, and at code 62 it is too low. Code 63 numbers indicate high voltage. 0601 - checksum malfunction. Code 0627 indicates tears in the fuel pump cables. With code 0645, 46 and 47 - problems with the air conditioner.
This is the main list of problems and malfunctions that occur in the car. If you decipher them correctly, then it will be much easier to repair the car and correct Priora errors. But even with the most effective equipment, you need to remember that a good auto mechanic cannot be replaced by any testing device.
Source
Disabling the immobilizer on the Lada Priora
Protective device diagram
On the Lada Priora, as on other domestic cars, an immobilizer is installed that will block the engine ignition system when starting without a key. Along with this, this protection system often fails, so you need to know how to disable the immobilizer on a Priora if it does not start, and how to activate the immobilizer back. It is quite difficult to carry out this work, since it will require certain knowledge in electronics and the necessary tools and devices.
| Action |
Description
Determine where the immobilizer is located in the Priora. To do this, you need to disconnect and remove the entire engine control unit located at the bottom of the console. For this purpose, it is necessary to unscrew the side covers of the console on both sides using a curved screwdriver and unscrew the controller, which is attached to three bolts. Then you need to disconnect the terminals and remove the control unit. After unscrewing the four screws at the edges of the block, you should disassemble it.
Modifying the control unit (resoldering the chip resistor) To do this, you need to connect the unit to the computer and, using a pack loader, read the flash and eeprom firmware, which needs to be saved. After this, the eeprom firmware must be installed again in the block, and then the chip resistor must be soldered in its original place.
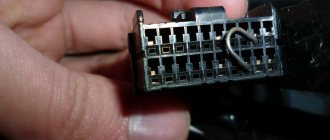
Disable the immobilizer unit on the Priora in order to prevent it from blocking during the installation process. To do this, you need to disconnect the twenty-pin connector, and the eighteenth and ninth wires need to be cut off from the connector and connect these two contacts together. The connection point must be insulated using insulating tape. Then you need to connect all the connectors to the control unit and put it in its original place. After installing the console, you can start starting the engine.
Immobilizers are found in almost every modern car. The purpose of this device is to protect the car from theft, which is achieved by blocking the electrical circuits of the systems (fuel supply, ignition, starter, etc.). But there are unpleasant situations in which the immobilizer blocked the engine from starting. What to do in this case? Let's talk about this.
How to disable and connect immo?
1. Immo connection diagram
2. Immo connection diagram
If you are wondering how to activate the immobilizer, then this procedure is usually carried out when selling a car in a showroom or by service specialists. To activate, follow the alarm connection points below. If you notice that there are malfunctions in the operation of the immo or a corresponding icon appears on the dashboard, then you can try to restore its functionality by disconnecting and connecting. As you know, over time, the contacts on the connectors can oxidize, and accordingly, this can lead to “glitches” in the operation of the system.
So, how to disable the immobilizer on a Priora:
- First you need to unscrew the bolts located under the steering column. Using flat pullers or a regular construction plastic spatula, you need to separate the parts of the column casing.
- Next, disconnect the connector, but before doing this it must be removed from the guides, so just press on it. Having done this, you need to press the opened latch, after which the connector is disconnected without any problems. The second part of the connector will be located under the tidy.
- After this, using a small screwdriver (for example, for repairing watches) or a regular needle, you need to clean the contacts that have oxidized. To prevent possible malfunctions in the future, the contacts should also be treated with copper grease, this will ensure normal protection of the metal. Moreover, such a lubricant allows for good current conductivity, and it also has high anti-corrosion characteristics. This lubricant is applied using the same screwdriver or needle.
- Now all you have to do is reconnect the plug, diagnose the functionality of the immo and reassemble the entire structure in the reverse order.
Immo connection points
Independent troubleshooting of alarm systems
- It is often possible to fix the malfunction and remove the engine lock yourself if you can detect blown fuses. This problem often leads to malfunctions of the alarm system. The fuses must be checked; if a problematic element is detected, the blown fuse must be replaced with a known good one.
- Malfunctions in the operation of the alarm can also be associated with insufficient battery charge or loose terminals on the battery contacts. In this case, the battery is still able to sluggishly crank the starter, but the engine blocking may already work and further prevent the engine from starting.
- Another step is to check the limit switches (limit switches), which are located under the hood and trunk lid. Moisture ingress or oxidation of the limit switch often causes an incorrect signal to the alarm control unit, which leads to engine blocking. Please note that unprofessional installation of alarms and limit switches, as well as improper engine washing can lead to malfunctions of electrical equipment.
How to disable the immobilizer on the Lada Priora yourself (instructions)
A standard immobilizer is now installed on all injection models of cars of the Togliatti Automobile Plant. This device automatically starts the engine by exchanging data with the electronic control unit. The car starts immediately after the immobilizer reads the corresponding code and confirms its compliance with the data stored in the ECU memory. Thanks to this, the capabilities of the device cannot be used by an attacker - if the car is not disarmed, the system will simply block the fuel pump and ignition.
Owners of cars equipped with an immobilizer quite often encountered problems caused by interference from cell phones, as well as a complete discharge of the battery, due to which the device simply stopped working. That is why the manufacturer has released additional software that allows you to start the engine bypassing this equipment. In addition, it became possible to disable the immobilizer and start the car in the traditional way. This is what we will look at in this article, but first we will try to understand the design of the device.
Design of a standard immobilizer on a Priora car
If you have experience working with modern anti-theft equipment, then you will easily discover the similarity of the standard immobilizer of a Lada Priora car with the APS-4 system.
The only structural difference is that the engine start code reader is mounted directly into the steering column, and a chip with this same code is installed on the ignition key.
In addition, we can highlight several new functions that the manufacturer has equipped the Priora immobilizer with:
- the ability to control power windows;
- turning on and off the rear fog lights;
- vehicle diagnostics carried out via K-line. By the way, it is precisely because of this possibility that the slightest interference can make it difficult to use the immobilizer to start the engine.
If the device fails, you must either contact a specialized car service center or use an additional password to start the engine. It must be a combination of 6 digits and is entered by pressing the gas pedal. As practice shows, it is better to choose passwords that are not too complex so as not to waste a lot of time entering them.
In addition, there is another way to start the engine bypassing the protection system. However, in order to do this, you will need to know how to disable the immobilizer on the Lada Priora without a training key. Step-by-step instructions to quickly do this can be found below.
Disabling the immobilizer: just a few simple steps
A procedure such as disabling the immobilizer will seem quite complicated to inexperienced drivers, since it requires special knowledge in the field of electronics. You also need to understand the design of your car.
The immobilizer on the Priora is turned off in several stages:
First we get to the immobilizer. For this purpose, you will need to remove the electronic control unit of the power unit, disconnect the wires supplying power to it and disassemble the part; the next stage is making small changes to the design of the control unit. You will need to unsolder the chip resistor from its standard place, connect it to a personal computer or laptop and read the ee prom and flash firmware
In this case, it is important to save the first one on your PC, since it will be useful in the future; after that we install the chip in place and return the saved firmware; at the last stage, we disconnect the immobilizer physically, that is, we disconnect the twenty-pin connector and connect wires 18 and 9 cut from it to each other. After this, you can assemble the control unit, install it and start the engine. Is it possible to disable the immobilizer using the key? No, since the device is reliably protected from such manipulations
It can only be removed from the engine control circuit (possibly even temporarily, until the failed code is restored). You can also take advantage of the possibility of emergency engine start by entering a special password
Is it possible to disable the immobilizer using the key? No, since the device is reliably protected from such manipulations. It can only be removed from the engine control circuit (possibly even temporarily, until the failed code is restored). You can also take advantage of the possibility of emergency engine starting by entering a special password.
Problem Resolution
What to do if the immobilizer blocked the engine from starting? First of all, make sure that it itself is functioning normally - the indicator on the dashboard (if there is one) indicates that the chip code is not recognized. If the indicator “shows no signs of life” when you turn on the ignition, then you should probably start by checking the electrical system - perhaps the fuse has blown in the section of the circuit where the immobilizer unit is powered.
Re-register a key that is not recognized by the system - this solves the problem. However, there are two ways to program the immobilizer. In the first case, which is used on most foreign cars, programming of key codes is carried out by a dealer diagnostic scanner, via an internal network (the request goes to the manufacturer’s servers). The entire set of keys is registered at one time, since at the beginning of the training procedure, data on previously registered keys is erased from memory. So the owner himself cannot do anything with the immobilizer: he turns to the official dealer of his brand or to a company specializing in such work. As a matter of fact, the existence of universal devices for training immobilizers “plays into the hands” of car thieves. And you should approach the choice of a company offering immobilizer training services more carefully - the car owner will not control how many keys are actually registered, and there may be an “extra” one for the future.
The second method of training the immobilizer involves the presence of a master key in the kit, which is used to program the others. This allows the owner to perform immobilizer training himself, but only if the master key itself is recognized. For example, the APS-6 unit, which is very familiar to VAZ owners starting with Kalina, has a similar learning mechanism.
You will also be interested in:
To program “working” keys using a training key on the APS-6 unit, you need to:
- After closing the doors, turn on the ignition with the learning key.
- Wait at least 6 seconds, then turn off the ignition. The immobilizer indicator will blink rapidly, indicating the start of the learning procedure.
- Insert the registered key into the lock and turn on the ignition. Do this before the immobilizer light goes off. The buzzer will beep three times, indicating that the chip in the key has been recognized and read. If the indicator goes off and there are no beeps, this means either that the ignition is turned on too late (repeat step 1 onwards) or that the immobilizer is faulty.
- Wait until two more beeps sound. This confirms that the key code is stored in the controller's memory.
- Repeat steps 3 and 4 for the remaining keys.
- After turning off the ignition with the last key you registered, with a pause of no more than 6 seconds, you need to reinsert the training key into the lock and turn on the ignition. First, three beeps will sound, then two more.
- Turn off the ignition, but do not remove the key from the lock until you hear a single signal. The blinking frequency of the immobilizer indicator increases. If not, go back to step 1 and try again. A secondary error will clearly indicate that training with this master key is impossible. Therefore, contact the service.
- When a single signal is heard, you need to quickly turn on the ignition. The buzzer will sound three times and the immobilizer indicator will go off. After 2-3 seconds, turn off the ignition. The car will respond by flashing the hazard lights and beeping.
- Remove the learning key. Before checking the operation of the registered key, wait at least 10 seconds.
The procedure looks complicated, but it ensures that the user cannot accidentally trigger relearning by simply using the master key to turn on the ignition.
In some systems without a master key, the manufacturer provides emergency PIN codes for key programming. On old Renaults, the PIN code is calculated through the Trantir program using the code printed inside the key body; on Kia/Hyundais up to 2007, it is determined by the last digits of the VIN, even without special programs (online services), and so on. The code entry itself is performed both by standard means of the car (Renault has an interior door lock button) and through the diagnostic connector. In this case, you will have to buy an adapter for old cars with inexpensive devices like VAG K-Line from Aliexpress. You can find the necessary software on the Internet. The already mentioned Kia/Hyundai uses the Cascade program, in which the immobilizer learning process is interactive and placed in the corresponding menu item.
Immobilizer device
The VAZ immobilizer device is functionally similar to the APS-4, but in this system the code key is sewn into the ignition key, and the reader is located in the steering column. A number of additional features are also presented - control of rear PTFs, electric windows, k-line diagnostics of the immobilizer. Structurally, APS-4 differs from APS-6. Moreover, APS-6 of different years of production differ slightly from each other. This is the case when “the manufacturer reserves the right to make changes that do not affect the performance of the product.” The internal structure of the immobilizer, despite its low cost, is quite complex. It is a microcontroller based on PIC16C65B, a K-Line circuit for exchanging data with the ECU via a diagnostic line and EEPROM memory for storing learning codes. It is also necessary to keep in mind that very often APS-6 is installed in a housing from APS-4, that is, externally the unit is marked APS-4, and the board is marked APS-6. The microchip on Priora cars is located inside the standard key fob, which controls the central standard lock (and standard alarm). In the Priora car, the immobilizer is structurally combined with the glass unit controller.