Lada Priora is a Russian car that is popular among experienced motorists due to its advanced design. Good acceleration capabilities and powerful engine. Another advantage is the low cost of this vehicle. According to the car manual, we will take a step-by-step look at the timing marks (timing belt). Which is located on the engine with 16 valves.
The tension roller guides the belt
However, experts advise changing the belt after driving 50,000 - 60,000 km. It is possible to carry out such a replacement yourself, in your garage. But don't forget about the marks on the shafts. If the instructions are followed, this procedure will be quite accessible to the amateur motorist.
The purpose of the timing belt on a Priora 16 valves
This part of the timing composite structure performs the function of transmitting rotation to the camshafts from the crankshaft. And thereby ensures a synchronous cycle of the entire timing assembly. With the help of this part, the necessary delivery of fuel to the engine cylinders occurs at the right time. The belt additionally allows the water cooling pump to move.
The belt itself is made from high-quality, high-strength rubber. To avoid the possibility of rupture as much as possible and is shaped like a closed circle. The toothed structure of the belt creates good adhesion to the camshafts and does not allow movement along the marked marks. When a belt wears out, most often the teeth themselves are worn away on the inside, but the body of the belt remains intact.
The Priora is equipped with belts, the number of teeth of which reaches 137 pieces, the width of the belt is 22 mm. Despite the simplicity of the design of the belt, its importance in the proper operation of the entire vehicle is of great value.
The basis of the operation of the gas distribution mechanism
When the mixture is compressed, a spark enters the working cylinder and the mixture explodes, pushing the piston. He pushes the connecting rod, the connecting rod pushes the crankshaft. Everything is known. The valves, by timely opening and closing, ensure tightness in the cylinder at the right moment and free inlet and outlet in other cycles. The camshaft controls these devices by pressing the valve mechanism with its cams. The Priora engine has 16 valves. They are controlled by two camshafts. And the camshafts are driven by the crankshaft via a timing belt.
To ensure that the valve timing matches and the drive is installed correctly, special marks are applied.
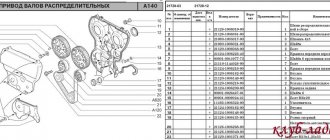
Timing timing marking points
They are applied by the manufacturer in several places and are divided into movable and stationary:
- On the body of the Priora engine
- On camshaft gears.
- On the crankshaft gear.
- On the engine flywheel.
Now in more detail about these tags.
On the engine body of a VAZ 2170
Here the mating marks are installed in three places. They are immovable:
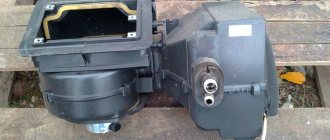
- On the lip of the oil pump housing.
- On the flywheel housing.
- Marks on the plastic protection of the Priora timing belt
The first two types of marks are intended for mating the crankshaft.
That is, the risks on the gear and on the flywheel must coincide with them. The crankshaft drive gear is located in the oil pressure pump housing. This is a slot in the metal skirt that half-encircles the gear from above. It is clearly visible in normal lighting. Sometimes it can be “bombarded” with oil and dust. Then you need to wipe this place with a rag, and everything will be visible.
There is a special arrow installed on the flywheel housing, in the viewing window in the starter area. It must be taken into account that the top dead center is determined only by the average of the three marks.
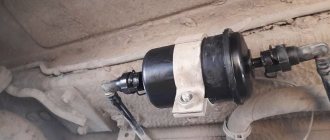
Weak links on the Priora: roller, belt, pump
Full operation of the timing mechanism is ensured thanks to the drive tension design. Two shafts regulating the operation of the valves require an additional support roller, taking into account the increase in the length of the drive. The roller, turning on an axis, regulates the proper belt tension. And the supporting roller fixes the direction of the belt.
The tension roller guides the belt
These parts can grind down, creating play during movement and unnecessary noise. The pump may jam when the engine is running. In this case, the consequences of such work may be cut teeth. Loss of seal in this design can result in unnecessary loss of coolant. To change the pump, the camshaft pulleys and the back of the casing are removed.
At the same time, the protection mounts and the generator support roller mounts are removed. After removing the casing, the bolts of the pump itself are unscrewed. To avoid additional faults in the future.
It is necessary to replace the timing belt with teeth at the same time as the rollers and pump.
How to check tech. condition of the timing belt
Checking the condition of the belt is only allowed when the engine is cold. If the car has air conditioning. The belt of additional mechanisms together with the tension roller is removed. To access the belt, you must remove the protective cover. First, an inspection is carried out under the protective cover for the integrity of all parts of the assembly.
Next, you should rotate the timing belt, while monitoring for possible malfunctions:
- broken teeth
- abrasions and delamination of rubber layers,
- belt stretching, etc.
The stretch is controlled by aligning the marks, with a tolerance of 3-4 mm in the location of the marks. Changes in deflection are calculated when pressing the strap with a force of 10 kg. The deflection tolerance is 5-7 mm.
Mechanical and electronic testing
This check can be carried out using a special torque tool. Which determines the tension of the belt using a built-in scale.
torque wrench in the hands of a master
Such devices are usually present at car service stations. Also, the most accurate measurement can be made using the electronic method. It is based on the use of a device with an ultrasonic indicator.
The nuances of independently checking the serviceability of the timing belt on the Lada Priora
The color of the belt should be uniform, without any extraneous stains of oily origin. It is also necessary to carefully examine the tension rollers. Since they can lead to a malfunction of the entire unit. But special attention is paid to the integrity of the belt.
When to change: consequences of untimely change
It is recommended to replace the timing belt on a Priora after different periods of time. The manufacturer claims that it can withstand one hundred thousand mileage, but experience shows that a change may be needed much earlier.
The optimal period is every fifty thousand kilometers. Some argue that over such a short service life, rubber is simply not capable of failure. However, no one takes into account the conditions - roads, fuel quality, etc.
Also, during the operation of the mechanisms, it wears out, the rubber stretches, and therefore does not provide the correct tension of the timing belt, and slippage is possible. The teeth can wear off - because of this, traction with the gears is not ensured.
There is no exact time for a change that would suit all motorists. Some take good care of their vehicles, drive carefully, and use only high-quality fuel. Others use a more extreme type of driving, foreign liquids get on the rubber, etc.
In order not to lose your car during the repair period and not to spend a fortune on restoring the mechanics, write down or remember the date of the last timing belt change on the Priora. Next, regularly check the condition of the rubber; if worn, replace it with a new device.
Signs of possible failure
There are several characteristic signs that should alert the driver:
- When the engine is turned on, extraneous noise occurs. Sometimes drivers confuse a timing belt malfunction with a poorly functioning tension pulley.
- If the color of the exhaust gas has changed.
- The engine doesn't start well.
- An unusual vibration is felt.
Pay attention to these “symptoms”, even if the Priora’s mileage with a new timing belt has not yet reached 50 thousand km. It may fail earlier if foreign liquid gets onto the drive - oil, coolant, as well as dust or dirt.
It’s worse if it’s the coolant that gets onto the drive. Firstly, this means that the gasket that ensures the pump is sealed has failed, or there is a problem with the pump. Then the rubber is damaged and service life is reduced tenfold.
Even if the belt is new, but coolant or antifreeze gets on it, it will fail even after operating for 10 thousand miles. You will have to replace the Priora timing belt and figure out why foreign substances get on it.
How to check the serviceability of the belt yourself
If you suspect that it is time to replace the Priora timing belt, it would not hurt to check the serviceability of this rubber product. Visual diagnostics will allow you to check the serviceability and absence of scuffs on the Priora timing belt.
You should have a choice of one of the tools at hand, or two at once - a 5-point hex key, or a T-30 sprocket bit. If one doesn't work, try the second.
- Open and lift the hood.
- You will see the front panel covering the mechanism and timing belt.
- Take the key and unscrew the five bolts that hold the front panel, remove it.
- In front of you you will see a mechanism, including a tension roller.
- Place a jack on the passenger side and place the wheel in a suspended position. Engage fifth gear while it is working, look at the surface of the belt for damage, even small defects.
- If you notice cracks of any size, mechanical cuts, or threads sticking out, be sure to replace it by contacting a specialist or yourself.
- Check the pump. If any traces of coolant leakage from the pump are noticeable, then the rubber will also have to be changed, even if there is no mechanical damage.
- Check the tension roller. Auto mechanics advise changing it less often than tires. The average lifespan is approximately one hundred thousand kilometers. Change it every other time you change the belt.
- Measure the belt tension. To do this, press on the stretched rubber in the area between the gears of the two camshafts. You need to press with a force of about ten kilograms. Correct tension of the timing belt should not bend more than seven millimeters.
- Check that the rubber is not too loose. Make sure that the Priora timing marks match the original condition. The first, similar to a recess, is located on the outer race of the tension roller. The next one is located at the base of the roller. The maximum deviation is four millimeters; if the tension does not meet the standards, the product will have to be changed.
External signs of the need to change the timing belt
- Changes in exhaust color. Typically, the exhaust in this case is black and accompanied by popping noises.
- Uneven operation of the motor or the motor does not start. There are dips in traction and an uncertain start.
- Additional noise and unnecessary sounds when the engine is turned on.
- A cracked timing belt causes a characteristic clicking and ticking noise inside the casing.
- An increase in sounds is observed with increasing engine speed.
- Side vibration of vehicles.
If dirt, oil and other elements get on the timing belt, the belt will need to be replaced before the time stated in the instructions. If the opposite occurs, the belt life will be significantly reduced. To begin with, if available, the causes of coolant leakage are eliminated.
Replacing the Priora timing belt when and possible consequences
Despite the period of 100,000 km specified in the regulations, it is advisable to replace it more often than 50,000-60,000 km. If, during inspection of the mechanism, you find breakdowns or problem areas, such a belt must be replaced immediately. Otherwise, the most negative consequences may arise. In worst cases, you will have to do a major overhaul of the machine's engine pistons.
Possible damage due to untimely replacement of the belt
- Malfunction of valves that stop when ruptured. At the same time, the crankshaft pushes the pistons - the valves bend from the impact.
- Such a malfunction can lead to deformation of internal elements and even replacement of the engine.
- Broken valves will damage the cylinder head. The consequences will be especially severe if this happens under heavy load or at high speeds.
- Holes in the pistons and damage to the piston mechanism. If the problem worsens, the piston may fall out through the block wall; mechanical defects of the camshaft appear.
What tools are needed to replace the belt?
To properly replace the timing belt, you need a set of the following tools:
- classic pliers for removing circlips;
- wrench for 10, 13, 15, 17 mm;
- 5 mm hex key or T-30 star;
- a set of standard keys;
- The set with rollers and belt includes a special adjustment key;
- Screwdriver Set;
- roller tension device;
- office proofreader for accurate installation.
When performing these works, installing the Priora on the pit will not be necessary. All work on changing the timing belt is carried out in the engine compartment area.
Priora timing belt replacement
If you have an additional air conditioner installed, the belt itself will need to be longer. The air conditioner will also need to be unscrewed. Otherwise, it will interfere with the removal of the protective cover. It is advisable to begin work with a complete package of all necessary tools.
Belt selection
Most owners of VAZ cars recommend installing Gates belts; such a belt is installed by the manufacturer on Lada cars. This company has proven itself well in the market, making high-quality and reliable products. The cost of the set is 4-5 thousand rubles. The kit includes: a belt and two rollers.
Gates timing belt
Also, along with Gates, good belts are produced by Dayco; a nice bonus of such a belt kit includes a key for tensioning the timing belt tensioner pulley. The cost of this kit is approximately 4-5 thousand rubles. The kit includes: a belt, two rollers and a key.
Dayco timing belt
Self-replacement of Priora timing belt 16 valves
When installing the belt, careful and precise approach is required. If the belt is replaced incorrectly, a mismatch occurs in the actions of the shaft and camshafts. After which the pistons will contact the valves of the cylinder head. When the valve stems bend, compression may be lost. After which the valves and other mechanisms will have to be changed.
you need to turn the crankshaft
If you need to turn the entire timing mechanism during work, then you can only turn the entire system using the crankshaft. When scrolling the camshaft, you can damage the entire system, since the crankshaft is the leading one in the mechanism.
no need to crank the camshaft
Why are tags needed?
The gas distribution mechanism of the power unit 126 from the Lada Priora, as already mentioned, must work in a certain order. If this order is violated, starting problems begin, or the motor completely fails. Often the cause of engine failure is incorrectly positioned marks after changing the timing belt. Such mistakes are made by novice car enthusiasts and mechanics who have just graduated from college.
The manufacturer has created the necessary phases on the sixteen-valve 126 engine so that the valves open and close alternately. These actions are carried out through the movement of the cams of the switchgear. The phases must not be disrupted under any circumstances.
Attention! The belt must be replaced before it breaks and destroys the engine. Changing this part is done only by experienced mechanics and not by beginners “on the knee” in a garage environment.
A broken belt leads to sharp contact of the valves with the pistons, because there is a mismatch in the angular location of the crankshaft and camshafts. As a rule, the car is brought for major repairs to the service center on a tow truck in case of a broken belt.
Experienced mechanics carry out checking and adjusting the belt on a cold engine. And the timing drive notches can be found in the following places on the 16-valve Lada Priora engine:
The following tools are used to straighten notches:
To start changing the belt, you will need to read the instructions for the 126 engine and see where the marks are so as not to forget any.
Replacing rollers and timing belt: step-by-step steps
If you have an air conditioner, the replacement procedure will be more complicated. To replace the belt, first perform the following operations:
- Using a 15mm wrench, remove the generator tension roller and release the generator belt.
- Using the T-30 tool, you need to unscrew the bolts (5 pcs.) on the protective casing and 2 bolts on the lower casing.
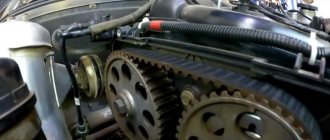
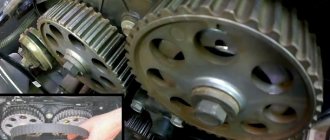
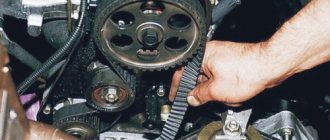
- Raise the car with a jack to lift the wheel. This is necessary to connect the camshaft marks. We combine the marks on the body and the marks on the pulleys by turning the wheel in 5th gear.
the mark on the pin coincides vertically with the mark on the body
- When aligning the marks, the gear should be switched to neutral so as not to disturb the installed marks.
- Use a screwdriver to remove the flywheel plug. The flywheel mark should line up with the cut out triangle on the left.
- By turning the wheel all the way you gain access to the crankshaft.
- While the assistant holds the brake pedal depressed in 5th gear. You need to unscrew the crankshaft bolt counterclockwise and remove the washer.
- Using a 15mm wrench, unscrew the roller bolts, then remove the timing belt itself.
- To remove the pump (if there is an additional need for this), the closed casing and camshaft pulleys are removed.
- Then the generator roller mounts are removed, as well as 6 mounting bolts.
- After the procedure, it is necessary to install the mechanisms in the reverse order.
- The tensioner roller should not be secured; it will be needed for adjustment.
- We secure the camshaft and crankshaft pulleys.
- We first put the new belt on the crankshaft pulleys, then on the pump and camshaft.
After completing the installation of the belt, be sure to move on to the next stage - adjusting the timing belt.
Gas distribution mechanism
Lada Priora boasts a 16-valve engine producing 106 hp. With. and a working volume of 1.6 liters (there is also an 8-valve one, but it is not popular). The timing belt drive is the weak point of the timing belt. If it breaks, the pistons will inevitably bend the valves, and this will lead to large expenses for repairs.
Unlike the power unit with 8 valves, the Priora engine with 16 valves is equipped with two camshafts, each of which has its own gear. The mechanism is designed to remove exhaust gases and timely supply the fuel-air mixture to the combustion chambers due to the synchronous raising and lowering of the pistons (opening/closing of valves).
Due to the design features of the 16-valve engine, the timing belt of the Lada Priora is longer. In addition to the tensioner roller, the drive has an additional support roller.