Probably every car enthusiast eventually encounters poor heater performance. The owners of the Lada Kalina, unfortunately, are no exception. Sometimes it is very difficult to understand the true reason for poor interior heating when a normally working heater suddenly begins to fail to cope with its task.
The problem of weak heating can be solved by replacing and adjusting the heater damper on the Lada Kalina.
Car heater Lada Kalina
Engine cooling system problems?
Most often, problems with the stove arise due to the EDS (engine cooling system).
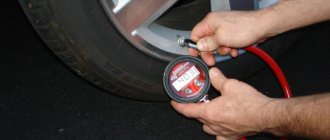
The first step is to check the coolant level in the expansion tank and, if necessary, add it to a level between o and “MAX”. By the way, many car enthusiasts in winter specifically add coolant only to the “MIN” mark; the less liquid there is in the system, the faster it will heat up, and therefore Kalina’s stove will start blowing warm air a little earlier than usual. If coolant has to be added all the time, then the cooling system is leaking somewhere. You should carefully inspect all pipes for leaks, and also tighten the clamps. If the stove (radiator) is leaking, then it should be replaced.
Now you should check the circulation of antifreeze in the system, paying attention to the expansion tank.
If there is no circulation of coolant, or it is insufficient, then there may be two reasons for this ailment: the pump (it should be replaced) or the ODS is clogged (needs to be cleaned).
We check the thermostat: warm up the engine to 75 degrees and touch the upper radiator pipe (in diagram No. 6), if it is cold, then the antifreeze is circulating only in a small circle, the thermostat should be replaced with a new one.
Another reason that Kalina’s stove does not heat is the air in the SOD. Read how to remove air from the engine cooling system. More details about how to repair Kalina's SOD.
Possible heater malfunctions and ways to eliminate them
If the stove blows very weakly or in the current mode it basically refuses to blow air, then there may be several malfunctions, as well as solutions:
- The heating system hoses are worn out. As a rule, if antifreeze leaks or the stove does not heat, this may be due to wear and tear on the pipes. To solve this problem, it is necessary to carry out a thorough diagnosis of each of the pipes. Coolant may escape through cracks or other damage.
- The heater valve has failed. If the stove control valve is broken, this can be indicated by traces of leakage of consumables in the vehicle interior.
- There are malfunctions in the operation of the control unit. If the problem lies in the unit, then first of all you need to check the quality of its connection to the on-board network. If it is connected correctly, then most likely the problem lies there. It is better to entrust unit repair to specialists.
- Wiring faults. Perhaps the unit does not turn on the heating system due to lack of contact with the on-board network. In this case, the problem is solved by checking the circuit to find the broken section.
- The additional resistor is broken. This device is used to control the heater fan, so if the stove on Kalina does not heat, you also need to check the functionality of this element. If it doesn't work, then it will need to be changed.
- The Kalina heater regulator, located in the car's interior, does not work. If the heater only blows hot air, but does not react in any way when switching its mode from hot air to cold air, then most likely the regulator installed on the center console has failed.
- The radiator of the heating unit is broken. This problem is considered one of the most common on domestic cars, and it is especially relevant for Kalina. You can try to repair this device or change it yourself. We will tell you more about how to shoot and how to replace the device below (author - Interesting Video channel).
Problems with Kalina's heater elements?
To understand why Kalina’s stove does not work, you should understand its operating principle: The heater control unit (HCU) receives a signal from the ceiling temperature sensor in the cabin (installed in the interior lamp) and compares it with the temperature set by the driver. If the difference is greater than a certain value (for example, more than 2 degrees), then the ACS unit sends a control signal to the micromotor-gearbox (MMR), which controls the heater dampers (opens or closes hot air from the heater).
Therefore, if Kalina’s stove only blows hot or cold air, regardless of the position of the handle on the heater block, then start by checking the interior temperature sensor.
Also, the cause may be the MMR itself, for example, its resistor layers or gear teeth have worn out.
Sometimes it happens that the stove does not blow well - the first thing you should do is replace the cabin air filter. The speed of the heater fan is affected by the heater resistor (for example, the 4th speed of the heater does not work), so it makes sense to check it too (it’s under the glove compartment).
If the electric heater fan does not turn on at all, then check the Kalina heater fuse - F5. And if the heater howls or hums, then most likely the problem is in the heater fan.
Another reason for the heater not working properly could be the Kalina heater control unit itself (for example, there are problems with the heater damper), but don’t rush to buy a replacement without making sure the actions are correct. The easiest way to find out why the stove is not working properly is to replace the part with a working one and check its functionality. It is not necessary to buy a new part; you can ask a friend for a known working part, or negotiate with the seller, leaving a deposit.
Thus, we have examined all the elements of the heater (see also the design of the Kalina stove). Start following the order of the article, moving from simple to complex, and then you will certainly be able to repair Kalina’s stove with your own hands!
In winter, my pepelats is not as warm as it should be. In this case, the fan works normally, judging by the air flow. The thermostat is most likely working, since the engine temperature reaches one hundred and ten, and the radiator fan turns on at the same time. The heater radiator couldn't have clogged up in three years, I think. What else can you sin on? Air lock? I have never had gurgling sounds anywhere.
I decided to touch the plastic heater flap lever. Sitting on the driver's seat, I crouched down and grabbed this lever with my right hand. He extended his left hand to the base of the windshield to feel the temperature of the air flow from the blower slots. At the same time, my ear ended up near the deflectors above my beard. My observation: When I pressed the lever, the sound in the deflectors changed. And the air became warmer. It's not like the air turned fiery. Of course not. But my hand felt the difference.
Now we need to figure out how to solve this problem. I don’t like the options that I saw during the drive, when they were tinkering with rubber bands and springs. The “shit and sticks” method is, of course, good... But I want to do it once and forget. Maybe someone has some ideas? Or has anyone already gone through this stage?
What if you turn the standard radiator upside down?
So, friends, with the arrival of cold weather, I noticed that the stove was heating rather weakly, and at an outside temperature of -10°C, the windows thawed only after 30-40 minutes of intense traffic. It was impossible to drive like this, and during the next thaw I decided to start the third (I hope the last) replacement of the stove radiator.
By this time, I had come to the understanding that enough experimenting and I still needed to install the original heater radiator from Kalina. ideal in size and shape. Moreover, before installation, it must be carefully sealed with foam rubber so that the air from the fan passes through the radiator fins and not past it.
At that moment, I didn’t yet know how I was going to install a standard radiator, but I still didn’t intend to cut out the air ducts or disassemble the dashboard. It seemed to me that there must be some simpler and more logical way to install a standard radiator. Having purchased new pipes and a heater radiator from Kalina in advance (650 rubles), I removed the installed radiator from the gazelle and tried to install the standard radiator in its place.
After dismantling the radiator from the gazelle, I began to think about how to install a standard radiator without breaking anything. I twisted and turned the radiator, placed it this way and that way, and suddenly an idea came to my mind: what if we turn the heater radiator over with the fittings not towards the engine, but towards the driver?
The idea, although bold, was viable, so after 4 hours hot air was already blowing from the heating system deflectors. Now, let's look at the whole process of replacing the stove on Kalina from start to finish using the radiator reverse method. Let's start by making a list of everything we'll need.
Heater device Lada Kalina
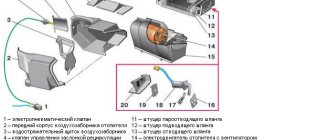
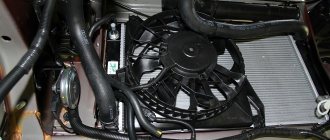
Air from the street enters the air intake through the air filter. The air is then forced into the ducts by an electric fan. The interior is heated by a heater (heater radiator), which is installed under the panel. When the engine is running, heated coolant circulates through the radiator, heating the air passing through it. The amount of air passing through the radiator and bypassing it is set by the central damper. The fan speed is adjusted, as well as the heater dampers are controlled using a control unit installed on the panel.
1 — heater fan electric motor; 2 — heater fan casing; 3 — air recirculation damper; 4— air ducts; 5 — heater casing; 6 — inlet pipe of the heater radiator; 7 — heater radiator outlet pipe.
The Lada Kalina heater dampers are controlled by a mechanical control unit. When the handles on the block are rotated, the rods are wound/unwound on a special roller inside the control unit. The rods have the following purpose:
- Recirculation flap drive rod.
- Drive rod for the heated windshield flap.
- Leg heating flap drive rod.
Thus, the Lada Kalina stove dampers are controlled mechanically without the use of automation. The only electronic part in the design is an additional resistor, which, depending on the position of the handle on the heater control unit, determines the fan rotation speed. This operating principle is very simple and reliable.
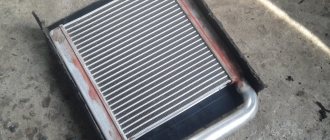
Heater fan (stove)
| See all advertisements in the archive |
| When the door windows are closed, air is supplied to the cabin by an electric fan. The intensity of the air supply is regulated by the rotation speed of the electric fan impeller. The fan electric motor has four speed modes (lower speeds are provided by an additional resistor with two windings). |
Climate control Lada Kalina Lux
The system design is similar to that described above, with the exception of some details. To maintain a given temperature in the cabin, two new elements are used in the design: a temperature sensor in the cabin (built into the ceiling light) and a damper micromotor reducer. Also, the mechanical control unit has been replaced with an electronic one, with degrees of air temperature in the cabin marked on it.
The operation scheme is as follows: the control unit periodically receives a signal from the temperature sensor in the cabin and compares it with the temperature set on the unit. If the difference is too large, the control unit sends a signal to the micromotor gearbox, which already controls the heater dampers (opens or closes hot air from the heater).
What causes malfunctions in the operation of the heater damper gear motor?
- A break in the electrical circuit, that is, when the motor does not receive the required voltage and, therefore, cannot work.
- Malfunctions of the autonomous heater control unit.
- Problems in the design of the gearmotor itself.
Often, with Kalina gearmotors, the slider flies off the contact track in the extreme position. This happens due to the fact that this platform with tracks has play in the seat of the gearbox housing. Sometimes you can solve this problem by moving it in a certain direction and securing it with glue.
Heater device Lada Kalina
Air from the street enters the air intake through the air filter. The air is then forced into the ducts by an electric fan. The interior is heated by a heater (heater radiator), which is installed under the panel. When the engine is running, heated coolant circulates through the radiator, heating the air passing through it. The amount of air passing through the radiator and bypassing it is set by the central damper. The fan speed is adjusted, as well as the heater dampers are controlled using a control unit installed on the panel.
1 — heater fan electric motor; 2 — heater fan casing; 3 — air recirculation damper; 4— air ducts; 5 — heater casing; 6 — inlet pipe of the heater radiator; 7 — heater radiator outlet pipe.
The Lada Kalina heater dampers are controlled by a mechanical control unit. When the handles on the block are rotated, the rods are wound/unwound on a special roller inside the control unit. The rods have the following purpose:
- Recirculation flap drive rod.
- Drive rod for the heated windshield flap.
- Leg heating flap drive rod.
Thus, the Lada Kalina stove dampers are controlled mechanically without the use of automation. The only electronic part in the design is an additional resistor, which, depending on the position of the handle on the heater control unit, determines the fan rotation speed. This operating principle is very simple and reliable.
The device of the stove adjustment mechanism
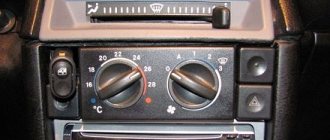
On the Lada Kalina car, the heater switches are located on a panel in the central part of the dashboard. It contains control mechanisms, namely:
- heater temperature regulator;
- fan operating mode regulator;
- air flow distributor control regulator;
- recirculation flap switch lever.
Actually, this is what our mechanism looks like. Now let's move on to possible causes of failure.
Climate control Lada Kalina Lux
The system design is similar to that described above, with the exception of some details. To maintain a given temperature in the cabin, two new elements are used in the design: a temperature sensor in the cabin (built into the ceiling light) and a damper micromotor reducer. Also, the mechanical control unit has been replaced with an electronic one, with degrees of air temperature in the cabin marked on it.
The operation scheme is as follows: the control unit periodically receives a signal from the temperature sensor in the cabin and compares it with the temperature set on the unit. If the difference is too large, the control unit sends a signal to the micromotor gearbox, which already controls the heater dampers (opens or closes hot air from the heater).
Replacing the gearmotor
If the damper does not work, hot or cold air blows from the heater, and the ability to adjust it is lost. In such a situation, the cabin heater gearmotor must be replaced.
Replacing the damper on a Priora begins with raising the hood and removing the wipers. To do this, remove the plastic caps and unscrew the nuts with a 14 wrench, after which they are easily removed. Next, the left and right frills are dismantled by removing the rubber pad, protective plastic caps and unscrewing six screws. Then the plastic soundproofing of the engine compartment is removed, the cooling system hose passing through it is carefully disconnected from the expansion tank, then the tank itself is removed. To avoid draining the coolant, the holes in it must be plugged.
What is the damper responsible for?
While the engine is running in the cooling system, the heated liquid moves through the heater radiator, while it heats the air flowing through it. The volume of air passing through the radiator and outside it is controlled by the main heater damper. Depending on how the temperature control knob is located on the dashboard, the amount of incoming air will depend.
You can distribute air movement throughout the cabin by turning the handle that regulates the position of the damper. But there are cases when the damper jams and it is impossible to properly regulate the flow of heat into the Kalina’s cabin.
If the problem is only with the valve, then you can correct the situation quite simply by tightening its cable. If after these actions the situation has not changed for the better, then you need to conduct a visual diagnosis of the condition of the mechanism and perform a number of simple steps.
Common faults
If the cooling system is working properly, a click is heard when the main device is turned on, otherwise it is faulty. There are several signs that make it possible to determine the reason why not. Sometimes cleaning the air conditioner helps. To do this, you need to remove the radiator and clean it and all pipes. You don't have to remove the radiator, but bleed the entire system.
Causes and solutions
If, when turned on, the clutch produces extraneous sounds and it gets hot, the reason is the bearing, which should be replaced. Sometimes a click is heard, but the air in the cabin does not become cool, this means that the air conditioner is idling; diagnostics by an experienced mechanic are required.
If there is no click after turning on, the following reasons are possible:
- freon leak, due to which the air conditioning system is blocked;
- the coil winding is burnt out;
- pressure sensor is faulty;
- clutch fuse burnt out;
- evaporator temperature sensor is broken;
- power supply interruption;
- relay is broken;
- The motor control is blocked, which prevents the compressor from turning on.
The cause of compressor failure may be easy and free rotation of the clutch, during which extraneous sounds are heard. The internal part of the compressor is not repaired, but the unit is replaced with a new one assembled.
The air conditioner's safety mechanism is designed in such a way that when it overheats, it turns off. If this happens while driving, you need to wait until the air flows reduce the temperature and the unit can turn on again. If the fan is constantly spinning when valve 8 is running, experts advise turning off the freon pressure sensor. In this case, the fan operates in normal mode, and the reason for its continuous operation on an 8 kL motor is a broken sensor. It is changed along with the seal.
Refrigerant leakage is a common cause of poor air conditioner performance. It is important to monitor the condition of the pipelines. The air conditioner tube is checked using a soap solution. Apply the solution in suspicious places; if it starts to foam, it means there may be a leak in that place. In this case, it is necessary to replace the air conditioner tube. When repairing an air conditioner, it is imperative to change the O-rings at the joints.
How can I check the operation of the heater damper?
- Set the temperature control knob on Kalina to the extreme position of the blue sector, and the fan speed to the maximum value.
- Turn the damper control handle on the block and at the same time watch for changes in the direction of the air flow.
If the air flow remains unchanged, this indicates a breakdown of the mechanical control unit of the stove. Most likely, the rod fell off and stopped screwing onto the roller due to its malfunction. Or the second option could be that the damper is stuck. If your car has climate control, then check the damper micromotor and check the condition of the ventilation control unit, heater and air conditioner.
DIY heating system repair
To change this or that part of the heating system, it is not at all necessary to seek help from specialists. This will help save time, but not money. If you follow the recommendations, you can replace some system components yourself.
Heater fan
Even beginners can replace the Kalina stove fan. The main problem is its location. For this reason, most of the time is spent not replacing the part, but dismantling it.
Fan replacement with panel removal
The method is recommended by AvtoVAZ engineers, but it is not the simplest. Not everyone decides to use it in a regular garage. When performing work, you must follow the instructions:
- First, turn off the power to the on-board network by disconnecting the battery terminals.
- Drain all coolant and remove the cabin filter.
- After unscrewing the fastening nuts, lower the steering column to its lowest position.
- Release the brake light switch from the wires, unclip the clips, and remove the upholstery from the pillars.
- Unscrew the screws and remove the front panel (cladding), then remove the dashboard along with the deflectors.
- Now you can begin dismantling the fan. To do this, you need to disconnect the terminal with wires from it, remove the ventilation hose, and unscrew the fastening nuts.
After installing the new fan, all further actions are carried out in the reverse order of dismantling. The procedure requires attention and accuracy and takes a lot of time. At some points, the help of a second person will be required.
Replacing a fan without removing the panel
It is not practical to remove the entire dashboard just because of the heater fan. You can replace the device without removing the dashboard - you just need to lift its right side. Next, you should “arm yourself” with a knife and a flashlight and crawl under the panel. The noise insulation is cut off, the fasteners are unscrewed, and replacing the Kalina stove motor becomes much easier. This method will significantly save time and nerves, although it will create some inconvenience.
Before you start replacing the electric fan, you need to make sure that this particular device is faulty.
Replacing the temperature controller
To dismantle the part and replace it, it is necessary to remove the control unit assembly. The procedure looks like this:
- the on-board network is de-energized by removing the “negative” terminal from the battery;
- the radio tape recorder (if any) is removed, and the terminal block of wires is unhooked from it;
- the damper control lever is removed;
- Next, the handle for controlling the temperature and direction of air flow is dismantled;
- there are plugs located at the bottom of the control unit - they need to be removed and the fastening screws underneath must be unscrewed;
- the center console should be carefully pulled towards you;
- After removing the console, disconnect the terminal blocks from the switches.
How to get to the damper?
To see where the central heater flap is located, you will need to partially disassemble the dashboard, and specifically, unscrew the beard. This is the location on the dashboard where the heater switches are located.
- Remove the ashtray.
- Squeeze out the 2 plugs located next to the emergency lights button.
- Remove all control knobs.
- Unscrew the 2 self-tapping screws of the center console and carefully pull it out, while prying it at the latches.
- Disconnect all wires.
- Now you can easily reach the damper.
- Replace the damper or its drive components.
Very often, the cause of the malfunction may be a broken damper drive mount. If the situation is not critical, then you can simply glue the part that has fallen off using superglue.
There are cases when the valve drive mount breaks off due to an undeveloped cable that is very difficult to lower. In this case, it must be developed manually, after which this problem should not arise.
Heating system modifications
Every owner of a Lada Kalina is faced with the need to modify the stove. The upgrade usually involves installing a new 6-hole thermostat, a coolant filter element, and a different heater valve. Many, given the mediocre performance of the pump, install an additional water pump. There are many ways of minor tuning that can be used to achieve improvements for greater comfort.
Increase in operating temperature
This method is suitable for Lada Kalina with an electronic gas pedal. Previously, the throttle valve, which was heated by a common cooling system, was controlled by a cable drive. After installing the electronics, the hose that went for heating was looped into the cooling system.
To upgrade, you will need a tee, an additional hose and clamps. The second air duct is mounted as close as possible to the thermostat - the tee is installed in the coolant supply pipe to the radiator. The other end of the air duct is connected to the outlet of excess steam near the expansion tank fitting. Thanks to such a simple modernization, it is possible to increase the operating temperature to 92-95 ° C when the stove warms up from 50 ° C and above.
Installation of a hydraulic fence for drainage
A regular medical dropper is inserted into the channel of the steam outlet tube, which is immersed in antifreeze to the bottom of the expansion tank. As the liquid cools, obeying the law of physics about communicating vessels, it will begin to be drawn into the steam outlet, preventing the possible formation of air plugs - airing. Thanks to this simple method, the stove will begin to heat much more efficiently, which means the interior will be warmer.
You can also change the clamps to more reliable ones - self-tightening ones, and ordinary rubber hoses - to silicone ones. To reduce heat losses, it is worth taping all the joints of the air ducts, but to do this you will have to dismantle the panel again. The most convenient way to do this is when troubleshooting a problem.
Regular removal and installation of the dashboard will lead to its loosening, squeaks, knocks and other extraneous sounds will appear coming from under the panel while driving.
Adjusting the heater damper
To get to the heater damper, you will have to disassemble part of the front panel - unscrew the center console. This is where the stove control unit is located. You will need to remove the ashtray and two plugs under the hazard warning button. There are two self-tapping screws that need to be unscrewed. All knobs and switches are removed from the control unit. When releasing the latches, the console must be pulled out towards you, and then all the wires behind it must be disconnected.
Often the cause of damper malfunction is wear and breakage of the mounting of its drive. If it is not possible to replace the part, use epoxy glue and seal the broken mount. It may be broken due to the drive cable being too tight. In this case, you will have to develop it manually - usually this is enough to avoid similar problems in the future.
It is better to start adjusting the damper position by adjusting the stove tap. The bracket holding the cable sheath should be removed from its body. After this, you can remove the cable from the crane. Turn the tap lever to the maximum open position and remove the old cable. In fact, the heater tap may not be closed at all in the future.
How to adjust the heater damper on a Lada Kalina?
- The first step is to adjust the heater valve.
- Remove the bracket that holds the cable sheath to the faucet body.
- Remove the cable from the faucet lever.
- Open the tap to the maximum.
- Unhook the cable from the lever block.
- Remove the old cable.
- In the future, the tap may not be closed at all.
If you don’t like the method described above, you can use another one:
- Adjust the length of the sheath and cable so that in the extreme right position of the lever on the block the tap opens completely.
- Secure the cable located in this state using a latch.
- Then we proceed directly to adjusting the heater damper.
- Remove the bracket that holds the cable sheath on the heater body and feel for the yellow galvanized lever located on the left.
- Pull the lever towards you - this will be the maximum open state.
- Adjust the length of the cable so that in the right position of the long lever on the lever block the valve is open to the maximum.
- Lock it in.
- Do not forget that with the help of one lever both dampers are simultaneously controlled: both the tap and the large one.
Definitely, the heater in the Lada Kalina heats much better than in previous models of the VAZ automobile industry line.
But incorrect operation of the heater dampers, unfortunately, is a very common “disease” of the Lada Kalina. Therefore, after purchasing, try to prepare in advance for the heating season, especially since you can do this yourself quite quickly and easily.
Catalog 13 items (0-13)
Heater damper gear motor
Heater damper gear motor
The heater damper gear motor, as the name suggests, is designed to regulate the amount of warm air directed, which allows you to control the temperature and maintain comfortable conditions for the driver and passengers. It is located under the hood of the car on the steering wheel side and next to the brake booster, so you can find it without any problems.
Causes of device failures
If, when you turn the handle, the intensity of the flow of heated air into the cabin does not change, then this will be a reason to pay attention to the condition of the heater gear motor. There are only three reasons for a device malfunction:
- The integrity of the entire electrical circuit is broken, which leads to a lack of power to the gearmotor from the battery (operation can be checked by checking the voltage at the output of the gearmotor with the ignition on and the damper adjustment knob in the middle position).
- There are problems in the autonomous unit, which directly controls the heater, which leads to the inability of the gearbox to provide the required heater temperature.
- Failure of the gear motor itself, which may be due to natural wear and tear (the most pressing problem for older cars).
Features of drive selection
A special feature of heater gearmotors is a large number of variants and designs that were used on VAZ brands of various years of production, so it is important to first correctly determine the model.
In some cases, the gearmotor can be repaired. To do this, bend the pressed side and remove the lid. Assess the condition of the bearings, brushes and commutator and, if necessary, replace faulty elements. Reassemble the entire structure, having previously lubricated the bearings with silicone grease.
How to replace the gear motor of a VAZ stove
The procedure does not take much time and is not difficult, but for convenience we recommend taking an assistant. In general, the work includes the following steps:
- unscrew the nuts securing the wiper arms;
- pry the lever with a flat screwdriver and remove it from the mounting slots;
- remove the hood insulation and the polymer lining that protects the windshield from damage (frill);
- remove the trapezoid with the windshield wiper drive motor (do this carefully so as not to damage the steel frame);
- disconnect the 2 plugs that supply power to the gear motor of the VAZ stove;
- unscrew the 3 screws securing the damper (a Phillips screwdriver is required), holding the entire structure with your hand at the same time;
- remove the gear motor by gently pulling it to the side so that it comes off its mounting points.
Installation of a new VAZ heater damper micro-reducer proceeds in the reverse order, and after completion of the work it is advisable to carry out testing. To do this, measure the resistance at its outputs (it is advisable to do this on an old device to monitor performance). Depending on the position of the damper control handle, it should be:
- at the extreme blue mark - 800-1200 ohms;
- in the middle position - 1200-1600 ohms;
- at the extreme red mark - 3600-5000 Ohms.
These numbers are relevant for controllers 1303.3854, 1313.3854, 1333.3854. If a 1323.3854 controller is installed on your gearmotor, then in the position on the red point the resistance will normally be 1200-1600 Ohms, and on the blue point - 3600-5000 Ohms. To measure, you need to wait 15 seconds after turning the handle, and then start the engine by disconnecting the controller from connector X1 (resistance is measured between contacts X1.4 and X1.1).
The stove blows cold air on the Lada Kalina
If your Lada Kalina heater is blowing cold air, but all the equipment is working properly, there are no air locks and all sensors are normal, then you should think about the fact that most likely the problem lies in the dampers of the car’s heating system. It is quite difficult to identify this problem; usually it is discovered by the method of elimination, when all other elements of the heater have already been checked. In this article, we will talk about what usually precedes the identification of problems with the heater dampers, and also share information on how to correct such an unpleasant situation.
It is worth noting that on our website there is a publication Replacing the stove without removing the Lada Kalina panel, which describes in detail a method that will allow even a complete beginner to cope with the task.
Signs of malfunction of the heating system dampers Lada Kalina
Most owners of Lada Kalina cars note that even at a temperature of -25 degrees Celsius outside, it is enough to turn on the heater to first speed and the cabin becomes warm. At the same time, after a certain period of time, the heating intensity begins to drop, and it is no longer enough to start the heater at first speed; you have to switch to second, and sometimes even further.
The thing is that Kalina, like a number of other cars produced by VAZ, has a native “disease” - even in the most extreme position of the temperature control knob (as hot as possible), the damper does not open completely
. As a result, with minimal wear of the heater elements, the heating of the interior begins to decrease. To make sure that your car has such a problem, just look at the heater housing from the driver's seat. You will be able to see the lever of this damper, which operates with incomplete amplitude, and the cable that goes to it.
FakeHeader
Comments 66
Hello! Tell me, have you tried heating this damper? Could it be due to the temperature, well, the “Yagodka” is 10 years old, I also started noticing that the heating has become worse But I have a “climate” and the damper is not a cable one. Everything is fine with the SOD
Unfortunately I haven't tried it. In theory it should be heat resistant.
On my damper there is a type of soft rubber around the edge from the factory. It is pressed tightly against the radiator.
It’s not on this damper, I had them on all of them except this big and yellow one.
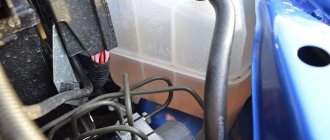
Hello! The one on the right, from grants or K2, the last picture, “bottom” And where is the damper, did you get hold of it?!
Two left Kalina 1, right Grant. I bought the damper in a place with a heater that was broken, for 700 rubles.
Yes, with the Kalinovskaya stove it’s just white, and actually with SOD. They got smart in the design department with SOD. It’s like winter and there’s only so much talk about SOD and the stove. True, this problem has passed me by. I immediately sharpened the rod on the thermostat and now the temperature is stable at 90. Instead of using springs to tighten the damper itself, I did something different on the damper control cable, I unscrewed it one turn at a time and now the damper fits all the way (although judging by your photos I already doubt that to end). But that’s not all, I put a piece of pipe of a smaller diameter into the pipe that goes to heating the throttle (Tobish reduced the cross-section of the pipe), which seemed to me to increase the pressure on the stove. The same thing goes after the remote control, but the cross-section of the reduced pipe is enough for a throttle Same for HBO, it was possible to mix something up with a tap instead of a tube, but I didn’t want to sweat and it turned out very well. At least in cold weather - 15, which is not so often where I live, the stove heats perfectly, HBO works perfectly, the temperature is stable 90 degrees.
HEATER DEVICE LADA KALINA
Air from the street enters the air intake through the air filter. The air is then forced into the ducts by an electric fan. The interior is heated by a heater (heater radiator), which is installed under the panel. When the engine is running, heated coolant circulates through the radiator, heating the air passing through it. The amount of air passing through the radiator and bypassing it is set by the central damper. The fan speed is adjusted, as well as the heater dampers are controlled using a control unit installed on the panel.
The Lada Kalina heater dampers are controlled by a mechanical control unit. When the handles on the block are rotated, the rods are wound/unwound on a special roller inside the control unit. The rods have the following purpose:
- Recirculation flap drive rod.
- Drive rod for the heated windshield flap.
- Leg heating flap drive rod.
Thus, the Lada Kalina stove dampers are controlled mechanically without the use of automation. The only electronic part in the design is an additional resistor, which, depending on the position of the handle on the heater control unit, determines the fan rotation speed. This operating principle is very simple and reliable.
Device repair
Repairing this part of the heater, unfortunately, is not always possible, but you can still try to do something.
- To begin, slightly bend the pressed side and remove the cover from the gearmotor.
- Look at the condition of the commutator, brushes and bearings.
- If possible, replace or correct faulty parts.
- Be sure to lubricate the bearings, but to do this, use silicone-based lubricants, they extend the life of the parts.
- Try to repair the damper if it is faulty or simply replace it with a new one.
- If there is no positive effect from the actions taken, replace the gearmotor with a new one.
The stove installed by the manufacturer copes quite well with its task of heating the interior. But there is one thing - the drive of the central heater damper of the Lada Kalina often suffers. This problem is not serious and in most cases, by following simple steps, you can get rid of it quite easily.
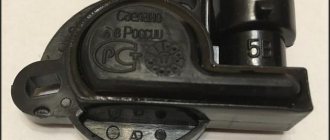
There has been no news since the winter, and all because nothing good or bad happened to Kalina... And here it is on you! Kalina reminded herself of herself with new “wants”. From time to time I began to hear clicking sounds in the area of the stove. I thought it was leaking, but it turned out that the damper gear motor was broken.
This thing cannot be repaired, but costs a thousand rubles! Yes, because of the small gear you have to pay 1k. Part number for cars with air conditioning: 1118-8127200-02
If you insert a new gear motor into the damper rod and turn the temperature dial, it becomes clear why the teeth broke. The stroke of the curtain in both directions is less than the stroke (71 degrees) of the axis of the gearmotor!
I suspect that this was done specifically for the purpose of a tight fit of the damper in the extreme positions of the adjuster, but I do not exclude the possibility of a design miscalculation. Be that as it may, in extreme positions the gears are always under great pressure. It is very difficult to hold the gearmotor in your hand; it tries to turn the gear to its extreme position, and the damper (or hand) prevents this.
PS There is nothing to say about the replacement process. The part is held in place by 3 screws, which can be unscrewed/tightened with a short Phillips screwdriver right near the spare parts store.
Depending on the configuration, the layout of the Lada Kalina stove may vary. In one case, the design of the ventilation and heating system is simple and reliable, in the other, temperature control in the car interior is controlled by automation and electronics. Let's look at the operating principle of the Lada Kalina heater in different modifications.
CLIMATE CONTROL LADA KALINA LUX
The system design is similar to that described above, with the exception of some details. To maintain a given temperature in the cabin, two new elements are used in the design: a temperature sensor in the cabin (built into the ceiling light) and a damper micromotor reducer. Also, the mechanical control unit has been replaced with an electronic one, with degrees of air temperature in the cabin marked on it.
The operation scheme is as follows: the control unit periodically receives a signal from the temperature sensor in the cabin and compares it with the temperature set on the unit. If the difference is too large, the control unit sends a signal to the micromotor gearbox, which already controls the heater dampers (opens or closes hot air from the heater).
The result of the work done is impressive!
After this improvement was made, now we again have to forget about the existence of a second speed of operation of the heater on the highway, since even at the 1st speed the car is pleasantly warm, and sometimes even hot!
This is even if my heater motor is already running out, it creaks, squeaks, rattles every now and then... But I’ll talk about that some other time, when I do this repair, I don’t want to bother with replacing it in the cold.
If you modified your Kalina in a similar way, share your impressions, and if you have questions, write in the comments, I will be glad to help!
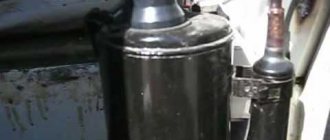
Lada 2106 Beige Shakhina › Logbook › Installation of electric heater tap and switch from viburnum
Actually, what initially bothered me was that in the dark the heater switch button and the faucet and damper control levers were simply not visible, so at first there was an idea to organize illumination of these controls, but after a little reflection, the decision was made to replace the standard faucet with an electric one from the Gazelle, it seems . Well, I also decided to replace the switch with a Kalinovsky one plus resistance from a Chevy Niva
I started thinking about how to arrange it all in the car. How to place controls. I decided to redo the panel. To do this, the old heater control unit cover was dismantled and slightly modified. Photos are attached
Next, the antifreeze was drained and the panel was disassembled
Next, the radiator was modified. Instead of a standard tap, a long tube was screwed on and cut to the length of the upper tube
A resistance is installed in the stove block
The faucet is located in the engine compartment using the necessary hose and tubes
Then everything was connected. The tap was connected according to this diagram
And the switch is on this one
Then everything was connected, assembled, checked, tested and washed))) It works perfectly and the appearance is aesthetic. Everything is illuminated and pleasing to the eye. Next photo
A couple of useful tips
Have you noticed that the heater on the Lada Kalina blows cold? Proceed according to the scheme “from simple to complex”, first check the simplest elements of the heating and ventilation system, for example, the air filter and the presence of coolant. Then gradually move on to more complex design details.
Another good way to find out which part has failed is to replace it with a known working part and check the operation of the system. And you don’t have to buy a new spare part if you borrow it from a friend. You can also try to negotiate with the seller in the store, take a new part for testing, leaving a deposit.