The clutch (friction clutch) is the mechanism that makes the car move and facilitates gear shifting with a manual transmission. Using this device, torque is transferred from the engine to the gearbox. The clutch can be single, double or multi-disc.
The Largus is equipped with a “dry” single-plate clutch with a diaphragm pressure spring. The device consists of a driven friction disk, a casing in which the pressure disk is located, a spring and a mechanism for releasing the clutch with the drive. The 8-valve engine is equipped with a cable drive with a JH3 gearbox, while the 16-valve engine is equipped with a hydraulic drive with a JR5 gearbox.
Bleeding the hydraulic clutch with the JR5 gearbox | VAZ
Lada Largus. Bleeding the hydraulic clutch with the JR5 gearbox
We pump the clutch hydraulic drive to remove air from it after depressurization when replacing the clutch master or slave cylinders, tubes and hoses, as well as when removing
master cylinder or brake and clutch hydraulic reservoir.
To bleed the hydraulic clutch...
Remove the protective cap from the bleeder fitting.
We put a transparent hose on the fitting, the other end of which is lowered into a container partially filled with working fluid so that the free end of the hose is immersed in the liquid.
An assistant presses the clutch pedal several times and holds it down.
...and slightly (by 4-6 mm) extend the tip of the tube.
In this case, part of the brake fluid and air are forced into the container. Air bubbles are clearly visible in the container with liquid. After the liquid stops flowing into the container, insert the tip of the tube until it stops. After this, the assistant can release the clutch pedal. We repeat this operation until the release of air bubbles from the hose stops.
Remove the hose and put a protective cap on the fitting.
When pumping, check the fluid level in the tank and add fluid if necessary.
If the clutch hydraulic drive is pumped correctly, then when you press the clutch pedal you should feel its elasticity, and there should be no grinding noise when you engage reverse gear. Otherwise, pumping the hydraulic drive should be repeated.
Video on the topic “Lada Largus. Bleeding the hydraulic clutch with the JR5 gearbox"
Bleeding the hydraulic clutch on Renault
HOW TO BLEED THE CLUTCH QUICKLY AND WITHOUT ASSISTANT!!!
Replacing the clutch (removing the manual transmission) for Renault Logan, Sandero, Largus
carmanuals.ru
Basic malfunctions and methods for their elimination
The most obvious reason for the failure of the Lada Largus clutch is oil contamination. If this happens, the clutch cannot be replaced until the leak is fixed. There can be two sources of leakage: engine or gearbox. Oil can leak out of the engine due to a worn oil seal behind the flywheel. Changing it is quite difficult due to the labor-intensive dismantling process.
If lubricant gets in from the gearbox, the culprit is a worn oil seal located on the front of the gearbox. To replace the unit, you will need to drain the oil from the gearbox and separate the final drive housing from the gearbox housing. The process is labor-intensive, but necessary. To remove the oil seal, you will also need to remove the flywheel.
Before proceeding with the removal and disassembly of the clutch, it is necessary to check the reliability of the fixing elements that attract the assembly to the Largus frame and engine. If the fasteners are loose or the rubber bushings are worn out, when pressing the pedal the driver will feel shaking and jerking when moving away.
To describe characteristic clutch problems, special terms are used, for example, seizing. This is a situation when strong vibrations are felt during operation of the mechanism, and when you try to move, sharp jerks begin. When the clutch is driven, the disc is not pressed away from the flywheel, that is, the friction clutch does not disengage, and it is impossible to engage the gear.
If the clutch begins to squeal when shifting gears or starting off, this indicates wear on the release bearing. Wear can occur both under natural conditions after long-term use, and as a result of the actions of the driver himself. This is especially typical for cases when the car is parked with the engine running and the gear is turned off (in a traffic jam, not at traffic lights).
Slipping
The engine crank spins the flywheel faster than it transmits rotation to the pressure plate. It is not difficult to determine the malfunction, since when the speed increases, the car cannot accelerate. This is especially noticeable on steep slopes when moving up and under heavy load. To make sure of this, the car is placed on a level surface. The parking brake is applied as high as possible, after which you need to start the engine. Now you should depress the clutch, engage fifth gear, raise the speed slightly and press the brake pedal firmly while releasing the clutch. After such manipulations, if the clutch is working properly, the engine should stall. If this does not happen, it means the friction clutch is slipping. Testing is best done on a warm engine.
Jerking when turned on
If sudden jerks occur when you try to engage the clutch, the engine or gearbox mounts may be loose. This also occurs when oil gets on the friction disc and when the pressure plate is incorrectly adjusted. As a result of this, the pressure plate will not be released from the friction plate smoothly, but with sharp jerks. Typically, jerking occurs while driving in first gear with the pedal released or when reversing.
The clutch is slipping
Slipping indicates wear of the friction linings of the driven disk, failure of the pressure disk, or contamination of its surface with oil. The malfunction is manifested by incomplete pressing of the pressure plate or loose friction of the friction linings. A small amount of oil that gets between the discs cannot harm, since it burns under the influence of high temperature. This will be indicated by the dark color of the overlays. If a lot of oil gets in, it leaves behind a carbon deposit on the linings. As a result, the pressure is not enough, the disc begins to stick and slip. There are two ways to identify a malfunction:
- When driving in fifth gear, you need to lightly press the gas pedal. If the clutch slips, the revs will jump, but there will be no acceleration.
- If the discs are slipping due to oil or dirt on them, then injecting carbon tetrachloride may temporarily relieve the problem.
Sticking
Occurs due to any obstructions in the friction clutch or on the splines of the input shaft. The result of the malfunction is the impossibility of the pressure plate coming out of engagement, even if the pedal is fully depressed. In the case of a hydraulic drive, sticking may occur due to an air lock in the system. The problem can be diagnosed by a difficult first gear to engage when starting off. There is also a malfunction if, while driving, the gears are difficult to engage; when the clutch is engaged, the engagement occurs too early, when the pedal is just beginning to be released. To fix the problem, it is necessary to dismantle the friction clutch to replace damaged and worn parts.
How loading affected grip. — Lada Largus, 1.6 l., 2012 on DRIVE2
Hello!
It was mid-February. I went to send an urgent cargo, or rather 3 cargoes. In the evening, when everyone is leaving work. To avoid wasting time in traffic jams on main roads, I went through the private sector. I drove up a main mountain with curves in the road (luckily I didn’t get stuck there!), went onto a straight line, and then the clutch pedal gave in. I stand at the side of the road: I look under the steering wheel, at the pedals, under the hood and at my phone. I find out that most often the pedal falls out of the plastic fastening of the clutch drive to the pedal (in the case of a hydraulic clutch drive, it turned out that this is exactly what I have). The plastic tendrils on the master cylinder rod, of course, have already been broken off, and the blooper is tied with wire and electrical tape. I place the eye of the master cylinder rod on the pedal, press it, and it also falls through. So it's not about him.
Full size
It was especially annoying when “very sane” drivers rushed right next to a car with flashing emergency lights on the side of the road, and the road was one-way, 2 lanes, the width allowed to leave the necessary gap. It seems that some people forget their heads at home.
Full size
I’m looking for where the clutch slave cylinder is located, and somehow I find a pipe in front of the internal combustion engine, where everything is wet. I understand that I won’t be able to do this on the spot; on top of that, it’s already dark. I try to start the car at first speed, but I couldn’t do it uphill, even if it was gentle.
I called my partner Lekhaa, he came from the other end of the city, and dragged me to our base, where the cars are dismantled. Then Yulka SunJulia came for me and took me home. All this action took 4 hours since the stop due to a breakdown.
And on Sunday, VTECman kindly agreed to work on my car; by the way, the day before in the morning he sent all 3 loads that I did not deliver in the evening.
Full size
It turned out that the clutch tube had become disengaged. Quite a pun! Slavyan sealed this matter, strengthened it with ties. Yes, it’s a collective farm, but that’s it for now! We pumped it up fun, at first the clutch didn’t want to pump. Then the Internet helped, where they found a way when, when bleeding, the brake fluid is supplied through a syringe stuck into the hose. As a result, Slavyan pressed the liquid with a syringe while pressing the pedal, tightened the grease fitting, and I released the pedal. After 5-8 times, I don’t remember anymore, force appeared on the pedal. The liquid was added to the tank, there is some kind of bad inside, it needs to be replaced as soon as it gets warmer.
Full size
Full size
Full size
They decided not to change the main brake brake for now; Slavyan attached it with stronger ties. Let's see how it behaves.
Full size
Good luck to all!
Full size
As an addition: why do I need Largus!
www.drive2.ru
2283-4-24-03 (Copy)
Similarly, we bleed the brake mechanisms of the other circuit.
When pumping, you need to monitor the fluid level in the tank and add fluid if necessary.
After bleeding the hydraulic brakes, bring the fluid level in the reservoir to normal.
There is an even simpler option for replacing brake fluid. This method does not require the presence of an assistant. With this method, a certain supply of brake fluid is desirable (at least 1 liter).
We place the car on an inspection ditch or overpass and provide free passage between the place where you can refill the brake fluid reservoir in the engine compartment and the brake cylinders of all four wheels.
Use a rubber bulb or syringe to pump out the brake fluid from the reservoir. Add new fluid to the top edge. To speed up the process (to release fluid from all cylinders at once), it is advisable to select four pieces of tubes that fit tightly onto the bleeder fittings of all cylinders. We lower the free ends of the tubes into small transparent bottles.
We unscrew the fittings of all brake cylinders. We make sure that the liquid has flowed through all four tubes. We control the decrease in fluid from the reservoir located on the brake cylinder and immediately replenish the reservoir. We observe an increase in the level of liquid in bottles located near the wheel brake cylinders.
It is necessary to move several times from the position of observing the flow of fluid from the brake cylinder fittings to a position where you can check and replenish the fluid level in the reservoir located on the brake cylinder in order to prevent the reservoir from drying out.
Usually the level rises most quickly in the bottle into which the hose coming from the brake cylinder of the front left wheel is lowered. As soon as there is about 200 ml of liquid in the bottle of the front left wheel, wrap and tighten the fitting of this cylinder. Next, we wait for the same result for the front right wheel cylinder and tighten its bleeder fitting in the same way. The process can be completed after 200–250 ml of liquid comes out through the fitting of each rear wheel.
We make sure that all fittings are tightly tightened. We put on protective caps. Check the fluid level in the master cylinder reservoir.
How to bleed your clutch with your own hands
Good afternoon
Secure the clutch pedal in the up position using a strap attached to the steering wheel to ensure hydraulic integrity during the bleeding operation.
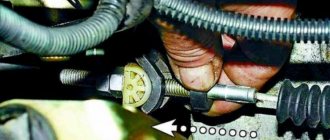
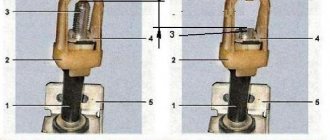
Remove the plug from fitting 1, Figure 8-1, to remove air from clutch slave cylinder 4.
Attach a transparent tube to the air removal fitting so that it takes the same height position as the tank (technological tube).
Press the lock 2 and pull out the pipeline 3 one click to open the air bleed hole.
Pour brake fluid into the reservoir of the master brake cylinder so that it flows out of the fitting for bleeding the hydraulic clutch drive (brake fluid according to the current “Codifier of basic and auxiliary materials used in the maintenance and repair of LAD A cars” K 3100.25100.00018).
Attach a new syringe for bleeding the hydraulic clutch drive system to the end of the transparent tube, filled with 60 ml of brake fluid (technological syringe, brake fluid according to the current “Codifier of main and auxiliary materials used in the maintenance and repair of LADA vehicles” K 3100.25100.00018).
Slowly and completely displace the brake fluid from the syringe into the hydraulic clutch actuator, making sure that no air from the top of the syringe enters the system.
Press the lock and install the pipeline into the working cylinder until it clicks.
Disconnect the transparent tube from the bleeder fitting.
Place a plug on the fitting to remove air.
Bring the brake fluid level in the master cylinder reservoir to normal. The brake fluid level should be between the “MAX” and “MIN” marks on the reservoir of the main brake cylinder (brake fluid according to the current “Codifier of main and auxiliary materials used in the maintenance and repair of LADA vehicles” K 3100.25100.00018).
Press the clutch pedal twenty times quickly.
Check the functionality of the clutch. If necessary, repeat the air removal operation.
blamper.ru
Preparation (tools and actions)
To remove air from the clutch drive we need:
- Brake fluid (preferably identical to the one in the system; if the origin of the fluid is not known, then you need to purchase the fluid recommended by the manufacturer and replace it completely, this will require approximately 1 liter. Fluids from popular manufacturers can be found in the GISAVTO catalogue);
- A medical syringe with a volume of at least 20 ml, preferably more (a syringe will be needed if you decide to bleed the clutch alone, without assistants);
- Tube , preferably transparent, for visual control of the process (perfectly suitable for a VAZ windshield washer system or dropper);
- A container for draining old fluid (1-1.5 liters will be enough);
- Needle-nose pliers to move the clamps, or you can use any hook of a suitable size;
- Depending on the modification of the fitting, you may need a 10mm spanner.
Before you start pumping, place the car on a level surface and set the parking brake to prevent spontaneous movement.
Next, we open the hood and try to find the clutch bleeder nipple, it is located between the engine and the battery in the depths (in some models, for convenience, you need to remove the battery with its bracket).
The next step is to remove the protective cap from the fitting and put a tube on it, then on the other end of the tube, if you are without an assistant, put on a syringe; if with an assistant, then lower it into a container in which brake fluid should be poured at the bottom to prevent air entering the tube.
We open the expansion tank; if a complete replacement of the fluid is expected, then it is necessary to pump out the old fluid from the tank and fill it with new one; if without replacement, then simply top it up to the maximum. The preparatory procedures are completed, now for the process itself.
It is also important to know about the reasons why the clutch pedal may fail.
Hydraulic clutch Lada Largus from JR5 gearbox (bleeding)
If, when the pedal is pressed all the way, the clutch does not fully “drive”, which is accompanied by a characteristic grinding of gears when reverse gear is engaged, air may have entered the clutch hydraulic drive. Remove it by bleeding the hydraulic drive. In addition, pumping is performed when filling the hydraulic drive with liquid after replacing it or after repairing system components associated with depressurization of the system. You will need: a flat-blade screwdriver, brake fluid, a bleeding hose, and a container for draining the fluid.
1. Check the brake fluid level in the master cylinder reservoir (common reservoir for both master cylinders). It should be at the level of the “MAX” mark marked on the tank body; if necessary, bring the level to normal. 2. Remove the protective cap from the clutch slave cylinder bleed valve.
3. Place a hose on the valve and lower its end into a container with a small amount of brake fluid.
4. Ask an assistant to slowly press the clutch pedal 10-15 times at intervals of 2-3 seconds and release the pedal. 5. Pull out the spring clamp on the hose end...
6. ...and remove the tip from the working cylinder pipe by 10 mm. Ask an assistant to depress the clutch pedal and keep the pedal pressed; Liquid with air bubbles will flow out of the hose into the container. As soon as the fluid stops flowing, push the tip of the hose into the nipple of the clutch slave cylinder and secure it with a spring clip. Release the clutch pedal and wait 5 seconds.
While bleeding the hydraulic drive, periodically check the fluid level in the master cylinder reservoir. Do not allow the fluid level in the reservoir to drop below the fitting of the tube connecting the reservoir to the clutch master cylinder, otherwise air will enter the system and bleeding will have to be repeated again. If necessary, add new brake fluid.
7. Repeat steps 4-6 until the fluid in the drive is completely pumped (clean fluid without air bubbles should flow out of the hose). 8. After pumping the working fluid, be sure to put the protective cap on the air bleed valve.
autosecret.net
We are preparing to replace the cable, removing all unnecessary
Of course, the car must be stopped before replacement. Next, remove the filter bellows (Fig. 1). On a 16-valve valve, the corrugation is held in place by a clamp, but it will also be easy to remove.
Then, if we talk about 16 valves, it is better to remove the "intake muffler". The plastic box, when there is no corrugation, can be immediately moved to the side (Fig. 3).
The cable ends with a tip-rod on which a weight is attached. This detail was hidden from us by the corrugation.
Clutch cable end
We will unscrew the nuts:
- Take two “10” wrenches and unscrew nut 1, holding nut 2. If the thread is “sour,” clean it with a solvent;
- Unscrew nut 2, holding the pressed part of the tip with a “7” wrench.
Now the weight will be easy to pull out of the slot.
Know that replacing the clutch cable on a Renault Logan can be done without unscrewing anything. The cable is pulled towards itself, the lever with the slot is pushed back, etc.
Lada Largus - replacing brake fluid - Behind the wheel magazine
The manufacturer recommends replacing brake fluid on a Lada Largus car every three years of operation or every 90 thousand kilometers.
We carry out the work on an inspection ditch or overpass.
2283-4-22-02 (Copy)
Unscrew the filler cap of the tank.
Unscrew the filler cap of the tank.
Unscrew the filler cap of the tank.
We pump out the old liquid from the tank with a syringe or rubber bulb.
2283-4-22-04 (Copy)
Fill the reservoir with new brake fluid.
Fill the reservoir with new brake fluid.
Fill the reservoir with new brake fluid.
It is necessary to bleed the brake system hydraulic drive until new fluid (lighter than the old one) begins to come out of the bleeder fittings of all working cylinders.
We carry out pumping to replace the fluid with the engine not running, first on one circuit, and then on the other in the following sequence:
- right rear wheel brake;
- left front wheel brake mechanism;
- left rear wheel brake;
- brake mechanism of the right front wheel.
Before pumping, check the level of working fluid in the reservoir of the brake and clutch hydraulic drives.
If necessary, add liquid. We bleed the brakes with an assistant.
We clean the bleeder fitting of the brake mechanism of the right rear wheel from dirt.
2283-4-24-01 (Copy)
Remove the protective cap from the fitting.
Remove the protective cap from the fitting.
Remove the protective cap from the fitting.
We loosen the tightening of the fitting with an “8” spanner. We put a hose on the fitting, and immerse its free end in a container partially filled with working fluid.
2283-4-24-02 (Copy)
Using the “8” wrench, unscrew the bleeder fitting 1/2–3/4 turn.
Using the “8” wrench, unscrew the bleeder fitting 1/2–3/4 turn.
Using the “8” wrench, unscrew the bleeder fitting 1/2–3/4 turn.
An assistant must vigorously press the brake pedal all the way 1-2 times and keep it pressed.
In this case, liquid will flow out of the hose, and the brake pedal should be pressed all the way.
As soon as the liquid stops flowing from the hose, tighten the fitting, and only after that can the assistant release the pedal.
We repeat this operation until new brake fluid (lighter than the old one) comes out of the fitting.
We remove the hose, wipe the bleeder fitting dry and put a protective cap on it.
Remove the protective cap from the brake bleeder fitting of the left front wheel.
We put a hose on the fitting, and immerse its free end in a container partially filled with working fluid.
2283-4-24-03 (Copy)
We bleed, as described above, the brake mechanism of the left front wheel, unscrewing the bleeding fitting with a “8” key.
We bleed, as described above, the brake mechanism of the left front wheel, unscrewing the bleeding fitting with a “8” key.
We bleed, as described above, the brake mechanism of the left front wheel, unscrewing the bleeding fitting with a “8” key.
Similarly, we bleed the brake mechanisms of other vehicles.
www.zr.ru
Special device for bleeding brakes
We replace the working fluid in the hydraulic brake and clutch drives (on a car with a JR5 gearbox) in accordance with the maintenance schedule - every 90 thousand km or after three years (whichever comes first).
We carry out the work on an inspection ditch or overpass.
We pump out the old fluid from the reservoir...
...with a rubber bulb or syringe... ...and fill the reservoir with new working fluid.
We bleed the hydraulic drives of the brake system (see.
“Bleeding the brake system hydraulic drive”) and the clutch (see “Bleeding the clutch hydraulic drive”) until new fluid (lighter than the old one) begins to come out of the bleeding fittings of all working cylinders.
After bleeding the brake and clutch hydraulic drives, bring the fluid level in the reservoir to normal (see “Checking the fluid level in the master brake cylinder reservoir”).
Bleeding the hydraulic clutch on Renault
HOW TO BLEED THE CLUTCH QUICKLY AND WITHOUT AN ASSISTANT.
Adjusting the sorcerer on Renault Logan
a common part
If there has been a brake fluid leak or if air has entered the system, the system must first be cleaned before further operations are carried out.
Place the car on a flat surface, start the engine and engage first gear or reverse gear on models with a manual transmission (on models with an automatic transmission, place the selector lever in the “P” position). then place bars under the wheels and turn off the handbrake.
Bleeding the brake system
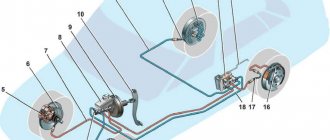
If the damage is only in one circuit of the hydraulic system (it has a diagonal branch on models without ABS and a front and rear branch on models with ABS), then only the corresponding circuit will need to be bled. In the case of the main brake cylinder (disconnecting or connecting it), if the brake fluid level has dropped significantly, it is necessary to bleed air from the entire system, observing the following sequence.
a) right front brake;
b) right rear brake;
c) left front brake;
d) left rear brake.
b) left front brake;
c) right rear brake;
Bleeding the system (basic method of operation: two people)
Prepare a clean glass vessel (jug), a plastic or rubber tube that matches the size of the outlet nipple, and a nipple wrench.
Remove the dust cap from the first nipple in order of operation. Place the tube and wrench on the nipple, place the other end of the tube in a glass jug and pour brake fluid into it until it covers the end of the tube.
Check that the hydraulic fluid reservoir level is maintained slightly above the MIN level mark throughout the entire process.
It is necessary for an assistant to press the brake pedal all the way down several times to create pressure, then leave it in this position.
Unscrew the nipple (about one turn) and allow the liquid to drain into the jug. At the same time, the assistant must press the pedal all the way to maintain pressure and release it. when needed. When all the liquid has drained. tighten the outlet nipple and tell an assistant. so that he slowly releases the pedal, then check the fluid level in the reservoir again.
Repeat these operations until then. until there are no air bubbles in the fluid coming out of the nipple.
Bleeding the system - using a device with a valve
Such kits consist of a piece of pipeline. having a one-way valve to retain air and direct liquid back into the system; Some devices have a transparent can so that the bubbles coming out of the tube can be seen.
The device is connected to the nipple, which is then opened. Then you need to press the brake pedal smoothly and evenly, slowly releasing it. The operation must be repeated until all the air has left the system.
It is necessary to ensure that the level is above the MIN mark, otherwise air will be drawn into the system.
Bleeding the system with a device for releasing air under pressure
Such devices are usually powered by compressed air, such as a spare chamber, although the pressure will have to be reduced as specified in the instructions supplied with the device.
Connect a pressurized container of fluid to the brake fluid reservoir and, opening each nipple, release air from the system (one at a time, in the prescribed order) until all air bubbles are removed.
For all methods
After releasing the air and eliminating the “sink” of the brake pedal, wash off the spilled liquid, tighten the nipples securely and install protective
caps. Do not tighten the nipples too tightly.
Check the brake fluid level in the reservoir and top up if necessary.
Removing air from pipelines and cylinders is a mandatory operation, which is accompanied by changing brake fluid, replacing hoses or working cylinders. Bleeding brakes with ABS differs from a similar procedure on cars without ABS. This is due to the presence of valves and a hydraulic accumulator, from which air cannot be removed in the standard way.
The procedure for bleeding the brakes is influenced by the design of the system, the location of components and the presence of additional electronic modules. You need to start by relieving the pressure in the hydraulic accumulator. To do this, you need to turn off the ignition (it is not necessary to start the engine) and pump the pedal.
There is a brake bleeding device on sale that allows you to independently replace the fluid on cars with ABS and easily get rid of air in the system. You don't even need an assistant for this.
I've been meaning to change the brake fluid for a long time because... It was unknown when it was last changed and it looked scary. I changed one, and because... There were no assistants, so the replacement was carried out under pressure. We bought DOT 4 tomosis fluid in advance, a dropper, a tubeless nipple and a bleeding kit for the VAZ 2109. I drilled out the lid and pulled the nipple through, and then everything was simple: I pumped out the old fluid from the tank, after stirring everything there so that the dirt would rise.
Pumping out the liquid, poured in new liquid with a syringe, screwed on the cap with a nipple (it fit perfectly), connected the compressor and pumped up 1 atmosphere. System - nipple Connected the dropper, unscrewed the bleeder fitting a little and waited for fresh light liquid to flow, periodically pumping up the pressure. Bleeding the front caliperNext we move on to the other and subsequent wheels using the same system.
Depending on the type and type, ABS is classified into:
- One scheme of operation of the ABS system is when all the devices that make up the ABS are located in one unit. That is, the hydraulic valve block, hydraulic accumulator and pump are located in one unit.
- The second ABS scheme is when the component devices (hydraulic valve block, hydraulic accumulator and pump) are located in different places. In this type of braking system, in addition to the ABS module, there is also an ESP module and an SBC module.
To achieve a good result, you will need an assistant, with whom you first need to bleed the brake system of the front wheels, then the rear ones.
Important! There can be high pressure in the brake system, up to 180 atmospheres, so you must first relieve the pressure.
You can bleed, that is, reduce the pressure by discharging the pressure accumulator. To discharge the pressure accumulator, you need to turn off the ignition and press the brake pedal many times (about 20 times).
Free play of the clutch pedal — Lada Largus, 1.6 l., 2013 on DRIVE2
For those who do not like the factory adjustment of the clutch pedal in Largus, I offer you my solution to the problem. I only did it today until I tested it in the field, but the preliminary tests were successful. Like every largus driver, I felt that the clutch was activated in the upper part of the amplitude of the pedal stroke, and approximately the lower third was idle. Even though I had already gotten used to it after a year, I still wanted better. So it was decided to make a stop that limits the downward travel of the pedal. The roller (wheel) from an office chair is used as a basis:
Donor
By manipulating the mount and pliers, unnecessary parts were separated. The result was this:
THIS 
In the hole where the rod was, I inserted a plastic dowel for assembling furniture. The hole had to be drilled out a little to 9mm.
dowel in place
Removed the soundproofing piston under the pedal
Piston
Ready seat for the stop
I glued foam rubber to the front stop and madeleine on top to avoid possible knocking of the pedal against the stop.
Then I screwed the whole thing onto the pin that held the Shumka piston. The seat is tight, doesn’t wobble, doesn’t try to fall off.
Emphasis in place
As a result of the work done, we have a reduced clutch pedal travel of about 2-3 cm. As a result, faster and more comfortable gear shifting. I didn’t notice any difficulties when switching, the box works as before installing the stop. Bonus - a spare piston, which is suitable for many things, in particular for replacing the ever-disappearing piston for attaching the front mudguard
Peace for everyone!
Issue price: 0 ₽ Mileage: 30,900 km
www.drive2.ru
Sign up for a technical center
We suggest you choose which method is appropriate for you - an electronic form (then you will be contacted after some time), or directly by telephone.
A preliminary agreement with the company is an undoubted convenience, because you yourself determine what time or day it will be convenient for you to arrive. You can make an appointment for the day of the call and for other days.
By the time you specify, the service station will provide a technician and a place in the work area. There will be a free lift and equipment available. In addition, you will be served out of turn.
My Largus has driven 219,160 km. And I realized that it was time to change the clutch that was installed at the factory. The clutch began to slip when accelerating or going uphill.
Since I thought that the clutch could fail at any moment, I bought a spare clutch back in 2022 before a trip to the Black Sea. As a result, I rode to the Black Sea with the clutch 4 times. And it’s good that I didn’t need it on the way. Since during repairs at the service center it turned out that I bought a completely wrong clutch. The store shipped me a clutch for a regular Logan/Largus
And since my Largus was equipped with 7 seats, it had a completely different clutch. Having loaded everything into a bag as a sample, I rushed to the store to get the right spare parts. And everything in the store was interesting. One set matched the “disc” perfectly. But it was the wrong “basket”. Another set had the same “basket”, but had a different “disc”
Also, the retractors had to be selected according to the sample. By the way, my car has a hydraulic retractor.
In general, not a machine, but a designer.
Well, we still had to change the ball joints and undergo scheduled maintenance a little earlier.
Price: 26,000 ₽ Mileage: 219,160 km
Trying to bleed the clutch — Lada Vesta, 1.6 l., 2016 on DRIVE2
I'm tired of driving with the gearshift lever periodically jamming, most often in second gear - I can't turn it into neutral. I tried to bleed the clutch using the method described here: www.zr.ru/content/article...-v-gidroprivode-tormozov/ “... There is an even simpler option for replacing the brake fluid.
You can also partially replace the fluid in the clutch hydraulic drive. A complete replacement of the fluid without dismantling all components will not happen, since the clutch slave cylinder, combined with the clutch release bearing, is a kind of “hydraulic dead end”. The bleeder fitting is located in the middle of the line, and it is not possible to replace all the fluid through it. Stirring the liquid will refresh it somewhat. We put a hose on the fitting, and immerse its free end in a container partially filled with working fluid. We recess the wire bracket in the direction of the red arrow and extend the plastic tube in the direction of the green arrow by 7–9 mm. The pipeline becomes depressurized, and the liquid is able to gradually flow out of the fitting under the influence of gravity. This will renew the fluid in the clutch master cylinder and plastic tube. Monitor the level in the tank and do not let it drop. Having spilled about 150 ml of liquid in this way, the replacement can be considered complete. We push the plastic tube into place, and the circuit is sealed. The wire clip snaps into place on its own. Once again, check the fluid level in the tank.
.
This is what came out of it, see video. Air is constantly leaking, I spilled half a liter of brake fluid, snapped the tube back into place, the pedal falls and the clutch does not work at all. I had to do it in the opposite direction, i.e. I poured brake fluid into the syringe and pumped it back into the fitting, that’s all that happened. What the hell is this, why is there air constantly coming out?
PS By the way, the old brake fluid was very dark...
www.drive2.ru
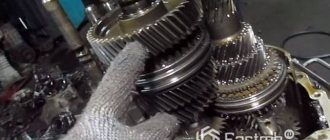
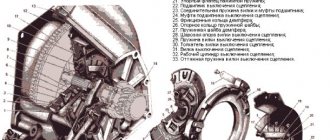
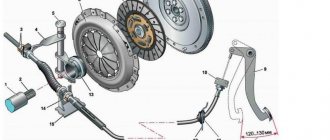
The design and principle of operation of the clutch
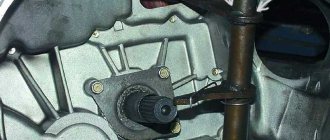
The pressure plate is located in a steel casing, which is bolted to the flywheel of the power plant. The friction disc is installed on the splines of the gearbox input shaft and is clamped by a diaphragm spring between the pressure disc and the flywheel. The guide bushing is a non-separable type unit, which includes the input shaft bearing and oil seal.
The bearing is moved by a ball bearing fork installed in the clutch housing. The fork is inserted into the grooves of the bearing coupling without fasteners. A drive (cable) is attached to the shoulder of this kind of shutdown lever, the second end of which is connected to the pedal in the cabin.
As the friction disc wears and operates, the clutch pedal travel is adjusted using an adjusting nut. It is located at the end of the cable.
The hydraulic clutch drive of the Lada Largus with the JR5 gearbox consists of the following components:
- the master cylinder, which is installed in the engine compartment,
- slave cylinder in the clutch housing,
- release bearing,
- pipeline with tubes and hoses,
- pedal.
The pedal is connected to the master cylinder pushrod using a tip retainer. It is combined on one axis with the brake pedal and is attached to the body with a bracket. The pedal is equipped with a spring to allow it to return to its original position.
The master cylinder is connected to a reservoir that contains the brake fluid. The reservoir also serves to connect to the brake cylinder. The slave cylinder is combined with the clutch release bearing, attached to the crankcase from the inside and exerts pressure on the bearing through a diaphragm spring. The hydraulic drive operates thanks to the presence of brake fluid. It does not need adjustment during its entire service life.
A flywheel is attached to the crankshaft of the Largus engine, which rotates during operation of the power unit. The flywheel contains a primary shaft, on the splines of which there is a clutch disc. Along these slots, the disc can move in both directions by several centimeters. The primary shaft is connected via a gear to the secondary shaft, which transmits torque to the axle shaft.
By pressing and releasing the clutch pedal, the driver adjusts the pressure of the disc from the engine flywheel. When the gear shift lever is moved to the neutral position, the secondary shaft gears do not mesh with the primary shaft gear. The same thing happens when the pedal is pressed: the driver engages the desired gear and, smoothly releasing the clutch, increases the speed. At this time, the gears gradually engage. The disc is pressed against the flywheel through the splines, thereby transmitting torque to the gearbox.
16-valve engines produce more power, so they use a clutch with a stiffer pressure spring and a friction disc damper. You can distinguish the discs by the slot of the spring petals and the damper springs, as they are marked with paint. The disk sizes used are the same.
You can install a disc from a 16-valve Largus engine onto an 8-valve one, but vice versa - you cannot.
Replacing clutch parts without removing the Lada Largus gearbox / Lada Largus
A typical clutch replacement job and other information are shown here.
When replacing clutch parts, you don’t have to completely remove the gearbox (since this requires removing the subframe, which is very labor-intensive), but only move it away from the engine to the required distance.
Disconnect the terminal from the negative side of the battery.
Remove the left wheel drive (see here).
We unscrew the bolt securing the left subframe bracket to the body and loosen the nut securing the bracket to the suspension arm (see here).
Disconnect the clutch cable from the clutch fork and the bracket on the gearbox (see here).
We disconnect the gearbox control rod from the switch on the gearbox (see here).
Remove the speed sensor.
Remove the crankshaft position sensor.
Disconnect the wiring connector from the reverse light switch.
Disconnect the ECM wiring connector from the wiring block of the control oxygen concentration sensor.
Remove the sensor block from the holder on the gearbox and remove the wiring harness from the holder.
We remove the starter (see here).
Unclench the holder on the gearbox housing and remove the wiring harness from it. We unscrew the four bolts securing the engine oil pan to the gearbox (see here).
We place adjustable stops under the engine and gearbox. We remove the rear and left supports of the power unit (see here and here).
We disconnect the ground wires from the gearbox, unscrew the bolts and nuts securing the gearbox to the cylinder block (see here).
Holding the right wheel drive inner joint housing...
...we move the gearbox away from the engine, removing the input shaft from the hub of the driven clutch disc.
In this case, the splined shaft of the differential side gear will come out of the tip of the right wheel drive inner joint housing.
We move the gearbox away from the engine to the required distance and rest the left side of the box on the subframe.
When removing and installing the gearbox, do not rest the input shaft of the gearbox on the petals of the diaphragm spring, so as not to damage them.
To replace the clutch release bearing , slide it along the guide sleeve to the end of the gearbox input shaft, disengaging the clutch release fork legs from engagement with the bearing clutch.
Remove the bearing (for clarity, shown on the removed gearbox).
Remove the fork from the ball joint and remove the end of the fork from the dirt cover.
Before installing the bearing, apply grease to the surface of the guide bushing, the clutch release fork tab, and also to the fork ball joint. We replace the torn rubber cover of the clutch release fork with a new one.
Install the clutch release bearing in the reverse order.
When installing the bearing, the 2 forks must fit into the plastic hooks 1 of the bearing clutch.
Further, the operations for replacing clutch discs are similar to replacing them with the gearbox removed (see here)
largus-mcv.ru
Replacing the friction clutch
Repairing the Larugsa clutch, like any other car, does not make sense; all worn parts must be replaced. To work, you will need a standard set of tools, amplifiers, a hammer and a new set of spare parts. First, the car must be placed on a lift or its front part raised on jacks above the inspection hole. The front wheels and engine protection are removed. After unscrewing the screws, you need to remove the left shield under the bumper. This will give you access to the shield fasteners in the wheel arch, which must also be removed.
The gearbox oil is drained into a suitable container; to do this, first unscrew the plastic and then the metal plug. Do not remove the reservoir until maximum oil has been drained. Dismantle the brake caliper and put it aside along with the pads.
Removing the steering knuckle
Removal is carried out according to the following scheme:
- disconnect the ABS sensor;
- Using a 16 mm wrench, unscrew the nut on the tie rod screw, use a screwdriver to open the two sides of the knuckle, and press out the ball joint rod;
- on the steering end stud, unscrew the nut with a 16 mm wrench and press out the stud;
- Using two 18 mm wrenches, unscrew the fastening nuts that secure the fist to the stand. Now you can remove the steering knuckle, and also dismantle the CV joint from the gearbox (in this case, the rollers will probably fall out).
It is impossible to replace the clutch on a Largus without draining the oil, since the internal drive mechanisms (CV joints) cannot be unscrewed if there is lubricant in the gearbox.
Working in the engine compartment
First you need to disconnect the negative terminal of the battery and remove the cable. To do this, the counterweight is pulled forward, removed through the slot, after which the rubber coupling is removed through it. The engine harness holder is attached to the gearbox housing. To remove it, just loosen the fastener. Now you need to disconnect all the wire terminals:
- unscrew the two mounting screws and remove the terminal from the TDC sensor;
- Disable the reverse sensor at the gearbox;
- disconnect the speed sensor terminal;
- The oxygen concentration sensor (lambda probe) is also disconnected.
The breather hose needs to be loosened and moved away from the box, unscrew the two wires to ground. Next, find the gearshift knob rod, loosen the fastening and pull out the rod.
A mark is left on the fastening clamp using paint so that the rod can be placed correctly during installation.
Removing the gearbox
It is impossible to replace the clutch on a Lada Largus without removing the gearbox. First you need to remove the subframe by unscrewing the three bolts securing it to the bumper. Then the rear support bracket is removed, the steering mounting bolts and the power steering mounting bolt on the left on the subframe are unscrewed. The exhaust pipe is disconnected from the exhaust manifold and removed from the rubber hangers. The subframe is attached to the body with 4 bolts - they need to be unscrewed. Additionally, you will have to remove the starter.
It remains to remove the two screws on top - they secure the gearbox to the engine - and the four bolts with which the clutch housing is attached to the oil sump. Suitable supports are first installed under the engine and gearbox. At the very end, the left engine mount bracket is dismantled, after which the nuts on the lower studs are unscrewed.
Replacing the mechanism
To remove the basket, perform the following operations:
- using an 11 mm wrench, unscrew 6 bolts that hold the basket, fixing it on the flywheel - one turn at a time, sequentially;
- holding the friction disc, remove the basket.
After replacing all worn elements, the assembly is assembled, and the steps are performed in the reverse order. For installation you will need to use heat-resistant grease and a centering mandrel.
Clutch adjustment
Ideally centering and balancing the friction clutch by doing the assembly yourself will be problematic, but possible. To adjust the tension with your own hands, you need to perform a number of actions:
- find the nuts for adjusting the clutch pedal (located under the power steering reservoir);
- unscrew the outer nut to the end of the stud;
- using the second nut, the travel of the clutch pedal is adjusted to the desired cable tension;
- After this, the external nut secures the fastener so that in the future it does not loosen and the cable does not fly off.
If the Largus clutch is adjusted correctly, first gear will engage easily. When the engine is running and the clutch pedal is fully depressed, there should be no crunching, crackling, spontaneous increase or decrease in speed.
Advice for car enthusiasts How to bleed the clutch on a Lada Largus
Of all the technological procedures performed by car owners, clutch bleeding is considered the rarest. The same can be said about bleeding the brake system. The algorithm for performing these two procedures is almost the same if you perform them at home. To bleed the clutch you do not need any special skills or spend a lot of time. If characteristic “symptoms” of a malfunction of this unit appear, it is necessary to perform pumping immediately, and not postpone everything until later. More details on how to bleed the clutch with your own hands will be discussed in this article.
This is a procedure for removing accumulated air in a vehicle's hydraulic system. Air bubbles can get there for a variety of reasons, but most often this can happen due to poorly secured threaded connections or a faulty pipeline. The presence of air in the system often leads to various breakdowns, which is fraught with serious consequences (the entire system may not work correctly).
Bleeding the clutch consists of the following steps:
- preparatory work;
- connecting the fitting to a rubber hose;
- Depressing the clutch pedal until air is released.
There are certain rules that need to be taken into account when replacing brake fluid, namely:
- do not use used fluid, as it will only harm your car;
- change the oil completely or add the same composition;
- make sure that no dirt or dust gets into the fresh oil;
- Be careful not to get liquid on exposed skin.
Replacing clutch fluid
As mentioned earlier, the bleeding procedure is simple. Next, you will learn what is needed for this and how to properly bleed the clutch on your car.
What you need for work
Any car repair procedure must begin with the preparation of the necessary tools and materials. This procedure is no exception.
To bleed the clutch system you will need:
- something to hold the clutch pedal in place. This will be needed if you bleed the system without an assistant;
- a transparent rubber hose that you will connect to the fitting. The diameter of the hose must match the model of your car, so you need to select it individually. If you don’t have a transparent one, you can take a regular hose, but this way you won’t be able to control the process of air bubbles leaving the system;
- hydraulic clutch fluid;
- the container into which it will be drained from the system;
- set of tools. It should be found in the trunk of every car (the set includes a screwdriver, keys, pliers, and so on).
tools for bleeding the clutch
To obtain a high-quality and quick result, it is better to invite an assistant to do the work. It’s a good idea if your assistant is familiar with the specifics of the pumping procedure.
Preparatory work
Before performing each repair procedure, preparatory work must be carried out. Check the fluid level first. You need to make sure that its quantity does not deviate too much from the norm. If necessary, add a little fluid to the recommended value (there are special marks on the body of the expansion tank indicating the permissible minimum and maximum). Then remove any dirt or dust that has accumulated on the surface of the protective cap.
Pour liquid into the expansion tank
The slave cylinder is a complex mechanism that includes a rod from the clutch pedal. This rod is located under the expansion tank and is mounted next to the brake cylinder on the driver's side. You need to remove the cap installed on the top of the air inlet valve. Then place the rubber hose onto the valve stem. After this, pour some working fluid from the system into a previously prepared container. There should be enough liquid to submerge the second end of the hose a few centimeters (no more than 10).
Some features
You can start working only after the clutch has been adjusted. The problem is that the lack of free play of the piston pusher will indicate the impossibility of pumping. Not only the pusher, but also the piston acts as a shut-off valve, so the lack of free play must be accompanied by a closed position of this valve.
The same phenomenon is observed when the tension spring breaks, when the pedal jams at the upper extreme point.
Step-by-step pumping
This can be done not only provided that compressed air is present in the system, but also without it. Let's get to work.
Table. Step-by-step pumping instructions
| Steps, photo | Description of actions |
| Step 1 | Add a small amount of liquid into the tank so that the level does not reach the top edge of the tank by about 2 centimeters. The procedure is performed using a special mesh filter to protect the system from various small particles and impurities. |
| Step 2 | In the PSU housing, or rather, in its upper part, remove the special cap, which is located on the bypass valve. After this, put a rubber hose on the valve, the second end of which is lowered into a pre-prepared container with a volume of 0.5 liters. It should be one third filled with working fluid. |
| Step 3 | Rotate the bypass valve 360 degrees, then press the clutch release pedal. Here you need an assistant who will press the pedal all the way. This must be done until air bubbles completely stop entering the container. Throughout the entire process, monitor the liquid level in the tank - the indicator should not fall below 3.5 cm from the edge. Add some liquid if needed. |
| Step 4 | Close the bypass valve after any remaining air has left the system. As a rule, mechanics prefer to tighten the valve each time the pedal is depressed, after which it is released and the operation is repeated again. This will speed up the pumping procedure. Often, to completely remove air from the system, it is enough to only depress the pedal 3 times. |
| Step 5 |
discoveruz.ru
Causes and symptoms of failure
Unfortunately, intensive use has the most negative effect on the operation of the clutch. Its mechanism wears out under the influence of friction, and the speed of wear will also be affected by the quality of the road surface and your driving style. Driving on old, unrepaired roads with a lot of dust leads to greater contamination of components and mechanisms, to an increase in friction force and, accordingly, replacing the Lada Largus clutch will be required sooner than if you were driving, for example, on German autobahns.
The following symptoms will tell you that it is time to change the clutch:
- Incomplete engagement (“Lada Largus” is slipping) and clutch disengagement (“Lada Largus” is driving).
- Engaging the clutch causes noticeable vibration in the vehicle.
- The clutch pedal has become too hard to press or has even sunk to the floor.
- You began to change gears with difficulty.
- Increasing engine speed does not lead to a significant increase in vehicle speed. This is especially noticeable when moving uphill.
Signs of a bad clutch
The design and principle of operation of a car clutch
It's not every day that a clutch breaks. It happens that you don’t immediately realize that the clutch on Largus is failing. This can be easily understood by the following signs:
- When you press the clutch pedal or in the neutral position of the gearshift knob and release the pedal, you hear an extraneous noise - grinding, squeaking, howling or rattling
- Some gears are difficult to engage or do not engage at all
- The clutch does not completely disengage when the pedal is pressed, the clutch moves
- The clutch slips and does not fully engage when the pedal is released and the gear is engaged
If the clutch engages at the very beginning or end of the pedal travel, then the clutch pedal free play may need to be adjusted. Our master can do this. He will also inspect the clutch and be sure to let you know if it needs to be replaced.
Most often, the release bearing disappears due to poor lubrication. It happens that the petals of the diaphragm spring weaken and sag, or critical wear forms at the point of their contact with the bearing. Over time, the damper springs or friction linings of the driven disc may become loose.
If the friction linings on the disc are worn out, cracks or delaminations are visible on them, then the disc must be replaced.
Replacing the clutch basket (pressure plate)
- preliminary determination of the need to change the basket
- using professional tools specially designed for this purpose
- compliance with the sequence of events
This part of the mechanism is important, since it is where all the clutch parts are located. So that the unit can operate without violating the principle of operation, the pressure plate should be changed only by a qualified technician and where they have real practice in changing the clutch basket.
It is common practice in car service centers to replace the basket assembly. This type of work is considered the most acceptable and high-quality, since it becomes possible to change the casing. Accordingly, the result will be of higher quality.
When is clutch bleeding required?
The operation of the clutch system is based on the laws of physics - the properties of hydraulic/brake fluid to compress/decompress under load. If air gets into the system, its properties change. As a result: the hydraulics stop responding to pressure or react late, which leads to jerks and jolts when pressing the pedal.
Signs of “airing” of the system
If the following symptoms appear, it's time to change the hydraulic fluid:
- the pedal is depressed too easily, but the gear does not change;
- the pedal moves normally, but the gear engages with vibration or delay;
- the clutch pedal “sticks” to the floor, slowly returning to the top position.
Even one of these signs is enough to check the system.
“Sinking” can also be caused by a broken return spring.
Before bleeding the clutch, find out that the spring mechanism is not the cause of the malfunction.
In what cases is the clutch hydraulic drive pumped?
Bleeding of the clutch and braking systems is mandatory if:
- The liquid used has already served its purpose
. Changes in physical and mechanical properties over time are the norm. The recommended period of use for hydraulics is 1-2 years (as a rule, the period is indicated on the container).
The liquid loses its properties, even if stored in an airtight container.
the clutch or brake system is being repaired
. When cuffs, seals, seals are changed, leaks are eliminated, depressurization occurs. Result: leakage of working fluid and airing. Needs replacement.
It is easy to speed up new bleeding if you loosely tighten the fastenings of the clutch mechanism units. Air leaks freely through the micro-holes.
Clutch/braking system components are severely worn
.
In case of wear of parts, only bleeding is not enough, because the cause of airing does not disappear. To fix the problem, you must first repair or change the functional elements, and then change the working fluid.
Preparing for pumping
Preparing to bleed the clutch
The fluid from the hydraulic system is not “poured out”, but is pushed out thanks to the cylinder piston pusher.
Preparation is carried out in stages:
- checking the volume of liquid in the expansion tank - the level should be within normal limits. If it reaches the desired level, you need to top it up;
- cleaning the valve cap on the cylinder from accumulated contaminants;
- removing the cap from the air inlet valve on the working cylinder;
- connecting the drain hose to the valve fitting.
The second end of the hose is lowered into a container into which fresh working fluid is poured. The end of the tube should be immersed 5-10 cm into it.
Do not remove the hose from the tank until work is completed.
After the preparatory work, the clutch is adjusted. This allows you to make sure that the movement is free and, in addition to airing the system, there are no other malfunctions.
What is required for pumping?
- tools: keys, screwdrivers, pliers;
- elastic transparent hose for draining old fluid. Make sure that the diameter of the tube connection matches the drain fitting connector;
- a reservoir into which the liquid will be drained;
- new working fluid;
- personal protective equipment: gloves, sleeves, goggles. Technical fluids are chemically aggressive; if they come into contact with the skin and mucous membranes, they can cause burns.
Ideally, bleeding the clutch system should be carried out by two people. One person presses the pedal, the second drains the fluid and diagnoses faults. If necessary, you can do without an assistant. In this case, you will need a reliable means to secure the pedal. For example, a suitable size stone or brick.