01 December 2016 Lada.Online 89 930 7
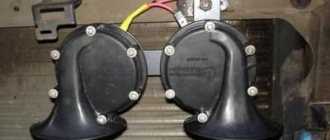
All cars have a device for producing sound signals (horn), but its sound does not always suit the owner. This is the main reason for replacing the standard horn with alternative options (for example, with a sound signal from the Volga). Let's look at this improvement in detail.
Nowadays, horns are usually used in pairs. One with a high tone, the other with a low tone. This provides strength and beauty of sound.
Will need to buy:
- A couple of sound signals from GAZ 3110 (article number for high tone - 22.3721, for low tone - 221.3721), or an analogue, approximate price 500 rubles; Other sounds in this category.
- 4-pin relay 75.3777-10;
- Relay socket;
- Mounted fuse 10-15A;
- Single-core wire;
- Corrugation for wires;
- Terminals;
- Brackets/brackets for mounting sound signals (optional).
Installation and connection of a sound signal from the Volga is shown using the example of the Lada Vesta sedan. On other cars (for example, Lada Largus, Granta, Kalina, Priora, Niva 2121 or XRAY) all actions are performed in a similar way.
Instructions for installing Volgov signals on a Priora.
To install signals you will need:
the signals themselves (2 pcs.) copper wire with a cross-section of 2.5 mm2 and a length of 1.5 m a soldering iron (if you solder the joints) or electrical tape (if you connect the wires by twisting) a figured screwdriver a knife a “14” wrench
| First you need to remove the radiator grille, unscrew 6 screws. | |
| Carefully pull the grill towards you... | |
| ...and we try not to lose the fastening plates into which the screws were screwed in | |
| We remove the standard signal | |
| Checking the plus on the connection connector | |
| I myself made a male connector for connecting Volgov signals to the specified connector | |
| We are attaching new Volga signals. We connect the “pluses” to each other, and connect one “plus” to the power connector. The “minus” will be the weight of the car | |
| This is what installed Volgov signals look like |
Source
Tags: installation of Volgov signals on a Priora, independent replacement of standard signals with Volgov signals on a Priora
Priora horn does not work
The sound signal on the Priora does not work?
Where is the horn fuse located? Is the horn broken? Where to look for the cause of the breakdown. Background.
The breakdown occurred a month ago, as soon as the snow melted. The first motorcyclists began to appear, and the heads of many pedestrians were besotted with the spring veil. Everyone starts racing, pedestrians run when red lights are on and much more. We ourselves try to drive carefully, not faster than the speed of the flow.
But every day I had to honk my horn 2-3 times because drivers and pedestrians were going crazy. Unfortunately, the sound signal has disappeared, and it is absolutely impossible to travel to Ivanovo without it. Here everyone thinks only about themselves. (there are also good people)
Our breakdown and repair
In fact, there are not many places, but the search may take a long time. We were lucky, the reason for the breakdown of the sound signal on our Priora was minor. We quickly found it and fixed it.
Where can the sound signal on a Priora break? — Blown fuse or horn relay on the prior — Open circuit — Oxidation of contacts — Failure of the horn
How can you tell if a fuse has blown? Look in the fuse box and see if the relay clicks.
Inspect the contacts. They oxidize very often. But in our case, the contacts dried up.
The absence of a sound signal on a car is a malfunction that affects traffic safety. The ability to promptly warn or attract the attention of pedestrians, as well as other road users, directly with the horn, can help avoid creating an emergency situation or an accident.
A malfunction such as the absence of a sound signal on VAZ family cars is quite easy to diagnose and repair with your own hands. To do this, you need to study the connection diagram (it is very simple) and follow the instructions to carry out the necessary checks.
How to install Volga signals on a LADA car
All cars have a device for producing sound signals (horn), but its sound does not always suit the owner. This is the main reason for replacing the standard horn with alternative options (for example, with a sound signal from the Volga). Let's look at this improvement in detail.
Nowadays, horns are usually used in pairs. One with a high tone, the other with a low tone. This provides strength and beauty of sound.
Will need to buy:
Installation and connection of a sound signal from the Volga is shown using the example of the Lada Vesta sedan. On other cars (for example, Lada Largus, Granta, Kalina, Priora, Niva 2121 or XRAY) all actions are performed in a similar way.
Installing an air signal in a car (typhon), auto.
Automotive sensors and intelligent transport.
Bus (computer network topology) - Wikipedia.
Technological instructions.
VAZ 2170 | electrical circuit diagrams | prior.
Relay and fuse blocks
The VAZ-2170 has three relay and fuse blocks:
- main block;
- mounting block;
- additional mounting block.
Luxury "Priors" with air conditioning have another additional block in which relays and fuses are located that are responsible for the operation of climate control equipment.
Main power fuse block
The main unit is located in the engine compartment of the car next to the battery and expansion tank. It is protected from above by a removable plastic casing. The main unit contains only six fuses that are responsible for the operation of the main (power) electrical circuits of the car.
To replace the fuses in the main unit, you need to disconnect the ground on the battery, remove the cover and replace the faulty part. VAZ-2170 mounting block
Relays and fuses in the cabin
The mounting block is located in the car interior under the dashboard on its left side. It is protected by a removable plastic panel attached to the “torpedo” using three latches. To remove the panel you need to turn each of these latches 900 degrees. After this, the panel will be completely removed.
The location, number, and markings of relays and fuses in the Priora mounting blocks may differ depending on the type of vehicle equipment.
Mounting block fuses
To remove the mounting block from its seat, you only need a screwdriver with a Phillips bit. She needs to unscrew the screw securing the block, then, pulling it towards you, disengage it from the fastening hooks.
Before replacing relays and fuses, you must disconnect the negative terminal from the battery. To remove the main unit, you will need to disconnect all terminals with wires connected to it, having previously marked their location.
Additional mounting block
The additional VAZ-2170 mounting block is located behind the panel of the right tunnel trim on the left leg side of the front passenger. To get to it, you need to unscrew the screws securing the cladding and remove it.
The additional mounting block contains three fuses and two relays.
To replace fuses and relays in the additional unit, there is no need to remove it from its mounting location. To remove the relay, you should unscrew the corresponding nut securing it with an “8” wrench. Before carrying out work to replace the relay, fuses or the entire unit, it is strongly recommended to disconnect the ground wire from the battery, and also disconnect the wiring harness block of the electronic engine controller from the additional connector mounting block.
Control and protection unit for climate control devices
In “Priors” equipped with climate control equipment, another additional mounting block is installed. It is located next to the main unit, and is attached to the “glass” of the left rack. Depending on the manufacturer of the climate system, the relays and fuses in it may have different locations and purposes.
The standard alarm on the Lada Priora does not work: reasons, repairs
Hi all! I can’t say that car horn malfunctions occur very often and everywhere. But we cannot exclude a situation in which the signal does not work.
Car horns are safety features. Moreover, they must be present in all vehicles and be in good condition. This will allow you to give a timely signal to other road users, inform about the approach, and prevent collisions and other dangerous situations.
But at some point it happens that the sound signal located on the steering wheel suddenly stops working. It is necessary to address the issue of diagnostics as soon as possible, since it is dangerous to continue operating the car with a non-working horn.
Fuses and relays in Lada Priora, electrical diagrams
Lada Priora is another car in the line of new VAZ cars, which is gaining popularity among segments of the population. External similarities with the 10th model attract the attention of young people; the relatively low price is also a reason for purchase for most car enthusiasts. Along with the growth in popularity, the owners of this model are gaining experience in repair and maintenance, which is becoming more and more every year. If your Priora has electrical problems, do not rush to get upset; first, check the fuses and relays in your Lada Priora. These are the ones that will be discussed in this article.
Features of electrical equipment
The electrical circuit of a Lada Priora car includes several main elements - front and rear blocks, control panel blocks, as well as engine control systems. All these elements are connected to each other by special plugs located on the left under the center console, as well as above the mounting block. Only the control panel and engine control system harness is located in the heating system shaft, on the driver’s side. It should also be noted that the rear block and the device are connected to the control device via an electrical package, which is located inside the car.
The main systems that the electrical circuit includes:
- heating unit, stove;
- optics, including main headlights, dimensions, fog lights, turn signals;
- windshield and rear window cleaning system, if provided for by the vehicle design;
- car central locking;
- electric windows.
Diagnostic tester with test lamp for checking electrical circuits
Fuse box in the passenger compartment of VAZ-2170, -2171, -2172
The fuse box in Priora is located at the bottom of the dashboard, on the left side of the steering wheel. To get to it, you need to open the cover, which is held on by three latches. Rotate each locking knob 90 degrees and pull the lid down and it will snap open.
Fuses in the interior mounting block
F1 (25 A) - radiator cooling fan . If your fan does not work, check its motor by applying 12 V directly to it from the battery. If the engine is working properly, then most likely the problem is in the wiring or connectors. Check the serviceability of relay K1.
The fan in the Priora usually turns on at a temperature of 105-110 degrees. Do not allow the engine to overheat, watch the arrow of the temperature sensor.
If the fan runs constantly and does not turn off, check the coolant temperature sensor located on the thermostat. If you remove the connector from the working sensor, the fan should turn on. Check the wiring to this temperature sensor, as well as the contacts of relay K1, move this relay, clean the contacts. If this is the case, replace it with a new relay.
F2 (25 A) - heated rear window . Check together with fuse F11 and relay K2. If the rear window does not fog up, the heating element threads may have broken. Inspect all the threads and if you find a break, seal it with special glue or varnish, which can be bought at car dealerships for 200-300 rubles. Check the connection contacts at the terminals to the heating elements at the edges of the glass, as well as the switch on the dashboard and the wiring from it to the rear window.
F3 (10 A) - high beam, right headlight . F4 (10 A) - high beam, left headlight . If the headlights do not shine on high beam, check the K7 relay and the headlight bulbs. The steering column switch, wiring or connectors may also be faulty.
F5 (10 A) - sound signal.
If the signal does not work when you press the steering wheel button, check relay K8. The signal itself is located under the radiator grille; you can get to it by removing the plastic casing from above. Check it by connecting the voltage to 12 V. If it doesn’t work, try turning the adjusting screw, or replace it with a new one.
F6 (7.5 A) - low beam, left headlight . F7 (7.5 A) - low beam, right headlight . When replacing lamps, be careful; there are separate lamps for the low and high beams, so they can be easily confused. It is better not to install lamps in high-power headlights; the reflectors may melt and the desired effect will not be achieved. Most low beam headlight problems that cannot be corrected by conventional means can be related to the light control module (LCM).
The low beam relay is only available in cars equipped with a light sensor, it is located in the place of relay K1; on most cars this relay is not in the mounting block; the low beam circuit goes through the MUS block. It happens that the tracks in the block burn out; if there are problems, it is better to replace it with a new one.
If the windshield wipers turn on spontaneously when the low beam is not working correctly, the problem is most likely in the windshield wiper control unit, located in the center of the dashboard, the topmost block, next to the radio, is best reached from the glove compartment, or by hand through the removed console covers at the feet.
Replacement and repair of VAZ sound signal
The most common reason for the absence of a sound signal lies in the signals themselves. The reason is mechanical, moisture and oxidation lead to blocking of the sound membrane and, as a result, the absence of vibrations and sound effect. Sometimes you can restore functionality by spraying the signal with WD-40 or a similar composition.
On cars, where two signals are installed, as a rule, they are of different tones, low and high. If one signal fails, the second will not be able to fully provide the required power, and therefore requires replacement. As a rule, many signals are equipped with a tone adjustment screw, and if there are wheezing, grinding and other unwanted sound effects, you can use the adjustment to achieve a suitable sound. Also, with their help, you can move the “soured” membrane, thereby restoring the functionality of the signal.
Source: https://prometey96.ru/obsluzhivanie/ne-rabotaet-signal-na-priore.html
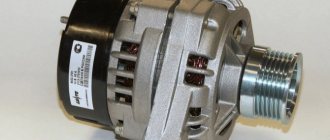
Do-it-yourself removal and disassembly of a VAZ generator
Replacing the VAZ 2110 generator
- Disconnect the generator excitation wire.
- Unscrew the nut securing the wires to terminal “B+” using a “10” wrench.
- Remove the “B+” terminal wires.
- Remove the generator tension bar.
- Unscrew the nut of the lower mounting of the generator using a “13” wrench.
- Remove the mounting bolt.
- Remove the tens generator.
Removing the generator voltage regulator
- Release the 3 spring clips and remove the protective cover of the generator diode bridge.
- Unscrew the 2 screws securing the voltage regulator using a Phillips screwdriver.
- Disconnect the block with the wire from the output of the relay-regulator and remove it.
Removing the diode bridge from the generator
- Unscrew 3 bolts that connect the terminals of the stator windings to the rectifier block (1) using an 8-mm spanner, and 1 more bolt holding the diode bridge (2). Remember how the isolating and thrust washers are installed.
- Bend the wires of the stator winding leads to the side.
- Unscrew the capacitor mounting screw using a Phillips screwdriver.
- Remove the diode bridge along with the capacitor. Unscrew the 2 contact bolt nuts using a 10mm socket wrench. Remove the spacer and insulating bushings from the bolt, remove the bolt from the diode bridge and the capacitor tip from the contact bolt.
Replacing the front and rear bearings of the generator
- Before removing the front and rear covers of the generator, you should mark their location with a marker.
- Unscrew the 4 bolts using an 8mm socket wrench.
- Open the generator covers using a flathead screwdriver.
- Disconnect the back cover from the front along with the stator winding.
- To remove the front bearing of the generator, you need to attach a suitable object to it, for example, a “27” socket. Then knock it out with hammer blows.
- Lubricate the bearing seat.
- The front bearing is installed using the old one. Place it on top and carefully drive the bearing in a circle.
- The front generator bearing is installed.
- If a special puller is not available, then a large open-end wrench will be required. We pick up the rear bearing with a wrench, as shown in the photo.
- Lightly hit the key with a hammer and move it around in a circle to remove the rear bearing of the generator.
- The rear bearing has been removed from the generator rotor shaft.
- Installation of the rear bearing can be done using a piece of pipe of a suitable diameter (for example, a deep “19” socket). Using light blows of a hammer, press the new bearing onto the generator rotor shaft.
xn--2111-43da1a8c.xn--p1ai
Replacing the standard sound signal in case of breakdown
First you need to prepare the car for work by putting the parking brake on and turning off the ignition. Then you need to lift the hood and, armed with a “10” key, disconnect the negative terminal from the battery. Then you should dismantle the front bumper, which is best done with an assistant, so as not to damage the paintwork on the bumper itself and on the wings of Vesta.
Once this is completed, all that remains is to disconnect the plug with the wires from the signal horn. Then you can dismantle the signal itself, the bracket of which is attached to the body with one nut. For dismantling you will need an extension, a wrench and a 13mm socket.
Assembly is carried out in the reverse order - you need to secure the signal, inspect its operation, install the bumper with an assistant and tighten the terminal on the Vesta battery.
Maintenance and testing of the VAZ generator
Generator Maintenance
- in cleaning external surfaces.
- in checking the fastenings of the generator to the engine.
- in checking the reliability of wire connections with the generator and voltage regulator
- in checking the tension of the generator drive belt (if the tension is weak, the generator will operate unstably; if it is strong, the belt and bearings will wear out quickly). The check should be carried out every 10 thousand km. mileage
- in checking the condition of the generator belt (there should be no cracks or delaminations on it).
- in checking the condition of the generator bearings (remove the belt and rotate the generator rotor by hand; if jamming, play, noise or clicks are observed, the bearings should be replaced).
Turning off the standard radio of the Lada Priora when arming
I was puzzled, so how can I turn off the standard radio when arming. From the factory, the standard PG is powered directly from the battery and is never completely de-energized. This is not right. Therefore, before leaving the car, you should always turn off the power steering manually. Tired of it. People are solving this problem, no matter what. The most common scheme is diode isolation. I will not describe the meaning in detail here, because everything is on the Internet. I’ll just say that if diode isolation is used, after the ignition is turned off, the GU continues to work until you turn it off manually. Only after this is it de-energized and will not turn on again until the ignition is turned on. As I understand it, such a garden was fenced in to reduce the current consumption of the on-board network at rest. Looking ahead, I’ll say that after measuring the current consumption of a standard power unit in the off state, I received a value of 10 mA. Therefore, you shouldn’t even fool yourself with the current consumption of a standard PG when it’s turned off, because it consumes practically nothing. Thus, the use of diode isolation does not relieve us of the need to turn off the PG manually. I saw another way. People are making a hybrid ignition lock, that is, they add some details from the ignition switch 2110 to the prioro lock (there is a contact group that is closed while the key is simply inserted into the lock and opens if the key is pulled out). In this case, in order to listen to music in the car, it is necessary that the key is in the ignition even when the car is turned off. Rave. I decided that the mafon should only turn off when arming. In all other cases (whether the engine is started or turned off, the ignition is on or off, the key is in the ignition or not - it doesn’t matter) the mafon should work. I started to look into this issue and then an unpleasant surprise awaited me. It turns out that on Priors and on Kalinas there is nowhere a standard output that would change its state only when armed. For a couple of days I went through all sorts of options until I remembered that back in 2011 I installed a Master Priora glass closer. So, this closer has such an output, and the instructions say in black and white that this output, in fact, is intended to turn off the radio. This function was simply not used for me. While the car is not armed, +12V is present at this pin (blue). As soon as the system is armed using the remote control, 0V appears on this pin. Therefore, it is enough to install a relay that will be controlled by this signal and interrupt the power supply to the standard PG.
0:4669
1:504
All modifications are shown in red. The signal from the control blue wire is supplied to the relay coil. The second terminal of the winding is connected to ground. Thus, while the car is not armed, there is + 12V at the control blue terminal of the closer, which powers the relay winding and keeps it in the on state. The closed relay contacts, in turn, supply power to the standard control unit. As soon as the car is armed, 0V appears on the blue control pin. The relay turns off. Its contacts open and the standard control unit turns off.
1:1481
All that remains is to decide on the relyushka. Or rather, with its electrical parameters. The maximum load capacity of the control blue terminal of the closer is 100 mA. Therefore, the operating current of the relay winding must be less than this value. A standard GU when turned on and at almost maximum volume consumes no more than 4.5A. And at a volume of 12-13 units (at which I almost always listen), the current consumption is about 2-2.5 Amperes. This means that a regular low-current 12V relay is enough for me. I found similar relyushki in my stash. Size approximately 12 by 15 mm. The operating voltage of the winding is 12V. The operating current of the winding is 50 mA. Operating current through the contact group is up to 20A. Looking at the size of the relay, this figure is hard to believe. But it will definitely handle 10A. And 2 - 2.5A and even more so. I quickly made a printed circuit board and assembled a device consisting of one relay and 2 terminal blocks.
1:3077
2:504
3:1009
To make the dimensions of the device clear, I photographed it together with the car remote control. The device is quite small.
3:1222
Well, the scarf is installed on the car.
3:1290
4:1795
Everything works as it should. We armed the car using the remote control and the phone immediately turned off. If you sit inside the car and simply press the central locking button, locking all the doors, then the control unit continues to work. If you arm the car using a non-standard alarm, the GU will also turn off. And after disarming, power to the control unit will appear only after the driver’s door opens. Now I’ll think about how to make the GU turn on automatically immediately after disarming.
4:2704
https://www.drive2.ru/l/10516985/
4:36 next article:
Connecting a subwoofer to the standard radio of the Lada Priora
We got around to connecting the subwoofer. Which my sister gave me. I won't say it was easy. Difficulties with the manager
5:895
Rating 0.00 [0 Votes] 15699
Alternative options
In this case, the possibilities are limited solely by the imagination of the Vesta owner. Most often, sound signals from the Volga are installed on the Lada, since their sound is much louder. But there are other ways. The most common options for such “modernization” are:
- installation of signals from the Volga - in this case, different installation methods are possible (with connecting a relay in the cabin or under the hood)
— installation of other signals;
— installation of a signal with an integrated compressor;
— a combination of signal and high beam.
Installation of signals from Volga
It involves not only installing “shells” directly on Vesta, but also various options for connecting them. It is worth remembering that the sound signal from the Volga can be either old or new. However, they have no differences, except for a slight difference in tonality:
— sound signals Volga-3110 (22.3721/221.3721) – low and high tone;
- sound signals Volga, RAF S302/303D - low and high tone.
Sound pressure – 105-118 dB.
It is necessary to take into account that simply replacing the signals on Vesta will not work, because their current consumption is different. For Vesta this figure is 5A (passport data), although in reality it usually does not exceed 3.5A. Signals from the Volga consume 8A each, which gives a total of 16A. Therefore, for their installation it is necessary to use a 4-pin type relay. In particular, you can use relay 904.3747-10.
In addition, on Vesta, only one plug is supplied to the factory signal - “Plus” is permanent, since it supplies power to the fan, and “Minus” comes from the button on the steering wheel. Regarding the Volga signals, they only need “Plus”, because “Minus” goes directly through the metal mount to the body.
It is also necessary to take into account the dimensions of the sound signals - the Volgov ones are larger than the standard ones on Vesta. Therefore, installation in factory locations is excluded. In addition, it is not advisable to mount them directly to the body, as this will lead to vibration, and the sound of resonating metal will be mixed with the horn. So the best solution would be to use a bracket. The advantage of this option is its low cost - a set of “Volgov” signals will cost about 1,000 rubles.
Installation of relays in the interior of Lada Vesta
This is done directly in the fuse box. To carry out the work you will need the following components:
— sound signals from the Volga;
— 4-pin type relay;
— terminals – wide (6 units) and narrow (1 unit).
For installation, it is best to use the free space in the fuse box, to which the wires from the contact relay, which is responsible for activating the signal on the steering wheel, are transferred. In the place that has become vacant, a wire from relay contact “87” is placed. Next, you will need to remove the wire from the 13th contact block and insert it into the 13th connector “87” of the relay contact.
To supply “Plus”, you will need to feed the wire to relay contact “30” from connector “Ш5-6”, using a jumper of contact “86”. In this case, you will have to insulate the wire in red-white or black-white color, since “Plus” always goes to it.
This method has a number of advantages:
— location of wiring under the hood;
— installation of the relay in the appropriate block, which guarantees dryness;
— use of a separate “Plus”.
However, if you have a complete lack of experience and knowledge in the field of car electrics, it is better to contact an auto electrician when installing a relay in the cabin.
Installation of a relay under the hood of Lada Vesta
Regarding the components, they are similar, but the list will need to be supplemented with a few more elements:
— pendant type fuse;
- plastic corrugation - 2 meters.
The installation of the beeps themselves is carried out in a convenient place, and the connection is made according to one of two schemes:
- Using “Plus” directly from the fuse block;
- Using “Plus” directly from the battery, using a separate fuse.
In general, the second option is preferable. The relay should be located in a place protected from moisture. In addition, it is recommended to first wrap this component in polyethylene or insulate it.
The work is quite simple - you will need to dismantle the Vesta bumper and remove the factory signal, and then you can begin assembly. First, it is necessary to properly insulate the wires, and it is recommended to pass the wire that connects the signals through the corrugation so that it does not fray over time. Then you will need to fix the relay, after which you can put everything back together.
Combined option
This method involves retaining the standard Vesta beeps, but installing “Volgov” ones as additional ones. At the same time, combining 2 different tonalities will be a very original and specific move. Fixation is carried out in the same way as in previous cases, in any convenient place through a bracket. After which you will need to properly insulate all connections so that dirt and moisture do not get on them.
Installation of other sound signals on Lada Vesta
It is not necessary to concentrate exclusively on “Volgov” signals, since you can use beeps from other manufacturers. There are a lot of options on the market from different brands that you can buy - MITSUBA HOS-04GL, Elephant CA-10100 12v, GMP France / 410-510Hz and others.
Photo report on removing the steering wheel yourself
First of all, read the material on removing the driver's airbag on a Priora. Then, when you have dealt with this, you can proceed further. Disconnect the power wires to the sound signal.
Then we put the head on 24 and rip off the nut, but don’t unscrew it completely yet. Before you start knocking it off the shaft, you need to mark the position of the steering wheel relative to the shaft - you can make marks on the steering wheel and casing.
When the nut is loosened, leave it on the shaft for now. Then we take and knock down the steering wheel from the reverse side, tapping it with medium force - on both sides.
When it comes off the splines, you can finally unscrew the nut and remove it from the shaft.
Carefully thread the horn power wires, as well as the airbag power wires, through a special hole.
And now the steering wheel is finally freed and you can remove it completely from the Priora.
If there is a need for replacement, then we perform it in the reverse order. Of course, the installation is carried out according to the marks that were originally set. The fastening nut must be tightened with a torque of 31 to 41 Nm. But you can take the average value and tighten it with a force of 40 Nm.
How to choose
Having decided to replace a relay or fuse in a Priora, take full responsibility for their selection and purchase. Under no circumstances should you buy cheap parts of unknown quality and origin.
It is better to give preference to original products produced by VAZ. As a last resort, buy relays or fuses from one of the well-known companies, such as Bosh, Hella or Tesla.
Replacing the sound signal on a Lada Vesta is a simple procedure that any owner should be able to perform. After all, driving without a properly working horn is a priori unsafe, and taking a car to a service station due to such a breakdown is an unreasonably large amount of time. However, replacement in the event of a malfunction is not the only need. Many people are simply not satisfied with the volume or tone of the sound signal, and they replace the standard Vesta components with alternative ones. Therefore, both of these paths need to be considered in more detail.
KIA Rio 2011 - electronics
Cars for sale
Kia Rio, 2008
Kia Rio, 2006
Kia Rio, 2011
Kia Rio, 2009
Life hack: Lada Priora immobilizer - standard alarm
Alarm on a Priora is a serious issue; everyone is afraid for their car, trying to protect it to the maximum. The Priora is equipped with an alarm system from the factory - an immobilizer (immobilizer). On a Lada Priora car, it allows you to partially protect the car from theft. The immobilizer on the Prior is a factory anti-theft device combined with the car's electrical package, which is located under the center console. Owners immediately try to disable the immobilizer on their Priora, because they consider it archaic and prefer to install a more advanced alarm system on the car instead of the standard anti-theft one. Installing an alarm on a Priora will cost approximately 10,000 -17,000 rubles.
Disabling the immobilizer on a Priora is not easy. The engine is started by an electronic engine control system, which also blocks its operation when the immobilizer is turned on. And already in the electronic control unit of the car, in the place where the EEPROM circuits are stored, the process of data exchange with the immobilizer takes place, and at the ECU level there is a ban or permission to start the engine. You can turn off the alarm on a Priora yourself, but this requires knowledge of electronics and special tools.
How to check the generator on a car without removing it? Our review
- When the engine is running, the light that monitors the battery charge is either constantly on or blinking.
- The battery spontaneously discharges or boils away;
- The headlights shine dimmer than they should;
- The operation of the motor is accompanied by rattling or a low, continuous squeak. Alternatively, the generator may howl;
- As the engine speed increases, the brightness of the headlights increases sharply. This phenomenon is considered normal when revving at idle speed. However, once the headlights reach normal brightness, the intensity should no longer change. If you accelerate - they burn brighter, release the pedal - they dim, which means the generator is clearly unhealthy.
- The generator drive belt is inspected. The degree of tension is controlled; If delaminations, tears or cracks are detected, the belt is immediately replaced. In some situations, more complex actions are not required;
- The fuse is checked - like any other, it quite often fails;
- Next, you need to make sure that the rotor rotates freely, the wires are not pinched or frayed anywhere, the contacts have not come loose, and the housing is not cracked;
- The charging relay is replaced with a new one - this is the easiest way to make sure that everything is in order with it. In most cases, a visual inspection cannot give complete confidence in its performance.
- The engine starts. The meter remains connected to the battery;
- All the electrics on board start to work randomly: the heater turns on, the headlights turn on/off, more gas is periodically given, you can turn on the audio system;
- During the described executions, testimony is taken. If the voltage remains stable between 14 and 14.2 V, your difficulties are not caused by the generator. If jumps of no less than 0.5 V are noticed (and usually they reach 1 V), you have a direct path to a specialist who will find what has gone wrong in this node;
- Bearings can fail (it is they that cause the whine and whistling of the generator); the reason for the non-working condition can be clogged or worn out generator brushes, worn or again clogged rings.
AutoFlit.ru
Types and causes of malfunctions
Statistics show that 70 percent of Lada Kalina car owners, to one degree or another, encounter problems associated with incorrect operation or complete failure of the horn. The fact is that the horn itself is installed between the radiator and the car body, so it is exposed to increased negative effects of an aggressive environment (dampness, high temperature, cold, icing). The main, main reason for the failure of the unit is the oxidation of contacts and conductive elements.
