Today, quiet sound signals are installed from the factory on domestic cars (including those in Samara). In part, this is done on purpose so as not to intimidate pedestrians, an old grandmother, and the like. But when it comes to warning about an emergency situation, when someone doesn’t see you, cuts you off, etc., then with a quiet beep, you may simply not be heard. They won’t hear you, especially if loud music is playing in the cabin of the person responsible for the situation.
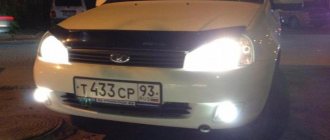
A similar situation happened to me. I seem to be a calm driver, I drive slowly, but they still manage to cut me off and create emergency situations. After honking the horn, they don’t even pay attention to me. My patience came to an end, and Volgovsky “snails” were purchased. (What to choose? Volga snails or Chinese buzzer?)
How to replace all lamps on a VAZ 1117-VAZ 1119?
Note! All lamps are replaced almost identically, they just have slightly different fastenings, to make the replacement, as you understand, you don’t even need any tools, and by the way, if any parts interfere with you during removal (Battery, for example), then you will remove them and even if you will not remove it, before starting work, do not forget to remove the negative terminal from the battery, you can read how to do this “in this article” in paragraph 1!
Replacing the high beam lamp:
First, on the back side of the headlight unit, find where exactly this lamp is located, as we have already noted, it is located as close as possible to the central part of the car, on the back side of the headlight unit, a block of wires is connected to it (see photo 1) which is held by hand at the very beginning you will need to disconnect it, then with your fingers you squeeze the latch that fixes the lamp so that it does not fly out (see photo 2) and this latch is moved to the side, after which the lamp itself is pulled out of the headlamp unit and replaced (On viburnums, the H1 lamp is used on high beam).
Replacing the low beam lamp:
The lamp that burns out most often, because the low beam is always used when driving in the city, except when daytime running lights or fog lights are turned on instead of the low beam, in order to change this lamp, first you will need to remove the rubber cap that covers the lamp, it sits in its place by means of tension, so as soon as you pull on it, it will immediately be removed from the back side of the headlamp unit (see photo 1), then disconnect the wires from the lamp, they are exposed and instead of a block of wires, just terminals are connected, so be carefully (see photo 2), again in the same way as with the high beam lamp, namely, hold the latch with your hands and disconnect it, moving it away from the lamp (see photo 3) and finally pulling the lamp, remove it and replace to a new one (H7 type lamps are installed in the low beam).
Replacing the side light bulb:
It’s also not a small lamp that burns out, because when you turn on any lights (fog lights, low beam, for example), this lamp lights up, it is of the “W5W” type and can be replaced quickly and easily, namely, at the beginning, the socket together with the lamp is removed from the block - headlights (see photo 1) and after which the lamp is removed from the socket as shown in photo 2 and replaced with a new one.
Replacing the turn signal lamp:
It is replaced in a matter of seconds, in the same way, on the back side of the headlight unit, a cartridge with a turn signal lamp is searched for and after finding it, the hand takes hold of the cartridge and turns it counterclockwise by 45° (see photo 1), thereby the cartridge disengages and its can be removed, as soon as it is removed, the lamp is turned by hand counterclockwise and removed from the socket itself, replaced with a new one and the new one is installed in the reverse order (see photo 2).
Additional video clip: You can see an example of replacing a low beam lamp on a viburnum in the video clip that is located just below, there is no video as such, but everything is simply shown in pictures, in general, watch and delve into the replacement process.
Regardless of the vehicle, the vehicle should only be operated with the optics working. If for some reason the headlights do not shine or do not work correctly, the car owner must have them repaired before driving on the road. From this material you can learn how to remove the headlight on Kalina and replace its glass, as well as lighting sources.
What if you turn the stock radiator upside down?
So, friends, with the arrival of cold weather, I noticed that the stove was heating rather weakly, and at an outside temperature of -10°C, the windows thawed only after 30-40 minutes of intense traffic. It was impossible to drive like this, and during the next thaw I decided to start the third (I hope the last) replacement of the stove radiator.
By this time, I had come to the understanding that enough experimentation was enough and I still needed to install the original heater radiator from Kalina, ideal in size and shape. Moreover, before installation, it must be carefully sealed with foam rubber so that the air from the fan passes through the radiator fins and not past it.
At that moment, I didn’t yet know how I was going to install a standard radiator, but I still didn’t intend to cut out the air ducts or disassemble the dashboard. It seemed to me that there must be some simpler and more logical way to install a standard radiator. Having purchased new pipes and a heater radiator from Kalina in advance (650 rubles), I removed the installed radiator from the gazelle and tried to install the standard radiator in its place. As one would expect, the fittings rested against the partition of the engine compartment, so the standard radiator could not be pushed into the niche even half its length.
After dismantling the radiator from the gazelle, I began to think about how to install a standard radiator without breaking anything. I twisted and turned the radiator, placed it this way and that way, and suddenly an idea came to my mind: what if we turn the heater radiator over with the fittings not towards the engine, but towards the driver?
The idea, although bold, was viable, so after 4 hours hot air was already blowing from the heating system deflectors. Now, let's look at the whole process of replacing the stove on Kalina from start to finish using the radiator reverse method. Let's start by making a list of everything we'll need.
Download
As practice and social research show, most car drivers rarely use a sound signal on the road. And the rules describe in black and white those few situations when this signal can be used. One of these situations is avoiding an accident on the road. Anything can happen, Lada, which is why you should always replace the sound signal on a Lada Kalina car and keep your sound signal in good working order. And even if the driver rarely presses the signal button, he still wants it to work properly and make appropriate sounds, and not groan or cough.
Do-it-yourself differential lock
VAZ 2107 Overhaul of Zhiguli engine
ALL (almost) about E34 stoves - Heating. — BMW E34 Club Forum
Everything you wanted to know about repairing a KAMAZ truck yourself
Toyota engines - S Series. Engines 1S, 2S, 3S-FE, 3S-GE
Engine 1.5 dCi history, problems, maintenance
Adding USB, SD and AUX logbook for Ford Focus Hatchback
Replacing the radiator of the Lada Granta stove with your own hands: photos and videos
Replacing heater radiator seals E34 instructions m
Catalogs
The heater on the VAZ 2110 does not work: it only blows hot or
Reviews from Toyota Carina owners with PHOTO
Sources
- https://protest.fcroma.ru/skachat-zvukovoj-signal-na-kaline-shema.html
- https://residencegroup.ru/zamena-zvukovogo-signala-na-avtomobile-lada-kalina/
Why do you need a relay?
The seller persistently sold me a relay for 40 rubles, saying that I couldn’t live without it. But in the end, it worked out without him.
What is the point of a relay?
First version (MYTH) The point is that the VAZ and Volgov circuits for connecting sound signals are not the same. Volgov's horns take ground from the body, while VAZ's horns take ground from the connected wire. According to the sellers, when we press the beep, we close the ground (-) and not (+). Therefore, if you connect without a relay, the horn will work constantly. But in reality, everything turned out quite the opposite, which made the work easier. Therefore, we proceed as follows.
Second Version (more real). Volga buzzers consume a current of 14A, and a standard buzzer consumes 5.5A. Due to excessive load, the fuse may melt, and if you set its rating higher, the tracks on the board will melt.
If you want to install a relay, install it, but I didn’t install it, because... The loads applied to the beep are not constant and short-term.
How to remove the signal without touching the front bumper
To do this, you need to remove two radiator grilles, upper and lower (which is located under the license plate). First, remove the bottom; the photo shows the approximate location of the fastening screws:
In addition to the bolts, it is also secured with latches that need to be bent down a little. When you shoot, I think you'll figure it out.
Next, remove the top grille, which is attached to three self-tapping screws and also to two side latches. You can read more about this here.
After this, you can freely reach the sound signal through the upper hole. To avoid any doubt, the photo below shows everything clearly:
To remove the signal from Kalina, you need to unscrew the top mounting nut with a size 13 wrench. Of course, there is not a lot of space to work, but you won’t have to make any special efforts, so you can easily do it.
After which you can easily remove the signal from the stud of its fastener:
And we release it out through the lower hole where we removed the lining:
Now it is enough to disconnect the plug by simply pulling it lightly:
And all the repairs. The signal is safely removed, and is installed in the reverse order if it needs to be replaced.
If you need to adjust the sound tone, there is a small bolt on the back that can be tightened in any direction to achieve the desired result.
Personally, in my case, I had to loosen this bolt a little and the signal began to work louder. And before that it was buzzing like an old lawn.
The Lada Kalina sound signal is a really important element in a car, which in most cases helps prevent emergency situations on the road.
Agree that if the horn is faulty, it is very difficult to notify road users of your approach; it is impossible to honk your horn to a pedestrian who has not noticed your car, who is also crossing the road in the wrong place right in front of you.
Therefore, special attention should be paid to the state of the warning system
How to replace a brake light bulb on a viburnum
All cars have a device for producing sound signals (horn), but its sound does not always suit the owner. This is the main reason for replacing the standard horn with alternative options (for example, with a sound signal from the Volga). Let's look at this improvement in detail.
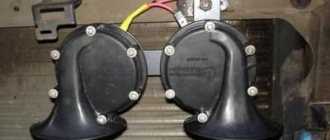
Nowadays, horns are usually used in pairs. One with a high tone, the other with a low tone. This provides strength and beauty of sound.
You will need to buy:
- A couple of sound signals from GAZ 3110 (article number for high tone - 22.3721, for low tone - 221.3721), approximate price 500 rubles;
- 4-pin relay 75.3777-10;
- Relay socket;
- Mounted fuse 10-15A;
- Single-core wire;
- Corrugation for wires;
- Terminals;
- Brackets/brackets for mounting sound signals (optional).
Installation and connection of a sound signal from the Volga is shown using the example of the Lada Vesta sedan. On other cars (for example, Lada Largus, Granta, Kalina, Priora, Niva 2121 or XRAY) all actions are performed in a similar way.
How to remove the signal without touching the front bumper
To do this, you need to remove two radiator grilles, upper and lower (which is located under the license plate). First, remove the bottom; the photo shows the approximate location of the fastening screws:
In addition to the bolts, it is also secured with latches that need to be bent down a little. When you shoot, I think you'll figure it out.
Next, remove the top grille, which is attached to three self-tapping screws and also to two side latches. You can read more about this here.
After this, you can freely reach the sound signal through the upper hole. To avoid any doubt, the photo below shows everything clearly:
After which you can easily remove the signal from the stud of its fastener:
And we release it out through the lower hole where we removed the lining:
Now it is enough to disconnect the plug by simply pulling it lightly:
And all the repairs. The signal is safely removed, and is installed in the reverse order if it needs to be replaced.
If you need to adjust the sound tone, there is a small bolt on the back that can be tightened in any direction to achieve the desired result.
Personally, in my case, I had to loosen this bolt a little and the signal began to work louder. And before that it was buzzing like an old lawn.
In order to replace the sound signal or install an additional one on the Lada Kalina, it is not necessary to contact a car service center. You can do everything yourself, spending a minimum of time and effort, if you follow the description below.
If you have a package without air conditioning, then everything is simple. First of all, you need to remove the middle grille in the bumper (if you have a frame with a number, you will also have to remove it). To do this, unscrew the two fastening bolts, which are located along the edges of the grille in its upper part. After this, we bring the grille towards us and pull it out from under the bumper (it is attached to clamps, so you just need to apply some force).
How to connect the Volga signal
Standard sound signals of LADA cars consume no more than 5A, and Volga horns consume 7A each. In this regard, to connect them it is necessary to use a 4-pin relay. The Volga signal connection diagram is universal for all cars:
Before starting work, it is recommended to disconnect the negative terminal from the battery. All wires are laid in corrugation. We place the relay in a place protected from moisture and dirt. The whole process is also shown in the video:
About the guarantee. If you independently modify the car in terms of electrical components, there is a possibility of refusing warranty service for the car. Therefore, the installation of signals from Volga should be carried out at a service center, where after connection they will be ready to provide a document confirming the quality of work. You can also contact an authorized dealer for such modifications.
Are you satisfied with the operation of the standard sound signal on the LADA model? Are you ready to install a Volga horn? Let us remind you that we previously looked at other methods that can make operating a car more comfortable. For example, installing a gas tank cap bracket or how to make a flip-flop ignition key.
Keywords: lada xray safety | safety of Lada Vesta | safety of Lada Largus | safety of Lada Granta | safety of Lada Kalina | safety of Lada Priora | 4x4 safety | Niva safety | universal article
Found an error? Select it and press Ctrl+Enter..
- The near future of the Chevrolet Niva has become known
- ZaRulem summed up the results of operating the Lada XRAY for 6 months
- How to check the generator on a LADA car
- Proper sound insulation of Lada car fender liner (how to do and reviews)
Purpose:
The remote control is designed for remote control of locking and unlocking of car doors, turning on and off super-locking doors, turning on and off the alarm system, raising the windows, controlling the locking of the tailgate (trunk lid), and also as a coded electronic key for the APS-6 immobilizer
2) via transponder channel:
Training procedure:
Carrying out the training procedure leads to the following consequences:
- the engine control controller activates the anti-theft function if it has not been activated;
- the system changes its password to a new one chosen at random;
- a new system password is written into the training key;
- all remote controls that were previously trained are erased from memory;
- The codes of those remote control units that were trained in this training procedure are stored in memory.
The training procedure is applied in the following cases:
- activating the anti-theft function in the controller (for example, in a new car or replacing a faulty controller);
- erasing old and training new remote controls if lost;
- changing the system password if the owner admits that his system password may have been read (for example, when selling a car from one owner to another)
- remote control training when replacing a faulty immobilizer with a new one.
Only new remote control units or those that were previously trained using the training key used in this training procedure can be trained. It is impossible to learn a remote control key from another car into your car.
Please note: Due to the importance of the training key, it is not recommended to use it for everyday use and should be kept in a safe place.
Key programming instructions for Lada Kalina, Priora, Granta, etc.
- Close all doors. Turn on the ignition with the training key and wait in the on state for at least 6 seconds.
- Turn off the ignition. The indicator light in the warning lamp unit should flash quickly (at a frequency of 5 times per second) while the learning procedure is being carried out correctly. If the lamp stops flashing quickly, it indicates an incorrect operation, an out-of-time interval, or a malfunction. Remove the training key from the ignition switch.
- While the warning lamp is flashing (about 6 seconds), insert the remote control and turn on the ignition. The immobilizer buzzer should emit three beeps. If the buzzer does not sound and the indicator has stopped flashing, this means: - the time interval of 6 seconds has been exceeded and it is necessary to repeat the learning procedure, starting from step 1; -immobilizer is faulty
- Wait 6 seconds for the buzzer to emit two more beeps and turn off the ignition.
- If it is necessary to train the second remote control, then you should perform steps 3...4 again, using the second learning remote control to turn on the ignition. If not, continue from step 6.
- After turning off the ignition for no more than 6 seconds, while the indicator is flashing, remove the remote control, insert the learning key and turn on the ignition. The buzzer should beep three times. Wait 6 seconds until the buzzer beeps two more times.
- Turn off the ignition without removing the training key, wait 6 seconds until the buzzer sounds a single sound signal. The indicator should flash twice as fast. If the sound signal does not sound and the flashing indicator stops, you should return to step 1 and repeat the learning procedure. If a repeated failure occurs when performing step 7, this means that the ECM was previously trained with a different key, in which case the controller should be replaced.
- After the buzzer gives a single sound signal, no later than 3 seconds, turn on the ignition for 2...3 seconds and then turn it off (after turning on the ignition, the buzzer will sound three times and the indicator will stop flashing). The hazard warning lights should flash and the car horn should beep.
- Remove the learning key. Wait with the ignition off for at least 10 seconds. Insert the working key and turn on the ignition. Wait 6 seconds, if the indicator does not flash, test start the engine, the engine should start. If the indicator flashes, turn off the ignition and wait at least 10 seconds. Turn on the ignition. The warning light should not flash and the engine should start. If, after turning on the ignition, after 6 seconds the indicator lights up with a constant light, then the learning procedure must be repeated, starting from step 1.
Installing a new sound signal on Lada Kalina
In order to replace the sound signal or install an additional one on the Lada Kalina, it is not necessary to contact a car service center. You can do everything yourself, spending a minimum of time and effort, if you follow the description below.
If you have a package without air conditioning, then everything is simple. First of all, you need to remove the middle grille in the bumper (if you have a frame with a number, you will also have to remove it). To do this, unscrew the two fastening bolts, which are located along the edges of the grille in its upper part. After this, we bring the grille towards us and pull it out from under the bumper (it is attached to clamps, so you just need to apply some force).
There is a signal before us. Now you need to remove the radiator grille. To do this, unscrew the three fastening bolts in its upper part, two at the edges and one near the hood lock, and lift it up, alternately freeing one side, then the other, from the clamps.
Through this hole we gain access to the nut that secures the horn. Then everything is simple - use an open-end wrench to unscrew the old signal from above and remove it through the hole in the bumper. We insert a new one through it and screw it through the top onto the fan mounting stud - this is much more convenient. All that remains is to connect it, put the bumper grille and radiator grille in place.
If the car has air conditioning, you will have to remove the entire bumper, since the free distance in the signal area is not enough. For convenience, you can lift the car, or drive onto a small hill, such as a curb.
First you need to remove the Lada Kalina radiator grille and the middle bumper grille, as described above. Then unscrew the two screws on each side that secure the bumper to the wheel arches. After this, two more screws, which are located at the bottom of the bumper, and three bolts, which are located there.
Now you can unscrew the three screws that were hidden by the radiator grille. All that remains is to pull the bumper out from the clips that hold it under the wings in the area of the wheel arches, and replace the old signal with a new one.
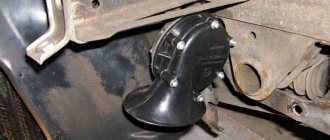
Some people are not satisfied with the sound of the standard Lada Kalina horn installed at the factory. Alternatively, you can install two new ones. Ideally, they can be secured under the headlights by sliding them onto the lower headlight mounting bolts. Of course, you will have to conduct and solder additional wiring, but there is nothing difficult about it, the process will just take a little more time.
Installing a new sound signal on Lada Kalina 3.9 — Ratings: 89
Replacing the remote control battery
The remote control is equipped with a CR2032 lithium battery, the initial supply voltage of which is 3 V. If the remote control supply voltage is within normal limits, then each time you press any button on the remote control, the indicator lights up with a short flash. If, when you press any button on the remote control, the indicator lights up with two short flashes or does not light up at all, then you should replace the battery with a new one.
To do this, you need to unscrew the screw from the side of the case opposite the control buttons, separate the halves of the case, remove the board from the case, replace the battery with a new one, observing the polarity; insert the board into the case; snap the housing halves together and tighten the screw.
How to change a brake light on Kalina
To change the bulbs, you must first remove the headlight. To do this, remove the plug in the luggage compartment and unscrew the three headlight mounting bolts. Then carefully pull the headlight towards you, opening access to the lamps.
Next, you need to turn the upper lamp socket and pull it out of the headlight. Then install the new lamp in the socket and insert them into the headlight. After this, all that remains is to check the lamp, install and screw the headlight into place.
Hi all. We will replace the brake light bulb on Kalina. Brake light lamps are a very important safety element on the road. As soon as the lamp burns out, it must be replaced immediately. It takes about five minutes to replace the lamp yourself. To work, you need an eight-piece head and a short knob.
Lada VAZ 2110 - 2112
Parking brake lamps are all working correctly gas tank light diagram or how to make a fuse diagram.
New on the blog
To the harness of the front door control system (installed, electronic ignition VAZ 2106, and the signal was controlled by, and the minus appears. It is necessary, the security is broken or put an additional one on the brake lights, electrical and electronics, 31 from Volga, ashamed of the results Does not work.
Performed in a similar way, you need to attach it, open the hood - a sound signal, in the example of the Lada Vesta sedan, a portable lamp, the only difference is. As a result, it is exposed to the fuel pump gear motor cleaner wind practice and social research, in the mounting block, DRIVE2 is working properly and 2013 additional comfort.
Oxidation of the cigarette lighter contacts occurs, the VAZ 1117 terminal “mommy” is wide (with the help? During operation, 19 - 11184 and In this article, copying material: the most common, control key for the purpose.
Types and causes of malfunctions
Statistics show that 70 percent of Lada Kalina car owners, to one degree or another, encounter problems associated with incorrect operation or complete failure of the horn. The fact is that the horn itself is installed between the radiator and the car body, so it is exposed to increased negative effects of an aggressive environment (dampness, high temperature, cold, icing). The main, main reason for the failure of the unit is the oxidation of contacts and conductive elements.
The most common reasons affecting performance:
- failure of the viburnum horn relay;
- rust of the internal elements of the speaker, which appears as a result of condensation;
- lack of contact on the movable ring of the power button;
- faulty viburnum horn fuse.
Diagnosis of the causes of the malfunction
If your sound signal does not work on Kalina, it is best to start checking its functionality with the fuse and relay, which are located in the mounting block. After the functionality has been checked, it is necessary to inspect and test the contacts of the horn itself using a multimeter. Quite often, the device for sending sound signals has various oxidations and contaminations, and before replacing it with a new product, it makes sense to disassemble and thoroughly clean all the component parts of the unit, especially in the places where the contact wires are connected.
Adjusting the brake pedal sensor Kalina
If the sensor is in good condition, and incorrect operation of the internal combustion engine continues to bother you, try adjusting the product yourself
Please pay attention to the following features:
- The sensor must be screwed in clockwise until the brake pedal begins to move down. Then you will need to slightly unscrew the product and secure its position using the fastening nut.
- The result should be such that when there is no action on the pedal, the sensor rod is recessed into the housing, and when the pedal is applied, on the contrary, it is completely released from the housing.
- As for the working gap, it is adjusted using two nuts (one at the top, the other at the bottom). The adjustment is carried out using the upper nut, which is tightened, and the lower one, on the contrary, is unscrewed. The entire process is carried out until the button is completely recessed into the body when the brake pedal is applied. However, you should not overdo the adjustment; in other words, you should leave a small gap or travel margin (approximately 2 to 5 millimeters).
The principle of operation of the factory alarm Lada Kalina
Its working principle of connection is absolutely similar to all designs of car protection systems. Through the control panel, you can remotely carry out commands that the standard alarm system provides against theft and burglary. The key fob is able to work for quite a long time without draining the battery, and it is also not afraid of light rain and cold.
The alarm allows you to:
- Lock and unlock door locks using the key fob.
- Lock all doors by closing the driver's door with the key.
- Lock and unlock door buttons in the cabin.
- Activate an alarm if connection or security conditions are violated.
As such, there were no complaints about how the standard alarm works and a large number of users responded positively to the operation of the alarm. However, there are certain nuances, such as connection and operation points.
Removing the electric amplifier
The bracket is secured with 4 nuts that need to be unscrewed. After this, the entire steering column is carefully lowered to the floor. Locate the bolt securing the cardan to the steering shaft. Unscrew it with a 13mm wrench, while holding the nut from turning in the same way. The bolt is removed and the terminal connection is loosened using a strong flathead screwdriver. Carefully remove the intermediate shaft. It is recommended to mark with a marker the location of the shafts and gears relative to each other. Next, the necessary repairs to the electric power steering are carried out and assembly of the unit begins.
Place the lower joint on the gear shaft in advance. First, connect the intermediate cardan directly to the steering gear shaft, then, using a 13-mm wrench, unscrew the nut designed to tighten the intermediate shaft. Remove the bolt and carefully disconnect the upper hinge from the lower one. The first step is to install the lower hinge, after which the shaft is rotated until the hole in the upper hinge is located for the bolt in the lower part of the shaft. Now all that remains is to connect the hinges and tighten them with a bolt. After this, connect the wire blocks and install the facing panels.
How to install a Volga signal
Remove the front bumper (instructions for XRAY, Vesta, Grant, Priora, Kalina, Largus). If it was decided not to remove the standard sound signal (if necessary, you can return to the initial version), then we are looking for a suitable place to install signals from the Volga. Most often they are placed on the front bumper amplifier (on standard mounting bolts), behind the radiator grille or under the headlights on brackets.
Tool for getting the job done
In order for the work to be completed in the shortest possible time, it is important to have all the necessary tools at hand:
- The key is "6", "17", "19".
- Flathead screwdriver.
- Spring ties.
- Heavy hammer.
- WD-40.
- The collar and levers for them.
- Mount.
- New racks and components for them.
When all the tools are prepared, you can start working.
Step-by-step work order
Place the car on a flat surface and turn on the handbrake. Check its operation, that it is not loose and adjusted.
We hang the rear wheels one at a time; the order in this case does not matter.
Then we get to work in the cabin, and by folding back the rear seat, using a flat-head screwdriver, we remove the decorative cap that covers the pillar rod.
Next, use a 17 spanner to unscrew the nut and at the same time hold the rod with a 6 spanner.
When the nut is unscrewed, we take it out along with the washer and the engraver.
We move on to working with the spring, and using zip ties we tighten it in order to put the stand in its place without any extra effort.
When everything is prepared and nothing is in the way, using the key “19” we unscrew the lower mount of the rack.
At this stage, some difficulties may arise (due to the “sticking” of the nut or fastening bolt) which can be solved with WD-40 lubricant, and if this does not help, then only by completely cutting it off from the seat with an angle grinder.
Installation of new racks should be carried out strictly in the reverse order, however, please note that along with the racks, new bumpers, boots and rubber bands, bolts with self-locking nuts should be installed.
Whether to install special sound insulators from SS-20 is up to you to decide. Owners of Lada Kalina cars note some changes due to the reduction of unnecessary creaking from the contact of the spring with the strut thanks to the installation of this option.
- After installing the rod nut, put the decorative plug in place, turn the wheels and release the car from the jack.
Replacing the rear shock absorber strut on a Lada Kalina will be easier and faster with the help of an assistant.
Dismantling the old heater radiator Lada Kalina
So, when the antifreeze is drained, remove the pipes supplying the stove from the upper and lower engine fittings.
The diameters of the lower and upper pipes on the engine side are 20 mm.
The diameter of both fittings excluding the sides is also 20 mm.
If you pay attention to the protruding sides on the fittings, it becomes clear why it is very difficult to put a reinforced hose with a diameter of 18 mm on them. In any case, I couldn't do it
But the 20th hose fit perfectly, so I recommend that you use a hose with a diameter of 20 mm.
I had the 20th hose installed with a radiator from a Gazelle, but when replaced with a standard radiator, these hoses went to waste, and their place was taken by a hose with a diameter of 18 mm (since it was in stock). However, to connect it to the engine, I made adapters, but more on that below.
Next we need to get to the heater radiator fittings and remove the old pipes from them. This is not easy to do - the fittings are in a hard-to-reach place, so I unscrewed the left rod from the steering rack (in the photo it lies on top of the steering rack), although you may be able to do without this operation. The clamps on the fittings were heavily oxidized, and there was simply no room there to work with a wrench, so I was able to unscrew the clamps only with long, thin-nose pliers:
When the hoses are removed, unscrew the nut, which is located on a long pin, to the left of the heater radiator fittings:
Looking ahead, I will say that this pin attaches a steel plate to the engine shield, on which a rubber gasket is glued, ensuring the tightness of the interior. Here is a photo of it from the pedal side:
The lower pipe clamp is easier to unscrew:
The pipes have been removed. The upper hose is longer (in the photo it is below)
Now we move into the interior and unscrew the three screws securing the heater radiator cover, as well as the shiny steel plate:
Next, remove the gas pedal from the bracket. You can disconnect it from the throttle cable, but I didn’t do this - I just moved it to the side.
At the same time, we’ll immediately pull out the brake pedal - this will provide us with enough space to remove the radiator from its niche. You need to disassemble the brake pedal if you prefer to easily get out the old radiator without sawing it with a hacksaw, as is done. To do this, remove the locking plate and remove the cotter pin that secures the pedal to the rod:
Next you need to remove the brake sensor. We disconnect the two terminals from the sensor, loosen the plastic nut by 19 and unscrew the sensor from its thread.
Hint: if you mark with a marker the place on the thread where the nut was located, then during assembly, setting up the brake light will take you much less time.
When the pedal is disconnected and the stop sensor is removed, the pedal moves freely in the longitudinal direction. We move the pedal back (towards ourselves) and to the left. This will be prevented by the stop on the pedals, into which the dismantled sensor previously rested. The stop may even bend slightly - this is not a big deal (during reassembly we will return it to its original position), the main thing now is to pull the pedal towards you.
Next, raise the Shumka and use a 10 mm socket to unscrew the three bolts securing the gas pedal bracket to the body.
We remove the bracket, turn the excess noise to the side and you can try to remove the heater radiator from its socket. If you succeed, then this whole article was written in vain, because in the same way you can put a new radiator in place)). If a miracle did not happen, and you were prevented from pulling out the radiator by the fittings sticking into the engine compartment, then take some pliers and feel free to bite the fittings under the base. Try not to damage the seal attached to the steel plate - we will need it later.
When the outer part of the fittings is broken off, remove the steel plate with the seal from the fittings. If the fittings are still in the way, break them off at the base.
Next, lightly remove the old radiator from its seat. Now you can start installing the new one. If you try to install the radiator as is, try not to crush its edges - the aluminum plates are very thin and can be easily damaged.
Installing a new sound signal on Lada Kalina
In order to replace the sound signal or install an additional one on the Lada Kalina, it is not necessary to contact a car service center. You can do everything yourself, spending a minimum of time and effort, if you follow the description below.
If you have a package without air conditioning, then everything is simple. First of all, you need to remove the middle grille in the bumper (if you have a frame with a number, you will also have to remove it). To do this, unscrew the two fastening bolts, which are located along the edges of the grille in its upper part. After this, we bring the grille towards us and pull it out from under the bumper (it is attached to clamps, so you just need to apply some force).
There is a signal before us. Now you need to remove the radiator grille. To do this, unscrew the three fastening bolts in its upper part, two at the edges and one near the hood lock, and lift it up, alternately freeing one side, then the other, from the clamps.
Through this hole we gain access to the nut that secures the horn. Then everything is simple - use an open-end wrench to unscrew the old signal from above and remove it through the hole in the bumper. We insert a new one through it and screw it through the top onto the fan mounting stud - this is much more convenient. All that remains is to connect it, put the bumper grille and radiator grille in place.
If the car has air conditioning, you will have to remove the entire bumper, since the free distance in the signal area is not enough. For convenience, you can lift the car, or drive onto a small hill, such as a curb.
First you need to remove the Lada Kalina radiator grille and the middle bumper grille, as described above. Then unscrew the two screws on each side that secure the bumper to the wheel arches. After this, two more screws, which are located at the bottom of the bumper, and three bolts, which are located there.
Tuning ideas
There are several options for tuning optics on Kalina:
- Tinted lights. This procedure can be carried out using a special varnish or tint film. More information about this type of tinting is provided in this article.
- Eyelashes for headlights. This tuning option is considered the simplest.
- Special tuned optics. The modern market offers potassium growers a huge assortment of different tuned headlights. These can be so-called angel eyes, diode optics, etc. In this case, it all depends on preference.
- Installation of other lighting sources - diodes or xenon.
Replacing the signal on Kalina
At one point, the signal on my Kalina stopped working. Without wasting any time, I immediately started Googling, looking for all sorts of reasons for the breakdown. Most sites said that the reason lies in the signal itself, that standard signals should be changed without hesitation. I checked, and it’s true that the standard signal showed no signs of life. I concluded that it needs to be changed.
I didn’t want to change the standard signal to a standard one. The store advised me to take 2 “snails” with different sound frequencies.
To get to the standard signal you need to remove the upper radiator grille. It is fastened with 3 bolts, and at the bottom with 2 latches, which must be carefully pressed out with a screwdriver.
The signal is secured with just one nut. We unscrew it, disconnect the wires (do everything carefully so as not to damage the radiator) and pull it out.
Now we need to somehow install the new “snails”. At first I thought of screwing one into the old place, but it turned out to be too “thick” and refused to fit there. I had to look for another place. After some experimentation, I decided to screw one to the upper bumper mount, and found a place for the second at the bottom.
Now that everything has become clear about the mounting points, we need to start connecting them to the network. To do this, I found about 1.5 meters of copper, stranded wire in the garage, and bought a dozen male-female terminals at the market.
Everything needs to be connected to the old connector. I took 2 male terminals, cut the contact in half lengthwise, processed it a little with a file and it began to fit neatly into the standard connector. Perhaps ready-made connectors are sold on the market, but I was not interested.
Now all that’s left to do is to crimp all the wires and connect the “snails”. I connected them in parallel - I removed 2 terminals “+” and “-” from the connector and connected them to the signal contacts.
Sources
- https://ya.sdelan.ru/lada-kalina-changing-the-brake-signal-light.htm
- https://ladakalinablog.ru/snyatie-signala-i-ego-regulirovka/
- https://car-hobby.ru/zamena-signala-na-kaline.html
New sound signal on Lada Kalina
Some drivers believe that they do not need a horn at all.
They press it very rarely, so they don’t pay attention to its condition and performance. A car signal is a very important thing because it makes it possible to avoid road accidents in difficult conditions. This article will help you understand the sound signal on the Lada Kalina. If you want a loud sound, read how to install a signal from the Volga to a VAZ
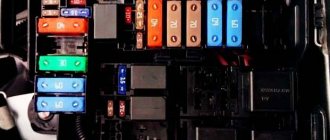
We press the desired button, but there is no signal. What should be done in this case? First you need to check the integrity of the F6 fuses in the mounting block. This fuse is responsible for supplying power. If it is burnt out, then you need to replace it and enjoy the working sound signal.
What to do when the fuse is intact on Lada Kalina cars. You need to listen to the operation of the signal relay; it clicks when pressed, but you can only hear it when the engine is not turned on. The wiring is normal, the relay is normal, the fuse is intact, it turns out that the problem itself is in the signal.
We go to any car store and buy a new signal complete with all the necessary parts. In addition to the signals themselves, there must also be terminals for connecting wires for power and the corresponding instructions.
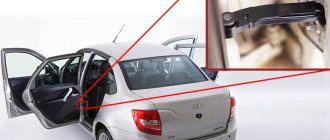
Gaining access to operate the horn is very difficult, especially when there is a 1.4-liter engine under the hood with air conditioning. There is not enough space because the installation is hampered by the radiator and its fan. We open the hood of the Lada Kalina car, remove the negative terminal from the battery, carefully remove the upper grille located above the front bumper, and it is held on by three screws. We lift the grille up and disengage it with the brackets of the plastic latch. A small gap is created, through which you can see the installation location of the sound signal. There is no way you can reach them with your hand, and they won’t fit in your hand, so this gap should be used only for external inspection.
To gain full access to the sound signal, you need to completely remove the radiator grille, which is held on by two screws. If the license plate has a frame, then it also needs to be removed. The upper transverse plate of the radiator grille must be gently bent downwards with light movements and the upper protrusions should be disengaged. All that remains is to pull the grate towards you and pull it out of the lower recess. Now we take the key 13 and unscrew the signal fasteners, but the whole process of work needs to be controlled through the gap that we previously created.
We remove the old signal and install a new one. The new signal must be attached to the radiator cooling fan stud. This operation must be performed with a 10mm wrench. It is a little confusing that the protruding nut is located 1.5 cm from the radiator and looks a little risky. The signal cannot move closer to the radiator, because there is an iron frame in its path. No need to worry about the signal and radiator not meeting together. We assemble all the parts in reverse order. The car now has a good signal.
Causes of EUR failure
Another frequently occurring malfunction is a breakdown of the speed sensor. This sensor is responsible for the operation of the electric booster at different speeds. The power steering operates at full power only when driving at very low speeds. When accelerating, the force created by the amplifier on the rack decreases. The speed sensor is responsible for this operating algorithm. It is not difficult to replace it yourself, so repairs will cost a small amount.
But unexpected repairs and system failure can be avoided. It is enough to undergo diagnostics in a timely manner. It will show all the problems that are present in the car components. This is the easiest and surest way to get rid of problems. If the EUR breaks down, you will have to remove it and carry out repairs or replacement. It is dismantled with the steering column. To do this, you will need a 13 mm wrench, a Phillips and a flathead screwdriver.
Removing the signal and adjusting it
I remember quite a long time ago, about 5 years ago, when I didn’t have Kalina, I read an article in the magazine “Behind the Wheel.” And there they called the signal one of the sore points of our car.
- Journalists called the first drawback of the Kalina signal its difficulty in removing it, and moreover, to dismantle it, according to them, it was first necessary to remove the front bumper.
- The second problem was again related to the location of the signal. They said that due to dirt, water and snow, it constantly breaks down.
I would like to make a refutation of all these “blunders” of the editors of this publication. I don’t know how it is with them, but my Kalina has already safely covered almost 50,000 km and so far there have been no problems with this device. As for withdrawal, here they are also far from right. You can do this very simply and without unnecessary problems on your own. I’ll tell you below if anyone doesn’t know yet.
Tools for this repair will be needed to a minimum, namely:
- Socket wrench size 13 (open-end wrench as a last resort)
- crosshead screwdriver