The rear lights on the Lada Kalina Hatchback are designed in such a way that to replace the bulbs it is necessary to almost completely remove it. To do this you will need a minimum of tools, namely:
- 10 mm head
- extension
- ratchet or wrench
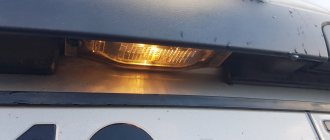
So, first of all, we open the tailgate (trunk lid), and from the inside you need to find those places where the nuts securing the rear light to the car body are located. One of them is shown in the photo below, made in the form of a special technological window in the casing:
And the second is located on top under a plastic plug, which must be removed by pressing two latches on the edges and pulling it towards you:
And now unscrew two nuts, one on top:
And the second one at the bottom through the same hole in the trunk upholstery:
Now you can move the rear light a little to the side by pulling it from the outside with a little force:
And from the back of it, you can without any problems remove the lamp that needs to be replaced, be it a hundred-signal, reverse, turn signal or marker. The cartridge itself is quite easy to remove; just turn it slightly counterclockwise.
To remove the light bulb itself, you need to press it lightly and also turn it counterclockwise.
After replacing, we put everything in its place and tighten the nuts into place. If you have any questions, please ask below in the comments.
It may be necessary to remove the rear light of the Lada Kalina 2 in case of its breakdown, replacement of lamps, or for modification and tuning of the light. The process is not complicated and will not take more than 20 minutes.
Required : 8mm socket wrench.
Procedure for the Lada Kalina 2 hatchback car:
- Open the trunk door and unscrew the 2 bolts securing the light.
- Pull the light back, removing the two clips from the holders on the body.
- Remove the lamp sockets from the lamp body by turning them counterclockwise.
Procedure for the Lada Kalina 2 station wagon:
- Open the hatch in the trunk trim.
- Disconnect the block with the tail light wires.
- Unscrew the 3 fastening nuts.
- Pull the flashlight back, disengaging it from the lock.
- Remove the lamp sockets from the lamp body by turning them counterclockwise.
Replacement Instructions
The procedure is performed in any convenient place - in an open street area or in a warm garage with good lighting, if we are talking about the cold season. No special tools or equipment are needed. To remove the low beam lamp, carry out a number of preparatory operations:
- Disconnect the battery from the on-board network by removing the terminal with the “—” (minus) sign.
- Clear access to the headlights from the engine compartment.
- Lighting devices are hidden in plastic headlight housings, covered with caps at the back. Once you reach the box, remove the round protective cover.
Usually, parts of the power unit - the air filter housing, pipes and coolant expansion tank, and various plastic linings - prevent you from reaching the light bulbs by hand. In some car models, access is blocked by the battery itself, so it will have to be removed.
The engine compartment of a modern car is filled extremely tightly with blocks and assemblies. When you reach the back of the headlight with your hand, you will not be able to look into the hole at the same time - you need to work by touch. Hence the recommendation: take a photograph of the light bulb mounting assembly with a smartphone equipped with a camera.
Step-by-step instructions for replacing a light bulb in most passenger cars look like this:
- After removing the rubber plug, grab the terminal block where the power wires are connected with your hand. Gently shaking it left and right, remove the connector from the lamp contacts.
- The metal base of the light bulb is pressed into the socket by a wire retainer. Press the loop (or bracket) end of it and slide it down or up to disengage the spring from engaging the lugs.
- The other end of the latch is fixed to the bracket. Move the bracket to the side and pull out the lamp, remembering the position of the housing. There is no need to rotate the base during removal.
To change the low beam bulb, wipe the new element with a rag and carefully insert it into the socket, holding it by the base. You cannot touch the glass flask with your bare hands - grease marks will remain. It is better to wear a thin fabric glove. Then return the latch to its place and snap it into the eyes, after moving it in the desired direction.
The last step is to connect the contact connector and install the plug. When finished, assemble the removed parts, connect the battery and check the functionality of the new low beam element. If it burns noticeably brighter than the other working headlight, it is worth changing the second lamp.
Disassembling the headlights of Lada Kalina (Kirzhach)
You will need: hair dryer, utility knife, flat screwdriver.
Removing the glass of these headlights without breaking it is not an easy task, requiring time (sometimes up to 6 hours) and patience. The difficulty of disassembly is that the sealant in this case is more “difficult”. Often, heating it with a hairdryer causes the plastic of the headlight housing to melt faster, so many people resort to other disassembly methods. For example, heat the entire headlamp unit in a cardboard box using a technical hair dryer to a certain temperature. After this, the sealant will easily give in under a little pressure from a screwdriver.
If you don’t have a hairdryer at hand, then a regular oven may come in handy. Turn it on at 150-160C and wait 5 minutes. Then put the headlight in the oven on a wooden board and bake it for about 15 minutes. Then, wearing gloves, we pull out the headlight with a slightly softened sealant, and using slotted screwdrivers of different sizes, we pry the glass around the entire perimeter of the headlight. The black plastic that runs along the perimeter will change its original shape, you should not be afraid of this, since it will then level out. After about 10 minutes, the sealant will begin to harden, so we work quickly. Did not have time ? Not then, we take the headlight into the oven again (this procedure can continue up to 10 times). We remove the mask (backing) of the headlight by unscrewing all the adjusting bolts (star) from the outside. After disassembly, you can begin tuning Kalina's headlights.
Car owners often wonder how to remove the headlight on Kalina in order to replace it with a new one, install a lens, LED eyelashes, or clean the reflector. To dismantle the optics, you need to remove the bumper, so you should prepare your tools and make sure there is enough space for work.
Options for tuning lighting devices
The most common variations of tuning Lada lighting products are:
- tinting;
- installation of an additional brake light.
Car headlights are tinted by painting or wrapping with film. The most popular among drivers is the 2nd method, because the film does not reduce the lighting intensity so much. In addition, covering a lantern with film can be faster and better than conventional painting.
Tinted tail light
For the coloring process you will need:
- hair dryer (household or industrial);
- plastic scraper;
- unstained scraps of tissue (the structure of tissues of living organisms is studied by the science of histology)
; - vinyl film (1 square meter is enough);
- stationery knife;
- water sprayer.
It is possible to carry out the tinting process without removing the lighting, but performing similar work at the highest level is only possible for trained specialists. It would be better to first dismantle the products according to the usual scheme.
After this, you need to clean the components from dirt, spray water (if indicated in the instructions for the film) and apply vinyl. To give it the desired shape, heat it with a hairdryer, and then smooth it with a scraper, removing excess water. Cut the film with a knife and wait for it to dry. The whole process will not take more than an hour. Remember that applying paint or film will affect the brightness of your lighting, so you may need to install the brightest light bulbs.
An example of painting the lights on a VAZ 2109
Often, to increase safety on the road, Lada drivers decide to install an additional brake light in the rear. To do this you will need:
- knife or ratfil;
- key to 8;
- LED strip;
- glue;
- soldering iron;
- wiring;
- sealed substance.
In case of installing additional devices, it is not necessary to dismantle the Lada bumper - just stick your hand under it at the location of the light sources and unscrew the appropriate nut with a size 8 wrench.
After this, disassemble the reflector: cut off the layer of sealant with a sharp knife and clean the edges with ratfil. Next, take the LED strip, cut it into pieces and place it on the glue inside the reflector. Connect the wires coming from the tape to the lighting system using a soldering iron. After installation, check the correct connection by turning on the brake lights. If you did everything correctly, assemble the reflector using a sealed substance. Pull the wiring coming from the tapes through the rubber in the reflector body. Wait for the sealant to dry. Route the wiring to the left (right) side of the car, depending on the installation location of the first reflector. Route the wires into the luggage compartment, first removing the plug. After this, connect the brake light to the flashlight wires, isolate the wiring and check the operation.
Source: okuzove.ru
How to replace all lamps on a VAZ 1117-VAZ 1119?
Note! All lamps are replaced almost identically, they just have slightly different fastenings, to make the replacement, as you understand, you don’t even need any tools, and by the way, if any parts interfere with you during removal (Battery, for example), then you will remove them and even if you will not remove it, before starting work, do not forget to remove the negative terminal from the battery, you can read how to do this “in this article” in paragraph 1!
Replacing the high beam lamp:
First, on the back side of the headlight unit, find where exactly this lamp is located, as we have already noted, it is located as close as possible to the central part of the car, on the back side of the headlight unit, a block of wires is connected to it (see photo 1) which is held by hand at the very beginning you will need to disconnect it, then with your fingers you squeeze the latch that fixes the lamp so that it does not fly out (see photo 2) and this latch is moved to the side, after which the lamp itself is pulled out of the headlamp unit and replaced (On viburnums, the H1 lamp is used on high beam).
Replacing the low beam lamp:
The lamp that burns out most often, because the low beam is always used when driving in the city, except when daytime running lights or fog lights are turned on instead of the low beam, in order to change this lamp, first you will need to remove the rubber cap that covers the lamp, it sits in its place by means of tension, so as soon as you pull on it, it will immediately be removed from the back side of the headlamp unit (see photo 1), then disconnect the wires from the lamp, they are exposed and instead of a block of wires, just terminals are connected, so be carefully (see photo 2), again in the same way as with the high beam lamp, namely, hold the latch with your hands and disconnect it, moving it away from the lamp (see photo 3) and finally pulling the lamp, remove it and replace to a new one (H7 type lamps are installed in the low beam).
Replacing the side light bulb:
It’s also not a small lamp that burns out, because when you turn on any lights (fog lights, low beam, for example), this lamp lights up, it is of the “W5W” type and can be replaced quickly and easily, namely, at the beginning, the socket together with the lamp is removed from the block - headlights (see photo 1) and after which the lamp is removed from the socket as shown in photo 2 and replaced with a new one.
Replacing the turn signal lamp:
It is replaced in a matter of seconds, in the same way, on the back side of the headlight unit, a cartridge with a turn signal lamp is searched for and after finding it, the hand takes hold of the cartridge and turns it counterclockwise by 45° (see photo 1), thereby the cartridge disengages and its can be removed, as soon as it is removed, the lamp is turned by hand counterclockwise and removed from the socket itself, replaced with a new one and the new one is installed in the reverse order (see photo 2).
Additional video clip: You can see an example of replacing a low beam lamp on a viburnum in the video clip that is located just below, there is no video as such, but everything is simply shown in pictures, in general, watch and delve into the replacement process.
Regardless of the vehicle, the vehicle should only be operated with the optics working. If for some reason the headlights do not shine or do not work correctly, the car owner must have them repaired before driving on the road. From this material you can learn how to remove the headlight on Kalina and replace its glass, as well as lighting sources.
The position of the lamps in the Kalina rear light
- Reverse;
- Brake signal;
- Turn indicator;
- Side and fog lights.
Comments (22)
Not much in Kalina's ointment; replacing the low beam bulbs in the left headlight can only be done by removing the washer reservoir. And if there is also an air conditioner with ABS, then a similar procedure in the right headlight can only be done by removing the entire headlight))))
oh, how strange, why is this not mentioned in the repair manual?
and in 3 minutes I replaced the near lamp. And before that, I couldn’t remove the burnt one for a long time. You can make sure that the lamp is positioned correctly by looking at the outside of the headlight (the first time I managed to place it incorrectly). I wish you all good luck.
Is it possible to press somewhere, or is there something stuck there? How to remove it from there more carefully?
I'm trying to change the left rear marker. I unscrewed the headlight unit (Kalina, station wagon), the headlight socket cannot be removed! It rotates freely, back and forth, but does not come out, it sits tightly. Turn and reverse - can be removed without problems.
Is it possible to press somewhere, or is there something stuck there? How to remove it from there more carefully?
just turn the cartridge counterclockwise and pull it out
Which fogs to choose for Kalina?
Before installing fog lights on Kalina 2 or 1, you need to decide on the type of optics and its manufacturer. Every car enthusiast who has ever connected a PTF knows that a lot depends on the manufacturer and type of optics. For Lada Kalina cars of the first and second generation, you can find many types of headlights on sale. Moreover, they differ from each other not only in type and manufacturer, but also in the efficiency of the glow, as well as in the configuration.
It will be useful What can replace cuticle oil
Connection diagram of optics with relay and button
The most common manufacturers of PTF for Kalina:
- the domestic company Kirzhach is one of the most trusted manufacturers, which boasts decent quality fogs;
- Luch is another domestic brand that has earned the trust of our compatriots;
- Bosch is a world-famous company that produces not only PTF, but also many other types of parts and components for cars;
- Prosport is a Chinese brand that entered the domestic market not so long ago.
As for the varieties, the optics may differ in appearance:
- headlights can be double;
- round shape;
- in the shape of a square;
- oval lanterns.
It is best to select optics that match the design of the plugs installed in the bumper (the author of the video is the Lada1119 channel).
Fog lights
PTFs for Kalina are installed only on expensive trim levels. But all the wiring is installed from the factory and there are “ears” for mounting on the bumper. To install headlights, you will have to purchase a power button, frames in body color and a relay.
Installation of fog lights:
- Use a screwdriver to remove the plugs under the PTF.
- Screw the lights into the standard recesses.
- Snap the frames to hide the excess cavity.
Lada Kalina Cross uses dark matte plugs that do not require coloring. When installing on your own, you should purchase bolts for fastening the headlight in advance.
How to connect the electronic part
Connecting the PTF to the standard wiring does not take much time. To search for the braid, you should look around the spar area at the entry point of the main beam. The PTF plug is taped to the wires with electrical tape.
Kalina 2 fog lights are often equipped with detailed instructions and an additional switch that must be installed instead of the old module to turn on the light. Connecting to pre-installed wiring does not take much time and does not require the installation of additional contacts.
If there are no power cables in the braid, you will have to independently pull the wires into the cabin, connect them to the connector, fog lights with plus and minus, and connect them through a relay. A detailed description of the connection is included with the part in the form of a diagram.
During the installation process you will need:
- insulating tape;
- copper wires;
- corrugation;
- connectors suitable for lamps.
When installing wiring, disconnect the battery and strictly follow the instructions.
Reasons for replacing lighting fixtures
The most obvious reason to replace the low beam is when the headlight bulbs burn out. The reasons for the failure of these parts may be different. On Lada Kalina cars of the 1st and 2nd generations, H7 type lamps are installed.
Imperfection and budget are the causes of the following malfunctions.
- Clogging due to depressurization of the flask. Due to dust ingress, overheating occurs and the lighting element fails.
- Voltage surges in the on-board network, namely an increase in permissible values. To identify this malfunction, it is necessary to diagnose the generated voltage; the generator should not produce more than 14.4 Volts.
- Blown fuse.
- Violation of the integrity of the electrical circuit.
- The output contacts are oxidized.
These are the most common factors causing low beam lamp failure. There are others, but they are extremely rare.
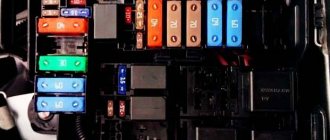
First of all, the integrity of fuses F12, F13 in the mounting block is checked. If in the dialing mode touching the terminals is accompanied by a sound signal, it means the fuses are working. If there is no signal, the fuses need to be replaced and the cause of their failure must be found out. You should also ring all sections of the circuit, especially if voltage is not supplied to the terminals.
Driving on public roads without working low beams is unacceptable. Especially in the dark, as it can cause a serious accident. For good lighting, it is also recommended to adjust the light at a car service center or do it yourself.
Possible malfunctions and how to eliminate them?
Intermittent operation of the rear wiper mechanism is a very common situation faced by owners of the Lada Kalina station wagon. The solution is simple - you need to replace the fuse. It is located in the mounting block, which in turn is located under the panel to the left of the steering column. Sometimes a replacement requires a relay, which can be found in the same mounting module.
When the rear windshield wiper completely refuses to function after activating the button, then diagnostics of the electric drive of the LADA Kalina station wagon will be needed. The wiring goes to the electric motor itself. Here you need to make sure that the contact at the ground terminal is reliable. In most cases, the problem is eliminated by simply cleaning the contacts from oxides. If such manipulations do not give the desired result, disassembling the mechanism and probably replacing the motor will be required. Sometimes the culprit for the lack of purifier functionality is the steering column switch.
How to remove the tail light of a Lada Kalina station wagon? Replacing bulbs in the taillights of Kalina 1
Hello everyone, dear motorists! Today in the “Repair” section I’ll tell you how to remove the taillight and replace the bulbs in the taillights on a Lada Kalina. The work is not difficult, but it does require certain skills.
Light bulbs can be called consumables; they don’t burn very often, but unfortunately, this still happens to almost everyone from time to time. However, there are cases when the lights come on very often, almost every week or more often, in which case you should check the on-board network and some other points, which are discussed below.
Why do the car lights light up?
The first thing you should pay attention to is the increased voltage in the car’s on-board network; if it exceeds 14.5 Volts, replacing the headlight bulbs will be frequent. In addition, other energy-dependent nodes will suffer. If the headlight glass is leaky or poorly ventilated, condensation may accumulate inside the headlight, causing the bulbs to burn out. Frequent failure of lamps can also be explained by the poor quality of the product itself
If the light bulbs are cheap, of low quality, you can hardly expect long service from them. Cheap non-original lamps do not have special gas and the correct pressure; as a result, after some time, tungsten evaporates and the lamp burns out. Poor contact. If the bulb is loose or has poor contact, it will most likely cause the bulb to burn out prematurely.
Lighting devices are a guarantee of safety
Today, there is probably no driver who is not aware of the regulatory requirements for operating a car. These standards also apply to external lighting devices; the brake light lamp also falls under the standard, since the use of a car with these components that do not comply with the factory regulations in terms of design is prohibited. This approach is dictated by safety requirements, which involve ensuring sufficient illumination and visibility of the car on the roadway, but at the same time eliminating the risk of blinding not only pedestrians, but also oncoming drivers by the light beam. In addition to headlights, the indicated requirements also apply to stern lighting fixtures.
The main element in any headlight is the lamp. The efficiency of illumination of the road surface depends on its quality conditions. Many people are interested in the question of what kind of light bulbs are in Kalina.
How to change the brake light bulb on Kalina
How to replace a light bulb on Kalinin
How to change a light bulb on a wild boar? Drivers often have this question, especially since viburnum is increasingly appearing on internal roads. She is reliable and easy to ride and can be serviced by the owner. And if you need minor repairs, you can do it yourself with minimal experience and a standard set of tools.
How to replace the lamps in the headlight unit
The owner of the frets needs to cope, and the problem is how to replace the lamp with a viburnum. First of all, we are talking about the backlight unit. They are a complex structural element that is divided into headlights designed for diving, driving, and there are overall dimensions and direction indicators. You can replace the faulty bulb while the headlight remains on the vehicle. Before replacing the lamp, disconnect the terminal at the point where the negative battery terminal is indicated.
The lights just turn on if you follow the rules:
- The turn signal holder must be carefully rotated to the left. Just rotate 45 degrees. Now it's easy to get rid of it.
- It's time to pull out the light bulb: press it, turn it all the way, all steps to the left, and it will immediately leave the socket.
- Install the new lamp by following all steps in reverse order.
How to disassemble the mirror of a Lada Granta, Kalina or Priora
May 21, 2022 Lada.Online 93 573
Have you decided to install heated mirrors or paint their trims in body color? The first step is to disassemble the side mirror. The principle of disassembling the mirrors of Lada Granta, Lada Kalina 2 and Lada Priora is the same and can be done in several ways.
To remove the rear view mirror covers, it is not necessary to remove the mirror element. To do this you will have to:
- fold the side mirror and unclick the first lock of the trim (only for Lada Kalina 2 and Lada Granta).
- Turn the mirror element to the side as far as possible, insert a screwdriver into the resulting slot and unclip the 4 clips of the cover.
- Separate the side mirror trim from the housing.
New Lada: How to change the inner CV joint on a Kalina
The process is shown in the video:
If there is a need to remove the mirror element, then you should:
- tilt the mirror element to the side.
- Unclip the latches in a circle using a screwdriver.
The process is shown in the video:
Let us remind you that there are nuances when replacing lamps in the headlights of a Lada Granta.
Keywords: side mirrors Lada Granta | side mirrors Lada Kalina | side mirrors of Lada Priora
6
Found an error? Select it and press Ctrl Enter..
- AvtoVAZ released prototypes of Lada XRAY Cross Black
- Which stabilizer struts are best installed on Lada Vesta
- How Lada Vesta is assembled (photos and description of production)
- What the plant has improved in Lada Vesta in one year
Connection diagram for PTF on Kalina
Installation instructions included:
And also a diagram (photo on the left). The circuit can be modified (photo on the right) by adding another relay, which will not allow the fog lights to light up after the ignition is turned off.
Connection diagram for the fog light button:
For owners of Lada Kalina with MUS, the fog light connection diagram is as follows:
Pinout of contacts of MUS Lada Kalina:
- Contact 1 – to the AFCP
- Contact 2 – control button of the AFCP
- Contact 3 – indicator (LED) of PTF status (on or off);
- Contact 4 – output for turning on the PTF relay
- Contact 30 – 12V (constant + coming from the battery)
- Contact 31 – Common minus (ground).
- Pin 56 – To low and high beam headlights.
- Pin 58 – To side lights.
- Contact 58b is an output (regulated voltage) for the illumination of knobs, buttons and instrument panel.
- Contact XZ – (+) from ignition switch
It will be useful: How does the motion sensor work in a DVR?
Let us remind you that you can find other photo reports in the Tuning Lada Kalina section.
Heading optics contains 4 lamps
Let's look at how the directional optics, that is, the front headlight, is designed. The block contains four compartments, each of which contains one element:
- High beam lamp (H1);
- Low beam lamp (H7);
- Combined lamp for running lights and “dimensions” (W21/5W);
- Turn signal lamp (P21W yellow - PY21W).
The standard size of the element is indicated in parentheses.
If we talk about low and high beams, standard power lamps (55 watts) are installed from the factory. It is not recommended to greatly exceed this value. Lighting fixtures of sizes H1-H7 look like this:
H1 – high beam, H7 – low beam
When making a purchase, the main thing is not to confuse an H7 lamp with a halogen lamp of a similar size (H4). Also, some companies produce 24-volt lighting devices.
When replacing halogen light sources, adhere to the following rules: do not touch the glass with hands without gloves; it is recommended to degrease the lampshade before installation. “Secunda” is suitable as a cleaner.
The following text shows the side and running lights:
How to remove the tail light of a Lada Kalina station wagon? Replacing bulbs in the taillights of Kalina 1
Hello everyone, dear motorists! Today in the “Repair” section I’ll tell you how to remove the taillight and replace the bulbs in the taillights on a Lada Kalina. The work is not difficult, but it does require certain skills.
Light bulbs can be called consumables; they don’t burn very often, but unfortunately, this still happens to almost everyone from time to time. However, there are cases when the lights come on very often, almost every week or more often, in which case you should check the on-board network and some other points, which are discussed below.
Why do the car lights light up?
The first thing you should pay attention to is the increased voltage in the car’s on-board network; if it exceeds 14.5 Volts, replacing the headlight bulbs will be frequent. In addition, other energy-dependent nodes will suffer. If the headlight glass is leaky or poorly ventilated, condensation may accumulate inside the headlight, causing the bulbs to burn out. Frequent failure of lamps can also be explained by the poor quality of the product itself
If the light bulbs are cheap, of low quality, you can hardly expect long service from them. Cheap non-original lamps do not have special gas and the correct pressure; as a result, after some time, tungsten evaporates and the lamp burns out. Poor contact. If the bulb is loose or has poor contact, it will most likely cause the bulb to burn out prematurely.
When and why to change
The factory light is adjusted during the production process, at the time of passing technical inspection. In the new car, the modules shine with maximum power and at the peak of their capabilities. The need for replacement is determined by the following main criteria:
- Reducing light intensity.
- The appearance of yellowness and cloudy areas on the cut-off strip.
- Complete shutdown of one of the light modules.
- Increased brightness after the suspension hits a pothole or has mechanical contact with the headlight.
Kalina lamps installed on the conveyor last no more than 4 years. Cloudiness, deterioration of visibility and the appearance of unlit areas appear after the filament burns and the bulb smokes. In this case, the light does not pass through the dirt well and does not reach the desired areas of the reflector. There are yellow spots of light and darkened areas on the road.
The thickness of the light module filament is calculated by production engineers. When struck, the lamp shakes and the spiral becomes thinner. An external examination reveals a large increase in beam power. This indicates that the halogen lamp will soon fail, since the thin filament heats up above the set temperature and begins to melt. The service life of a damaged part ranges from one minute to several hours.
Dismantling and repair of optics
One of the most common malfunctions in the operation of optics, if you do not take into account the failure of lighting sources, is damage to the headlight glass. If the lamp itself is damaged, it will have to be removed and disassembled to change the glass.
How to disassemble the headlight and how to replace the brake light bulb:
First you need to open the trunk and move the brake light source to the left. The Kalina brake light lamp must be pressed and turned to the left, so that the device can be removed from the installation location. The installation procedure is performed in reverse order. If you need to replace the glass, you will have to remove the bumper to do this. To do this, you need to unscrew the corresponding fasteners. After dismantling the bumper, it is necessary to disconnect all the wiring connectors that are connected to the optics. After completing these steps, you can unscrew the lower fasteners of the flashlight; to do this, use a wrench. After this, similar actions are performed with the upper bolts securing the optics. When all the screws are removed, the optics themselves can be removed. The next stage will be the glass repair itself.
You need to pull the headlight towards you and carefully remove the rubberized seal. It is usually attached to the lantern quite tightly, so most likely you will have to use a utility knife to cut the elastic. After the headlight housing and glass are separated from each other, all remaining adhesive and sealant should be removed from the perimeter of the housing.
To do this, you will also need to use a utility knife, and if the residues are small, then use sandpaper. Make sure that the surface on the housing is clean and free of sealants and dirt. Before installing new glass, the housing around the perimeter of the installation will need to be treated with a solvent. This will allow the surface to be degreased, so that the fit of the new glass will be maximum. Next, apply glue to the new seal and connect the glass itself to the body. The tightness of the structure must be optimal, otherwise the problem of fogging of the optical glasses from the inside may arise. Press the headlight on both sides so that the lens is connected to the housing as firmly as possible. At this stage, the repair can be considered complete; assembly is carried out in the reverse order. When installing the lights, they will need to be readjusted.
Front headlights
Replacing a headlight yourself will require preparation of the vehicle and tools. To work you will need:
- set of wrenches;
- screwdrivers;
- rag;
- gloves to protect hands.
For ease of work, it is necessary to rinse Kalina in advance and clean the place in the garage. To change the headlights, you need to remove the bumper and unscrew several mounting bolts.
Dismantling
Actions required to remove headlights:
- Open the hood lid.
- Disconnect the battery terminal.
- Remove the clips from the front part of the fender liner.
- Unscrew the radiator mesh fasteners and remove it.
- Unclip all the clips along the contour of the bumper and remove the screws.
- Remove the bumper without scratching the corners of the fenders and headlights.
- Disconnect the optical power plug.
- Remove the two screws holding the light on top.
- Remove the lower headlight bolts.
- Carefully remove the part.
Before assembling and installing a new headlight, you should check the presence of light bulbs and their functionality. To do this, connect the flashlight to the connector and check all the functionality. When installing a new part, you should not rush, it is important to be careful and not to destroy the case or glass.
Repair
To disassemble Kalina's headlights, they will need to be dismantled. You can repair the Kalina headlight by polishing the glass, replacing it, washing the internal parts, or restoring the reflector.
To remove the glass, you will need:
- Dismantle the part.
- Warm up the headlights in the box using a hairdryer.
- Tear off the glass.
- Carry out all the required work and assemble the lantern using a special sealant.
To disassemble the headlight, it will take several hours, depending on the experience of the car owner. Replacing Kalina's headlight glasses will improve the exterior and increase light transmittance.
During operation, it is important to observe safety precautions, do not leave the hair dryer unattended and use gloves.
Installation
Before installing the lights, you should wash the mounting points and seating area. Installation is carried out in the following order:
- The power plug is connected.
- The Kalina headlight mounts are aligned and secured with standard bolts.
- The bumper is hung in front and screwed on.
- The radiator grille is installed.
- The clips for the left and right fender liners come back.
In versions with fog lights, you will have to additionally connect the connectors to the lamps when installing the bumper and disconnect them during removal.
How to replace the lamps yourself
Changing a light bulb in Kalina yourself is not difficult. The time spent on the work depends on the skill of the driver and the size of the hands. Some owners change light fixtures in 15-20 minutes without removing the headlight, while others suffer for more than an hour and ultimately dismantle the optics.
When replacing, cloth gloves are used. This helps protect the skin on your hands and also prevents contact with the bulb. When touched, fingerprints remain, which heat up when the light is turned on and after a while burn through the thin glass.
Far module
Replacing the high beam lamp is easier than in the low beam module, since the cover is located closer to the radiator grille.
To perform the operation you will need:
- Turn off the Kalina engine.
- Open the hood lid.
- Remove the protective boot on the back of the flashlight.
- Carefully disconnect the plastic chip.
- Open the latch.
- Pull out the lamp.
Assembly is carried out in reverse order. When installing the terminal, you need to check the contacts and, if necessary, clean them using a flat-head screwdriver, sandpaper or a special chemical spray.
Low beam
Replacing a low beam lamp on a Lada Kalina depends on the experience of the owner and is divided into two types:
- Without removing the headlight.
- With module dismantling.
To change lamps on installed optics:
- Unscrew the filter housing near the left headlight and move it towards the engine.
- Disconnect the washer motor terminal, remove the screws and move the reservoir to the side.
- Open the light module seals.
- Remove the block with wires.
- Remove the spring clip.
- Remove the part.
Assembling the headlight with a new spare part is carried out in the reverse order.
To dismantle the headlights, you need to unscrew the grille, fasten the modules and disconnect the contact chip. Place the removed optics on a convenient surface and replace the light elements.
Dimensions and DRLs
In the first generation Kalina, the dimensions are installed under the cover of the near reflector.
Replacement is no different from work in the near headlight compartment, however, to disconnect the lamp, it is turned counterclockwise. Drivers often install a diode instead of the original light source, which has a bright glow and can work for more hours.
Replacing DRL lamps on second generation Kalina:
- Open the hood.
- Find the plastic retainer at the bottom of the lamp near the radiator grille.
- Turn left 90°.
- Pull towards yourself.
Daytime running lamps do not contain halogen in the bulb, so they can be handled by hand when installing. Parts without gas include reverse elements, which are changed by bending the trim in the luggage compartment. To replace the Kalina station wagon's brake light bulb, you will have to unscrew the plastic plug on the fifth door, disconnect the chip and pull out the old spare part.
Turn signal
If the marker light on Kalina is freely accessible, then it is more difficult to get to the turn signal module.
To install a new lamp, you need:
- Unscrew the screws holding the air intake barrel and washer fluid reservoir.
- Move the parts towards the engine.
- Feel for the plastic cartridge and turn it to the left.
- The lamp is removed from its seat by slightly pressing and turning it 90° to the left.
To install a new part, you need:
- Install it into the cartridge.
- Press and turn to the right until it stops.
Fog lights
When replacing the fog lights, partial dismantling of the locker will be required. To do this you need:
- Turn the wheel towards the engine compartment.
- Unscrew the screws and unclip the clips where they are attached to the bumper.
- Bend the fender liner.
- Turn the light bulb to the left until it stops.
- Pull towards yourself.
- Disconnect the plug.
To install a new light source in the PTF, you must first snap the connector, insert the part into the lamp and turn it to the right.
After carrying out the work, you need to check the correct functioning of the light and adjust the angle of the reflector. A properly functioning car light ensures good visibility in all conditions and safety on the road.
Substitution process
The process of replacing headlights on the Lada Kalina 2 varies depending on its type. There are “Kalina 2” hatchback and station wagon. For a hatchback, the replacement sequence is as follows:
- open the 5th door of the car;
- Remove the 2 bolts securing the rear lighting component to the luggage compartment side. Use the key on 8;
- pull the light from the back of the car towards you, using little force;
- remove the fastener studs from the headlight fixing fasteners at the rear;
- move the lighting component away from the car body;
- if you need to replace the lamp, remove the socket with the broken product;
- When installing the newest lamp in your lighting system, reverse the entire process.
Removing the rear light on Lada Kalina hatchback
The principle of removing the headlight on a Kalina (station wagon) and replacing the lighting unit varies depending on the shape and structure of the car itself. For the process of replacing the rear block lighting, you will need:
- open the 5th car door;
- open the hatch located in the trunk trim;
- disconnect the block with the light cables at the rear of the car from the harnesses and wires;
- Unscrew the 3 nuts securing the product to the car body;
- release the device lock;
- remove the lamp retainer from the car body.
If you are interested in replacing the lamp, then after the above steps you need to remove the broken socket by turning it counterclockwise. This way you can remove it from the headlight housing. A new lamp is inserted into the socket by pressing and turning it clockwise. If you need to completely change the lighting, simply insert a new product into the space and proceed with the disassembly process.