I decided to update an existing article that was written more than a year ago. In that case, the rattling of the gearshift lever was not particularly strong and was eliminated quite simply, which will be written about at the very bottom.
In the meantime, I want to give a short instruction on how to eliminate lever rattling on Kalina. For this I needed the following accessories:
- Open-end wrench or socket wrench 13
- Pliers
- Electric sharpener
Why does the gearshift lever rattle on Kalina?
The main reason for this problem lies in the very design of the attachment of the lever to the rod. To put it mildly, it is not perfect, but it can be corrected at minimal cost and in just a few minutes of time.
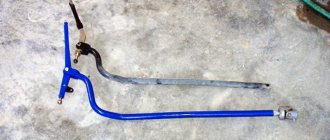
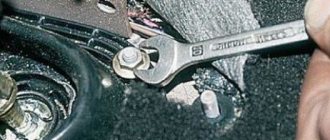
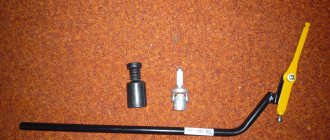
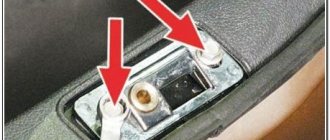
So, first you need to lift up the lever casing, and then unscrew the fastening nut, which is already shown in the photo below almost completed:
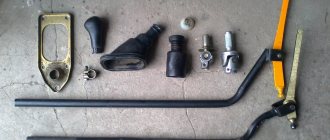
When the bolt is removed, we also remove all the washers and the metal sleeve. And this whole damn thing looks like this in parts:
So, the reason for the rattling is that when connecting this entire structure, a small gap appears between the parts, which is the source of strong vibration.
To achieve a smaller gap, it is necessary to slightly grind off the metal bushing, which prevents these washers from being compressed more tightly. I would like to warn you that you need to grind very carefully and very little, literally 1 mm. If you overdo it, then the lever will move with very great effort.
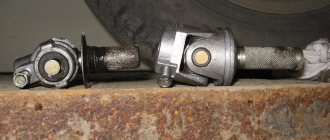
As a result, after connecting the bushing with washers into a single structure, as was shown first, we get a picture when this gap has decreased:
I messed up a little and sanded a little more than necessary (which I warned about above). As a result, when the fastening nut is tightly tightened, the lever moves tightly when switching. But I loosened this nut a little, literally half a turn - it shouldn’t come off!
When everything was done, I started the car and gave good speed, and there were no sounds from the lever. But to be sure, I decided to take a ride. I accelerated to about 70 km/h in third gear and left the gas pedal. Previously, in this situation, the rattling was simply terrible, and the only salvation from this was a hand on the lever! Now there is not a single hint of extraneous sounds or vibration.
Anyone who has not yet eliminated a similar defect on their Kalina can use this advice, just grind the bushing minimally. It’s better to improve it a second time than to screw it up the first time!
Below is material from an old article that talks about a similar problem, but it is easily solvable and is a thing of the past!
Many owners of the Lada Kalina very often have the following problem: when accelerating, as well as when braking the engine, the gear lever begins to rattle. A similar problem arose with my Kalina after about 15,000 km of operation.
At first, these extraneous sounds did not irritate me much, but every day the rattling of the gearbox lever became stronger, and to be honest, it’s not very pleasant to listen to it every day. I decided to tackle this issue. So, eliminating the cause can occur in different ways, depending on the complexity of the problem.
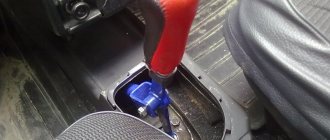
Fortunately, in my case it was enough to pry and remove the upper cover of the lever, on which the gearbox diagram is extruded. It is better to pry off this cover with a thin screwdriver so as not to damage the plastic parts. After we managed to remove it, we wrap its inner circle with a thin strip of electrical tape and insert it back. After this, this lid fits much tighter and does not rattle.
Of course, there are other sources of extraneous sounds, but for me everything worked out as simply and quickly as possible. The picture above shows exactly what needs to be wrapped with electrical tape.
In this article I will talk about possible causes and malfunctions due to which the reverse gear on the Lada Kalina does not engage. You will also learn how to find and fix a malfunction in the reverse gear locking mechanism with your own hands.
- Before you start drastic actions and disassemble “anything and everything”, check the gear shift lever itself, this may be the reason. The linkage and cardan are quite often the cause of this breakdown. The splines could also be worn out or the clamp loosened. In this case, you will need an inspection hole.
- A faulty release bearing is an option. Although it is unlikely, since in this case all gears without exception would be engaged with a characteristic crunch and with great effort.
- Reverse gear may stop engaging due to problems in the reverse gear locking mechanism; in order to confirm or refute this, remove the gear shift knob along with the dashboard between the seats and perform a visual inspection.
Repair or replacement
Before deciding whether repair, adjustment or replacement of the link is necessary, it will have to be disassembled.
- Remove the cover on the gear shift knob;
- The machine must be installed on a jack or on an overpass (pit);
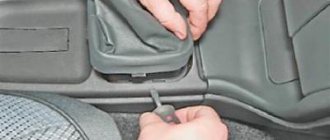
- Remove the front console, which is bolted on;
- Remove the rocker by unscrewing 6 bolts.
During this procedure, carefully inspect all parts. You definitely need to bend the boot and inspect the condition of the support, cardan shaft, and oil seal.
It may be necessary to use a rem. kit, and perhaps a more complex repair is needed.
If the bushing is deformed, it needs replacement. If the cardan has play, as well as if the hole in the lever axis is worn, a complete replacement of the link and repair belt is necessary. the kit clearly won't help.
It happens that the rocker pad is to blame for the rattling noise when changing gears. Replacing a pillow is a simple operation, but can be beneficial.
REQUIREMENTS AND SUGGESTIONS
Figuring out what and how we could improve, we agreed on one thing: not to touch the gear part, namely the shafts, gears, and synchronizers. Otherwise, huge financial costs will be required to launch a new gearbox into production - without high-precision equipment, it will not be possible to ensure the proper quality of engagement, operation and synchronization.
Main elements of the VAZ-2181 gearbox:
2 - secondary shaft;
4 — fifth gear fork;
6 — reversing light switch;
8 — gear shift mechanism;
SYNCHRONIZER
The first samples were equipped with a three-cone synchronizer. But calculations have shown that double-cone, cheaper ones, can withstand the required torque with a margin (see pictures). Among other advantages, they made it possible to get rid of the problematic cone on the gears of the first and second gears, which is in contact with the synchronizer ring and requires high precision in manufacturing. The ring set now creates two friction surfaces for smooth and efficient synchronization. In addition, the German manufacturer (Ho¨rbiger) applies an additional coating to the intermediate ring, which reduces wear and ensures stable operating parameters, including the required coefficient of friction.
Structure of VAZ-2110 (A) and -2181 (B) gearbox synchronizers:
2 — intermediate rings;
4 — synchronizer clutch;
6 — clamp;
Making a short-stroke slide with your own hands
The diagram shows in detail where you need to cut with a grinder, and where you need to cook.
So, let's begin the modernization process:
- We raise the place of attachment of the piece of iron that goes from the gearbox to the lever inside the VAZ 2110 interior.
- You can do without dismantling the rocker, the main thing is to disassemble the ball joint.
- Now we need to ensure that the plastic paws release the ball. To do this, you need to unclench the metal ring. We disconnect the rod and carefully drag it inside through the cover, which is responsible for protecting it from dirt. It will be much more convenient to work if the clamp near the gearbox is loosened.
Adjustment is made using this lever. - Guided by the diagram, we cut off the parts using a grinder. It is necessary to weld a piece of metal pipe with a wall thickness of about 3 millimeters into the rod. To avoid skew, it is necessary to use identical pieces. The pull can be lengthened by 2-4 centimeters.
- All that remains is to raise the hinge with the hook, which serves to prevent an erroneous shift to reverse gear 2110.
Replacement is carried out according to the same scheme. Only instead of welding, a freelance short-stroke rocker from another car is installed. Replacement is a more expensive solution, so doing it yourself is problematic. If you have experience working with gearboxes, then replacing and purchasing a new part will cost about 1,000 rubles.
SWITCH MECHANISM
The new mechanism is a separate module. It can be installed last and removed if necessary without disassembling the box. This is technologically advanced not only in production, but also in repair. Already at the concept stage developed by the VAZ team, a selector grill appeared in it, clearly repeating the gear shift pattern and setting the lever stroke when selecting gears. The mechanism includes a lock against accidental reverse gear, which is only accessible from neutral.
The characteristics of the mechanism were selected on the original simulation stand. The tester sits down on the seat and begins to go through the gears, while the automatic system imitates the shift pattern, forces and lever strokes implemented on a specific production car. You can also upload your own settings. Don't like an overly tight lever? A couple of taps on the keyboard and the effort is reduced. So, step by step, we selected the optimal settings for the “eighty-one”. The computer processed the data and produced parameters for constructing an accurate mathematical model, according to which those very tricky central plates were made.
ROPE DRIVE
The single-rod gear shift drive was replaced by a cable. The unpleasant vibrations on the lever are gone, there is less play, and shifting is clearer.
Lightweight aluminum German gear forks are equipped with anti-wear shoes made of plastic. Previous parts were cast from steel, and to reduce wear, a bronze layer was applied to individual parts, which wore off over time and tinted the oil with golden powder.
VAZ-2181 is the first AVTOVAZ gearbox for which a computer calculation of all parts subject to loads was performed: crankcases, forks, levers, etc. Thus, the design was not only optimized, but also made more reliable.
1 — gear selector levers;
3 — selector grid;
5 - central three-dimensional plate.
Thank you for your help in preparing the material.
Mikhail Votinov, Vladimir Petunin,
Instructions for replacing the rocker on a VAZ-2110
If adjusting the part does not give positive results, there is only one thing left to do - replace the part or try to resurrect it through repair, but in the latter case you will need the help of knowledgeable repairmen.
Replacing the VAZ-2110 backstage looks like this:
- Prepare the necessary tools in advance so that you don’t have to be distracted from your work later. What you will definitely need:
- screwdriver;
- side cutters;
- set of wrenches.
You won't be able to cope without a repair kit designed specifically for the VAZ-2110.
- Now that everything is at hand, open the hood and find the nut connecting the transmission rod and the tip of the handle.
- Remove the special protective cover from the nut and tighten the turnbuckle.
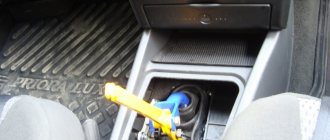
- Get back into the car and take out the frame that fits the lever that controls the transmission. Clamps may interfere with this work, but you can’t get rid of them, spend a little time and everything will work out.
- Turn the cover inside out.
- Using a sharp knife, cut the clamp to secure it and remove the cover. It's okay if you couldn't avoid damaging the integrity of the clamp. It is disposable, so the clamp will still have to be replaced with a new one.
- Get rid of the tunnel lining on the floor.
- Disconnect the axle retaining part from the gearbox handle.
- Pull out the gear knob by pulling the lever up.
- Slide the sleeve inside the lever, which is responsible for the direction of the part.
- Remove the 4 mounting bolts holding the guide bushing in place.
- Remove the housing and remove the shaft.
- Now look at the nodes. If there are signs of wear on the rubber part, the bushing cannot be repaired and must be replaced. If the hole located under the handle axis is severely worn out or the play is noticeable to the naked eye, it’s time to change the link.
- Return all parts to their original place and adjust the operation of the gearbox.
Video on how to replace the rocker on a VAZ-2110: