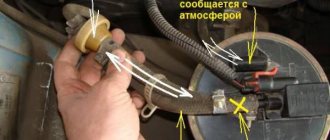
In a car, the adsorber absorbs fuel vapor from the gas tank ventilation system and supplies it to the intake, because according to environmental standards, the gas tank must be isolated from the atmosphere.
From Wikipedia ;
Adsorber (from Latin ad - on, with and sorbeo - absorb) is a device for absorbing (thickening) a surface layer of a solid, called an adsorbent (absorber), of dissolved or gaseous substances, not accompanied by a chemical reaction. The adsorber is used in chemical, oil refining and other industries. The process occurring inside this apparatus is called adsorption.
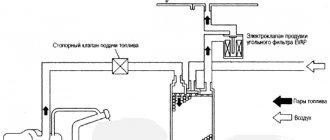
Gasoline vapor filtration system. The diagram is quite conventional, but it reflects the essence. Gasoline vapor from the tank passes through a carbon filter, is cleaned and supplied to the inlet through a solenoid valve controlled by the ECU.
Now the first question is - why filter gasoline vapors if they still go into the intake? The answer is simple - adjusting the internal combustion engine control program by adding the nth number of clean air at the inlet is much easier than making adjustments based on the fuel-air mixture (gasoline vapor from the tank) of an unknown proportion.
And now the answer to the main question - why delete it? So, although some manufacturers claim that this device will have enough resources for the entire life of the car, we know that they are lying)
In general, over time, the adsorber becomes clogged and stops passing air. As a result, we get excess pressure in the tank, which interferes with the normal operation of the fuel pump. In the cabin (sometimes under the hood) we get a periodic smell of gasoline, the vapors of which are squeezed out of the ventilation tube. And the engine starts running on a rich mixture due to lack of air.
Now guess how our country solves this problem? That's right, most people simply throw out the adsorber and turn off the system as shown in the diagram:
A fuel filter from a carburetor classic is usually placed on the tube from the gas tank, and the solenoid valve, through which clean air should flow into the engine, is simply shut off with a bolt.
In the picture I already wrote that this is wrong and here’s why. This method of removing the adsorber only partially solves the problem. Yes, the smell of gasoline disappears, the tank is ventilated, but no air is supplied to the intake and the engine continues to run on a rich mixture.
And now the following diagram:
And now it already shows how it SHOULD be done. The same filter from the classics is put on the hose from the valve to the adsorber, which now serves as an air filter and prevents dirt from getting into the receiver. This is how the fuel-air mixture is brought to normal parameters.
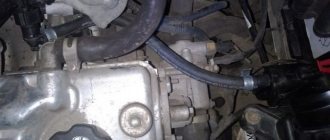
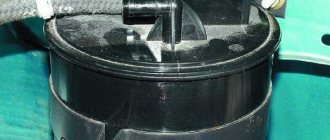
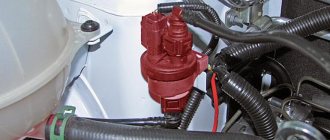
Well, now a couple of visual photos of what it all really looks like:
Everything is clear here, one tube goes to the gas tank, the second through the valve to the engine.
Bottom part of the adsorber. There is a fitting for supplying air from the atmosphere so that a vacuum is not created in the adsorber.
So this is all done on my machine. I didn’t take a photo of the tube from the tank, it’s hard to get to it even without a phone
» How to remove
Causes of car adsorber malfunction
If you do not take into account the service life of the adsorber and the associated contamination of activated carbon, there are only two most common causes of problems with this unit:
- Violation of the tightness of the valve with simultaneous clogging of the tube connecting the adsorber to the atmosphere. In this case, it is impossible to start the engine the first time - this is due to the over-enrichment of the mixture with gasoline vapors entering the manifold through a faulty valve.
- Clogging of the tube communicating with the atmosphere when the valve is in normal condition. In this case, the engine starts normally, but as soon as it warms up and the canister valve opens, vapors rush into the manifold under high pressure, instantly re-enriching the mixture, which leads to the engine stalling. When restarted, when the excess vapor pressure in the fuel system has been eliminated, it operates normally.
Thus, it becomes clear why an adsorber is needed in a car, and what important role it plays for the normal operation of the engine. The faulty unit can be replaced with a new one, or you can try and repair it. How to do this is shown in the video:
What is a VAZ 2114 adsorber and for what purpose is it installed on a car? And it’s worth remembering such a thing as European standards for car toxicity. Every year they become stricter; only those cars that emit a permissible amount of harmful substances into the atmosphere are put on the road. Someone will say that Europe is small, and it really needs this so as not to suffocate in the smog (and in England there has always been smog without cars). But for the Russian Federation this is irrelevant - a large territory and a huge number of forests that require carbon dioxide to live.
But in order to supply cars to other countries, they have to be improved and adjusted to standards, including environmental ones. And immediately you need to highlight two main points:
- An absorber is a substance that absorbs vapors. In this case we are dealing with activated carbon. It is also used in gas masks.
- An adsorber is a device in which the vapor absorption process takes place.
This, in general terms, applies specifically to cars. In fact, absorbers can be of several types, just like adsorbers. But if you need it, consult your chemistry textbooks.
And now in more detail
How can I check the functionality of this device? The fundamental element in the absorber is the valve. To understand the function, let’s look at how the adsorber works. When a car is parked, a huge amount of gasoline vapor can accumulate in its tank. Some of the vapor is caught by the recuperator, and the rest settles back into the tank. The part that was caught goes into the adsorber. When the engine is running, the absorber valve closes and interrupts the access of vapors, now they are sent to the combustion chamber. What is it for? When you start the car, our device prevents vapors from entering the exhaust manifold, thereby reducing the amount of harmful substances in the gas.
Adsorber VAZ 2112 16 valves signs of malfunction
It seemed like such an inconspicuous element, which at first glance is not important for the car, but without which it cannot work properly. Dips appear, the engine “troubles” and the gas tank may even collapse! And all this is due to a faulty adsorber valve
Many people don’t know what it is, how it works and MOST IMPORTANTLY what it affects. Today I will try to put everything into simple terms, and also describe the main symptoms of a malfunction
It will definitely be useful, so read and watch...
First, let's start with a definition.
An adsorber (from Latin sorbeo - absorb) is a car system that serves to capture gasoline vapors that come out of the tank. When the engine is running, they are sent to the fuel injection system, namely to the intake manifold. When the engine is turned off, some of the vapors are captured by the separator (it directs them back to the tank), and the remaining vapors enter the adsorber, where they are neutralized.
Adsorber VAZ-2114: design review, features and causes of malfunction
Components
In fact, this is a large plastic jar with activated carbon inside, because it is this composition that perfectly fights gasoline vapors. The main parts can be described as follows:
- Separator + gravity valve
- Pressure meter
- Filter part (usually carbon)
- Connecting tubes
- Solenoid valve
As you can see, there is absolutely nothing complicated. Separator - serves to catch part of the gasoline, then sends it back to the tank. Gravity valve - almost never used, but it is needed in emergency situations, for example during accidents, it prevents fuel from overflowing from the tank (for example, when a car overturns).
The pressure sensor is a very necessary thing - it monitors the pressure of gasoline vapors inside the tank, if necessary, it opens and resets it, preventing the structure from being damaged.
The filter part is, as I wrote above, a large jar into which coal powder is poured, in fairly large granules. This is done so that vapors can pass and condense freely.
Connecting tubes are needed to connect all the main parts, filters, sensors and valves, I think this is clear.
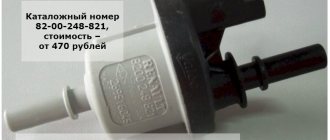
Solenoid valve - used to switch modes for capturing gasoline vapors, we will talk about it in more detail below.
Design and operation of the adsorber purge valve
The KPA is an electromagnetic locking device that operates from the vehicle’s on-board network. The valve consists of:
- plastic case;
- valve with spring;
- windings;
- metal core;
- connector
When the vehicle's engine is turned off, no voltage is supplied to the valve and it remains in the closed position. That is, on the motor side, the system that captures vapors is blocked. At the same time, the adsorber begins to “collect” vapors. When the power unit starts, voltage is applied to the valve, causing it to open and fuel vapors to enter the intake manifold. As soon as the ignition is turned off, the control unit is de-energized and the pipeline is closed: no vapors enter the receiver.
Cars of a high price category have a more complex evaporation system. Such machines have special sensors that can “calculate” the amount of air and vapor as a percentage. This allows you to more accurately control the supply of gasoline to the injector.
How to disable or remove the adsorber on a car and do you need to reflash the ECU?
You need to understand that when the adsorber is removed, the solenoid valve is turned off, which is directly connected to the controller and controlled by the latter.
This will lead to error p0443, which we already mentioned above. The tubes are also silenced, in particular the one that goes to the intake manifold.
What is the disadvantage of such a shutdown?
The fact is that through the tube that goes to the intake manifold, air is constantly sucked in; even in idle mode, the so-called small purge of the adsorber occurs. At high speeds from 1500 – 2000 and above there is a lot of purging.
In the ECU firmware, constant air leaks and the flow of fuel vapor are taken into account when forming the air-fuel mixture, despite the fact that all this goes past the mass air flow sensor, the causes of the malfunction of which can be found out by clicking on the link.
If you plug the pipe, which many people do, a certain amount of air will not flow into the intake manifold bypassing the ECU, but the latter still takes them into account.
That is, the controller takes into account one volume of air, but another (smaller) one actually enters. As a result, the amount of fuel is generated by the ECU based on more air than is supplied. This leads to an over-enrichment of the air-fuel mixture.
As a result, the engine does not work correctly, because the mixture is constantly over-enriched where it is and is not needed, and fuel consumption increases.
It is also worth talking about the transient mode of operation of the engine, which can manifest itself when approaching an intersection, a traffic light, lying to a policeman, at the moment when the gas is released.
At this moment, a failure may occur - a decrease in speed below idle. The engine seems to choke, it doesn’t have enough air, the reason is an over-enriched mixture. After a few seconds, the situation is resolved electronically.
Therefore, it would be correct to disable the adsorber in the following ways:
- After removing the device, install a nozzle with a diameter of 1 mm into the tube that goes directly past the mass air flow sensor. This will, at least partially, solve the problem, since only air without gasoline vapors will be supplied in doses.
- The ECU is being reflashed (difficult). If it is impossible to remove the Check error, you may need engine chip tuning, which is expensive.
- Dismantling the entire system except the solenoid valve, which operates idle.
- By installing a resistor (valve emulation) in the electrical circuit at 200 - 250 Ohms and 2 watts. To do this, bend the legs of the resistor and insert them into the valve chip. We secure everything with electrical tape. But this doesn't always help.
Installing a new adsorber valve
To replace an element, it is not necessary to contact a car service. You can do the work yourself using several Phillips screwdrivers. You also need to purchase a new valve (its markings must completely match the data on the old device).
- We find the adsorber.
- Remove the negative terminal from the battery.
- Disconnect the wire block by pressing the latch and pulling the device towards you.
- We loosen the fastenings of the solenoid valve and disconnect the hoses.
- We take out the old device (the bracket will come out along with it) from the absorber.
- We install the new device and put everything back together in reverse order.
Installation
At this stage, the adsorber has been successfully dismantled. Now you can begin installing the new device. The longest piece of rubber hose is connected to the tube that supplies fuel vapor to the purge channel. The smaller part of the hose is connected to the intake pipe from the separator. After that we put it on the fastenings. Now we connect the vapor supply hose to the purge channel. The latter is installed on the motor cover. The block with wires is also connected here. A long hose must be installed between the purge valve and the adsorber. Let us remind you that all rubber tubes must be resistant to motor oil and gasoline. The old hose and tube are removed. A short piece of part is installed in its place. That's it, at this stage the adsorber has been successfully installed. As you can see, the installation of this device can be done without the help of specialists.
Finally, we note that many car owners install adsorbers from the younger model, Priora, on VAZs of the tenth family.
Purge valve failure
The valve operates on the principle of electromagnetic induction.
A faulty shut-off valve, as it can also be called, makes clicking and hissing sounds when it releases unrefined vapors from the gas tank. The machine panel display includes a breakdown signal; the diagnostics carried out will accurately show the fault. Reasons for malfunction:
- the winding is short-circuited;
- wires are broken;
- mechanical damage.
A faulty adsorber part cannot be repaired; it only needs to be replaced. You can do this simple procedure yourself. In the latest Priora models it is located under the engine cover, and removing it is not difficult.
- disconnect the wiring;
- soften the pipe with hot water;
- remove and replace the valve;
- again use boiling water and clamp the soft tube, you can use a clamp.
- cut the hose along the edge of the part;
- install a new lock;
- heat the pipe and put it in place.
Don’t forget to attach the adsorber to its original position and flash the electronic control unit.
Removal and inspection
2. Having released the latch, disconnect the wiring harness block from the canister purge valve.
- How to properly clean the adsorber in a car?
3. Connect the negative voltage probe (to the car body).
4. Turning on the ignition, use a voltmeter to measure the supply voltage at terminal A of the wiring harness block (the pins are marked on the block).
Comment. The voltage at the terminal must be at least 12 V. If the voltage does not flow to the block or it is less than 12 V, it means that the battery is discharged, the power circuit is faulty, or the ECU is faulty.
5. Use a Phillips screwdriver to loosen the clamp securing the hose to the canister purge valve.
6. Remove the hose from the valve nozzle.
Advice. If the hose on the nozzle is seated tightly and cannot be disconnected, then you can remove the valve from the adsorber and, by rotating the valve, remove the hose from it.
7. Using a screwdriver, remove the valve from the adsorber.
8. We apply 12 V voltage from the battery to the valve terminals (“+” to terminal A, “-” to terminal B).
Comment. When voltage is applied to the terminals, the valve should open with a characteristic click. The faulty valve must be replaced.
The smell of gasoline in the interior of a VAZ 2107, possible causes of the malfunction, solutions
Operating principle
When the fuel is heated in the engine, the same hydrocarbon vapors appear, which, according to the laws of physics, rise upward into the separator, where most of them condense (return to a liquid state and flow back into the fuel tank, i.e., fuel savings occur). Residual gases are transferred through a steam line to an adsorber filled with activated carbon, which neutralizes them.
While the engine is running, there is another option for getting rid of harmful vapors - by redirecting them from the intake pipe. The temperature there is quite high, and the gas simply burns.
The adsorber is located under the hood, in the VAZ 2110 - in the near left corner. The adsorber looks like a small cylinder with a lid.
Adsorber design
- separator;
- gasoline drain pipe;
- steam outlet tube and hose;
- purge valve;
- gravity valve;
- adsorber
Where is it installed?
As a rule, the adsorber is installed under the hood on the right in the direction of travel of the car, for example, in the VAZ 2110 it is in the form of a barrel.
In other cars, it can be square and installed to the left of the engine (in the direction of travel), under the air duct (Lada Granta), the vacuum brake booster (some Nissan models) or in the radiator area. For VAZ 2114 it is located near the battery and air filter.
On the Volkswagen Passat B3, the adsorber is located under the air filter on the right side in the direction of travel.
Useful video
You can get additional information about the design of the adsorber and options for replacing it from the video below:
Here's some interesting information I found about the adsorber, it's scary: Due to the fight for the environment, the used tank has no outlet to the atmosphere. Gasoline vapors go through the pipeline to the carbon adsorber-receiver, and from it through the valve they enter the inlet manifold, participate in the mixture formation process, and then, of course, are burned. During parking, the valve is closed and vapors accumulate in the receiver. After starting the engine, it begins to open with impulses from the control unit.
The moment the system starts to operate may differ for different engines - for some the valve begins to open immediately, for others there is some time delay relative to the moment the engine starts. First you need to check whether there are control pulses to the valve. You can check by the sound (clicking) of the valve or by checking for the presence of control pulses on it. If the voltage at the connector is about 4 when the engine is running.
5 volts - pulses are coming (the voltmeter integrates rectangular 12V pulses). Next, turn off the engine, disconnect the tube that goes from the valve to the adsorber and, for convenience, put a suitable tube on the valve fitting instead. Blow into it in the valve-manifold direction. There must be an obstruction. Remove the connector from the valve, apply 12V to it and blow again.
The valve should now flow. So the adsorber-black can is installed under the air intake, in the right wing, has a diameter of 6 cm, a length of about 20 cm. Two hoses go from above, one goes into the gas tank, the other through the valve into the injection (or carburetor), from below through a 3 cm tube is connected with atmosphere. The task is to protect the environment; it accumulates gasoline vapors and then they are sucked off by the engine. If it fails, although there is nothing to break in it, so it is more correct that if it becomes clogged, the consequences for the machine can be catastrophic.
Consequences: 1) When clogged, the engine begins to suck all the air from the gas tank, as a result of which the tank is flattened with terrible force, and there is a gasoline pump in it, and so the gasoline pump is flattened by the tank with the same force, which threatens its breakdown 2) When the adsorber is completely filled with gasoline that has been sucked out from the tank, this gasoline begins to flow directly into the intake manifold and naturally into the cylinders and into the exhaust manifold. If a large amount of gasoline gets into the cylinders while the engine is running, there is a risk of damage to the cylinder head, pistons, etc., etc.
K. Gasoline is still an incompressible liquid. Getting gasoline into the exhaust manifold can lead to failure of the lambda and fusion of the catalyst. These are the consequences that can arise due to a seemingly insignificant detail. Periodically, after the engine warms up to more than 60 degrees, the engine idle speed begins to drop. While driving, the car periodically starts to stall for no apparent reason (like 2 min.
I'm dumb for 10 minutes. I fly). Diagnostics produces errors such as: the adaptation limit has been exceeded or the mixture control is outside the permissible limits. The situation becomes aggravated in wet weather or if the right wheel drives into a puddle. If the above symptoms are observed, it is worth checking the adsorber.
You can do this: disconnect the hose going from the valve to the manifold and plug it and drive for 5 days, if the symptoms disappear, then the adsorber is clogged. After the engine is turned off, liquid is observed to flow through the hose from the adsorber to the gas tank. When you unscrew the gas tank cap, you can hear air starting to be sucked into the tank. When driving, the gasoline reading level begins to drop sharply.
After filling the tank with gas, the car stalls. If the above symptoms are observed, then the adsorber is completely clogged! Further movement is only possible with the tank cap unscrewed, and it is better to disconnect the hose going from the valve to the manifold and plug it, otherwise you will face the above consequences. If your car is more than 10 years old (of course, depends on operating conditions), or more than 5 years old but you drive on dusty country roads, I strongly recommend cleaning the adsorber. from the forum https://www. Forum. Skoda-club.
Ru/viewtopic. Php? t=4900Taken from: https://2114.ru.
Canister purge valve
I decided to call this article exactly that, although the adsorber valve itself is not the main character here. It all started when my engine fault light came on (the check engine light came on). I waited for the next maintenance (fortunately it happened shortly before the scheduled maintenance) and informed the car service employees about it. They carried out diagnostics and said that the culprit was the canister purge valve, but they did not have this valve in stock, and for now it was possible to drive as is. I must say that at that time there were two weeks left before the end of the warranty, but they swore that they would replace the valve free of charge, even if the warranty had already expired by the time the valve arrived at the warehouse.
I was happy (despite everything, I never stop believing people)))), and in the article Three years on Priora I hastened to write that the adsorber valve was replaced under warranty. However, I was in a hurry...
As you may have guessed, no one was going to change anything for me for free. After several dozen phone calls to the car service center, I came to the disappointing conclusion that I had been duped once again. There was neither time nor desire to go to court over such a trifle. And I decided to change the canister purge valve on the Priora myself. But the experience of dealing with car services still taught me something, and I decided to check whether this ill-fated valve was really the problem.
The Priora's standard computer showed error 4. This is an error in the coolant temperature sensor. Of course, this could have been an accidental mistake. I didn't have the opportunity to use another computer or connect a laptop, so I tried to determine the source of the problem based on the symptoms. And the symptoms were:
- Sometimes (rarely) the engine was not very stable at idle
- Fuel consumption has increased quite slightly (almost imperceptibly - pure intuition)
- Sometimes a hot engine would not start the first time
- The engine began to pull worse (especially at low speeds), but also not much worse
After surfing the Internet, I came to the conclusion that the malfunction was somehow related to the air. And I read in several sources that the cause of this problem may be worn out rubber bands on the exhaust manifold fittings (see Fig. 1).
Rice. 1. Canister purge valve.
For various reasons, these rubber plugs deteriorate and lose their seal. Through the formed holes (Fig. 2), air begins to be sucked in, which leads to minor disturbances in engine operation.
Rice. 2. Damaged plug.
They write on the Internet that instead of these rubber bands you can use rubber bands from the brake cylinder bleeding fittings. You can probably install other suitable rubber bands. However, I only had tape on hand. I carefully wrapped the damaged elastic band with this tape (Fig. 3).
Rice. 3. Repair the plug using tape.
And, lo and behold, the engine malfunction light went out (of course, after resetting the errors). Of course, tape is a temporary solution to the problem. Most likely, it will not withstand temperature changes, especially in winter. But I’ve already been away for several weeks and so far everything is fine.
Conclusion
: no matter how developed the diagnostic tools are, people who work with them do not always have sufficient qualifications. And it may well be that in your case, instead of purchasing a new adsorber valve for 1500...2000 rubles (or so), you will solve the problem with the help of adhesive tape and such and such)))))
Well, if you still suspect the adsorber valve, then you can check its operation using improvised means.
We disconnect the negative terminal of the battery and remove the canister purge valve, which is held on the plastic engine cover with a latch (Fig. 1). Disconnect the power supply to the valve and the air supply/exhaust hoses. Then we try to blow the valve through the holes for the hoses. A serviceable valve is closed when the power is turned off, that is, it should not be purged.
Then carefully connect two wires to the valve power connectors and connect them to the battery (polarity does not matter). The valve should click quietly, that is, open. We try to blow out the valve again, now air should pass through the valve freely, that is, when power is applied, the valve opens. Turn off the power - the valve should close again and stop blowing.
If you succeeded in all this, then the valve itself is 99.99% likely to be working. However, there remains the possibility of malfunction of the valve control circuits. But that is another story…
Lada 2110 PhiX › Logbook › Removing the adsorber on a VAZ 2110
Hi all! Today, I will tell you how to properly remove the adsorber on a VAZ 2110-12. First, a little background. It all started when one day I removed the locker from the rear left fender and saw frayed hoses clogged with dirt and some kind of container, which, as it turned out later, turned out to be a separator. Judging by the condition of the hoses, it was clear that the adsorber was not performing its function, but was just cracking the valve in vain. Even then, the first thoughts crept in about getting rid of this device. Recently, in connection with the transition to DBP, I had to switch to a sports engine management program, in which the adsorber is not involved. I still don’t understand whether the customizer considered it unnecessary to turn it on, or whether the firmware did not allow this, but one way or another, I decided to completely remove the adsorber from under the hood. The procedure for removing the adsorber is not complicated, but there are some aspects that you need to know.
How the system works - operating principle
Why am I focusing on the solenoid valve, because it is practically the key one in this system. For a better understanding, I am posting a diagram of an injection car, and in this case it is a VAZ of the 10th family
For a better understanding, I am posting a diagram of an injection car, and in this case it is a VAZ of the 10th family.
So, fuel vapor rises to the top of the tank and stops at the separator, which is combined with a gravity sensor (as I wrote above, it prevents fuel from leaking out in the event of an accident - capsizing from the tank). In it they partially condense and return back (in the form of liquid fuel).
However, the other part of the evaporation, bypasses the gravity valve, passes into the adsorber, where they actually accumulate
Accumulation occurs when the engine is not running! IT IS IMPORTANT
After starting the engine, the solenoid valve opens - thereby connecting the adsorber cavity (where the gases are trapped, as it were) with the intake manifold or throttle assembly (in different cars in different ways). THE PROCESS OF THE SO-CALLED PURGE BEGIN! The vapors are mixed with air (from the street), which is supplied through the throttle assembly, then enter the intake manifold and then into the engine cylinders, where they are burned with the air-fuel mixture.
The system is very simple if you understand how it works.
Absorber device
Many VAZ 2112 owners have no idea what an absorber is, let's figure it out, starting with the name:
- Absorption is the phenomenon of absorption of gases by solid or liquid substances. In our case with an automobile system, coal acts as an absorbent, and the absorber is filled with this coal (the same principle is used in a gas mask)
- Now let’s look at this unit using the example of a VAZ 2112, what is an absorber, with an injection-type engine
- The feedback injection system uses a system to capture fuel vapors
- Such a system includes an adsorber, which is installed in the engine compartment, valves, a separator, as well as connecting hoses.
- In such a system, fuel vapors generated in the tank are partially condensed inside the separator, and the condensate is drained into the tank
- Non-condensed vapors are released through a two-way and gravity valve
- The gravity valve is used to prevent gasoline from leaking out of the tank if the car suddenly rolls over, and a two-way valve is necessary to prevent excessive pressure or strong vacuum from occurring inside the fuel tank
- After this, gasoline vapors enter the adsorber, where they are absorbed by activated carbon
- A hose goes from the second fitting of the adsorber to the throttle assembly, and from the third the hose is connected to the atmosphere through a solenoid valve
- Usually, when the engine is stopped, the third fitting is always closed using an electromagnetic valve; it turns out that the adsorber does not communicate with the atmosphere
- And when the engine starts, the controller in the injection system supplies control pulses to the valve with a frequency of about 16 Hz
- Then the valve opens and its sorbent (coal) is purged through the cavity of the adsorber - gasoline vapors enter the receiver through the hose along with air
- The higher the air consumption of the motor, the longer the pulse duration and the more intense the purging.
- If the injection system operates without feedback, then the gasoline vapor recovery system consists only of a separator with a two-way check valve
- The air filter is located in the left front section of the engine compartment and is secured with three rubber holders - supports
- The filter contains a paper element; when changing it, the corrugations must be positioned parallel to the axis of the machine
- The air passes through the filter to the air flow sensor, then passes through the intake hose to the throttle body
- The throttle assembly itself is mounted on the receiver
- When you press the gas pedal, the owner slightly opens the throttle valve, thereby changing the volume of air entering the engine, and accordingly, the combustible mixture, since the supply of gasoline is calculated by its controller strictly depending on the air consumed
Operating principle and design of the adsorber
The plastic body of the assembly contains a filler, simply activated carbon or a more complex substance. It is required to have high porosity and the ability to adsorb gasoline vapors, that is, to retain them in itself, separating them from the air.
The housing is sealed, on top there are inlet and outlet plastic fittings, usually for quick-release connectors, and there is also an integrated mount for an electric purge valve with its own connector.
While the engine is running, the pressure in the car's tank changes. In those days when they did not care about the environment, the problem was solved by a simple drainage hole in its plug.
Now, when ventilating the tank, it is necessary to separate hydrocarbons, that is, gasoline vapors from atmospheric air. To do this, an outlet is made from the top of the tank, connected by a hose through a separator and a system of safety valves to the internal space of the adsorber.
Gasoline vapors passing through activated carbon are separated and retained by its porous structure, which is very similar to the principle of operation of a gas mask.
The air passes further into the atmosphere through the breather fitting of the adsorber. At high temperatures and intensive use, the device’s capacity will quickly be exhausted, and gasoline will have to be removed somewhere.
For this purpose, the automatic operation of a car engine provides a special mode for purging the adsorber through the corresponding valve, which is connected by a hose to the throttle space of the intake tract. Usually directly to the intake manifold. Purge occurs due to the vacuum present there.
Certain conditions must be met for the electronic engine control unit (ECU) to issue a purge command:
- the engine should not be idling, which is determined by the speed and the pressure of the accelerator pedal;
- the temperature of the coolant and outside air are within the ranges specified by the program;
- The crankshaft rotation speed and engine air consumption determine the rate at which the adsorber is purged.
The purge flow is regulated in a key mode, that is, the valve opens and closes with a certain frequency, and the time of its relative stay in the closed and open states determines the performance of the mode.
It should not affect the main tasks of the motor - smooth traction, high output and stable operation.
Adsorber. Why is it needed, how does it work, how to check.
During purging, air is taken through the breather fitting of the adsorber, passes through the absorbent filling under the influence of a pressure difference, is saturated with gasoline vapor and is sent to the intake manifold for combustion in the cylinders as part of the air-fuel mixture.
The device is prepared to receive the next portions of vapor from the gas tank.
Detailed diagram of the fuel system
Detailed diagram of the fuel system.
1 — nozzles; 2 — fitting plug for monitoring fuel pressure; 3 — injector ramp; 4 — bracket for fastening fuel pipes; 5 — fuel pressure regulator; 6 — adsorber with solenoid valve; 7 — hose for suction of gasoline vapors from the adsorber; 8 — throttle assembly; 9 - two-way valve; 10 - gravity valve; 11 - safety valve; 12 - separator; 13 — separator hose; 14 — fuel tank plug; 15 - filling pipe; 16 — filling pipe hose; 17 — fuel filter; 18 — fuel tank; 19 — electric fuel pump; 20 — fuel drain line; 21 - fuel supply line.
Below we will look at the main elements of the fuel system separately.
Fuel tank
Dismantled VAZ-2112 gas tank.
The filled gasoline is supplied from the tank, which is located in the rear of the car, in the area where the sofa is located . The tank is made of steel and assembled by welding two stamped parts. Gasoline is supplied to the tank through a special neck, from a gas-resistant hose made of rubber, secured together with clamps.
Gasoline pump
Fuel pump VAZ-2112 1139009
A gas pump is an electrical functional device, submersible, installed directly into the gas tank itself. This pump is started by a signal from the ECU controller, which is responsible for fuel injection, through a relay when the ignition is turned on. If the fuel pump doesn't pump, the engine won't start! The operating pressure of the pump is at least 2.8-3 bar (atmospheres - approx.). In order to get to it, just lift the rear sofa and unscrew the technical hatch.
Fine filter
The new filter is ready for installation.
From the fuel pump, through a flexible steel hose, gasoline passes under pressure to the fine filter. The filter is made of steel and cannot be disassembled. A special paper filter element is installed inside. On the housing cover there is a special arrow, created for visual indication during installation, showing the direction of movement of gasoline in the system.
Fuel rail
Through steel fuel pipes, after filtration, gasoline passes directly to the fuel rail. It is designed to transfer gasoline to atomization and is mounted on the “outlet”. On one side of the fuel rail there is an RTD, on the other there is a fitting for controlling gasoline pressure. The pressure in the ramp in operating condition should be from 2.8 to 3.2 bar ( 2.8-3.2 atmospheres - approx.) - this indicator depends on the stabilization in the receiver, indicating constant differences in them. This is necessary in order to dose the optimal amount of gasoline into the injectors.
Fuel pressure control
Be careful when dismantling.
An RTD is a special device with a valve, assembled with a special diaphragm with a spring retainer. Under the influence of this element, the working position is in the locked type. It is also designed to divide the internal space of the regulator itself into two closed cavities - air and fuel.
The cavity for air is connected to the hose and receiver, and for fuel it is connected to the structure itself on the ramp.
During operation of the motor, the vacuum overcomes the resistance created by the spring and tries to tighten the diaphragm, thereby opening the valve. And from another position, at this time, gasoline presses on the diaphragm, also influencing the spring. As a result of this action, the valve opens slightly and part of the fuel flows back into the gas tank through the fuel line.
When the gas is pressed, the vacuum behind the throttle valve (throttle valve - approx.) becomes less, and the diaphragm, under the influence of a spring, closes the valve, increasing the fuel pressure. And if it is closed, the vacuum pulls the valve as far as possible - reducing fuel pressure.
The total pressure drop in the sensor is determined by the stiffness of the spring and the size of the hole. It cannot be adjusted, it is a non-separable element, and when it fails it must be replaced.
Checking the functionality of the adsorber
To make sure that the malfunction is related specifically to the valve of this element, you can send the car for a full diagnosis. But this is expensive, so let’s first try to identify possible problems ourselves.
First of all, you need to see if the controller is generating errors, for example, “open circuit control.” If everything is fine, then it will use a manual check. To do this, just prepare a multimeter, a screwdriver and several wires. After this you need to follow a few simple steps:
- Raise the hood of the car and find the valve you need.
- Disconnect the wiring harness from this element. To do this, you must first release the special lock that secures the pad.
- Check if there is voltage going to the valve. To do this, you need to turn on the multimeter and switch it to voltmeter mode. After this, the black probe of the device is connected to the ground of the car, and the red probe is connected to the connector marked “A”, which is located on the wiring harness. The next step is to start the engine and see what readings the device gives. The voltage should be the same as the battery. If it is not there at all or is too small, then you will probably have to look for a more serious problem. If everything is fine with the voltage, then you can move on to the next step.
Remove the purge valve. To remove it you need to use a screwdriver to slightly loosen the clamps. After this, you can easily move the valve slightly up and smoothly pull it out along a small bracket. After this, the device must be connected directly to the battery terminals. One wire goes to the purge valve (to “+”), and the second is connected to “minus”. After this, both conductors are connected to the corresponding battery terminals. If there is no click, then the valve is completely out of order and it is best to replace it.
Adsorber - what is it? Visual characteristics
The word “adsorber” itself translated from English means “to absorb”, “to absorb”. By its design, this part is an energy-absorbing plate. From the outside, you may not immediately be able to tell that the bumper is not solid - inside it there is a special filler made of polymer materials.
This part of the device (bumper) is considered the main one and converts mechanical energy into thermal energy, which is then dissipated in the external environment. The plate located in the adsorber bears a lot of responsibility, which is why many manufacturers place such stringent requirements on its technical characteristics and the properties of the entire device as a whole.
The main material used in the manufacture of this element is cellular plastic or, recently, manufacturers have also begun to use glass beads. The quality of the material itself is also strictly controlled, since the health of many people depends on it. For this reason, the adsorber (you can see a photo of this device below) is equipped only with high-quality bumpers.
But the safety and health of people depends not only on this. In order for the adsorber to perform its functions efficiently on a VAZ Kalina car, it is necessary to reduce the risk of damage to the rear bumper to zero. This part is a power element, and it is it that “bears the blow” that can cause mechanical damage. And if the device is broken or punctured, it can no longer be allowed to be used. This is because with each blow the adsorber (including the 2110 VAZ) loses its ability to absorb emissions.
How to check the adsorber valve
If after checking it turns out that the adsorber is in more or less working condition, then it makes sense to check its purge solenoid valve. It’s worth mentioning right away that for some machines, due to their design, some actions will differ, some of them will be present or absent, but in general the verification logic will always remain the same. So, to check the adsorber valve, you must perform the following steps:
Canister valve
Visually check the integrity of the rubber hoses included in the fuel vapor recovery system, in particular those directly approaching the valve. They must be intact and ensure the tightness of the system. Disconnect the negative terminal from the battery. This is done to prevent false alarms of the system diagnostics and to enter information about the corresponding errors into the electronic control unit. Remove the absorber (usually it is located on the right side of the engine, in the area where the air system elements are installed, in particular the air filter). Turn off the electrical power to the valve itself. This is done by removing the electrical connector (the so-called “chip”) from it. Disconnect the inlet and outlet air hoses from the valve. Using a pump or medical bulb, you must try to blow air into the system through the valve (into the holes for the hoses)
It is important to ensure the tightness of the air supply. To do this, you can use clamps or a thick rubber tube. If everything is in order with the valve, it will be closed and air will not be blown through
Otherwise, its mechanical part will fail. You can try to restore it, but this is not always possible. It is necessary to supply electric current from the power supply or battery using wires to the valve contacts. At the moment the circuit closes, you should hear a characteristic click, which signals that the valve has actuated and opened. If this does not happen, then perhaps instead of a mechanical failure there is an electrical failure, in particular, its electromagnetic coil has burned out. With the valve connected to an electric current source, you must try to blow air into it in the manner described above. If it is working properly, and therefore open, then this should work without problems. If it is not possible to pump through air, then the valve has failed. Next, you need to reset the power from the valve, and there will be a click again, indicating that the valve has closed. If this happens, it means the valve is working.
You can also check the adsorber valve using a multifunctional multimeter, switched to ohmmeter mode - a device for measuring the insulation resistance value of the electromagnetic winding of the valve. The probes of the device must be placed at the coil terminals (the places where the wires coming from the electronic control unit are connected to it; there are various design solutions), and the insulation resistance between them must be checked. For a normal, serviceable valve, this value should be within approximately 10...30 Ohms or differ slightly from this range. If the resistance value is small, it means that there is a breakdown of the electromagnetic coil (short interturn circuit). If the resistance value is very large (calculated in kilo- and even mega-ohms), then the electromagnetic coil breaks. In both cases, the coil, and therefore the valve, will be unsuitable for use. If it is sealed into the housing, then the only way out of the situation will be to completely replace the valve with a new one.
Please note that some vehicles allow a high insulation resistance value on the valve coil (in particular, up to 10 kOhm). Check this information in the manual for your car. Thus, in order to know how to check whether the adsorber valve is working properly, you need to dismantle it and check it in a garage.
The main thing is to know where its electrical contacts are located, and also to perform a mechanical inspection of the device
Thus, in order to know how to check whether the adsorber valve is working properly, you need to dismantle it and check it in a garage. The main thing is to know where its electrical contacts are located, and also to perform a mechanical inspection of the device.
Principle of operation
Now let's look at how the absorber works in a general fuel vapor recovery system:
- Gasoline vapors are formed in the fuel tank, which rise upward; they enter the separator through the neck hole, where the vapors condense and flow back into the fuel tank
- Part of the vapor that has not yet turned into condensate passes through the gravity valve and further along the steam line, and enters directly into the absorber, where the vapor is absorbed by the activated carbon contained in it.
- This process occurs when the car engine is not working, the diagram of the entire system is in the photo below
Diagram of a gasoline vapor recovery system
- From the diagram it becomes clear where the absorber is connected to the VAZ 2112
- When the engine is running, while the machine is moving, the control system promptly opens the solenoid valve, and the absorber substance is purged
- And gasoline vapors are mixed with the incoming air from another valve, blown into the intake manifold of the engine, where they are burned
In this case, we get some positive double effect, in which:
- firstly, the air is not polluted by harmful fuel fumes
- secondly, we get, although small, fuel savings. Since without an absorber, gasoline simply evaporates
It turns out that we save the environment and save fuel, a double benefit.
Absorber malfunctions
However, over time, the absorber becomes clogged and becomes unusable. Our instructions will help determine the signs of a malfunction of such a fuel system unit:
- The main symptom is the occurrence of excess pressure inside the fuel tank
- Pressure arises due to the appearance of vapors that simply have nowhere to escape from the tank
- In this case, when you unscrew the lid, you hear a hissing sound.
- It even happens that as soon as you start unscrewing the cap, it is knocked out with terrible force, either the valve is not functioning, or there is a problem with the absorber
- In general, you should go to a service station and figure it out, or look for a specialist among your friends and repair it yourself
- Until we get to the point of repair, you’ll just have to open the gas tank cap several times a day to let out the fumes
- In addition, due to poor performance of the absorber, the car engine speed may fluctuate at idle.
- In our home country, the problem of faulty parts is solved very simply, it concerns those without which the car can continue to move
- You shoot and move on as if that’s how it should be, folk craftsmen unanimously advise everyone
- It’s up to you to decide, of course, but you should remember that you yourself breathe this polluted air, as well as your children (never thought about it, right?)
- And if you take and remove all the “extra” environmental parts, since there is no need for them in the car, then one “beautiful” day you will have nothing to breathe
Replacing this part takes 15 minutes; you can do the job in two ways:
- on one's own
- contact a car service specialist if the price suits you
