The information presented in this article will concern the disassembly of the VAZ 2110 headlight. Why do you need to disassemble the headlight? In my case, I did this in order to insert the diode strip inside the headlight. This will also be useful for those whose headlights sweat. The reasons may be different.
I will not describe how to remove a headlight from a VAZ 2110 in this article, since you can find detailed information about this HERE.
Well, let's get down to the process itself. In order to disassemble the VAZ 2110 headlight, you need to be patient. Since the parsing process is simple, but it can take a while.
First, let's look at how to disassemble the headlight of a VAZ 2110 (Kirzhach)
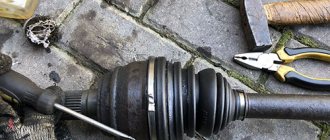
- So, the first thing you need to do is remove the glass from the headlight. I consider this stage to be the longest and most dangerous. Dangerous because if you are not careful you can break the glass.
A) Insert a screwdriver or knife into the edge of the headlight, between the glass and the plastic block.
B) This will create a small gap through which you can insert a utility knife and begin cutting the sealant.
C) be careful, do not rush, do not insert the screwdriver too deeply, otherwise the headlight glass will simply crack.
D) We go through the entire perimeter of the headlight with a knife. If the sealant does not yield, you can warm up the headlight with a hairdryer.
D) When the sealant has been slightly trimmed around the entire perimeter of the headlight, you can carefully push the screwdriver deeper into the headlight or insert a thicker screwdriver.
E) And again we go through the entire contour with a knife. (I played with the first headlight for 2 hours, with the second one less, either I gained experience, or there was less sealant. The second one succumbed to me in half an hour).
G) When the glass has completely come off, remove it from the headlight. Be careful, as the glass caught on the chrome plastic inside the headlight. And then it is fastened behind the headlight with three bolts. Therefore, if this happens to you, pry it with a stationery knife so that it comes unstuck from the glass.
We've sorted out the glass, let's move on.
2. Remove the chrome insert. To do this, unscrew 3 bolts from behind the headlight.
3. If you need to remove the headlight module and reflector, then remove the spring through the hole for the hydraulic corrector.
4. Now tighten the adjustment screws as much as possible, insert the screwdriver handle and unscrew the adjustment screws.
5. Now you can remove the board from the plastic headlight housing.
That's all, now let's look at the analysis of the VAZ 2110 (Bosh) headlight . Everything is much simpler with her.
- The glass on a Bosch headlight is very easy to remove, since it is not sealed with sealant. Unfasten the headlight latches.
3. To remove the reflector, you need to unscrew the adjustment screws and pull out the cap that covers the low beam bulb; to do this, pry it off with a screwdriver from the other side.
You have to adjust the headlight beam quite often, especially on station wagons, when the car trunk is heavily loaded and the light is directed into the eyes of oncoming drivers. If at one point you notice that the reflector has fallen and the light adjustment does not work, then you can try to repair the 2110 headlight yourself .
We will talk about Kirzhach optics. First, we remove the headlights, and then disassemble them (remove the glass that is on the sealant and 6 metal clips.) Cut the sealant around the perimeter using a knife:
We cut off a convex U-shaped profile on the glass, and a “convex” profile on the plastic of the headlights. Remove the reflector from the paper; to do this, unscrew the 3 small screws on the back side.
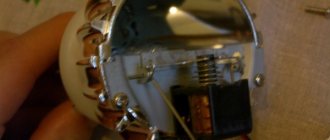
Inside the headlight, in the area of the hydraulic corrector hole, we see a spring that needs to be removed. Also 2 plastic roses from 2 “twists” that hold the reflector. Remove the reflector by squeezing the roses.
The ball at the tip snaps into the plastic, and the metal bobbin snaps into groove 2 and does not allow the adjustment to be unscrewed beyond it.
If you twist the hydraulic corrector too much when adjusting the headlights, it is easy to break the metal stop/latch. That's why the ball jumped out of the place.
All headlight repairs will consist of replacing the broken metal part with a plumbing gasket
Such a rubber gasket is not quite the right solution, because it does not give a clear understanding of when the headlight adjustment has reached the extreme position and rested. Therefore, you can also easily twist it again and have to repair it again. It would be more correct to modify the fastening, for example, insert a cotter pin made of wire between the petals of this plastic thing.
Reassemble the headlight in the reverse order, clean off the old sealant and apply a new one, install the glass. Another way to repair a hydraulic corrector : Cut M3 threads on the adjusting screws. Next, screw them into the headlight and put on the washers. We take out the plastic fasteners. We put on the bar with low and high beam modules. We put another washer on the top, then a spring, and another washer, and tighten this whole sandwich. It is advisable to use a lock nut and secure with anaerobic sealant.
Do-it-yourself repair of the headlight hydraulic corrector on a VAZ 2110. Important points
Often, car enthusiasts are faced with the need to repair the headlight hydraulic corrector on a VAZ 2110 with their own hands.
There may be several reasons for this. But in any case, they are associated with the impossibility of normal adjustment of light beams. The system works as follows: with standard loading, the headlights shine on the road. If you put something heavy back, the rear of the car will sag and the front will rise. Accordingly, the headlights will no longer shine on the road, but a little higher. This reduces visibility and increases the risk of dazzling oncoming drivers. It is to correct such situations that a hydraulic corrector is used.
As the vehicle's weight increases, the headlights move down slightly and the road is normally illuminated. When the load decreases, the light fixtures rise.
What does it consist of?
Repairing the headlight hydraulic corrector on a VAZ 2110 with your own hands has several features. All of them are related to the structure and location of this device. In general, this device consists of several elements:
- The master cylinder is located behind the dashboard;
- Working cylinders. They can be seen on the headlights;
- Pipelines, they connect the main cylinder with the workers;
- Special liquid.
This entire structure is non-demountable. If there is a malfunction, the entire element must be replaced. The system operates as follows. By turning the adjuster knob, you advance the cylinder piston. Accordingly, the fluid pressure increases and the headlight cups move. They lean forward a little.
Many car enthusiasts struggle with replacing and installing a hydraulic corrector. But in reality this work is not difficult. And if everything is done correctly, then no problems should arise. Replacement consists of the following steps:
- First the preparation is done. All clamps securing the tube to the body are removed. It is also advisable to remove the radiator expansion tank. This will make access to the headlight easier. In the cabin, the control knob is removed; to do this, you simply pull it towards you;
- Next you need to get the cylinder. To do this, grab the switch on the panel and pull it off. In most cases it can be easily removed. After this, the cylinder is unscrewed from the switch. This is done using a 22mm head. Afterwards the cylinder is pulled out by the tube under the torpedo. As a result, he should hang on the hoses;
- The actuator cylinders are disconnected from the headlamp. They are dragged into the salon. This completes the dismantling of the corrector.
Assembly is carried out in reverse order. In this case, pay attention to the seals. They should stand straight. Otherwise, you will have a noisy interior, and in winter it will blow from there. Don't forget to check the operation of the new hydraulic corrector. If it turns out that it does not work, you will have to repeat the procedure.
Dismantling
Replacement
To solve the replacement issue, you will first need to dismantle the headlight unit. By following fairly simple instructions, you will quickly understand the device and be able to remove it.
- Disconnect the negative terminal from your battery. This way you will de-energize the car, thereby protecting yourself from electricity.
- Remove the radiator trim.
- Disconnect the connectors with wires from the flashlight. Don't forget to disable the second one too.
- Now press the latch on the hydraulic corrector cylinder, turn it clockwise 90 degrees, which will allow you to remove the element from its seat. You will also see hoses there. There is no need to turn them off. They won't bother you.
- The headlight unit is held on by three bolts, which can be unscrewed with a regular wrench.
- Slide the light back and then to the side, moving towards the center of the car. Move until the hook disengages from the wing.
- The top bolts on the bumper will have to be loosened. There is no need to completely dismantle them.
- Press the trim from below until the flange disengages from the buffer. This will allow you to remove the cover.
- There is a nut at the bottom that holds it in place. It needs to be unscrewed.
- Now pull the headlight unit towards you, disconnect the block from the turn signals. That's it, the device is dismantled.
Design features
The design of the hydraulic corrector includes the following components:
- The master cylinder, which is mounted on the dashboard;
- Actuator cylinders, which are mounted on the headlights and turn them;
- Connecting pipelines of the hydraulic corrector, fixed with clamps;
- A working fluid that is characterized by increased frost resistance.
A hydraulic corrector works like this: a normal, working corrector maintains the pressure required for operation. If the driver needs to direct the headlights downwards, then the pressure in the system decreases. In this case, the rod turns the optics down using a piston. If the liquid leaks, the corrector pistons are fixed in one position, and adjusting the direction of the headlights becomes impossible.
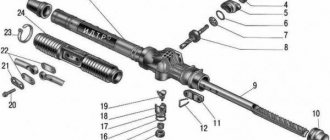
VAZ 2110 headlight hydraulic corrector diagram
Disassembly
After removing the device, it can be replaced with a new one, the old one can be repaired, or the optics can be tuned. Here the decision depends entirely on your needs and wishes.
Foggy
Disassembling the headlight unit is not a tricky task. But there are some peculiarities:
- Unscrew the two screws that are responsible for fastening;
- Disengage the two hooks located on the turn signals from the headlights;
- Thus, the optics is disassembled into two components.
Fault detection
If it is impossible to adjust the headlights, it may not be advisable to rush to immediately change the corrector, because it is quite possible that the problem is something else. If you have made sure that there is no leakage of liquid, and the direction of the light flux cannot be changed with the adjusting screws, measure the stroke of the rods. To do this, remove the actuator cylinders and take measurements. The stroke is considered normal if it is 6.5-7.5 mm.
VAZ did not provide for the repair of the corrector; its design is not collapsible. That is why, if the need arises, the entire structure, including tubes and cylinders, is replaced.
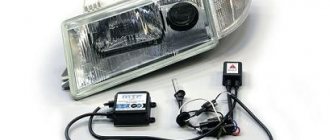
The right light
Dim light from headlights or foglights is not only annoying, but also reduces visibility at night, which is understandable even to a child. With good electrical equipment and good light bulbs, it’s simply a shame to turn on the headlights or fog lights and end up with a scattered yellowish spot. Not respectable and dangerous. Therefore, all questions are directed to the headlight housing.
It may well be that the reflector has nothing to do with it. Very often the lampshade itself becomes dark and cloudy, especially if it is made not of glass, but of polycarbonate, which replaced headlight glasses in almost all cars ten years ago. Glass is easier to work with because its internal structure remains transparent. It is enough to polish or clean the lampshade on both sides, and the headlight will be like new. The polycarbonate lampshade is not as resistant to heat and abrasion by road sandblasting, so it has to be polished more often, and its transparency is lower than that of glass. With the ceiling, things are much simpler. But if the reflector has become unusable...
Replacement procedure
For inexperienced drivers, replacing the corrector often causes difficulties, as evidenced by numerous discussions on VAZ owner forums. And yet, changing the hydraulic corrector is not so difficult. This is done in this order:
- Fastenings. First you need to disconnect all the clamps securing the hydraulic corrector tubes to the body;
- Cabin management. Remove the corrector switch handle located on the panel in the passenger compartment. To do this, just pull it towards you;
- Space for renovation. In the VAZ 2110, repairing the headlight hydraulic corrector is difficult precisely because of the inconvenient location of the hole through which the corrector tubes are threaded. At this stage, the whole process “slows down” for many. To get to the hole, you need to somehow remove the antifreeze reservoir. You just need to clear the “approach” from above so that you can work;
- We take out the cylinder. Further repairs take place from the interior. On the panel you need to sharply pull the switch towards you (pull it off), it will come off. Then unscrew the cylinder using the “22” socket. Open the cover with the fuses located there and, pulling, pull out the cylinder so that it hangs on the hoses;
- We take out the hydraulic corrector. The hydraulic corrector has a latch for the actuator cylinder; you need to press it. Then turn clockwise until it stops (90°) and remove it from the socket. Do the same steps with the other headlight;
- Push it inside the cabin and remove the hydraulic corrector;
- The new corrector is installed in the reverse order;
- Control. Check how the new hydraulic corrector works. Be sure to test whether the new device changes the angle of the headlights. If the repair is successful, then the luminous flux will be optimal and obedient to your adjustments.
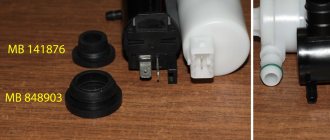
Washer: main aspects
Many drivers install jet headlight washers themselves. You can choose OFS-12P.
for this you need:
- up to 4 m of hose;
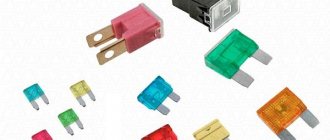
- about 15 worm clamps;
- relay, fuse with holder, terminals, wiring.
The washer reservoir has two pumps, but another additional one is mounted, which is connected to the battery via a relay and fuse. The jet headlight washer is connected to hoses and wiring. Its operating time is dosed manually.
Good light clearly illuminates surfaces and objects, and has a direction that does not blind oncoming motorists. This will ensure high-quality adjustment; there are rotating screws for it that fix the device horizontally and vertically. The best way to do this is to use mobile light devices, and also use a screen.
Features of operation
The new corrector will last a long time and will not need repairs for a long time if the replacement is done correctly. During operation, the corrector must be checked regarding the integrity of the pipeline. If a leak is detected, the entire set must be replaced again.
AutoNews / Reviews / Tests
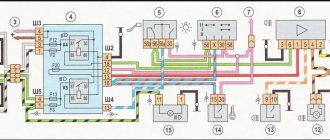
How to Adjust Bosch Headlights on VAZ 2110
We adjust the headlights on a VAZ-2110 with our own hands (video)
Adjusting the headlights on the VAZ-2110, as on any other car, is done to illuminate the space as efficiently as possible and at the same time does not blind oncoming drivers. This applies to both the low beam and the high beam. Ten can be equipped with two types of optics. German block headlights from Bosch and domestic headlights from the Autoshow plant from the city of Kirzhach. Adjustment is necessary for both those and other headlights than we will do now.
Changing the type of optics (tuning)
Car enthusiasts often tune their car headlights to improve their appearance. High-quality tuning gives the car a fashionable look and beauty. If you choose the right accessory, the appearance of dozens will change completely . The most popular among car enthusiasts is tuning headlights in the form of tinting. It is carried out in a variety of ways that have virtually no effect on the brightness and quality of road lighting. Types of headlight tinting:
- Painting of the headlight mask;
- Glass painting;
- Glass tinting film.
The process of such tinting is best shown in a video. For those who don't want to paint or tint their headlights themselves, there are ProSport headlights. They are already sold in black or chrome. You just need to install them instead of the standard headlights. Only they cannot boast of high quality or bright light.
Which headlights for the VAZ-2110 are better and easier to adjust?
No one can answer this question for sure, since the design of the optics of the domestic and German manufacturers is different. Both there and there have their pros and cons. German headlights cost 200-300 dollars cheaper, and for Kirzhach porcelains they charge an average of 2.7. 3 thousand rubles. However, the point here is not at all about the price:
- Kirzhach headlights have a lens-shaped block for low beam. On the one hand, this is good, since the light output is more concentrated and theoretically better regulated. However, the internal diffuser does not allow the full potential of the lens to be used. This affects lighting in bad weather (fog, snow, rain). The low beam has a classic reflector.
- German Bosch headlights received reflectors of light transmission and light transmission lamps, they do not have lenses, but the quality of the diffuser is much higher than that of the internal one. The low beam light beam is not as focused as in Kirzhach lamps, but the light level, especially in difficult conditions, is much higher.
The importance of adjustment
Many drivers adjust the headlights of their cars according to the principle “you can see me better.”
If the light shines lower and closer, then driving with such light is simply dangerous.
I drove to a flat part of the road, released both lights so “I could see better” and that was the end of it. In fact, this approach is fundamentally wrong and dangerous. Such drivers do not take into account that even long-range headlights can blindly blind an approaching driver, and this threatens him, if this is not an accident, and then loss of control over the car for at least 20-40 seconds .
Now calculate how far the car travels during this time at a speed of 60 km/h and notice that all these hundreds of meters the driver is almost blind. And if the speed of the oncoming car is 120 and there is an obstacle ahead, a pedestrian or a sharp turn?
Adjust your headlights correctly
That's why we will respect other road users and adjust our headlights exclusively according to the rules :
- As soon as it gets dark, we find any vertical plane that we can approach strictly perpendicular to a distance of at least 5 meters. It can be a wall, a fence, a fence, a shield, anything, with dimensions of at least two meters per meter. Main. install the car at a distance of five meters from the screen strictly perpendicularly, exactly in the horizontal plane .
Headlight adjustment diagram.
Turn the knob to position "0".
We achieve complete coincidence of the location of the light spot on the screen with the presented diagram.
After this, close the right headlight and adjust the left one with the same screw 1 and 2. If the headlights are adjusted correctly, the upper limit of the light spot should run along line 2, that is, at a distance of 525 mm from the ground, not higher.
The necessary conditions.
To ensure that the headlight adjustment is carried out correctly, before performing it, take care to ensure that the following conditions are met:
- the fuel tank must be completely filled;
- headlights - thoroughly washed;
- the car is equipped with everything necessary: a set of tools, a fire extinguisher, a spare wheel and other items that, according to the rules of safe driving, must always be present in the car;
- The tire pressure must be identical to that specified in the “tens” operating manual.
Next, find a flat vertical surface (fence, wall) - such that there is still about 8 meters of free space in front of it, and the light from the headlights falls on it perpendicularly. Stock up on chalk or duct tape. Proceed to the markup.