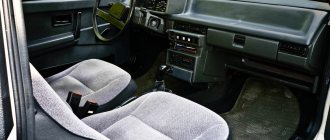
How to remove the visor of a high instrument panel without disassembling the entire panel
- Sometimes there is a need to remove only one visor on the high instrument panel of a VAZ 2109 without removing the entire panel. Often this point is not described in the manuals; the emphasis is on dismantling the entire dashboard and disconnecting it from the car body. At the same time, to access the instrument cluster, for example, to install LEDs for dial illumination instead of standard lamps or install another instrument combination, there is no need to dismantle the entire instrument panel; it is enough to remove only one visor.
- In this article we will look at how you can do this yourself.
- Before starting any work on the vehicle's electrical wiring, it is necessary to disconnect the negative terminal from the battery to avoid possible short circuits in the wires.
- Remove the headlight/low beam switch button from the panel using a screwdriver. The button is tight, you need to be careful not to damage it.
- Disconnect its connector from the button.
- In the same way, remove the emergency button. It will be more difficult to pull it out, we also need to be careful.
- Disconnect its connector.
- Using a Phillips screwdriver, unscrew the two screws securing the tidy console trim, also called the “beard.”
- Having unscrewed the screws, we bend the beard down, holding it from below with another self-tapping screw.
- We take out the radio and disconnect all its connectors, or the standard plug if you do not have a radio in your car.
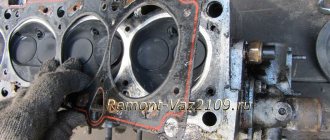
- There are 3 metal latches (2) on the top of the visor, and 2 plastic tabs (1) on the bottom edges. To remove the visor, you need to press them out one by one and release the instrument panel visor.
- We start with the two top latches, use a screwdriver to press them through the niche for the radio, and slide the visor towards you. Caution is also necessary here as the latches are fragile and can come off.
- Next, use a screwdriver to press out the two lower plastic fasteners of the visor and lift the visor up.
- Raising the visor, unhook the third upper mounting bracket, located on the left. Well, having disconnected the electrical connectors of the cigarette lighter, its illumination and the emergency signal lamp, we release the visor.
- That’s it, access to the instrument cluster is free, just don’t forget that the connectors and speedometer cable are holding it at the back. If you need to remove the instrument panel combination, for example, in order to illuminate the instrument scales from the inside, do not forget to turn off the whole thing.
The interior design of the VAZ-2109 depends on the year of manufacture of the car. In any case, dismantling the panel is a very labor-intensive job that takes a lot of time. Let's figure out how to remove a high or low instrument panel on a VAZ-2109.
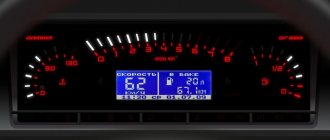
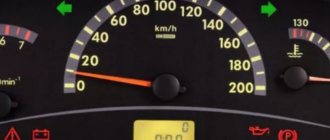
Instrument cluster
As for the instrument cluster of the VAZ 2109 with a low panel, it has the following diagram.
Dashboard
According to the image shown, the components of the instrument cluster are as follows.
| Number | What is this |
| 1. | Speedometer |
| 2. | Coolant temperature gauge |
| 3. | Voltmeter |
| 4. | Fuel level indicator in the tank |
| 5. | Fuel reserve warning lamp |
| 6. | Econometer |
| 7. | Vehicle mileage meter |
| 8. | Vehicle mileage meter |
| 9. | STOP lamp |
| 10. | Battery charge level indicator lamp |
| 11. | Air damper warning lamp |
| 12. | Hazard warning light activation indicator |
| 13. | Low brake fluid level warning lamp |
| 14. | Handbrake activation warning lamp |
| 15. | Warning lamp for low oil pressure |
| 16. | Indicator lamp for turning on the direction indicators |
| 17. | Indicator lamp for turning on side optics |
| 18. | Indicator lamp for turning on the rear fog lights |
| 19. | High beam warning lamp |
| 20. | Rear window heating indicator lamp |
Instrument scale
Low version dismantling procedure
A low dashboard is used in some VAZ-2109 cars, as well as in the Baltika modification. If the situation forced you to disassemble this part of the interior, then do the work like this:
- First of all, remove the 3 knobs from the panel for switching stove modes.
- Removing the airflow control knob is simple - slightly pull it towards you.
- On both sides of the shield, remove the fasteners of the decorative trim, then slide it towards you.
- Disconnect the connectors with wires from the fog lights and heated rear window switches. There is another wire going to the latter that needs to be disconnected.
- De-energize the hazard light switch and the cigarette lighter illumination.
- Now you can begin to remove the cigarette lighter wiring and decorative trim from the stove.
- On the stove control element you will see 4 fasteners that will need to be removed.
- Next, remove the 2 fasteners from the instrument panel.
- Remove the dashboard visor.
- Compress the spring clips and remove the housing from the instrument cluster.
- Unscrew the speedometer fastener and disconnect it from the drive cable.
- On the instrument panel, find the block with white wires and disconnect it from the power.
- Find the econometer fitting and remove the hose from it. After this you can remove the cotter pin.
- Then disconnect the speedometer from the cable, which is used to record the readings of the device for the day.
- Disconnect the red wire from the power supply.
- Pull the hydraulic corrector and light switch handles towards you.
- Unscrew the two fastening nuts that are located at the hydraulic corrector socket and next to the instrument backlight switch.
- Remove the steering wheel, along with the switches that are located under it.
- You can only remove the power pads from the ignition switch if you turn it to position 1 with the key.
- Remove 2 fasteners and the same number of nuts from the steering column.
- Remove the steering column along with the ignition switch.
- Pull the choke handle towards you to remove it from the rod. This rod is held in place by two fasteners that need to be removed.
- Remove the bolts from the left side and bottom of the instrument panel. Do the same on the right side.
- Inside the glove compartment there is another fastener that needs to be unscrewed.
- Remove the last fasteners and carefully remove the panel.
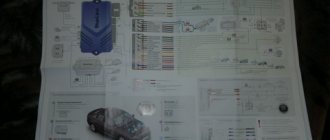
Dashboard
We will take a look at the dashboard diagram and its components using the image below.
Dashboard
This diagram contains the following elements.
| Number | What is this |
| 1. | Instrument cluster |
| 2. | Ignition switch |
| 3. | Dashboard |
| 4. | Central nozzles of the interior heating and ventilation system |
| 5. | Side nozzles of the interior heating and ventilation system |
| 6. | Glove compartment lid |
| 7. | Shelf |
| 8. | Stub |
| 9. | Heated glass switch on the tailgate |
| 10. | Rear fog light switch |
| 11. | Hazard switch |
| 12. | Central switch for outside light |
| 13. | Control panel for interior heating and ventilation system |
| 14. | Radio socket |
| 15. | Gear shift lever |
| 16. | Hand brake lever |
| 17. | Ashtray |
| 18. | Cigarette lighter |
| 19. | Windshield washer and wiper control lever |
| 20. | Gas pedal |
| 21. | Brake pedal |
| 22. | Clutch |
| 23. | Choke closing handle |
| 24. | Horn switch |
| 25. | Trip counter reset knob |
| 26. | Instrument panel light switch |
| 27. | Control knob for hydraulic headlight adjustment |
| 28. | Hood lock drive lever |
| 29. | Control lever for headlights and turn signals |
How to do easy tuning of the VAZ-2109 dashboard with your own hands
During the modernization of the interior of the domestic “nine”, tuning its “tidy” becomes a truly indispensable element. Beautiful modifications can be done with your own hands. To do this, you will need to make a new dial on a computer using special design programs and printing the picture on a printer.
However, first you need to clearly think through the appearance of the dials for the car's tachometer and speedometer, as well as for all the sensors that remain. Once the dials are printed, they need to be laminated, and then you can start removing the instrument panel.
To dismantle it correctly, you must first remove the steering wheel pads and also mark the steering position relative to the shaft. Then carefully unscrew the fastening nut.
Next, you can remove the steering wheel and unscrew the screws that are located in the area of the car lower casing. After this, you will have to disassemble the steering column. When the instrument panel is removed, you should unscrew the arrows from the old speedometer and tachometer. Subsequently, they will be attached to the updated dials.
When tuning a VAZ 2109 with your own hands, you can also repaint the dials and hands in bright colors. Regular spray paint cans are suitable for this. At the same time, it is better to make the dial a rich black color.
You can make it matte using special products. In this case, the arrows need to be painted in bright pink or original red-burgundy tones. After the painted plates of the machine dial have dried, they are completed with an old or pre-prepared scale and removed hands.
In a situation where the owner wants to modernize the instrument panel in a more modern way, he should also use a special (original, as in the video) backlight. You can add an original touch using a fluorescent marker, but more on that below.
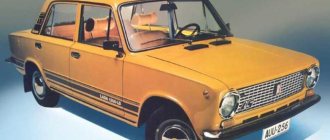
Is it allowed to install a dashboard on a VAZ 2115 from another car?
In short, no. The dashboard on the VAZ 2115, 2114 and 2113 has a number of design features that are not found on other cars. Its cross members, mounting brackets and console sides are too long. There is nothing like this even on other VAZ models, not to mention foreign cars. But it should be noted that car owners often practice reverse replacement. In particular, a dashboard from a VAZ 2114 can be successfully installed on a VAZ 2109. But in this case, you have to trim the sides of the console and drill new mounting holes on the brackets.
Replacing the VAZ 2109 speedometer drive due to gear wear
The drive also fails due to wear of the paired gears. In this case, its repair is carried out without removing the gearbox according to the following scheme:
- the car is placed on an inspection hole or overpass;
- using a socket wrench, unscrew the fixing bolt that secures the drive housing and gearbox;
- remove the case (it should be pryed off with a screwdriver);
- remove the gears and change them.
It is important to immediately count the number of teeth on the old gears. New parts must have the same number. Otherwise, the speedometer will provide incorrect information both in terms of mileage and speed. When inspecting the housing, you can see oil leaks on it, which indicates the need to replace the o-ring. It is pushed out after the driven gear is removed. It is recommended that after all replacements, wash the drive parts using clean kerosene, and then reassemble the unit in the reverse order.
Dismantling
There may be several reasons for dismantling the low panel of the VAZ 2109:
- Body repair;
- Repair of panel components;
- Car noise insulation;
- The desire to replace the old torpedo with a new one, etc.
We offer you a step-by-step guide that will allow you to remove the low type of panel installed on the VAZ 2109 without outside help.
- Remove the stove control knobs. A total of three.
- Remove the heater fan switch knob. To do this you need to pull it towards you.
- Unscrew the 2 fasteners of the dashboard trims on both sides of the console. The cover needs to be pulled towards you.
- Disconnect the wiring block from the rear fog light switch.
- Disconnect a couple of power connectors and one power wire from the rear window defroster switch.
- Disconnect the wiring block from the hazard warning light switch.
- Remove the wiring harness from the exterior light switch.
- Disconnect the power supply for the cigarette lighter illumination.
- Disconnect the cigarette lighter wiring harness and remove the panel trim.
- Remove the 4 heater control panel fasteners.
- Unscrew the 2 fasteners of the instrument panel visor.
- Remove the instrument cluster visor itself.
- The spring clamps must be compressed.
- Remove the instrument cluster housing from the panel.
- Unscrew the speedometer mounting nut, and then disconnect the speedometer cable.
- Disconnect the block with wires (it is white) from the instrument panel.
- Remove the hose from the econometer fitting, and then remove the cotter pin.
- Disconnect the cable from the speedometer that resets the odometer for the day.
- You now need to disconnect the red block from the instrument cluster.
- Remove the instrument panel light switch handle and the headlight hydraulic adjustment handle. They need to be pulled towards you.
- Unscrew the mounting nut of the instrument backlight switch.
- Unscrew the fastening nut of the headlight hydraulic corrector socket.
- Remove the steering wheel and its paddle shifters.
- Insert the key into the ignition and turn it to position 1. This will disable the anti-theft device. Only after this can you turn off the power supply to the ignition switch.
- Unscrew the 2 mounting bolts and 2 nuts of the steering column tube.
- Remove this pipe, taking the ignition switch along with it.
- Pull the choke handle towards you (we are talking about carburetor suction). There should be a craving. After this, the handle is removed from the rod.
- Unscrew the 2 choke guide rod fasteners holding it to the instrument panel.
- Remove the mounting screw on the left side of the dashboard.
- Unscrew the fasteners for the lower panel fixation on the left.
- Similarly, remove the fasteners from the side and bottom on the right side of the dashboard.
- Unscrew the panel fastening screw, which is located inside the glove compartment.
- There remains one fastener on both sides of the panel, which must be unscrewed in order to eventually remove the tidy.
The low panel is assembled in the reverse order unless it is planned to replace it with a more modern one or with a modified design. Then the assembly depends specifically on the panel that you have chosen for your VAZ 2109.
Do not forget that assembly is no more difficult or easier than dismantling. Therefore, you should not relax after completing only half the task.
Source
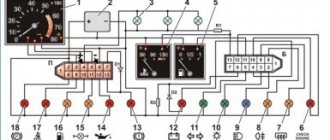
Relay and fuse box diagram 2109
The fuse blocks do not depend on the fuel injection system used - carburetor or injector. BP will differ only by year of manufacture of the car. That is, the mounting blocks for the carburetor and injector are the same. The VAZ 2109-099 fuse box (carburetor, injector) is located under the hood, in the compartment in front of the windshield on the left side.
Fuse block 2114-3722010-18
K1-relay for turning on headlight cleaners; K2-relay-breaker for direction indicators and hazard warning lights; K3 - windshield wiper relay; K4-relay for monitoring the health of lamps; K5-power window relay; K6 - relay for turning on sound signals; K7-relay for turning on the electric heating of the rear window; K8-relay for high beam headlights; K9-relay for low beam headlights; F1-F16 - fuses.
Fuse block 2114-3722010-60
K1 - Headlight wiper relay, K2 - Turn signal and hazard warning relay, K3 - Windshield wiper relay, K4 - Brake light and parking light relay, K5 - Power window relay, K6 - Horn relay , K7 - Rear window heating relay, K8 - Headlight high beam relay, K9 - Headlight low beam relay, F1 - F16 - Fuses, F1 - F20 - Spare fuses.
Attention! The power terminals on the generator often become loose, heat up, spark and melt the wiring. Pay attention to this point when searching for possible faults yourself.
votes
Article rating
Removal and installation of the “high” instrument panel for VAZ 2108, VAZ 2109, VAZ 21099
Before removing the “high” instrument panel from a VAZ 2108, VAZ 2109, VAZ 21099 car, disconnect the wire from the “-” terminal of the battery. Set the car's wheels to the straight-ahead position. Disconnect the rod from the carburetor choke lever and the speedometer cable from the gearbox. 1. Remove the steering wheel (see section 7 “Steering”, subsection “Steering column”) and steering column switches (see “Checking and replacing steering column switches” in section 9 “Electrical equipment”).
2. Pull the carburetor choke handle towards you until a draft appears, and remove the handle from it.
3. Remove the two screws securing the instrument panel console trim.
4. Remove the trim from the instrument panel console.
5. Remove the cigarette lighter socket from the socket.
6. Remove the ashtray from its slot by pressing the cigarette extinguishing plate.
7. Remove the interior heater fan switch handle.
8. Remove the three interior heater control knobs by prying the knobs with a screwdriver.
9. Disconnect the connector with wires from the interior heater fan switch under the heater control panel.
10. Disconnect the two wires from the contacts of the interior heater control panel backlight lamp.
11. Remove the headlight hydraulic adjustment handle by pulling the handle towards you.
12. Remove the instrument cluster light switch handle.
13. Unscrew the nut securing the instrument cluster lighting switch.
14. Unscrew the nut securing the headlight hydraulic corrector.
15. Push the instrument cluster lighting switch and headlight hydraulic corrector inside the panel.
16. Remove the side nozzles on both sides of the instrument panel using a screwdriver.
17. Remove one screw securing the trim on both sides of the instrument panel.
18. Use a screwdriver to pry the exterior lighting switch out of the instrument panel.
19. Disconnect the connector with wires from the exterior lighting switch. Push the connector into the instrument panel.
20. Using a screwdriver, pry up and remove the radio socket. If radio equipment is installed on a VAZ 2108, VAZ 2109, VAZ 21099 car, first remove it.
NOTE Remove radio equipment in accordance with the manufacturer's instructions.
21. Unscrew the screw securing the instrument panel trim.
22. Insert two screwdrivers to pry open the plastic tabs.
23. Lift up the instrument panel trim.
24. Disconnect the connector with wires from the cigarette lighter connector.
25. Disconnect the connector with wires from the cigarette lighter illumination connector.
26. Disconnect the connector with wires from the hazard warning switch illumination lamp.
27. Disconnect the connector with wires from the hazard warning switch and finally remove the instrument panel trim.
28. Gently press down and remove the speaker trim on the left side of the instrument panel. Be careful - the latches break off easily.
29. Disconnect the connector with wires from the heated glass switch of the trunk lid door.
30. Remove the connector from the rear fog lamp switch.
31. Remove the two screws securing the instrument cluster.
32. Remove the instrument cluster from the panel, unscrew the fastening nut and disconnect the cable from the speedometer.
33. Disconnect the red connector with wires from the instrument cluster.
34. Disconnect the connector with wires from the on-board control system.
35. Disconnect the white connector with wires from the instrument cluster.
36. Disconnect the ignition switch connector with wires from the ignition relay.
37. Disconnect the ground wire of the ignition relay.
38. Disconnect the connector with the wires of the air damper opening warning lamp.
39. Unscrew one screw of the lower fastening of the instrument panel on both sides.
40. Disconnect the connector with the glove box illumination lamp wires.
41. Unscrew the two fastening screws and lower the interior heater control panel down.
42. Remove the two screws securing the air damper guide rod to the instrument panel.
43. Unscrew two screws of the upper fastening of the instrument panel on both sides.
44. Use a screwdriver to pry and remove one plug from both sides of the instrument panel. Remove one instrument panel side mounting screw on both sides of the panel.
45. Unscrew the screw of the central fastening of the instrument panel.
46. Remove the instrument panel. 47. Install the instrument panel on a VAZ 2108, VAZ 2109, VAZ 21099 car in the reverse order. After installing the instrument panel, check the operation of the switches and instruments to ensure they are connected correctly.