If you are the owner of a first generation “nine”, then you have probably thought more than once about improving your car by installing an electronic instrument cluster from a VAZ-2110. And there are objective reasons for this. The standard dashboard installed on the VAZ-2109 cannot be compared with the instruments that are equipped with the second generation Samara and the 2110 model range. The latter have a brightly lit panel and a beautiful set of instruments.
In addition, they are deprived of such an element as a speedometer cable, which eliminates problems with excessive noise and its frequent breakdown. Therefore, installing an updated element carries a number of advantages, which VAZ-2109 owners can also appreciate. In the article we will tell you how to install the instrument cluster of a VAZ-2110 on a “nine” without resorting to outside help.
Installation of a high or euro dashboard (on domestic cars VAZ 2108 and 2109)
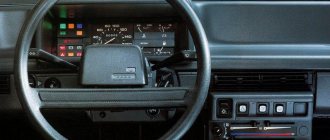
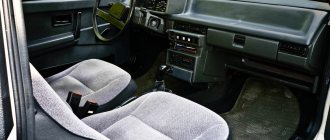
The most popular thing among car enthusiasts who have 2108 -2109 is changing the dashboard. Most often they use a low, high or euro panel. The most significant differences between these panels are the design, the presence of a device for indicating the number of revolutions (available on the high and euro panels) and other useful control keys.
The low panel has a wide shelf and good air ducting, but the buttons and instruments are poorly placed.
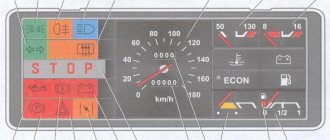
The high panel has a device for visually displaying the number of engine revolutions - a tachometer; instruments and buttons are more conveniently located. The disadvantages are that the air duct was installed poorly and the plastic is weak.
Euro panels combine all the advantages of the above listed panels, but are quite expensive.
All types of panels have identical stoves.
If you have everything needed to replace the panel, you can begin to remove the panel.
Dismantling the “low” type panel
- Disconnect the battery. We remove the steering wheel and all the switches under it. Turn off the ignition relay.
- We unscrew the 2 bolts that hold the top of the instruments and remove it.
- Next, we compress the springs and pull out the devices. We take out the speedometer cable.
- Pull out the white terminal and disconnect the econometric hose.
- We pull out the reset cable of the daytime mileage sensor.
- Disconnect the red connector and remove the devices.
- We remove the handles for the light corrector from the headlights, the light switch for the instruments, the car heating adjustment, and the fan switch. Unscrew 2 bolts from the console trim on both sides and move it towards you. Then we disconnect the connectors.
- Insert the key into the ignition to “0”. Disconnect the connector with the ignition switch. Unscrew 2 nuts and 2 bolts, pull out the steering column tube, as well as the ignition switch.
- Remove the choke handle.
- Remove the 4 bolts from the interior heater control panel. Unscrew the side screws of the dashboard on both sides.
- Unscrew the mounting bolts from the bottom of the dashboard on both sides.
- Unscrew the nuts that secure the light switch to the devices.
- Now remove the bolts that secure the panel to the glove compartment. And 1 bolt each, which secure the instrument console on both sides, and remove the dashboard.
Removing the “high” panel
- Disconnect the battery, steering wheel and all switches.
- We unscrew the two bolts that secure the console trim and remove it.
- We take out the handles of the heater, fan, and lighting devices.
- Unscrew the secured nuts of the light switch.
- We remove the nozzles from both sides and turn 1 bolt each that holds the pads on both sides.
- We take out the headlight and emergency lights switch.
- We take out the place for the receiver. Unscrew the screw that holds the panel trim.
- Use a screwdriver to pry off the panel trim. Disconnect the cigarette lighter terminals and the backlight, remove the trim
- Pull and remove the surface of the speakers on the left. Disconnect the terminals from the rear window heating switch and the fog light switch.
- We unscrew the 2 bolts that secure the devices and remove them. Remove the speedometer cable and turn it off.
- Disconnect all terminals that go to the panel.
- Unscrew 1 bolt from the bottom of the dashboard on both sides.
- We unscrew 2 screws and move down the socket, which is designed to control the heating. Then unscrew 2 bolts from the top of the dashboard on 2 sides.
- We remove the muffling devices and turn 1 screw on each side that holds the tidy. You also need to remove the screw that holds the dashboard centered.
Now you can remove the panel and begin installing the high dashboard.
Installation of a “high” panel
Installing a high panel is practically no different. But there are some special features: you should use the wiring harness for this panel. The heater cable and speedometer cable need longer ones. The side trims on the front of the cover are special for this panel. You need to plug the tube of the device that shows the flow. The signal to the device, which is designed to indicate the number of revolutions, must be connected from the wire to the ignition coil. Assembly must begin by laying new wiring. Installation of the panel is the reverse of removal.
Euro panel installation
Before installation, you need to prepare the euro panel. The air ducts must be intact.
- We glue foam rubber on the central air duct and on the stove. The panel is now ready. We put it down, but don’t secure it.
- First, let's run the new wiring harness and connect it.
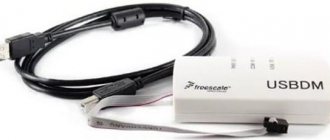
If the installation takes place on a car that is equipped with an injector, then some parts will not have to be replaced; they will fit perfectly. These include the ignition switch. When you buy a harness for a car equipped with an injector, you need to consider several factors. These harnesses have different connectors that lead to the “brains” of the car. There is a controller called BOSH, which has nine pins, and a controller called January, which has only 5 pins. Don't make a mistake when purchasing, choose the one that suits your car.
- Next, we need to connect a sensor that shows the level of gasoline in the car’s tank. It is connected through the so-called mounting block, but this does not suit us, and we need to reconnect this sensor directly. It's quite simple: you need to pull out the pink colored wire from the red terminal inserted into the dashboard. We replace the pink wire with a dark yellow one, which needs to be connected to the pink one.
- Now you need to connect the sensor responsible for determining the speed. You need to run wiring from it to the tidy. This sensor needs to be connected to the place where the speedometer cable used to be. You need to connect two wires with polarity “+” and “-“ to it. We also shouldn’t forget about the signal wiring: we connect it into the red well to the ninth contact.
- Now you need to install a thermometer, which is best placed inside the bumper. From this sensor, one wire must be connected to ground, and the other must be connected to the red well of the tidy.
- Connect the BSK indication unit. The car door switches are connected to the interior lighting. This needs to be redone. To do this, we need to reconnect the door switches to the mounting block and then connect them to the on-board control system.
- Now you need to install a new ignition switch in your car so that there are no problems with the wiring.
- Let's reconnect the sensor indicating the fluid level in the brake reservoir from ground to positive.
- The fan related to the water cooling system also needs to be installed new, which can withstand up to 16 amperes and work without a relay. To install the fan, you need to connect it to its switch. To do this, we throw one wire of the switch to ground, and the other will be connected to minus. There will be a wire with a positive value. We connect it to the mounting block.
- Next, we need to connect a device that indicates the number of engine revolutions - a tachometer.
It is very important to check all sensors and all devices for serviceability and functionality! All cables must be carefully inspected and tightened if necessary. It would be a good idea to check the wiring again; if there are exposed contacts somewhere, they must be insulated (ordinary electrical tape will do).
Once you have checked everything thoroughly, you can begin to secure the panel.
So, where do the work begin?
Removing the high instrument panel begins with removing the decorative steering wheel trim. Next, you need to unscrew the steering wheel mounting nut so that its front part is flush with the end of the column shaft. But you should not remove the nut right away. The steering wheel on the “nine” sits very tightly on the splines, and with sudden movements it can jump off the mounts and cause serious injury.
With sharp blows of the hand, the part is knocked off its fastenings and finally removed. Next, unscrew the 6 bolts of the lower column casing. The last part, together with the ignition switch trim, is pulled out entirely. We do the same with the top casing. After this, the base is removed from the shaft and the two wire blocks from the sound signal are disconnected. Then the cords from the windshield wiper and washer are removed along the chain, as well as the turning and lighting lever.
After pulling out the “choke”, the handle is removed from the rod and the instrument panel consoles are removed. Next, remove the cigarette lighter socket, the ashtray, as well as the fan switch and heater control knobs (here you can try prying them off with a minus screwdriver). After this, the hydraulic corrector, lighting switches and other elements are removed in the same way.
After it comes to the instrument panel and the speedometer cable has been removed, remove the red and white pads from the instrument cluster and on-board control system. Then we disconnect the ignition switch along with the ground, the control lamp for opening the damper and the guide rods. The shield fastening screws themselves are located on both sides of the cladding. After removing them, the instrument panel (VAZ-2109 Samara) will be in a position free from the car.
New dashboard on the VAZ-2109
If you are the owner of a first generation “nine”, then you have probably thought more than once about improving your car by installing an electronic instrument cluster from a VAZ-2110. And there are objective reasons for this. The standard dashboard installed on the VAZ-2109 cannot be compared with the instruments that are equipped with the second generation Samara and the 2110 model range. The latter have a brightly lit panel and a beautiful set of instruments.
In addition, they are deprived of such an element as a speedometer cable, which eliminates problems with excessive noise and its frequent breakdown. Therefore, installing an updated element carries a number of advantages, which VAZ-2109 owners can also appreciate. In the article we will tell you how to install the instrument cluster of a VAZ-2110 on a “nine” without resorting to outside help.
Instrument panel (high) VAZ 21099 Lada Samara
- Repair manuals
- Repair manual for VAZ 21099 (Lada) 1990-2008.
- Instrument panel (high)
Disconnect the wire from the “–” terminal of the battery. Set the wheels to the straight ahead position. Disconnect the rod from the carburetor choke lever and the speedometer cable from the gearbox.
| Ignition switch trim. |
| PERFORMANCE ORDER Install the panel in the reverse order. After installation, check the operation of switches and devices to ensure they are connected correctly. |
Installation of the VAZ-2110 instrument cluster on the VAZ-2109
So, in order to clearly understand whether you need a new dashboard or not, we will list the main advantages and disadvantages of the VAZ-2110 instrument cluster from the “tidy” installed on the “nine”.
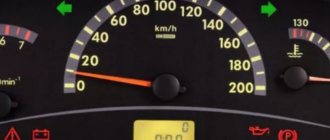
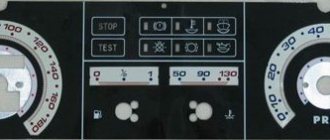
- Location of the speedometer and tachometer scales. In the new dashboard they are located in the center, which gives the driver a more complete overview of these indicators.
- The updated devices not only have a beautiful design, but also began to provide more accurate information due to factory modifications.
- Now a light bulb, controlled electronically, signals the critical level of fuel in the tank. Previously, it could light up and go out depending on the position of the liquid in the volume of the tank.
- A self-diagnosis system has been implemented. It is enough to turn on the ignition together with the daily mileage reset button.
- Increased panel dimensions. To install a new dashboard you will have to cut down the standard visor.
- Special fuel level sensor. If you want to receive true information about the fuel level in the tank, you will have to look for a sensor that matches the fuel resistance. Otherwise, the readings will not be correct.
Another point that cannot be put into any of the categories. When installing a dashboard from a VAZ-2110, you will have to install a speed sensor. Since there is no speedometer cable, the sensor is directly responsible for these indicators.
From all of the above, we can conclude that the new dashboard, although it has some disadvantages, is significantly superior to the old one.
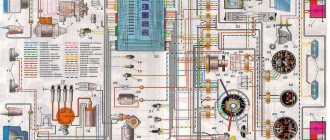
In order for the installed instrument cluster to work properly, it is necessary to reconnect the wires in cells X1 (white) and X2 (red). The tables below show the connection diagrams:
In the end, only 3 wires will remain untouched.
We recommend signing the standard wire connections before starting this procedure. This will allow you not to get confused and do everything correctly.
We also provide the numbering of contacts in the blocks:
In addition, a small update will occur with the connection of the brake fluid level lamp. The wire coming from the lamp must be switched from “ground” to 12V. If this is not done, the lamp will remain inoperative.
Pay attention to the dashboard from the VAZ-2110. If an additional monitor is installed there to display outdoor temperature readings, you must install a corresponding sensor. Connect the contacts from the sensor as shown in the diagram with contacts 1 and 2 of block X2.
Installing a speed sensor also has its own nuances. We put the yoke in place of the cable. Since the wiring of the contacts on the cable and the sensor is different, we use a table for connection, and the contact values are contained on the sensor.
Video review of the dashboard on the VAZ-2109:
Installation highlights
Before deciding which panel you can install, you should take into account that the original VAZ 2107 torpedo can be returned at any time. If such a procedure is carried out independently, it is recommended to use a book on repairing classics. It will take a lot of time to complete the work.
When connecting the wires, you need to remember that one goes to ground, and the second goes to the panel to the corresponding contact. It is recommended to label which connector goes where. To operate the speedometer, a speed sensor from model 2110 with 6 pulses is installed. If the “seven” is equipped with an econometer, it is recommended to install a tee from 2106 on 2 sensors, including a pressure sensor from engine 402.
Updated dashboard installations
The instrument panel from the VAZ-2110 is shorter than the standard panel of the “nine”, and therefore for its reliable and correct installation it will be necessary to increase the length to the required size . You can increase the length using polystyrene. Glue the plate of the required size and fix it in the appropriate place. In addition, it is necessary to slightly change the angle of the new tidy. We again use polystyrene plates, which we glue onto the mounting surface. A small life hack: you need to increase the length of the dashboard on the left side. Due to this, we can easily install the light switch button in its regular place. You can fix all the elements using superglue or “moment”.
Step-by-step tuning steps
Before dismantling the VAZ 21099 panel, you will need to remove the terminals from the power supply by hand. Then the decorative steering wheel trim is removed. The nut should be unscrewed so that its end is flush with the similar element of the steering column shaft. You can’t turn it away right away. Then tuning the VAZ 21099 panel involves removing the steering wheel.
After unscrewing the 6 screws that secure the lower casing, you will need to remove it. The ignition switch trim is removed. The next step involves loosening the bolt that secures the base of the switches. The last element is removed from the shaft, and 2 blocks with the corresponding wires are disconnected.
Visor modification
As noted at the beginning of the article, the standard visor on the VAZ-2109 does not fit the dashboard of the VAZ-2110, and therefore it will have to be improved. In the photo below we present a clear example of how, using epoxy, trimming and special other “individual” means, you can obtain the required window configuration. In the end, just paint the visor black and everything will look as if it were a standard visor.
And this is what the finished version looks like:
Agree that such an instrument panel looks much more pleasant. At night, with the backlight on, we get this view:
see also
- Which vehicles can be parked using the method indicated on the sign?
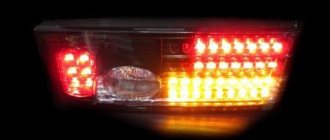
What kind of engine can be installed on the UAZ Patriot?- What LEDs should I put in the dimensions?
- Which alarm to install with auto start?
- Which lanes do the rules allow you to drive on this road?
- How long is the wiper blade?
- Which tickets will I use to pass the traffic rules if I have the all category?
- Which tooth is the DPKV VAZ looking at?
- What laws should a driver know against a traffic cop?
What kind of bulbs should I put on the low beam headlights?- What is the fine for not turning on the low beams?
Fuel level sensor
Especially for those car owners who want to see accurate data and are looking for a suitable type of sensor, we offer a table for your reference:
The optimal choice would be the sensor number 2108-3827010-01. Its reading is approximately as follows: the middle of the scale indicates a level of 20 liters, and the red zone begins when the tank contains about 5 liters of fuel.
In any case, when you buy a sensor, test it for resistance: the best option for you is a sensor that shows 360 ohms when the tank is empty.
Video review of the dashboard on the VAZ-2109:
Source: auto-cool.com
Popular methods for changing a torpedo
To begin with, here is a list of the most popular methods for changing the front panel. We include:
1. Complete replacement. Installing a new torpedo, which was taken from another car, can be called a rather difficult job. Note that if instrument panels and other small tuning parts can be found on sale, then suppliers of such parts do not create a torpedo (it can be found on sale extremely rarely). This is due to the fact that such tuning is carried out quite rarely. However, only by completely replacing the panel can you get rid of cheap plastic and put an end to the crickets that can make long-distance travel simply unbearable.
2. Quite often, partial modifications are carried out, which is represented by the creation of additional niches for the multimedia system, a control unit for new functions, and so on. Such work cannot be called difficult, since plastic is used in the manufacture of the torpedo - a material that can be easily processed using available tools. The main thing is to carry out such work carefully, since if mistakes are made, important electrical elements and so on can be damaged.
The first method is implemented quite rarely, but allows you to achieve truly unsurpassed results. The second is easier to implement, but does not allow you to completely get rid of low-quality plastic.
Car dashboard cover
Another way to get rid of low-quality plastic in the car interior is to cover the dashboard. As a rule, leather or a high-quality substitute is used for this. It is quite difficult to do the covering yourself; the plastic, which was previously part of the interior design, will serve as the basis.
Sidebar: Important: It is recommended to carry out the covering only after creating all the necessary niches for installing additional equipment. Otherwise, costs increase significantly.
When choosing a material, you need to abandon fabric, since the front panel is constantly exposed to direct sunlight and is often exposed to greater impact than other upholstery elements. When choosing a color, you need to give preference to not bright shades that will not be very noticeable. Quite often you can find examples of tuning that use bright fabric: red, blue and other colors. Note that this option looks quite attractive, but during a long trip the driver and passengers will be very tired.
Installing a torpedo from another car
A significant modification can be called the installation of a torpedo, which is intended for another car. Such work is carried out extremely rarely, as it is difficult to perform. Its features include:
- The panel must be selected according to the width of the cabin, otherwise it will not become simple even after modification. At the same time, attention is also paid to the height. For example, SUVs have a higher dashboard, which will not fit into the car in question. Most often they choose torpedoes from foreign cars that were produced in the last millennium. This is due to the fact that they can be found at an affordable price when disassembled, and modifications may be insignificant.
- All elements of the front part will have to be redistributed. Particular problems arise with the location of the stove and steering column. If these elements do not significantly coincide in location, then significant changes must be made to the design of the torpedo.
- In any case, you will have to create new seats and fasteners on the body, since it is more difficult to change the torpedo. This moment determines the need for precise marking, as well as welding, creating holes, and so on.
- Many problems arise if the panel does not fit the width of the body. It is quite difficult to shorten a torpedo qualitatively, but it is still possible. After this, you will have to use additional decorative elements to close the seams.
The work can take several days or even weeks, and the cost of rework varies widely.
Such services are provided only by companies that specialize in tuning.
The final stage of work
The high panel of the VAZ is dismantled carefully, since there are latches on the left that quickly break. After disconnecting the block from other elements, the entire instrument cluster is dismantled. The final step involves disconnecting the cable from the speedometer. If the Europanel is equipped with additional equipment, then you need to be even more careful. Tuning a torpedo involves disconnecting the block from the following units:
You will need to unscrew the screws for the lower fixation of the torpedo on both sides. Using a screwdriver, pull out the plug and unscrew the screws for the side fixation of the torpedo. The europanel is removed at the final stage. Installation of a new structure of this type is carried out in the reverse order. Upon completion of this procedure, the operation of the switches is checked.
Often, tuning a VAZ torpedo involves dismantling the plastic and removing the panel board. In this case, you will need the following tools and materials:
- soldering iron;
- europanel or insert;
- ultraviolet light bulb;
- wires;
- light bulbs;
- cartridges;
- glue;
- marker.
Initially, you will need to remove the old europanel, remove the glass and the existing edging. The insert and arrows are carefully pulled out. Particular attention should be paid to the new insert. It is recommended to make holes with some margin. This will prevent the arrows from sticking.
Further tuning is based on dismantling the standard backlight. This may break the plastic. Initially, the board is dismantled. Experts advise first drawing on paper the existing connection diagram and connections.
The standard lighting is replaced with neon lamps. Neon is glued to the panel. A plastic protection is fixed on top. In this case, you need to check whether this structure is securely held. The block with which the neon lighting is controlled should be glued to the europanel. To do this, you can use glue or double-sided tape.
Such tuning is easy to do with your own hands. An important point is the installation of the panel and the correct connection of its devices to the network. For this, auto mechanics recommend using books on repair and operation of the VAZ 21099.
Installation of a multimedia system and other elements
With the spread of touch screens, they have become quite often used in the production of multimedia systems that are installed in cars. Of course, you can purchase a GPS navigator that will be mounted on top of the panel. But still, this design option is impractical, as it takes up a lot of free space and impairs visibility.
If desired, you can implement a multimedia system into the torpedo. For this:
1. Select a multimedia system. 2. Find out its exact dimensions. 3. We mark the area on the dashboard. 4. We cut out the plastic. 5. Install the multimedia system. 6. Connect the system. 7. We carry out decoration.
In the same way, you can install control units for additional functions, for example, self-installed fog lights or interior lighting. In order to significantly simplify the work, you can buy a disassembled control panel from another car, also mark the location on the dashboard and cut out a place to install the panel.
In general, we can say that it is possible to modify a factory torpedo almost beyond recognition.
Experts' opinion
Alexander. It is recommended to abandon GPS navigators with external installation: there is no need to mount them on glass, as the view from the driver’s seat is significantly reduced. If the navigator is really needed, then you can create a special niche for it in the dashboard. The VAZ torpedo is quite simple and has a large amount of free space to accommodate various control units and multimedia systems.
Alexei. I installed a new torpedo from another car - a difficult job that required patience, precision and a lot of free time. I’ll say right away that you need to be well versed in the placement of important elements of your car: wiring, air ducts, and so on. Dismantling must be carried out carefully, since the original torpedo may still be needed.
Tuning VAZ 2109
The electronic instrument cluster, first installed on the VAZ 2110, and then on the second generation Lada Samara, is often the object of adoration for owners of the VAZ 2109 with a low and high dashboard. Not surprisingly, the new tidy looks much more beautiful than the old one, and its lighting is organized from the inside, and not from the outside, as on the old combinations. Plus, the new device does not need a speedometer cable, which often fails or begins to annoy with the noise it makes. In this regard, good news: the VAZ 2110 instrument cluster can be installed on a VAZ 2109, and this article will look at how you can do it yourself.
Electrical circuit repair
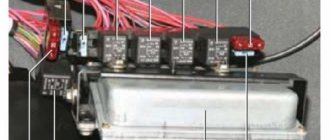
The VAZ 2109 power supply circuit is based on general connection principles. Plus goes from the battery to all devices. The minus for each is indicated separately, from the unit whose operation is signaled by a specific light bulb. Most breakdowns can be fixed with your own hands.
Any video will tell you that if several indicators fail to work, you should start by checking the serviceability of the fuses. Having opened the hood, you will see on the right under it a black box with a diagram of the location of each specific breaker. Select the correct fuse and replace.