Differences in the design of different panels
The fundamental difference between the variations of the torpedo is the following varieties:
- high panel;
- low panel;
- Europanel for VAZ;
- non-standard panel.
The low panel device is considered the most convenient in location, as it is equipped with a wide shelf, and the air supply system is designed in the best way among all types of linings. This ensures the correct response to temperature changes and instantly prevents the glass from fogging up. This VAZ panel has only a few drawbacks: a simple and unpretentious design and the absence of a tachometer.
The high and euro instrument panels are very similar to each other. The Euro model visually resembles part of the interior of an expensive imported car, so the developers put a lot of effort into its “stuffing”. Because of this, the cost of such a model of the VAZ 2108 instrument panel is significantly higher than the prices of other dashboard options.
There is a misconception that the stove hiding behind the high dashboard of the VAZ 2108 heats worse. But this factor does not depend on the instrument panel, but on the type of stove itself. Particular attention should be paid to the heating system equipment at the time of laying sound insulation. Almost all motorists subject their “steel horses” to this process.
When laying soundproofing materials, it is worth carefully sealing all kinds of cracks through which heat loss can occur. This will provide an additional guarantee of high-quality operation of the stove. In places of contact with the VAZ dashboard, it is necessary to carefully lay it with special materials. This will help avoid squeaks and other noises during operation of the heater.
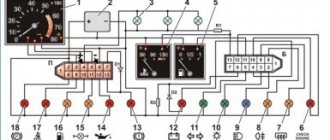
VAZ dashboard pinout
When repairing or replacing the dashboard (instrument panel) of VAZ cars with a more convenient and modern version of VDO, made with LEDs, you will need connection diagrams and pinouts of panel connectors. For this purpose, the editors of 2SHEMI.RU have prepared a complete collection of panel contact pinouts for all popular models of this car.
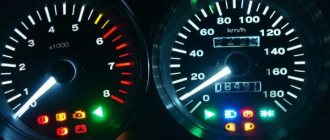
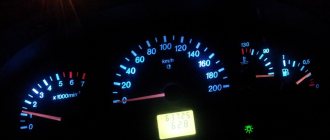
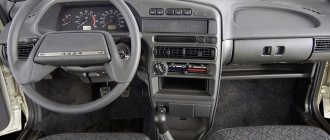
The main symbols that are found on the dashboard of absolutely any car of the VAZ family are: speedometer, fuel gauge, tachometer and sensors to indicate engine temperature.
Dashboard modification options
The VAZ 2108 dashboard trim will help to radically change the interior decoration. You can choose any modification that suits your requirements and wishes. You can transform the interior by installing leather elements with inserts of bright colors instead of boring ones. Quite popular is a panel overlay that allows you to cover the “native” factory background images.
A car with such an insert will resemble a racing car, and you will need to spend a minimal amount of money. There are quite a few similar options for transforming the interior: from laconic snow-white inserts to bright and colorful ones, allowing the car to radically transform.
Drivers who spend a lot of time behind the wheel of their vehicle decide to change the entire VAZ 2108 dashboard or at least some part of it. A simple change of a light filter from green to another - blue, purple or yellow - adds uniqueness and enlivens the interior.
The VAZ dashboard trim and instrument dials, in which the standard font is modified, add newness to the long-familiar elements of the car. The trim on the VAZ dashboard may differ in appearance, and the instrument scales may have different divisions, for example, not 2-3-4, but 2-2.5-3-3.5-4. It is impossible to significantly change or move the location of the dials due to the design of the car, but modifications for stylization are possible.
The overlay on the instrument scale must be replaced with special care, since the probability of breaking thin arrows or knocking down the zero marks of indicators is very high. And it is very difficult to correct this situation, since arrows are rarely sold separately; they can only be found at disassembly. At the same time, they may differ from the factory ones, which cannot but be striking.
The neon trim on the VAZ dashboard looks stylish. In the evening and at night, it gives the feeling of participating in a race in the famous movie “Fast and Furious”. It seems that you just need to press the gas pedal and the accelerator will turn on, which will take you far forward in a matter of seconds. The design of the low panel of the VAZ 2108 does not provide for:
- minimum brake fluid level indicator unit;
- block thickness control unit;
- presence of lamp health indicator and many other functions.
Despite this, the popularity of cars from early years equipped with such an instrument panel does not decrease. Sometimes it’s even the other way around: the demand for a VAZ 2108 dashboard equipped with the first instrument panels is higher for modern cars that their owners are going to convert. A wide shelf, powerful air exchange, or simply a pursuit of retro elevate these instrument panels to the top of the popularity ratings.
Tuning the low panel of a VAZ is no less popular. In this case, there are no limits to the designer’s imagination. The factory location of the buttons and the niche for the car radio allow you to modify and build in, for example, a TV for a car, or change the location and functionality of the buttons depending on your wishes or needs.
Recently, the installation of a rear camera has been gaining popularity, which significantly increases the maneuverability of the car. Any dashboard allows you to build a screen for such a camera, but sometimes it is necessary to additionally connect some functions to free buttons. Manufacturers thought through the VAZ 2108 dashboard taking into account the wishes of not only the driver, but also the passengers. This explains the convenient location of the buttons, accessible exclusively to the driver in order to avoid emergency situations.
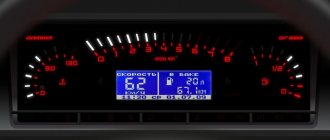
Instrument panels VAZ VDO (LED)
You can install a more beautiful and convenient panel with LED indicators, the so-called VDO panel. Here VDO is the panel manufacturer.
| Connecting VDO on a Kalina car | ||
| 1 | Pink-white | To electric power steering |
| 2 | Blue and white | To the hazard warning indicator |
| 3 | Gray-blue | To emergency oil pressure sensor |
| 4 | Brown blue | To the parking brake switch |
| 5 | Yellow-blue | To the immobilizer control unit |
| 6 | Black | To the airbag control unit |
| 7 | Yellow | To the outside light switch |
| 8 | Blue | To the right turn signal switch |
| 9 | Blue with black | To left turn signal switch |
| 10 | White-blue | TO ECU |
| 11 | . | To brake pad wear sensor |
| 12 | . | To seat belt sensor |
| 13 | Black | To the traction control control unit |
| 14 | Red-blue | “RESET” key on the steering column switch |
| 15 | Pink-blue | To brake fluid level sensor |
| 16 | Black | To ABS |
| 17 | Green | To the high beam switch |
| 18 | White | To the instrument cluster light control |
| 19 | Brown | Panel weight |
| 20 | White-red | Terminal “30” |
| 21 | Orange | Terminal “15” |
| 22 | Yellow-red | To fuel flow sensor |
| 23 | Orange-white | MK key “forward” |
| 24 | White black | MK key “back” |
| 25 | Black and white | Outside temperature sensor (-) |
| 26 | Yellow-green | Outside temperature sensor (+) |
| 27 | Pink | Fuel level sensor |
| 28 | Grey | Speed sensor |
| 29 | Green-white | Coolant temperature sensor |
| 30 | Brown-red | Tachometer (low voltage) |
| 31 | . | Official. Panel diagnostics. |
| 32 | Brown-white | Terminal “L” of the generator relay regulator |
Dismantling stages
There is a story among “Kulibin” motorists that only a professional, after dismantling and repairing, can put everything back together. In this case, unnecessary parts will remain and everything will work better than before.
This is the result that those who want to replace the instrument panel themselves strive for. There are no particular difficulties in this process, and since all types of panels for a given brand of car are dismantled almost the same way, let’s look at how to remove the dashboard on a VAZ with a low platform.
- Disconnect the battery.
- Set the wheels straight, disconnect the carburetor choke drive rod, and also disconnect the speedometer from the transmission.
- By pulling towards yourself, remove the three interior heating control knobs, as well as the blower mode switching knob.
- On the passenger seat side, disconnect the shield where the instrument panel trim is located, and remove the lower part of the solid panel block.
- Carefully disconnect all connections that are attached to this element.
- The next important step is to unscrew the four screws securing the stove control panel. This step is often skipped, which can later cause the part to break due to sudden pulling.
- Unscrew the screws that are located directly at the top of the niche.
- Remove the housing covering the niche, compress the spring clips on the sides of the glass, blocking access to the scales. Remove the housing and disconnect the speedometer cable.
- Carefully disconnect all wires and mechanisms suitable for this instrument unit.
- Remove all light knobs.
- Remove the steering wheel and related mechanisms.
- The VAZ torpedo is equipped with an anti-theft system that blocks the steering mechanism. Therefore, you need to insert the ignition key to position “0” to unlock the anti-theft system. Only then can the ignition switch be turned off.
- Disconnect the steering column and remove the pipe along with the lock.
- Remove the handle and unscrew the choke rod guide.
- Unscrew the screws located on the left and right (almost at the door itself) that secure the VAZ dashboard on the sides.
- Unscrew the screws located in the glove compartment, as well as near the gas pedal and on the passenger side.
If everything is done correctly, you can completely remove the control panel.
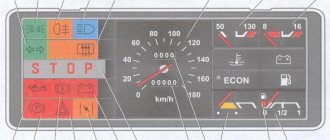
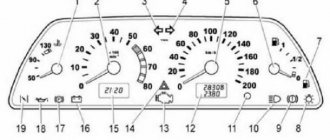
VAZ instrument panel indicators - explanation
- coolant temperature gauge.
- tachometer;
- left turn signal indicator lamp;
- right turn signal indicator lamp;
- speedometer;
- fuel level indicator;
- fuel reserve warning lamp;
- side light indicator lamp;
- service brake system warning lamp;
- high beam indicator lamp;
- reset button;
- mileage indicator;
- warning lamp for turning on the hazard warning lights;
- "check engine" warning light;
- time and temperature indicator;
- battery charge indicator lamp or battery lamp;
- parking brake warning lamp;
- oil pressure warning lamp;
- reserve.
Installation and repair instructions
If you are faced with the problem of a failure of the dashboard of a VAZ 2109 vehicle, then the best option would be to replace the dashboard yourself. To properly replace, you will need instructions for dismantling and installing the shield, which are given below. To perform these steps, you only need screwdrivers - flat-head and Phillips-head. The instructions are given on the example of a low panel, but in general they are identical for other versions of instrument panels. Don't forget to disconnect the battery!
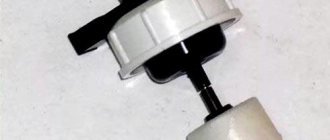
Unscrew the screws of the shield visor. Disconnect the speedometer cable. Disconnect the ecometer hose.
- First of all, you need to de-energize the system; to do this, disconnect the terminals from the battery.
- Using a Phillips screwdriver, unscrew the plastic trim around the steering wheel. You don’t have to remove it, but it is advisable to do so for greater convenience.
- You can also disconnect the steering column switches by simply unplugging the wiring harness.
- Using a Phillips screwdriver, unscrew the two small screws securing the dashboard visor and remove this element.
- After these steps, you can compress the springs and remove the electronic panel from the center console.
- The next step is to disconnect the speedometer cable. It is necessary to be very careful when dismantling so as not to damage the cable, especially if it is old. Otherwise, it will need to be replaced.
- Next, turn off the white outlet and remove the econometer hose.
- Then you should disconnect the cable for resetting the car’s daily mileage data from the speedometer.
- The final step will be to disconnect the red connector and dismantle the shield itself. A new panel is replaced and installed, after which further assembly is carried out in the reverse order.
As you can see, the procedure for replacing the instrument panel is not particularly complicated - just do everything in accordance with the instructions and there will be no problems in the further operation of the device.