Priora steering rack device
Removing the Priora steering rack
You will need : remove the front wheels and prepare tools (a 13mm socket, a 15mm wrench, a 19mm spanner, a large slotted screwdriver, pliers, a mounting blade and a hammer).
Inside, remove the lower part of the intermediate shaft from the splines of the gear shaft:
- Unscrew the fastening bolt nut using a 13mm socket.
- Pull out the bolt.
- Release the terminal connection using a large slotted screwdriver.
- Remove the lower part of the intermediate shaft from the splines of the pinion shaft.
To remove the Priora steering rack without tie rods, disconnect the inner tie rod ends from the steering mechanism:
- Remove the retaining plate for the inner tie rod ends by using a flathead screwdriver.
- Unscrew one bolt completely using a 15mm spanner and loosen the other bolt.
- Turn the connecting plate downwards.
- Remove the steering rod. We remove the second steering rod after unscrewing the second bolt.
To remove the Priora steering rack along with the steering rods , you will have to disconnect the outer tie rod ends from the swing arms of the shock absorber struts:
- Unbend and then remove the cotter pin using pliers.
- Unscrew the ball pin fastening nut partly using a 19mm spanner.
- Press out the finger using a special puller. If it is not there, then insert a mounting blade between the swing arm and the outer tip, and then hit the end of the swing arm with a hammer.
- Press the ball joint pin all the way out using a large slotted screwdriver.
Now, to pull out the steering rack with or without rods:
- Unscrew the two nuts securing the steering rack bracket to the front panel using a 13mm socket.
- Remove the two brackets.
- Remove the steering rack through the window in the left wheel arch, having first moved it forward to remove the gear shaft from the hole in the front panel.
If you remove the Priora steering rack yourself, then you will need at least 1 hour.
Electric amplifier breakdowns
To diagnose a malfunction of the electric amplifier, you first need to determine the conditions under which the problem arose. There may be several of them:
- the failure occurred after discharging and then charging the battery;
- after turning the steering wheel at a large angle;
- when performing a parking maneuver;
- when driving at speeds above 110 km/h.
Based on these reasons, we can draw a conclusion about the nature of the occurrence of malfunctions. Often the cause of malfunction is low voltage of the on-board network. For normal operation of the EUR, the voltage must be at least 13.5 V. First, the battery is checked. If it is working, it is possible that the on-board network was de-energized after the battery was removed for recharging. To resume work, sometimes it is enough to turn the steering wheel 5-6 times to the extreme positions and back.
If everything is fine with the battery, you need to check the insulation of the wiring and connections for short circuits. The EUR on the Priora does not work in constant mode, like the power steering. The maximum load on the electric motor occurs when the steering wheel rotates at low speed or the car is stationary; the minimum load occurs when driving at speeds over 100 km/h. After reaching 110 km/h, the electric booster does not work at all.
If you hear knocking or other suspicious sounds while driving when turning the steering wheel, the fastening nut may have become loose - it needs to be lubricated and tightened. To do this, you need to dismantle the apron under the steering wheel and remove the casing. Sometimes a situation may arise when the wheels turn spontaneously. This directly indicates a malfunction of the electric power steering control unit.
The main problem with the EUR Lada Priora is that in order to reduce the cost of the design, a high-quality German-made electrical circuit was replaced with a domestic analogue, modified, but “crude”.
If the amplifier and speedometer do not work, then the problem is in the speed sensor - it is either dirty or faulty. The same goes for torque and steering angle sensors. First you need to clean them and reset errors from the on-board computer; for this you can use several methods:
- remove the terminal from the battery, de-energizing the on-board network;
- using diagnostic programs and an adapter for connecting to the OBD II diagnostic connector.
If you suspect that a fuse has blown, it should be checked and replaced if necessary. It is located in the mounting block, in the cabin, below the steering wheel on the left side. If any of the listed malfunctions occur, you can fix them yourself, but to completely replace the electric power steering mechanism, it is better to contact specialists.
Installation of steering rack Lada Priora
Before installation, check that the rail is installed in the middle position. To do this, using sliding pliers, use the flat on the gear shaft to rotate the shaft in any direction until it stops, then turn the shaft in the opposite direction two full turns and turn the shaft so that the flat on the shaft is located vertically on the right side along the direction of the car. Otherwise, the installation of the rack is carried out in the reverse order.
The steering rack of the Lada Priora is the same as the rack of the Kalina or VAZ 2110-2112 of the new model and has a catalog number: 11183-3400010 (rasp inside 21100-3401068). Price approximately 3500 rub.
About the rake
The steering mechanism on Lada cars, starting with model 2108, has a steering rack. It is designed to move steering rods along a horizontal plane, which helps turn the car's wheels.
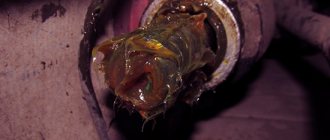
The design of the slats is quite simple and reliable, with the exception of one small drawback - a plastic bushing.
This bushing is made by the manufacturer from low-quality plastic, which soon leads to play in the rasp in it and the appearance of an unpleasant knock when moving on paving stones.
There is a rail between the engine and the passenger compartment, perpendicular to the exhaust manifold and attached with two brackets to the engine shield.
What affects the cost?
The main criterion for cost remains quality. The latter, in its best manifestations, is achievable within the framework of AvtoVAZ factory production or manual production of modernized steering racks. In addition, the following parameters of the product affect the cost:
- Availability of a power steering system (rack with an additional mechanism and line for connection)
- Equipped with rods with pressed-in fingers (thrust ball diameter of the finger, type of liner)
- Providing boot, clamps, retaining rings.
- Use of new seals, thrust plates and disc springs.
Some models of steering racks are equipped with a metal protective casing. Its price starts from 269 rubles . for a model without mounting kit and 370 rubles . with nuts, washers, studs.
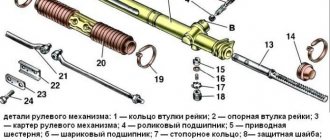
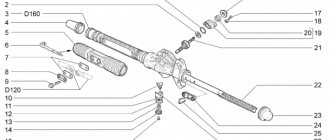
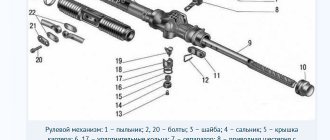
Design
Steering rack design: 1 – shaft boot, 2 – cover mounting bolts, 3 – Belleville washer, 4 – worm shaft oil seal, 5 – worm gear cover, 6 – sealing collar, 7 – thrust bearing, 8 – worm shaft with bearing, 9 – rasp, 10 – left boot, 11 – binoculars, 12 – binocular bracket, 13 – nut plug, 14 – thrust nut, 15 – thrust spring, 16 – locking collar, 17 – thrust piston collar, 18 – thrust rasp piston, 19 – piston liner, 20 – steering rod bolt, 21 – stopper, 22 – plate, 23 – plastic clamp, 24 – steering rack boot, 25 – left side boot, 26 – steering rack pipe.
Signs of play in slats
When driving over small irregularities such as a gravel road, shocks and knocks in the suspension are clearly audible and are transmitted to the steering wheel. These signs will not always refer to play in the rack. Similar impacts to the steering wheel can occur due to broken steering ends or a broken crosspiece of the steering mechanism. Before you begin repairing the rack, you must exclude the tips and steering cross from suspicion.
- Impacts to the steering wheel when driving over bumps
- Creaking sound when turning the steering wheel
- Biting the steering wheel in different positions
- The steering wheel does not return to zero position
Checking for play
Checking for play is done by rocking the swing arms up and down. To do this, we find the steering rods under the hood and pull each of them up and down; there should be no play or knocking. If any, then the rack should be maintained.
Design and operating features of power steering and power steering
To make steering easier to turn and increase comfort, either hydraulic or electric power steering can be used. Both amplifiers have both pros and cons.
Structurally, power steering is a system of high and low pressure hoses containing oil driven by a pump. Power steering fluid must be poured into the reservoir near the pump. It only works when the engine is running. The driver turns the steering wheel, and at this time the fluid flows through the distributor under pressure created by the pump to the steering mechanism. It enters the working cylinder, puts pressure on the piston, which begins to move, and facilitates the rotation of the steering wheel. When moving in a straight line, the liquid flows back into the system reservoir.
Advantages and disadvantages of power steering
In the case of a hydraulic booster, the main disadvantage is the bulkiness of the entire system. But it is cheaper to produce and maintain, and this affects the price of the car. At the moment, power steering is found mainly on budget class cars, which include Priora. An amplifier of this type is also installed on expensive, powerful SUVs. This is explained by the fact that the power steering is capable of transmitting greater torque transmission power to the steering. In this regard, it outperforms an electric booster, but there are still more disadvantages:
- In a car equipped with a hydraulic booster, it is not recommended to hold the steering wheel in the extreme right or left position for more than 5 seconds. Otherwise, the oil in the power steering on the Priora begins to heat up, which can lead to system failure.
- The mechanism requires constant monitoring of the oil level, inspection and replacement of drives, hoses, and pump.
- The pump depends on the operation of the engine, which means it takes a certain percentage of power from the power plant. If the power steering does not work when driving in a straight line, this percentage of power is wasted.
- Such a system does not imply setting operating modes depending on the speed of movement or the angle of rotation of the steering wheel.
- At low speeds, the steering mechanism provides good sensitivity, but at high speeds it becomes less pronounced.
Engineers compensate for the last drawback by using a steering rack with a variable gear ratio. Power steering has already become an outdated system; designers are no longer involved in improving it.
Electric amplifier design
The design of the EUR is simpler than that of the power steering. It consists of an ECU, a torque sensor, a steering angle sensor and an electric motor. There are no hoses or fluids here. The electric motor is mounted directly on the steering rack itself, and torque is transmitted to it via a torsion shaft built into the steering mechanism system.
In the case of power steering, the force is facilitated by liquid, and in the electric booster the current is responsible for this. When the driver turns the steering wheel, force is transmitted to the steering rack. At this time, the torque sensor transmits data to the electronic control unit. The controller calculates how much current needs to be sent to the electric motor to optimally facilitate steering rotation. Since the force must be uniform, the speed of movement and the angle of rotation of the steering wheel are taken into account.
Pros and cons of EUR
The electric booster is a more modern system with high potential for modernization. It is not without its shortcomings, but there are fewer of them than the power steering:
- high price,
- The electric motor cannot provide high power, so it is installed only on passenger cars.
The disadvantages are leveled out, since the design of the electric amplifier is constantly being improved.
The EUR for the Priora has many advantages. The system is easy to maintain due to its simple design. The only part that requires inspection is the rolling bearing. The ESD mechanism has more compact dimensions and can be installed on the steering shaft in the cabin, freeing up space in the engine compartment. Due to this, the durability of the structure increases, since there is no exposure to temperature changes and high humidity.
The electric booster does not take power away from the engine, which saves fuel. The drive only operates when the steering wheel is turned. The ECU is responsible for the operation of the amplifier, with the help of which you can adjust the operating mode of the EUR, taking into account the operating conditions of the vehicle. The electric booster is not afraid of extreme steering positions. Driving at high speed makes the steering wheel with ESD more sensitive.
Lift
If knocking is detected in the steering wheel, it can be tightened, but tightening will be effective only if there is knocking from the worm gear. If the knocking noise comes from a broken plastic bushing, then tightening is useless.
As is known from practice, the worm mechanism is quite reliable and is very rarely the culprit of knocking. Most often the bushing is to blame.
You can determine the culprit of the knock by pulling the steering rods one by one.
- If there is a knocking sound when applying forces to the right link, then the bushing is to blame.
- If there is a knocking sound when you apply force to the left linkage, then the worm gear is to blame.
In the first case, a lift is not advisable. Since the tightening nut only tightens the worm mechanism. To eliminate the knocking noise, it is necessary to remove the steering rack from the car and have it repaired.
Repair kit
In a Priora with an EUR, a rack from Kalina was installed with catalog number 11183-3400010 20. Therefore, the repair kit must be purchased specifically from Kalina.
Steering rack number
The repair kit includes a large number of parts necessary for repairs.
The price of a new rack starts from 5,000 rubles and higher, depending on the manufacturer, but new does not mean good, and the cost of a repair kit varies from 500 to 1,000 rubles, which is almost 10 times cheaper than a new rack.
Standard rail: article number and price
Lada Priora is a “converted Lada 2110.” Some parts from the tenth family may be suitable for it, but they are already structurally outdated. In the set for the old Lada 2110 you can find:
- Rake and rasp from VAZ 2108, straight-cut (3.7 turns). Article 2108-3400009-20
- The body is different, the rasp is from 2108, straight-toothed (3.7 turns). Article 2110-3400009-20
In the set for the new Lada 2110:
- Rasp 2110-3401068 with helical gears and variable pitch (4.2 turns). Article 2110-3400012
- Short rack with power steering (2.7 turns). Article 2110-3400010-30
The factory steering rack set for Priora contains:
- Rasp 21100-3401068-00 (4.2 turns). Article 11183-3400010-20;
- Rasp 2110-3401068 (4.2 turns). Article 11183-3400010;
- Short with power steering (2.7 turns). Article 21100-3400010-30;
- The article number for the rack set for Lada Priora with ESD will contain the model number - 2170.
EUR - electric power steering - is called an improved mechanism compared to hydraulic power steering. The fact is that power steering is more demanding on driving style. As an example, power steering does not tolerate moments when the steering wheel is held in the extreme position for several seconds - the working fluid simply overheats. In addition, you have to monitor the oil level in the tank, the pump, and carry out diagnostics twice a year - servicing the mechanism.
With an electric booster everything is a little simpler, but at the price of a rack for a Lada Priora with an electric power steering it will cost almost 2.5 times more - its average cost is 25,000 rubles.
Steering rack removal and repair
Removal work must be carried out with the necessary tools. Such as:
- Ratchet;
- Head at “13”, “15”, “17”;
- Key to "14";
- Hexagon at "6";
- Screwdriver "-";
- Hammer;
- The beard is blunt;
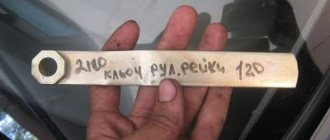
- Wrench for tightening the steering rack;
- Steering wheel end remover;
- Mount;
- WD-40 lubricant;
- Lubricant "Litol - 24";
- Steering rack repair kit;
Steering wheel removal process
- We align the steering wheel exactly in the center.
- Raise the left side of the car with a jack
- We unscrew and unscrew the steering end nuts, then use a puller to squeeze them out of the strut bipod.
- We unscrew the steering cardan in the car with a head on “13”, and forget the screwdriver into the slot of the cardan without damaging the splines. This is necessary for its easy removal from the rack splines.
- Remove the steel washer retainer from the tie rod bolts and unscrew the left steering arm from the rack and pull it out into the left window of the tie rods
The process of disassembling the rack
- We unscrew the steering rods with a head at “15”
- We remove the anthers by biting off the plastic clamps with side cutters. We pull out the central steering boot to the right side without damaging it.
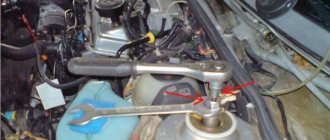
- Place a mark as shown in the picture and unscrew the nut securing the rack pipe using a punch and a hammer
- We take out the pipe
- We unscrew the steering tightening nut using a special wrench (don’t be afraid to turn it very tightly), take out the rubber ring and the pressure piston.
- To remove the pressure piston, you need to hit the back of the rack and the piston will fall out.
- We take out the rasp
- We unscrew the two bolts with a hexagon “6” and carefully remove the “worm” cover without damaging the oil seal.
Disassembly and assembly of the steering mechanism
We disassemble the steering mechanism when repairing it.
Remove the steering mechanism (see “Removing the steering mechanism”). Remove the steering gear boot (see “Replacing the steering gear boot”). Remove the steering rod support. We insert the bit into the groove of the crankcase pipe mounting nut.
We unscrew the nut, striking the beard (right-hand thread).
...and remove the crankcase pipe.
Use a screwdriver to press out the two clamps of the bushing located inside the pipe...
...and remove the bushing.
Remove the two rubber rings from the bushing (arrows indicate the bushing clamps).
If it is necessary to replace the nut, use pliers to remove the locking rings. . and remove the retaining ring... Remove the nut securing the pipe.
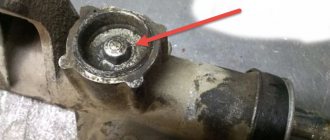
Remove the rubber plug from the rack stop adjusting nut. Using a scraper, remove the jammed metal in the locking areas of the stop adjusting nut.
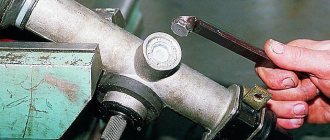
Using a special 24mm wrench with an external octagonal head, unscrew the stop nut.
We take out the stop spring. Using a screwdriver...
...remove the O-ring.
By hitting the crankcase against a wooden block, we knock out the rack stop. Using a screwdriver...
...remove the liner from the stop. A rubber ring is installed in the groove of the stop.
Remove the rubber ring from the crankcase that seals the hole for the steering mechanism on the front panel.
Remove the boot from the gear shaft. Use a 6mm hexagon to unscrew the two screws (shown by arrows)…
...and remove the crankcase cover.
Remove the separator with the thrust bearing rollers.
Remove the sealing ring of the cover.
We remove the rack from the crankcase.
We press out the gear shaft by holding the shaft in a vice with soft metal jaw linings and pressing the crankcase upward with the mounting blade.
We remove the gear shaft with bearing from the crankcase. We pry it off with a screwdriver...
...and remove the bushing retaining ring.
We take out the gear shaft bushing assembled with the support plate.
If it is necessary to replace the needle bearing, use a drill with a diameter of 4 mm to drill two diametrically located holes in the crankcase so that they extend to the end of the outer ring of the needle bearing. Through the drilled holes, using a rod of the appropriate diameter, we knock out the outer ring of the bearing from the crankcase.
Using a puller, we press the ball bearing of the gear shaft with the inner ring of the roller thrust bearing.
Use a puller to press the inner ring of the needle bearing off the shaft.
Use a screwdriver to pry and remove the gear shaft seal from the crankcase cover. If the outer race of the roller thrust bearing needs to be replaced...
... use a scraper to remove the extruded metal in four places and take out the ring. We generously lubricate the bearings, rack and gear teeth, and the plastic rack bushing with Fiol-1 grease. We assemble the steering mechanism in the reverse order. We press the outer ring of the needle bearing into the crankcase using a mandrel of suitable diameter. To seal holes in the crankcase, you can use “fast steel” or “cold welding”. We press the gear shaft with the ball bearing into the crankcase using a piece of pipe of a suitable diameter or a high head, applying force to the outer ring of the bearing. You can press the gear shaft into the crankcase, resting the outer ring of the bearing on the jaws of a vice. Then we put the crankcase on the bearing...
...and press the crankcase with light blows of a hammer through a wooden block.
We press the gear shaft oil seal into the cover through a mandrel or head flush with the end of the cover. We insert the rack into the steering gear housing. We install the pipe.
After tightening the pipe fastening nut, tighten the nut. We rotate the gear shaft so that the flat on it is located on the right side. We move the rack so that the steering rod support mounted on the rack is located in the middle of the pipe groove. We insert the rack stop, the stop spring and tighten the stop nut. It is recommended to replace the stop nut with a new one.
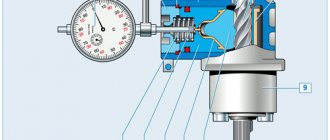
Scheme for monitoring the gap in the engagement of the rack and pinion shaft
: 1 — dial indicator; 2 — indicator mounting bracket; 3 - nut; 4 - sealing ring; 5 — steering gear housing; 6 — needle bearing; 7 — gear shaft; 8 — bushing; 9 — crankcase cover; 10 - rack; 11 — liner; 12 — rack stop; 13 — indicator leg; 14 - spring
We adjust the gap in the engagement of the gear with the rack. To do this, set the rail in the middle position and block it from moving. Insert the leg of the dial indicator into the hole of the adjusting nut of the stop until the tip of the leg touches the stop of the rack. The diameter of the tip of the indicator leg must be at least 3.5 mm...
...so that the leg rests against the end surface 1 of the stop, and does not fall into its hole 2 (for clarity, shown on the dismantled stop). We apply a torque of 15 N m (1.5 kgf m) to the gear shaft, while the gear pushes the rack and stop. Based on the indicator readings, we determine the amount of movement of the stop, which corresponds to the actual value of the gap in the engagement. If it exceeds 0.05 mm, tighten the adjusting nut, achieving the specified amount of movement of the stop. After this, having unlocked the rack, we check the ease of rotation of the drive gear throughout the entire range of travel of the rack.