No one will deny the fact that proper steering in any car guarantees not only the safety of the driver and passengers, but also trouble-free operation in principle. Regardless of the type of steering gear, be it worm gear, power rack or pinion steering, they all require periodic maintenance. VAZ-2114 and all second-generation Samaras received a fairly reliable and easy-to-repair and adjust steering mechanism. It does not have a hydraulic booster, which makes its maintenance and adjustment easier.
Why tighten the rack on a VAZ-2114
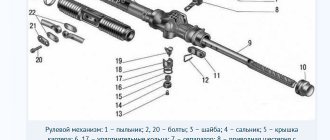
Diagnostics of the steering rack and steering mechanism
Before tightening the steering rack on a VAZ-2114, it is worth considering the prerequisites that will tell you that it’s time to repair or tighten it.
Backlash
First of all, this is a backlash.
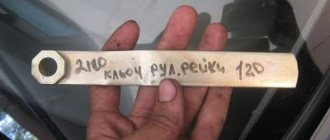
Key for eliminating steering rack play Eliminating steering rack play
In principle, AvtoVAZ guarantees a fairly long service life of the steering mechanism, namely ten years . However, we must understand that we are talking about ideal operating conditions. This assumes smooth asphalt roads, constant availability of high-quality lubrication in the rack housing and a gentle driving style.
Under normal operating conditions, this period is practically unattainable. Unimportant roads, poor quality of spare parts and often harsh operating conditions of the car lead to the fact that the mechanism makes itself felt much earlier.
The first symptoms of a faulty steering mechanism on a VAZ-2114
The first symptoms of a rack malfunction or the need for tightening are clear:
- Knocking noise under the hood in the area of the engine shield, especially when driving over uneven surfaces.
On a VAZ-2114, a knocking sound when driving through uneven sections of the road may occur due to a loose nut on the bolt that compresses the cardan clamp - Increased steering wheel play.
- Steering wheel rotation is too tight or too free.
- Leakage of lubricant through oil seals and rack casings.
- Sudden biting of the steering rack while driving.
The latter can be considered a glaring signal of malfunction and can lead to serious troubles while driving.
In this case, most likely, tightening the situation will not correct the situation, however, it is too early to draw conclusions, you can try to adjust it. This can be done in two ways - both on the car and with the rack removed.
Complete disassembly of the steering rack and replacement of the repair kit
In the second case, the adjustment is made after replacing the repair kit and completely repairing the mechanism. We will try to make do with little expense and simply adjust the gap in the gear-rack engagement , thereby eliminating backlash and knocking.
Parsing the elements
The gear rack is also pulled out from the housing. It also needs to be treated with white spirit. After the surface has dried, re-coat the part with lubricant. The plastic insert is pulled out through the slot in the housing and the clamping nut is unscrewed. Usually it gives in very hard, but this is not terrible - the repair kit contains a brand new spare part. We take out the stop, change the O-ring and look at the “whiskers” of the rack. As a standard, the tips should be in good condition, without any play. The “fingers” should move with normal effort. The same goes for covers - they should not have any flaws. If one of the listed parts (or several) does not meet these characteristics, only replacement will help the situation. When performing similar work, experts advise treating the threads with Movil to protect them from rust.
We tighten the VAZ-2114 rack with our own hands
Most often, all work on tightening the rack comes down to only selecting the play in the engagement and adjusting the play of the steering wheel . In the event that the wear of the mechanism parts (bushings, the rack itself, the gear, oil seals and anthers) is critical, repair and installation of a repair kit cannot be avoided. However, the easiest way to check this is to tighten the rack directly on the car.
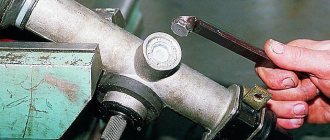
To adjust the rack, you will need a special wrench, which is inserted into the adjusting nut in the steering mechanism housing. You can make this key yourself, but it is sold in any store, it costs a penny, and it never hurts to have it in your arsenal of tools. In addition, it will significantly facilitate the work not only when adjusting, but also when disassembling the rack if necessary.
The VAZ-2114 rack is adjusted as follows:
- It is advisable to install the car either on an overpass or on a lift.
You can adjust the rack from under the hood, but you have to work almost by touch. We install the car on lifts or overpass - We remove the crankcase protection and the engine mudguard from below.
- We clean the steering rack from dirt and check its condition visually. There should be no grease leaks on it, the anthers should be intact.
- The rack must be firmly fixed to the engine shield, the steering rods must not have any play at the point of attachment to the rack.
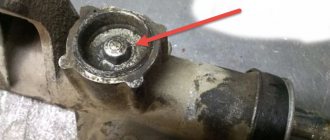
Checking the play on the steering rack and steering rods - We find the adjusting nut and clean it of dust and dirt. It comes with a plastic plug installed from the factory. It needs to be dismantled.
- Using a special wrench, we tighten the adjusting nut, which is screwed into the steering mechanism housing.
The nut can be tightened with a core, so after adjustment it is also necessary to fix it. Tighten the adjusting nut with a special wrench - Adjustment is carried out by tightening the nut until it stops, after which the play on the steering wheel is checked. If the force on it is too strong, the nut is released a few degrees.
- After adjustment, the nut must be fixed by rolling, otherwise there is a possibility that it will unscrew spontaneously.
Video about adjusting the steering rack
Having chosen the play, we do not hide the tool, but do a test drive, during which we evaluate the operation of the steering mechanism. If the steering wheel rotates freely and there is no play, the adjustment can be considered complete. If the steering wheel turns too tight, it is better to loosen the adjusting nut a little by turning it a few degrees counterclockwise.
What kind of steering wheel can I install?
If you decide to replace your old steering wheel, it means that its appearance did not suit you in some way. Of course, the issue may be a breakdown or external damage, however, even in this case, you should consider installing third-party models. What if you like one of them much more than the previous steering wheel?
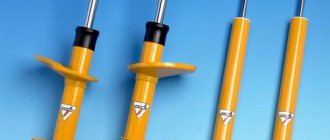
Sports models
When tuning their iron horses, car enthusiasts often look at sports steering wheels. Their appearance helps create the image of a fashionable racing car. The sports steering wheel has a smaller diameter than a regular steering wheel, which significantly improves maneuverability. In addition, it saves space inside the car. And various design options give room for creativity when styling the rest of the interior.
The design of a sports steering wheel can refresh the interior of the car
Unfortunately, sports steering wheel models have as many disadvantages as advantages. It is not as safe in a collision as the stock steering wheel. Its construction uses metal, so upon impact, the risk of serious injury increases. In addition, sports steering wheels are not equipped with airbags.
To install such a steering wheel you will need special adapters. They can be divided into two categories:
- cast;
- corrugated.
Moreover, the latter are much safer, since in the event of an accident they can fold up and absorb part of the energy.
The corrugated adapter for the sports steering wheel can fold upon impact, therefore it is considered injury-proof
Buy a sports steering wheel from trusted stores and from well-known manufacturers. Make sure you have the appropriate certificate. A poor-quality steering wheel, even with a corrugated adapter, can play a cruel joke on you if you get into an accident.
Steering wheels from other VAZ car models
Steering wheels from more modern models of VAZ cars, such as Lada Priora, Kalina or Granta, look prettier and are much more comfortable in the hands. Installing them will not be difficult, provided that you replace not only the steering wheel itself, but also the steering column column. Otherwise, the hub size will not match.
The Lada Kalina steering wheel looks more stylish and presentable than the standard part from a VAZ 2114 or 2115
Read on to learn how to choose the right steering wheel for the VAZ 2114 and VAZ 2115.
What you need to know when installing
Please note that not every steering wheel is suitable for installation on VAZ 2114 and VAZ 2115 cars. You need to choose a steering wheel with the same contact group as the original part.
choose a steering wheel with the same contact group as that of the VAZ 2114 and 2115
This is quite easy to do if you plan to install a steering wheel from other VAZ models. For example, a steering wheel with a Europanel from a VAZ 2110 is ideal for these purposes.
If you have chosen a Lada Kalina car, then its steering wheel should be marked 1118–3402010. With it you will also have to install the upper casing marked 2110–3403070–30, as well as the lower casing 2110–3403072–30.
To install a non-standard steering wheel on a VAZ 2114, use the steering shaft housing 2110–12
If you like sports models, then you will have to purchase a special adapter designed for VAZ 2113–2115 cars. This adapter is installed on the steering shaft, and the steering wheel is mounted on top. An adapter model suitable for this purpose is PROSPORT RS-04282.
for installing a sports steering wheel on VAZ 2114 and 2115 cars, the PROSPORT RS-04282 adapter is suitable
Cheto searched for this topic, but couldn’t find it here. In general, the problem is this: Recently, at speeds from 40 to 70, the steering wheel began to jerk. It jerks from side to side, not much, but unpleasant. I went through the forums and everyone kept saying that it was a problem with the tires because of old age or that there was a problem with the cord. First I want to try changing the wheels front and back. Could something else be causing the steering wheel to wobble?
Sasha, I have similar symptoms. I don’t know about you, but when I hit a rock with my right wheel, the steering wheel pulls to the left. For some reason I'm thinking about the steering rack.
If in turns, when returning to straight-line motion, the steering wheel jerks, and even if you let go of the steering wheel, and it spins jerkily, then this is definitely a misalignment of the wheels. It’s just that on worn (bald) tires the effect becomes more noticeable.
When driving in a straight line, the steering wheel may jerk due to crooked discs.
Well, as an option, the steering tip is worn out on one side, the wheel cannot move in the straight direction.
The tires are really not new. Masyanya arrived in it from Japan. Only I skated on it for five seasons, and how much longer the cross-eyed one can only guess. Is it useless to balance the front wheels? Just wheel alignment?
This is if after turning the car you straighten out and it goes straight with pushes on the steering wheel. change the front to the back and check, then you will think further
Symptoms of a problem
Complete disassembly of the steering rack in a VAZ 2114
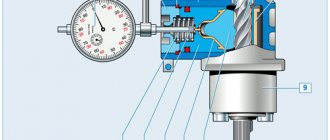
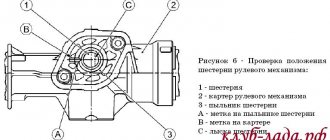
Competent drivers know that power is transmitted to the wheels through a spur or helical gear, which interacts with the gear rack. Backlash in the rack is eliminated using pressure springs. When there is a knocking sound from the steering mechanism, which is noticeable when hitting an obstacle or driving over uneven surfaces, it is necessary to adjust the rack.
Some VAZ 2114 drivers do not know that play and creaking in the rack can be eliminated; they believe that it is impossible to tighten the steering rack in a VAZ 2114 car. Adjustment helps to get rid of backlash and ensure high-quality control of the machine. It should be understood that incorrect adjustment of the VAZ rack can lead to poor steering rotation. This is caused by overtightening of the adjusting screw.
When replacement is required
If you encounter one of the above signs of malfunction, the rack must be repaired or replaced. By ignoring this need, you risk losing control at any moment. While on the road and driving at high speed, losing control of the car can lead to the most dire consequences.
There are three ways to solve the problem of faulty steering racks.
| Way | When is it relevant? |
| Adjust the rack | If diagnostics show that the unit does not require repair or replacement |
| Repair | If diagnostics allows for partial replacement of elements. Replacement is provided using a repair kit |
| Replacing the unit | If the test shows a complete failure of the node. Installation can be carried out with new rods or old ones, depending on their condition. |
Let us add that if the old steering racks on your VAZ 2114 have covered more than 100 thousand kilometers, their malfunction is unlikely to be corrected with the help of a repair kit. The best option in this case is a complete replacement of the unit.
Removing the boot
Adjustment
The adjustment is performed in this way: you can remove the rack from the vehicle or adjust it on it. The first method is used after repairing the machine, before installation. To simply adjust the rack, the work is done directly on the machine.
Tightening the rack with a key
To carry out the work, you must have a 17 mm universal octagon and an adjustable wrench. All work related to troubleshooting is carried out on a lift or inspection pit:
- First, the car must be put on the handbrake, some kind of support must be placed on the rear wheels;
- Then you need to lock the steering wheel and turn off the power to the car’s on-board network (remove the negative terminal from the battery);
- Then you need to find the nut with which the steering rack is adjusted. It is located on the opposite side, facing the body, of the rack mounting side. Sometimes it is mistaken for another part;
- First you should wash the bottom of the car. In this case, use a suitable device (Kärcher, for example). This is done in order to clean the nut from a layer of dirt. After cleaning the part from contamination, a wrench is inserted into it to tighten the rack and its position is adjusted. The tool rotates clockwise.
Thus, the adjustment is considered complete. If, after the work done, the control of the car is unsatisfactory, the play and knocking does not disappear, you should check the condition of the steering tips; they may need to be replaced.
The steering wheel wobbles slightly, but there is no play.
- Please log in to reply.
#1 Valdemario
- Users
- 93 messages
- Registration 17-February 09
- Top
- Complaint
I have such a problem, the steering wheel seems to be in perfect order, but if you grab it and pull it stupidly up and down, it seems to be a little loose. At first I thought it was a nut, I tightened it, but to no avail. I showed it to the mechanic and he says it’s not a backlash, it’s no big deal on old cars. Right now the new spare parts are so bad that it will be even worse.
But I still don’t understand how this is treated and what needs to be replaced? The steering wheel itself costs from 2107.
#2 cqe
- Top
- Complaint
#3 ajm
- Top
- Complaint
#4 Andrey Kuzma
- From: Kyiv, Bereznyaki
- Car: VAZ 21011 + ZAZ Lanos 1.5
- Top
- Complaint
#5 Voodoo Child
but if you grab it and stupidly pull it up and down
If up to down is the same as to yourself and from yourself, then this happened to me. I tried to tighten it as Andrey Kuzma wrote with a socket head and a wrench. So the bolt burst (it’s special, hardened), but the shaft did not clamp onto the splines. Moreover, in my case it turned out to be very easy to overdo it.
I understand that the splines on the shaft were already worn out, so I replaced the shaft, and now there is no longitudinal play.
- Top
- Complaint
#6 Andrey Kuzma
- From: Kyiv, Bereznyaki
- Car: VAZ 21011 + ZAZ Lanos 1.5
Moreover, in my case it turned out to be very easy to overdo it.
- Top
- Complaint
#7 Voodoo Child
AndreyKuzma I first looked at the manual for the second time https://www.redmotor. az2101/377.html
True, I limited myself to 12 somewhere, I was afraid to go further. maybe my key is not very good. Pull and pull, but he's still 12 and 12 :puppy:
- Top
- Complaint
#8 Valdemario
Thanks for the advice, but it seems to me that the steering wheel and the shaft are not loose. The shaft seems to be normal, but the steering wheel itself seems to be moving in the steering column.
Added after 2 minutes 17 seconds:
there is a plastic bushing on the steering shaft, it works over time, it is located between the shaft and the tube to which the headlight and turn control levers are attached, if you remove the steering wheel you can see it or at least the casing
- Top
- Complaint
#9 AndreyKuzma
- From: Kyiv, Bereznyaki
- Car: VAZ 21011 + ZAZ Lanos 1.5
Bolt securing the steering shaft to the worm shaft M8
- Top
- Complaint
#10cqe
I have a steering wheel from 2107, I removed the upper casing, except for the bolt, I didn’t find anything similar
- Top
- Complaint
#11 Valdemario
Damn, today I discovered this, the backlash is not only to the right - to the left, etc.
But even if you pull towards yourself and then back (((
At first I thought that it was enough to tighten the nut under the hood, it’s hanging there, but it’s only tightened to the maximum?
So that means everything has arrived? How dangerous is this? Is it possible to drive like this or not?
- Top
- Complaint
#12 Voodoo Child
Valdemario I went like this for six months. I won't say that I liked it.
In the end, in general, when starting off, the shaft always moved towards itself along the axis, and just like that you would pull it off the gearbox.
But by the way, when I changed it, I barely took it off. Although he was hanging out, he didn’t want to continue filming for long.
- Top
- Complaint
#13 ajm
tighten the nut, under the hood, it’s hanging there,
put a hardened bolt with a good thread, a normal bolt under it and tighten it) should help
although I was hanging out, I didn’t want to act further
- Top
- Complaint
#14 Voodoo Child
- Top
- Complaint
#15 Valdemario
put a hardened bolt with a good thread, a normal bolt under it and tighten it) should help
- Top
- Complaint
#16 M&M'S
- Top
- Complaint
Steering ends: signs of malfunction
A new set of tips for the VAZ rack
Steering tips are replaced when the following symptoms are observed: when driving over uneven surfaces, when accelerating, braking, a knock is felt, the steering wheel begins to vibrate and shake, play is noticed in the steering rod, kickback is observed in the gas pedal. You can fully check the serviceability of the tips by checking the integrity of the anthers, etc.
Since these parts affect wheel alignment, they must be replaced on time so that the rubber does not start to wear unevenly.
The steering tips are changed on both sides at once (if one breaks, then after a while the other will break too).
When performing repair work to replace VAZ 2114 tips, the following tools are used:
- The key is “19”, the key is “24”, the key is “27”.
- Calipers.
- Press-out puller or mounting tool.
- Hammer.
- Brake fluid or chemical WD-40.
All work related to replacing tips on a VAZ 2114 can be performed either on a lift, or, as in this case, using a jack.
Replacement
Pressing out the tie rod end
Replacing tie rod ends involves performing the following actions:
- The machine is fixed in a stationary state (using wheel chocks and a hand brake);
- The car is raised to a height, the wheel is removed from the side where the replacement will be made;
- The steering wheel is turned as far as possible in the opposite direction to the wheel (left or right, depending on where the repair is being made);
- Next you need to remove the cotter pin, using a key set to “19”, unscrew the nut securing the tip;
- Using a special tool, you should press the finger out of the lever. If you don’t have a tool, you can use a hammer or a pry bar;
- Angles are also measured using a caliper to speed up the installation of wheels;
- Fixing the position of the coupling with a key set to “24”, you need to unscrew the lock nut with a key set at 27 (clockwise rotation). It is often twisted tightly (perhaps rusted or stuck). To make the nut start to unscrew, you should spray brake fluid or WD-40 on it. You can also use a hammer - gently tap it on the nut;
- The steering tip must be unscrewed with a universal key, moving counterclockwise;
Unscrewing the tip from the steering knuckle - Then a new steering tip is installed on the VAZ 2114, the parts are pre-coated with engine oil;
- Installation is carried out in reverse order.
Such manipulations help eliminate knocking and creaking, as well as improve vehicle control. If after replacement the car's handling is unsatisfactory, and vice versa, it has only worsened, you need to adjust the wheel alignment. Sometimes experts advise performing a comprehensive replacement: replacing the tie rod ends and tie rods, since they have approximately the same service life.
To prevent such malfunctions from occurring, tie rod ends should be replaced at least once a year.
Every car owner wants his car not to fail at critical moments, to cause a minimum of problems and bring maximum benefit. But this directly depends on how the owner cares for, monitors, and repairs his car on time.
One of the most important components affecting safety is the steering. VAZ 2114 owners do not have to repair steering racks very often, since these units have a fairly long service life. But a number of factors and time lead to the fact that you have to pay direct attention to the helmsmen, diagnose the problem in a timely manner and promptly fix it.
Today we’ll talk about how to repair this unit yourself, as well as what measures will bring your slightly worn steering rack back to life.
Preparatory activities
Many experts advise taking certain steps to prepare for the replacement so that everything goes easier and faster. These actions include the following.
- Treat all nuts and fasteners with penetrating liquid. WD40 works great.
- If the tips last longer than one winter, to remove their fist you will need to use a 17 socket to unscrew the nuts.
- If the nuts stick, try heating them with a hair dryer. A gas burner is also suitable, but you need to be as careful as possible with it.
- Prepare tools for removing tips.
Today, two methods are used to dismantle steering tips - modern and traditional. The first involves the use of a special puller, and the second - a sledgehammer.
Jack and WD40 at the ready
The traditional dismantling method involves the following actions:
- The steering wheel is turned all the way;
- Several strong blows are applied to the steering knuckle;
- Vibration causes the tip to pop out.
But the method has two serious drawbacks.
- It will take special skill to deliver precise, but at the same time accurate and strong blows.
- This method can reduce the service life of steering racks.
Therefore, the best option is a puller. You can literally buy it for 200-300 rubles, but it will be useful in the future and will significantly preserve the integrity of the remaining parts when replacing the launch vehicle.
Dismantling works
Replacement
The replacement procedure is quite simple. Especially if you have prepared the connecting elements in advance and acquired a puller.
- Using a jack, lift one of the sides where you will begin to change the tips.
- Turn the steering wheel to such an extent that it is convenient for you to replace damaged elements.
- Treat the elements again with a penetrating liquid.
- Unscrew the fastening nut.
- Remove the tip from the steering knuckle hole. Here you just need a puller or the traditional old-fashioned method using a sledgehammer.
- Check the condition of the steering rods. Sometimes it is better to replace them in the first couple of wears. Besides, you still got into this knot.
- Replace damaged tips with new ones.
- Perform the reassembly procedure.
Assembly
- Do the same with the second wheel.
- We recommend that you think additionally about protecting threaded fasteners from moisture and dirt. To do this, the threads can be lubricated with lithol, graphite grease, a tube of a suitable diameter can be put on, or heat shrink can be used.
- After completing the replacement of the steering tips, visit a service station to adjust the wheel alignment.
- If you don’t want to go to a service station, then count in advance the number of revolutions when removing the old tip. The new one is twisted by the same number of revolutions.
- Drive onto a straight road and check whether the car does not skid to the sides when driving in a straight line.
One of the main conditions for a successful replacement is the choice of quality parts.
New part
What to choose
Finally, we will present several options for the most popular steering tips, which are used today when replacing a VAZ 2114. So you can decide for yourself what to choose and which ones are better.
| Manufacturer | Price |
| AvtoVAZ | 620 rubles |
| TRACK | 620 rubles |
| VIS | 730 rubles |
| Lemfoerder | 830 rubles |
| Finwhale | 860 rubles |
The last two tips are foreign made. This makes their price higher. But the quality is somewhat higher than AvtoVAZ products.
Replacing a LV is not so difficult that you need to go to a service station and pay 500-1000 rubles for the work of the craftsmen. You can easily cope with this task yourself, relying on the video and instructions provided.
VAZ 2114: adjustment and tightening of the steering rack. Replacing tie rod ends
Symptoms of a problem
To understand that the racks require repair, you need to monitor the behavior of the car and know the characteristic signs of a malfunction of this element.
Is it possible to determine whether the unit requires a complete replacement, or can you get by with simple repairs? We will tell you about this in the table below.
| Sign | Necessary actions |
| When turning the steering wheel, a knock is heard and play occurs | If the situation occurs while the car is moving, it is enough to carry out repair measures, use a repair kit |
| Knocking and play occurs when the steering wheel is turned when the car is stationary | This is clear evidence of the critical state of reiki. The problem can only be solved by completely replacing it. |
Wheel imbalance
First of all, I checked the presence of balancing weights on each wheel - they were all in place, but I dare to assure you that this is not a hundred percent guarantee that the wheels are not unbalanced. This can only be determined using special stands or instruments. So I postponed further testing at the stand until a later time (since this requires money and equipment).
Tightening and adjustment
As the practice and experience of VAZ 2114 owners shows, if problems arise with the racks, they can most often be repaired. The only condition is that you have an inspection hole at your disposal.
Full analysis
The first step is to tighten the rack. But how is this done? To do this, simply tighten the adjusting bolt. Adjustment is made with a 17 mm key.
After tightening the bolt, take your car out for a few kilometers to check whether the knocking or play remains. If these symptoms of the problem disappear after you have tightened and adjusted the steering rack, the repair can be considered complete.
But this doesn't always happen. The knock may remain, but the play may go away, or vice versa. In any case, if at least one sign still remains, you will have to begin a full-fledged repair with your own hands. Now you can find a number of useful videos that describe in detail the procedure for repairing this unit. Take a look, it will be useful for you.
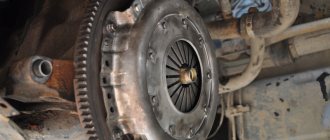
Article on the topic: Replacing the clutch release bearing on a VAZ 2114
Repair
To perform the repair, you will still have to disassemble the steering wheel. You can see detailed instructions in the material on replacing the steering rack.
Replacement process
Let's move on directly to the repair procedure.
- Remove the rail from its seat.
- Remove the thrust nut with a 17mm hexagon.
- Remove the thrust nut, remove the retaining ring, spring, and rack stop.
- First, the gear shaft boot is removed, after which you can easily get to the locking ring.
- Remove the nut that holds the gear bearing in place. Be prepared for the fact that it will be quite difficult to unscrew it; use some force. This is fine. It's worse if it practically doesn't hold on.
- The drive gear shaft is pressed out.
- The rail is removed from the housing.
- Next, remove the support sleeve, lubricate it and put it in place. It may take some effort to push it back.
- Replace all bearings present in the assembly. Some are difficult to extract, while others are almost impossible. But it needs to be done. If you cannot remove it at all, then cut the bearing with a chisel and remove it with pliers.
- Examine the condition of all surfaces, parts, and assemblies for any defects or damage.
- If you notice faulty elements, replace them using a repair kit.
- The design will have quite a lot of moving elements. Each of them must be lubricated with high-quality lubricant. Litol will perform well here.
- Reassemble by following the reverse disassembly sequence.
- You will definitely need help for reassembly. Therefore, agree in advance with a friend or someone else who can help you in this matter.
- Place the repaired rail in place and attach its fasteners.
- A rack is inserted into the spitz. This is where you will need an assistant. It is almost impossible to do this yourself.
- Use a chisel to loosen the clamps.
- Tighten all mounting bolts in place.
Price issue
A new rail will cost you about 3 thousand rubles. The cost of service stations for replacing slats costs about 2 thousand rubles. That is, in total you will have to spend 5 thousand rubles if you entrust the work to the masters.
Repair kit
However, the rack is not difficult to repair. Most VAZ 2114 owners perform this event with their own hands. Plus a decent saving of money.
coupling
Now is the most difficult and labor-intensive moment. On the interior side, the ends of the control shaft are aligned with the gear shaft. It is best to do this together, because you will spend a lot of time on a similar event alone. Don’t forget about the special flat on the shaft - the coupling bolt must “climb” onto it.
The latter is planted using a hammer (the blows are applied smoothly and very carefully). Finding the correct order of work is painfully simple - to do this, connect the removed battery terminal and press the horn. If the element does not make a sound, it means that the part that suits us is not put on one hundred percent. In this case, we continue to tap it with a hammer.
How to install the control rack (VAZ-2114) next? A bolt is inserted into the “ears” of the coupling and clamped tightly with an open-end wrench. Self-locking nuts are tightened on the clamps of the spare part, and the studs are treated with Movil. Now all that's left to do is to connect the rack arms to the ends and tighten all the fasteners. That's it, the replacement of the VAZ-2114 control rack is successfully completed. All that remains is to put on the negative terminal, fasten the wheels, check the brakes and do the wheel alignment. Typically, dismantling and installing this part takes up to 3-4 hours of free time. Yes, you have to tinker. But after that, the knock of the VAZ-2114 control rack will definitely not bother you. In terms of mileage, this is approximately 100-150 thousand km.
So, we found out how you can tighten the steering rack of a VAZ-2114 with your own hands. Success!
We repair it ourselves
To get started, you will need a set of tools and repair kits.
Replacement kit
Be sure to include the following in your list of tools and materials:
- Repair kit for one of three configurations (more about them below);
- Bearings;
- Lubrication;
- Set of keys and screwdrivers.
Selecting a repair kit
Spare parts
As for repair kits, the standard minimum set includes four elements:
- Washers;
- Nuts;
- Bearings;
- Bushings made of fluoroplastic.
But is it enough for your specific steering rack situation? Let's try to understand the purpose and configuration of each of the three types of repair kits.
- The cheapest repair kit, the contents of which you are already familiar with, allows you to solve the most minor problems that have arisen with your slats.
- The middle kit additionally includes other bearings and shafts. Designed for more serious repair work.
- The most expensive repair kit may consist of whole new slats, that is, it involves not a repair, but a simple replacement of units.
When choosing a repair kit, it is important to make sure that it is suitable not just for repairing steering racks, but also for your specific VAZ 2114 car. Plus, it is important to know which rack is currently on the car. If this is not an original part, which happens quite often, then the repair kit for the “fourteenth” model will no longer be suitable. You need a kit that matches the vehicle the steering system part was taken from.
Final stages
Next, the gear and bearing are pressed in until they stop (the shaft and housing are clamped in a vice). Then the stop, spring and nut are inserted. The hole in the latter is closed with plasticine. The rubber ring from the repair kit is installed on the shaft side and tightened with another nut. Then the cover and lock washer are put on.
Afterwards the “whiskers” of the slats are installed. With quite a bit of effort, the locking plate is tightened and bent. Next, rubber plugs are installed. The left side of the cover should rest here.
That's it, our set is assembled. Now the control rack (VAZ-2114 will soon be ready for use) is being installed back into the car. The part is installed in its original place, and the shaft must fit into the body hole. Then clamps are put on and nuts and washers are attached.
Steering rack repair
The car is secured against unexpected movement by installing stops under the rear wheels. Pull the handbrake and lock the steering wheel.
So:
The front wheels are removed. Using a puller, remove the fingers from the lever struts, having first unscrewed the tip nuts. After installing the puller, tighten the screw until it stops. When the key is in tension, the finger is knocked out of the lever with a hammer. The nuts securing the rack brackets are unscrewed. The bolt on the steering shaft is loosened from inside the passenger compartment. Having completed all preliminary operations carefully so as not to damage the splines, using oscillatory movements, the gear shank is disconnected from the steering shaft. The entire assembly is pulled out through the right hole in the car body.
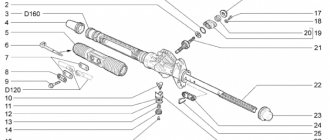
Steering mechanism with tie rods
Next, the VAZ 2115 steering rack is directly repaired:
- The structure is clamped in a vice. Use a special brush or a cloth soaked in white spirit to clean all surfaces of the product.
- The steering rods are removed. To do this, unscrew the bolts on the bracket securing them, after bending the “antennae” of the locking plate, using a “22” key.
- The locking and connecting rod plates are removed.
- The tie rods are removed.
- On the right side, the support and retaining ring are removed from the steering gear housing.
- The clamps with which the protective cover is attached are cut off. Disposable parts are made of plastic.
- The protective cover is removed.
- On the left side of the device, the support and protective cap are removed.
- Using a “17” wrench with an octagonal head, the rack stop nut is unscrewed, the part is removed, the spring and the retaining ring are removed.
Removing the nut, spring and retaining ring
The rack stop is knocked out of its socket. To do this, the crankcase hits a wooden stand. For sealing, a rubber ring is mounted in the groove of the stop.
- The seal is removed.
- The gear boot is removed by simply prying it off with a screwdriver.
- The lock washer is removed.
- Use a special 24mm wrench with an octagonal head to unscrew the nut that secures the gear bearing.
- The nut is removed from the shaft.
- Using a “14” wrench, the gear is removed from the crankcase along with the bearing.
Removing the gear with bearing from the housing
- The rack is removed.
- The bushing is removed. To do this, use a screwdriver to pry up the support sleeve, its protrusions should fit into the crankcase holes and the part can be freely removed.
Removing the support sleeve
- A new bushing is installed. To do this, new damping rubber rings are put on it so that the thin parts of the ring are located opposite the cuts in the bushing. The protrusions of the bushing must fit freely into the holes in the crankcase.
- Along the edges of the bushing, the rubber rings are cut and the cut off parts are removed.
- The retaining ring is removed from the gear shaft.
- Using a two-jaw puller, the ball bearing is pressed.
Removing the ball bearing
Pressing out the needle bearing is done using a special puller. If it is not there: two holes with a diameter of two millimeters are drilled in the end of the crankcase to allow the needle bearing to exit onto the ring. Through it, the bearing is knocked out of the crankcase.
Pressing out the needle bearing
The crankcase cavity of the structure is washed. The needle bearing is pressed into place using a piece of pipe. After this, the hole is sealed with preparations similar to “cold welding”. Bearings, drive gear and teeth on the rack are generously lubricated with FIOL-1 lubricant.
UNIOL-1 lubricant is placed in the cavity, which is located above the nut holding the bearing of the drive gear. The steering rack assembly is assembled in the reverse order. The protective cover is attached and secured with clamps. The rack stop and nut are adjusted so that there is a gap of 0.12 millimeters between them. After adjusting the rack clearance, the stop nut is capped to prevent unwinding.
Let's summarize
As you can see, the work will require some skill. But, if desired, they can be performed by a beginner who knows how to handle the tool and has common sense. Repeating the operation no longer causes problems.
After repairs, you should perform a wheel alignment procedure or do a simple check. To do this, you need to start the car and drive at a slow speed. If, with the steering wheel in a straight position, the vehicle does not pull to the side, everything is in order.
To protect fasteners with threaded connections from dirt and water, experts recommend using lithol or graphite-based lubricants. Parts must be lubricated carefully. You can further enhance the protection with tubes. They are put on the joints of the steering tips and traction devices (heat shrink can also be used).
Why should you order from us?
Experienced craftsmen
Diagnostics in just 1 hour
Repair in just 1 day
Hunter 3d stand
Guarantee on all work
Your own turning park