Despite the fact that this model of the Zhiguli car has been out of production for quite some time, the issues of its operation and especially repair have not lost their relevance, since a huge number of “sixes” continue to travel along Russian (and not only) roads.
The simplicity of the design of the VAZ 2106 and the relatively high operational reliability of mechanisms, components and assemblies suggest a fairly long period of its use. These same qualities allow the owner of the “six” to carry out repair, restoration and adjustment work without the use of special, and therefore expensive, equipment and tools. In addition, this process does not require the car enthusiast to have specific knowledge and skills.
All of the above fully applies to the clutch adjustment procedure, which is, in fact, an adjustment performed in accordance with certain rules, as a result of which the specified gap values are introduced between the elements.
Checking and adjusting the clutch drive on a VAZ 2106 car
To adjust the clutch on a VAZ 2106 car you will need: keys “10”, “13”, “17”, a ruler or square, stop, pliers, cobra pliers. The following adjustments are made in the clutch drive:
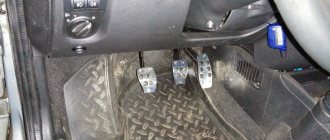
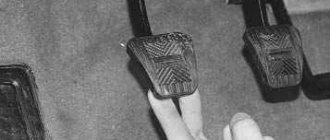
1. In the car interior, under the steering column, there is a
clutch pedal travel, a gap is established between the pusher and the piston of the clutch master cylinder. The gap is determined by the initial free play of the clutch pedal, which should be 0.4-2.0 mm.
2. From below the VAZ 2106 car by changing the length of the pusher b
the free play of the clutch fork pusher is set, which should be 4-5 mm.
NOTE After making adjustments in paragraphs. 1 and 2, the full free play of the clutch pedal (before the clutch starts disengaging) should be 25-35 mm.
3. If the initial free play of the clutch pedal is not normal, adjust it by changing the length of limiter 14 (see Fig. 5.2 “Pedal and clutch master cylinder”).
NOTE For clarity, the images in the photo for points 4-7 are rotated 90°.
4. Holding the clutch pedal travel limiter with wrench 1, unscrew locknut 2 1-2 turns.
5. By screwing or unscrewing pedal travel limiter 1 into bracket 2, achieve normal initial free play of the clutch pedal. 6. Holding the travel stop with a wrench 1, tighten the locknut 2.
7. Repeat steps 1 and 2. Without changing the position of the ruler, press the pedal until noticeable resistance appears, selecting full free play of the clutch pedal. Use a ruler to determine the pedal movement, which will be the complete free play of the clutch pedal. 8. If the full free play of the clutch pedal is not normal, adjust it by changing the length of pusher 4 (see Fig. 5.3 “Slave cylinder and clutch release fork”).
9. Remove the clutch release fork release spring.
NOTE The release spring of the clutch release fork can not be removed, but then, when determining the free play of the clutch release fork, you will have to overcome the resistance of the spring.
10. Install a square (or ruler) along the axis of the pusher, resting the end of the square against any stationary part of the clutch working cylinder. Press the end of the clutch release fork first forward along the direction of the VAZ 2106. Fix (remember) the position of the clutch release fork on the square. Then move the end of the fork back along the direction of the VAZ 2106 (in the direction of the arrow) and determine the free play of the clutch release fork pusher. If the free play is not correct, adjust it.
HELPFUL ADVICE To make work easier, lubricate the adjusting unit (for example, with WD-40 lubricant).
11. While holding key a
adjusting nut, use a wrench
to
loosen the locknut.
12. Holding the pusher from turning with pliers a
, unscrew the locknut with a wrench
1-2
turns.
13. Holding the pusher from turning with pliers a
, by rotating the adjusting nut with a wrench
,
achieve normal free play of the clutch.
14. At the same time, holding the pliers from turning
pusher, and use wrench
b
to tighten the adjusting nut, and use wrench c
to
tighten the lock nut. 15. Repeat steps 1, 2 and 8. Make sure that the full free play of the clutch pedal is correct.
USEFUL ADVICE Check the correct clutch adjustment in the following ways: 1. Put the VAZ 2106 in neutral gear, start the engine and warm it up to operating temperature. When the engine is running at minimum engine speed, disengage the clutch (press the pedal) and engage reverse gear. The transmission should engage without grinding, knocking or other extraneous noise. 2. While the VAZ 2106 is moving, change gears. All gears should be engaged without grinding, knocking or other extraneous noise. 3. When accelerating a VAZ 2106 car, there should be proportionality between the increase in engine crankshaft speed and the increase in vehicle speed (the clutch should not “slip”).
If the clutch actuator is adjusted correctly and the indicated signs of normal operation are absent, try bleeding the clutch hydraulic actuator. If bleeding the hydraulic clutch does not lead to the desired result, remove the clutch from the VAZ 2106 for repair.
Method number 2
Now we need to set the stroke of the fork pusher. It is adjustable up to 5 millimeters. Use a wrench to hold the travel stop. Loosen the locknut two turns. Next, turn the limiter towards the bracket with a wrench. Selectively set the required gap. After this, hold the limiter again and tighten the locknut back. We take a ruler in our hands and measure the pedal play. To do this, press the clutch pedal with your hand until there is obvious resistance. Measure how far the fork has moved back. If necessary, reset the gap.
How to adjust the clutch on a VAZ-2106 with your own hands
The design solution of the Zhiguli model 2106 is distinguished by its comparative simplicity and at the same time reliable operation. Thanks to these qualities, car owners can carry out most repairs and adjustments themselves. After all, contacting a service is an expensive matter, and not everyone can afford it. This article is about how to adjust the clutch on a VAZ-2106 with your own hands. The instructions will step by step explain all the stages of the work, which, in essence, are setting up the clutch system with the installation of the correct clearances between the components of the structures.
How to detect the problem
How to understand that the correct settings of the clutch system have gone wrong and adjustment is necessary?
- Inspection of the working cylinder reveals the presence of fluid leaks or depressurization of connections.
- Extraneous noises, squeaks, knocking when changing gears.
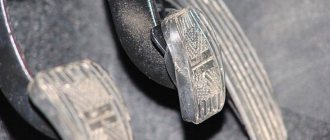
- Inadequate operation of the pedal lever: increased free play, fork dips.
Violations of the clutch system settings lead to the loss of torque transmission, and the interaction of the engine flywheel and the gearbox becomes incorrect. If this happens, it means the clutch needs adjustment. If it is a VAZ-2106, then the procedure can be carried out independently.
Adjustment will not help in cases where natural wear of parts occurs, their deformation and failure. The clutch may also fail due to brake fluid leakage. It is with its help that the hydraulics are started.
The functionality begins to slip if the system does not work completely. If you hold the pedal down for a long time, the elements heat up, causing the parts to burn. Improper operation leads to clogging of the holes, oiling of the friction linings, etc. Therefore, the surfaces should be periodically cleaned with white spirit.
Symptoms and causes of malfunction
There are not so many symptoms of air in the clutch hydraulic drive - difficult gear shifting, crunching of gear teeth when shifting, especially when engaging reverse gear, weakening of the effort to depress the clutch pedal.
Often the cause of airing is a drop in the working fluid level below the minimum value; in this case, air enters the main cylinder through the fitting.
It is possible that liquid began to leak from the system due to loose connections of the pipelines, or their damage; a leak may appear from under the cylinder sealing rings due to wear.
There may even be an option when the hole in the tank lid is clogged. This hole is needed to equalize the pressure in the tank.
And if it becomes clogged inside the system, a vacuum occurs during operation, causing air to penetrate through the sealing rings.
Well, of course, after repair work related to the clutch and its drive, the system will be aired.
To restore the drive's functionality and remove air bubbles, the system should be bled.
This operation is in many ways similar to bleeding the brake system. But before starting work, the cause of airing should be identified.
Therefore, before starting work, you should carefully inspect all drive elements for leaks. If any are found, they must first be eliminated.
Also read - why the clutch pedal fails, reasons and ways to eliminate them.
general information
The clutch needs to be adjusted every time the car owner detects the above “symptoms”. The Zhiguli 2106 model has this problem more often than other cars. Therefore, it is necessary to inspect the state of operation of this sector for preventive purposes. After all, if the clutch “flies”, the car simply will not budge.
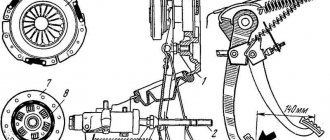
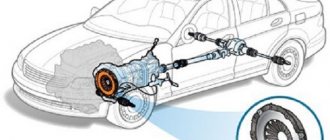
The main purpose of the unit is to transfer torque to the wheels of the drive axle. The VAZ-2106 has rear-wheel drive and a friction, single-disc dry clutch. The levers in the “six” are moved using a hydraulic subsystem, not cables. It includes:
- main cylinder;
- working cylinder;
- high pressure auxiliary hoses.
Preparing for self-adjustment
To start adjusting the clutch on a VAZ-2106, you yourself need to prepare a set of some simple tools:
- three wrenches No. 10, 13, 17;
- pliers;
- adjustable pliers (car mechanics call them “cobra”);
- stop-fix;
- school triangle or ruler.
For theoretical preparation, you should read the operating manual for your car. Then remember or write down the manufacturer’s recommended settings for clutch adjustment control values.
Pro Tips
Experienced auto mechanics recommend following the advice.
- When pumping, only high-quality fluid should be used.
- Operations related to the clutch must only be carried out cleanly. Dirt entry is unacceptable.
- It is recommended to check the clutch settings every 3-4 months of active use. The maximum permissible deviation from the working position is 10% of the range width.
Specialization : Graduated from the State Automobile University, worked for 20 years at GAZ-56, now I drive a Zhiguli.
Source
List and values of parameters
The task of adjusting the drive is to create distances - gaps between the clutch functionalities:
- between the main cylinder piston and the pusher;
- between the thrust flange friction ring and the trip bearing.
The first play is created by adjusting the limiting screw of the clutch pedal lever. The distance by which the piston can be removed from the pusher is in the range from 0.1 to 0.5 mm. Then the free play of the lever will be, respectively, from 0.4 to 2 millimeters.
The second play is determined by the free play value made by the pusher. Its values are as follows: from 4 to 5 mm. And the gap separating the bearing from the ring should be 2 mm. At the end of the adjustments, the free play of the pedal lever is from 25 mm to 35 mm.
Instructions for adjusting the clutch on a VAZ-2106 with your own hands
The work is carried out in two stages. On the first one, the required settings for the starting freewheel are set from the interior of the VAZ-2106.
- Wrench No. 1 secures the position of the travel stop. At this time, use wrench No. 2 to unscrew the lock nut by 1.5-2 turns to loosen it.
- Using key No. 2, rotate the limiter towards the bracket until the correct free play value is achieved. It is necessary to fix the position of key 2.
- Use the first wrench to tighten the locknut.
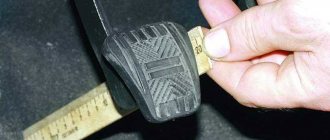
- Take a ruler and measure the distance the pedal travels to noticeable resistance.
At the second stage, the free play of the pusher is adjusted.
- Using pliers, completely remove the tension spring from the working cylinder. This will make it more convenient to carry out work.
- Fix a ruler or triangle along the clutch fork.
- Move the fork forward by hand until it stops and fix this position with a mark on the ruler.
- Release the fork. The distance to which it has advanced is that very free movement. It should not be less than 4 mm or exceed 5 mm. Otherwise, proceed to adjusting the gap.
- Use wrench No. 1 (GK No. 1) to fix the main adjustment nut. Using GK No. 2, loosen the locknut by 1.5-2 turns.
- Adjustable pliers secure the pusher from rotation.
- Using GK No. 1, turn the adjusting nut to the desired value.
- GK No. 2 tighten the locknut, while the pusher and the adjustment nut are fixed. Then they mount the spring at their workplace and proceed to checking the correctness of the work results.
To make sure that everything is done correctly, simple checks should be carried out upon completion of the work.
- Set the gearbox to neutral. Start the engine and warm up the car to operating temperature. Reduce the gas to such an extent that the crankshaft speed becomes minimal. Depress the clutch pedal and shift to reverse gear. In this case, there should be no extraneous sounds: tapping, creaking, etc. If, nevertheless, some extraneous noise occurs, it means that the work was carried out incorrectly.
- When the car is moving at a speed of 40-45 km, depress the clutch pedal and change gears. There should also be no third-party sounds.
- At the acceleration stage of the VAZ-2106, you need to observe the correspondence between the increase in speed and the increase in crankshaft rotation speed. Proportionality and the absence of slipping indicate that the adjustment was made correctly.
The check must be done to make sure that the car is in good technical condition, which is important in terms of the safety of the driver and his passengers. At the end of the work, it is recommended to bleed the system by filling it with brake fluid to remove any trapped air. This procedure is also easy to carry out yourself using a set of inexpensive and accessible tools and materials.
If the adjustment does not show the desired result, it should be done again. Since the 2106 is quite an old model, the last car was produced before 2006, it is worth inspecting the clutch parts and replacing them if necessary.
Setting up the VAZ 2106 clutch
You can check whether the clutch position on a VAZ 2106 is set correctly in this way.
- Place the car in neutral and warm up the engine to operating temperature. With the engine running, without touching the accelerator lever, turn on the “R” position. The response to the action should be a smooth movement of the lever without extraneous sounds or excessive force.
- During the operation of the car, all gearbox positions work clearly, there are no crashes, squeaks, or crunches.
- During sharp acceleration, the increase in engine speed is proportional to the acceleration. If the clutch disc slips, the engine starts to spin up without a manual transmission.
If any malfunctions or malfunctions are detected, it is necessary to perform more detailed diagnostics of the unit. You may need to replace the disk or repair the basket.
What's next
The next step is to remove the clutch basket. To do this, fix the position of the flywheel (you can use a pry bar) and unscrew the basket bolts one by one. You will need a thirteen wrench (to speed up the process, use a head with a ratchet handle). Carefully move the unscrewed basket to the side and remove the worn clutch disc. We will also need to remove the release bearing of the gearbox input shaft and the clutch release fork.
Clutch adjustment VAZ 2106
Despite the fact that this model of the Zhiguli car has been out of production for quite some time, the issues of its operation and especially repair have not lost their relevance, since a huge number of “sixes” continue to travel along Russian (and not only) roads.
The simplicity of the design of the VAZ 2106 and the relatively high operational reliability of mechanisms, components and assemblies suggest a fairly long period of its use. These same qualities allow the owner of the “six” to carry out repair, restoration and adjustment work without the use of special, and therefore expensive, equipment and tools. In addition, this process does not require the car enthusiast to have specific knowledge and skills.
All of the above fully applies to the clutch adjustment procedure, which is, in fact, an adjustment performed in accordance with certain rules, as a result of which the specified gap values are introduced between the elements.
How to adjust the clutch yourself
Logistics support for the process of setting up the “six” clutch consists of preparing the following tools and devices:
Wrenches for “17”, “13” and “10”.
Ruler or square.
Cobra type ticks.
The process of adjusting the clutch itself includes a set of simple technical measures. Namely:
Adjusting the gap separating the hydraulic master cylinder piston and the pusher. This is carried out using a limiter (pos. a) located under the steering column of the vehicle. The size of the gap (0.4-2.0 millimeters) is determined by the moment the pedal begins to freely move.
Adjusting the free play of the pusher (item b) of the clutch fork. It is installed by changing its (pusher) length. The parameter value should be in the range of 4.0-5.0 millimeters.
Attention! After making the above settings, check the free play (full) of the clutch pedal. Before the clutch is disengaged, it should be 25.0-35.0 millimeters.
To adjust this indicator (free play amount), it is necessary to perform the following manipulations:
Having secured the pedal travel limiter with a wrench, loosen the lock nut by unscrewing it 1-2 turns;
by unscrewing (screwing in) the limiter, adjust its length so that the free play value corresponds to the value indicated above;
repeat the measurements made earlier (the free play of the pusher and the gap between it and the piston of the main cylinder of the hydraulic drive);
Use a ruler to measure the free play.
If the above described manipulations did not achieve the desired result, adjust the length of the pusher:
remove the release spring of the clutch fork, which will eliminate the influence of its resistance when determining the free play of the pedal;
set the ruler (square) parallel to the axis of the pusher and press the clutch fork (in the direction of movement of the car);
Using a ruler, we fix the position of the clutch fork;
we move the end of the clutch fork in the opposite direction and, based on the difference in the obtained measurements, determine the amount of free play of the pusher;
if it does not correspond to the control values (4.0-5.0 millimeters), we correct it by changing the length of the pusher.
Attention! Treating the unit with WD-40 lubricant will greatly facilitate adjustment work.
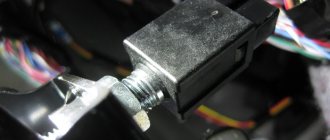
To change the length of the pusher it is necessary to perform the following manipulations:
Having firmly fixed the adjusting nut, loosen the locknut.
Holding the pusher with pliers, unscrew (1-2 turns) the lock nut.
Continuing to hold the pusher, by rotating the adjusting nut we set the length of the pusher, ensuring the required amount of free play of the pedal.
Without changing the position of the pusher and the adjusting nut, we fix the locknut.
We repeat the measurements made earlier (the amount of free play of the pusher and the gap between it and the piston of the main cylinder of the hydraulic drive).
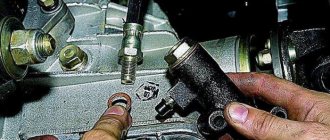
Adjusting the working cylinder pusher
You can adjust the optimal pedal travel by adjusting not only the master cylinder, but also the clutch slave cylinder.
Let's move on to setting up the working cylinder itself. Since the element is located under the bottom, there may be traces of dirt and corrosion on it. To unscrew the required nut, use VD-40 or its equivalent from. You need to unscrew it with two keys.
Control of clutch settings of VAZ 2106
There are several simple but quite effective ways to monitor the correct implementation of adjustment measures on the VAZ 2106 clutch. Here are some of them:
Set the gearshift lever to neutral and warm up the vehicle's power unit to operating temperature. While the engine is running at minimum crankshaft speed, press the clutch pedal and move the gearshift lever to the reverse position. If the clutch is adjusted correctly, shifting will not be accompanied by extraneous noise (grinding, knocking, etc.).
Accelerate the car to a speed of 40-45 kilometers per hour, disengage the clutch and move the gearshift lever to different positions. The absence of extraneous noise indicates that the clutch has been adjusted correctly.
When accelerating a car, monitor compliance with “proportionality,” that is, the correspondence of the increase in the crankshaft speed of the power plant with the increase in the speed of the vehicle. The absence of clutch “slip” is a sign of a correctly performed adjustment.
Signs of clutch problems
Clutch adjustment VAZ 2106
Perhaps every car enthusiast knows the main signs that the clutch requires replacement or its adjustment is inevitable. So, first of all, there are jerks when moving, mechanical crackling when changing gears, a burning smell in the cabin, and slipping of the clutch. All these are not even alarm bells, but let’s say alarm bells, noticing that you must understand that the main transmission mechanism requires adjustment.
Preparing to adjust the clutch
Some car enthusiasts are wondering how to adjust the clutch of a VAZ 2106 with the least financial cost and preferably without the involvement of expensive specialists. Therefore, our article outlines how to carry out the entire complex of technological operations for adjusting the clutch of a VAZ “classic” with your own hands in a garage or inspection pit.
It should be remembered that if defects occur in this mechanical unit, then adjustment of the clutch is required, which will allow the vehicle to function correctly. Adjustment, a video about which is posted on the Internet, is necessary when pressing the foot pedal for turning on this component of the mechanism reveals defects in the operation of the unit. Such malfunctions include:
To carry out such work you need:
- a set of tools and other accessories;
- special emulsion WD-40 or similar solution;
- bench knife;
- special solution for the operation of the mechanism’s hydraulics;
- special tank;
- ruler of a certain scale.
When to do this?
Novice motorists often ask the question: when is the VAZ-2106 clutch adjusted? The clutch drive is designed in such a way that there is free play on the pedal. So, normally it ranges from 0.4 to 2 millimeters. If there is a lot of play in the pedal and noticeable “dips,” it means that the element settings have gone wrong. The car needs the clutch readjusted. VAZ-2106 will not work correctly. When there is backlash, there is no integration of the mechanism in the working joint with the gearbox. Therefore, as soon as the pedal begins to fall, you need to set the free play again.
Pay attention to the clutch slave cylinder. The VAZ-2106 is equipped with it near the transmission. The element must not contain traces of liquid leakage. If the boot is damaged or the tightness of the connections is broken, the mechanism must be replaced.