Payment for goods and downloading of the book in electronic form (PDF format) is made on the website.
To do this, you need to find the book you are interested in and click on the “Buy” button. The price of the book is indicated on the button.
For convenience, the price on the website for residents of Russia, Belarus and Kazakhstan is presented in rubles.
For residents of Ukraine in hryvnias, and for all other countries - dollars.
After clicking on the “BUY” button, a payment window will open where you can select a payment system with which you can pay for the selected book using any bank card (Visa, MasterCard, MIR, etc.)
When you click on the “Pay by bank card” button, the Portmone payment system will open, which is the easiest way to make a payment.
In addition, the website offers four payment systems for payment:
- Yandex (payment from any bank cards, Yandex Money account, QIWI Wallet, terminals, etc.);
- Portmone (payment from any bank cards, Portmone account);
- PayPal (payment from any bank cards, PayPal account);
- WebMoney (payment from any bank cards, payment from WebMoney wallets).
Payment via Yandex Cashier
After selecting payment via Yandex, the Yandex Cashier payment system will launch, where you need to select a convenient payment method (bank card, QIWI, Yandex Money account, etc.)
After specifying payment details and confirming payment, payment for the goods will occur.
If you have a bank card in a currency other than the ruble, then the money will be debited from the card at the rate of the Central Bank of Russia at the time of the purchase.
This payment method is optimal for residents of Russia, Kazakhstan and Belarus.
Official website of the Yandex Kassa payment system https://kassa.yandex.ru
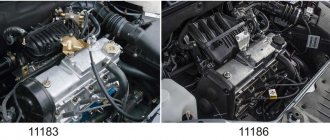
Checking the connecting rod and main journals of the engine model 1MZ-FE Toyota Camry 2001
Tools:
- Micrometer
- Scan
- Crankshaft Grinding Machine
- Hammer with plastic head
- Torque wrench
- 12mm wrench attachment
Parts and consumables:
- Crankshaft
- Rags
- Crankshaft bearings
- Gauge wire
- Engine oil
- Main bearing cap bolt
- Dye
- Main bearings
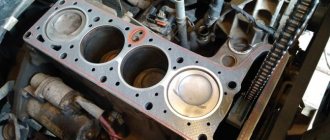
1. Remove the piston and connecting rod.
2. Using a micrometer, measure the diameter of each connecting rod and main journal in two mutually perpendicular planes, turning the crankshaft 90 degrees.
Measuring the diameter of connecting rod and main journals
Root neck diameter:
standard – 60,988–61,000 mm.
Crankpin diameter:
standard – 52.992–53.000 mm.
Note:
If the diameters are outside the specified limits, check the oil clearances. If necessary, regrind or replace the crankshaft.
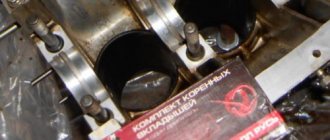
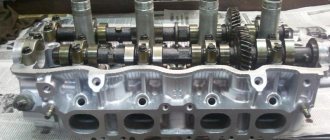
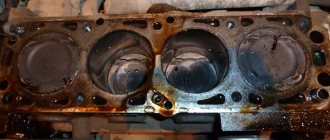
3. Clean each journal and bearings. Check the surface of each main journal and bearings for pitting and scratches.
Damaged crankshaft bearings
Note:
If the neck or liner is damaged, replace the liners. If necessary, regrind or replace the crankshaft.
4. Install the lower thrust washers onto the No. 2 main bearing cap with the lubrication grooves facing outward.
Lubrication grooves of the thrust half ring
5. Place the crankshaft into the cylinder block.
6. Place a plastic bearing clearance gauge on each main journal.
7. Install the main bearings.
Installing main bearings
8. Apply a coat of engine oil to the threads and under the 12-point bolt heads.
9. Temporarily install the eight bearing cap bolts.
10. Using the bolts as guides, insert the bearing cap so that the gap between it and the cylinder block connector is less than 6 mm.
The size of the gap between the main bearing cap and the cylinder block connector
11. Using a hammer with a plastic striker, hammer down the bearing caps so that they fit snugly.
Additive for main bearing caps
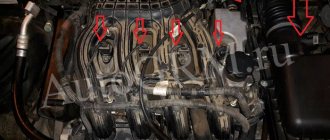
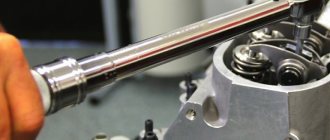
12. Apply a thin layer of engine oil to the threads and under the heads of the main bearing cap bolts, and install them. Tighten the sixteen main bearing cap bolts evenly in several passes in the sequence shown in the illustration.
Procedure for tightening the main bearing cap bolts
Note:
If any bolt does not reach the required torque when tightening, replace the bolt.
13. Apply paint marks to the front of the cylinder head bolts.
14. Tighten the cylinder head bolts 90° in the above sequence. Check that the paint mark is 90° from its original position.
Correct position of the mark when tightening the cylinder head bolts
15. Install the old sealing washers onto the pinch bolts securing the main bearing caps. Tighten the main bearing cap pinch bolts evenly in several passes to a torque of 27 Nm in the sequence shown in the figure.
Sequence for tightening the main bearing cap bolts
16. Remove the main bearing caps as indicated above. Measure the maximum width of the flattened plastic gauge to determine the radial oil clearance.
Plastic gauge showing the radial oil clearance
Oil gap:
- main bearings No. 1 and No. 4 –
- standard – 0.014–0.036 mm;
- maximum – 0.05 mm;
- main bearings No. 2 and No. 3 –
- standard – 0.026–0.048 mm;
- maximum – 0.06 mm.
Note:
If the oil clearance is greater than the maximum, replace the bearings. If necessary, regrind or replace the crankshaft.
Note:
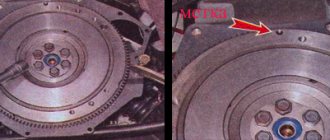
When replacing inserts of a nominal size, it is necessary to use inserts of the same size group. If the number of the size group of the liners cannot be determined, select the desired liner from the table by adding the number of the size group of the cylinder block with the number of the size group of the crankshaft. There are five standard size groups of earbuds, designated “3”, “4”, “5”, “6” and “7” (necks No. 1 and No. 4), “1”, “2”, “3”, “4” ", "5" (necks No. 2 and No. 3), respectively.
Location of number markings:
1 – number markings.
The article is missing:
High-quality photos of repairs
Payment via Portmone
After selecting payment through Portmone, the payment system will launch, where you need to select the payment method: bank card or Portmone account.
The price in the Portmone payment system is converted into dollars at the exchange rate of the Central Bank of the country where you are located.
If you have a bank card in a currency other than the dollar, then the money will be debited from the card at the rate of the Central Bank of your country at the time of the purchase.
After specifying payment details and confirming payment, payment for the goods will occur.
Official website of the Portmone payment system https://www.portmone.com
In what cases is it necessary to tighten fasteners?
Maintaining the correct tightening torque of the bolts on the VAZ-2106 engine is necessary when:
- problems with the engine, in this case it may be necessary to replace the cylinder block gasket, valve stem seals or valve liners, after which you need to return the cylinder head fasteners to their place;
- problems with the car that require head diagnostics;
- every 2-3 thousand kilometers for preventive purposes.
Few people tighten fasteners with the required force for prevention. Meanwhile, the engine constantly vibrates during operation. Because of this, the bolts weaken and over time may even leave their places. This is fraught with serious engine damage.
Payment via PayPal
After selecting payment via PayPal, the PayPal payment system will launch, where you need to select the payment method: bank card or PayPal account.
If you already have a PayPal account, then you need to log into it and make a payment.
If you do not have a PayPal account and you want to pay using a bank card via PayPal, you need to click on the “Create an Account” button - shown with an arrow in the picture.
PayPal will then prompt you to select your country and provide your credit card information.
After specifying the information required to make the payment, you must click on the “Pay Now” button.
Official website of the PayPal payment system https://www.paypal.com
Do-it-yourself engine tuning 2106
Increasing the engine capacity of the VAZ 2106
Tightening torques for gazelle threaded connections
For all owners, sooner or later, the standard 75 power ceases to be enough, the car begins to seem sluggish, unresponsive, and the question arises of how to increase the power of the 2106 engine. The most economical and simple tuning is to bore the VAZ 2106 engine by 3 mm for an 82 mm piston. Sharpening will no longer be possible, the walls of the block become very thin, only the sleeve of the block remains. To obtain a more torquey engine and further increase the volume to 1.8 liters. you need to increase the piston stroke to 84 mm. Otherwise, the modernization, modification and boost of the 2106 1:1 engine repeats the modification of the 2103.
Engine from Priora to VAZ 2106
Got an extra prioromotor lying around in the garage? Don't rush to send it to the landfill, there is a better idea. Installing a 16 valve engine on a VAZ 2106 is one of the best ways to get reliable 100 hp, but at the same time the procedure is quite difficult, you will have to saw the engine shield with a grinder, digest the pan, install the crankshaft bearing 2101 on the eight-wheel, the original gearbox remains, the clutch is changed to Priorovskoe. In addition, the flywheel, exhaust system, cooling system and accelerator drive will require improvements. Doesn't it scare you? Then it's worth a try. Materials with step-by-step photo reports are widely available and will not be difficult to find. The situation is similar with the 2112 engine on the VAZ 2106; in any case, such a swap is better than squeezing the juices out of an old classic engine. All this can be done with Niva 1.7 and 1.8
Payment via WebMoney
After selecting payment via WebMoney, the payment system will launch, where you need to select the payment method: bank card or WebMoney wallet.
If you already have a WebMoney wallet, then you need to log into it and make a payment.
If you do not have a WebMoney wallet and you want to pay in another way, you need to select any of the methods that WebMoney offers and make the payment
After specifying payment details and confirming payment, payment for the goods will occur.
Official website of the WebMoney payment system https://www.webmoney.ru/
Malfunctions when removal and installation of the cylinder head are required
There are a number of malfunctions due to which the cylinder head of the VAZ “six” has to be removed from the car for further diagnostics or repairs. Let's look at them in more detail.
Gasket burnt out
The following signs indicate that the cylinder head gasket has failed (burnt out or was punctured):
- the appearance of leaks or gas breakthrough at the junction between the engine block and the head. With this phenomenon, extraneous noise appears in the operation of the power plant. If the outer shell of the seal ruptures, traces of lubricant or coolant may appear;
- formation of an emulsion in motor oil. This happens when coolant gets into the oil through the gasket or when a crack forms in the BC;
The formation of an emulsion indicates that coolant has entered the oil.
- the appearance of white smoke from the exhaust system. White exhaust occurs when coolant enters the combustion chamber of the engine. In such a situation, the liquid level in the expansion tank gradually decreases. Untimely repairs can lead to water hammer. Water hammer is a malfunction that is caused by a sharp increase in pressure in the sub-piston space;
If the gasket is damaged and coolant is leaking into the cylinders, thick white smoke will come out of the exhaust pipe.
- entry of lubricant and/or exhaust gases into the engine cooling system. You can detect whether lubricant has entered the coolant by the presence of oil stains on the surface of the liquid in the expansion tank. In addition, when the seal of the gasket is broken, bubbles may appear in the tank, indicating that exhaust gases have entered the cooling system.
The appearance of air bubbles in the expansion tank indicates exhaust gases entering the cooling system
Video: Damage to the cylinder head gasket
Damage to the cylinder head mating plane
The following reasons can lead to the formation of defects in the mating surface of the block head:
- long-term operation of the power unit;
- motor overheating;
- poor quality coolant.
Defects of this kind are eliminated by processing the plane, with preliminary dismantling of the head.
Damage to the mating plane using the example of the Kalina cylinder head
Cracks in the block head
The main reasons that lead to the appearance of cracks in the cylinder head are overheating of the engine, as well as improper tightening of the mounting bolts during installation. Depending on the nature of the damage, the head can be repaired using argon welding. In case of serious defects, the cylinder head will have to be replaced.
Overheating of the engine can lead to a crack in the cylinder head.
Wear of guide bushings
With a high mileage of the engine or the use of low-quality engine oil, the valve guides wear out, which leads to a violation of the tightness between the seat and the valve plate. The main sign of such a malfunction is increased oil consumption, as well as the appearance of bluish smoke from the exhaust pipe. The problem is resolved by replacing the guide bushings.
Valve seat wear
Valve seats can wear out for several reasons:
- use of low quality fuel;
- long engine mileage;
- Incorrect ignition setting.
The malfunction can be solved by straightening or replacing the saddles. In addition, the ignition system must be checked.
Seat defects lead to a loose valve fit and loss of combustion chamber tightness.
Broken spark plug
Quite rarely, but it happens that as a result of over-tightening the spark plug, a part breaks off on the thread in the spark plug hole. To remove the remains of the cylinder head spark plug element, you need to dismantle the threaded part and unscrew it using available tools.
CPG malfunctions
If there is a problem with the cylinder-piston group of the engine, the cylinder head also has to be removed. The most common failures of the CPG include:
- increased wear of cylinders, rings and pistons;
- piston damage;
- occurrence of rings.
If the cylinders are worn excessively, the engine is completely disassembled to replace the piston group, as well as to bore the internal cavity of the cylinders on a machine. As for the damage to the pistons themselves, although they rarely burn out. All this leads to the need to dismantle the cylinder head and replace faulty parts. If the rings are stuck, normal operation of the cylinder and the engine as a whole becomes impossible.
If the rings are stuck, normal engine operation is disrupted
Downloading a book
After successfully completing the payment (by any method) and returning to the KrutilVertel store from the payment system website, you will be taken to the successful payment page:
On this page you need to indicate your e-mail, where access to download the book will be sent.
If you are already registered on our website, then simply follow the link to your personal account.
The book you purchased will be in your personal account, from where you can always download it.
Please note that after making the payment, you need to return back from the payment system website to the KrutilVertel website.
If for some reason you did not return back to the site and closed the payment system tab with a message about the successful completion of the payment, please let us know - we will send you a letter indicating access to download the book.
Video.
In previous articles I explained how you can remove the engine from a VAZ 2109 without removing the gearbox and disassemble it yourself at home.
Now I will explain how to assemble it. The engine was disassembled for repair, the reason for the repair was that the VAZ 21083 engine was burning oil. After disassembly, it turned out that the oil consumption was due to the high wear of the piston group; the block was bored to accommodate the pistons of the first repair, 82.4. The crankshaft turned out to be completely new; it was not ground; only the bearings were replaced with new ones. I also lapped the valve and replaced the valve seals; the head grinding is described in the article Grinding in the head valves of a VAZ-2108 up to 15
Problems when paying with bank cards
Sometimes difficulties may arise when paying with Visa/MasterCard bank cards. The most common of them:
- There is a restriction on the card for paying for online purchases
- A plastic card is not intended for making payments online.
- The plastic card is not activated for making payments online.
- There are not enough funds on the plastic card.
In order to solve these problems, you need to call or write to the technical support of the bank where you are served. Bank specialists will help you resolve them and make payments.
That's basically it. The entire process of paying for a book in PDF format on car repair on our website takes 1-2 minutes.
If you still have any questions, you can ask them using the feedback form, or write us an email at [email protected]
Why do you need to observe the tightening torque?
Installation of new bolts is carried out in compliance with the diagram and tightening torque. It is important to follow the instructions for the following reasons:
- an incorrect sequence will lead to deformation of the middle part of the block;
- Excessive force causes cracks in the cylinder head metal;
- Insufficient tightening may result in the need for engine overhaul.
In order to do this job accurately and correctly, you will need to have a torque wrench on hand. This tool will allow you to maintain the tightening torque. It cannot be replaced by a regular gas wrench, since you cannot use it to determine how many kilograms of force were applied to the screw. If you often repair your car yourself, this special tool is best to buy. For one-time use, it is better to rent it at the nearest service station.
Lada 2106 ☭ Gear › Logbook › Replacing the cylinder head gasket
At the beginning of August, my gasket burned out ((I’m posting it only now)
Next, take a 13mm wrench, unscrew the camshaft mounting nuts, and remove it. We remove all connections to the carburetor and disconnect the exhaust gas outlet. WE GOT ACCESS TO THE STUDS ATTACHING THE HEAD TO THE BLOCK
DO NOT RIP OFF THE BOLT CAP! I tore it off (I couldn’t find a new bolt (Thankfully, I have a turner friend who turned me a new pin.
IF YOU BROKEN A BOLT! Don't panic, everything can be fixed. It’s unlikely to be welded (I personally didn’t succeed), so we take a DRILL, a good DRILL for metal and drill out the bolt (I broke 3 drills), but still drilled it out.
YOU CAN CUT OFF THE HAT WITH A CHISEL using a sledgehammer (tried it myself - it worked! First I cut it down, then I drilled it out a little)
They took out all the pins and removed the head.
Clean the block and head from any remnants of the old gasket.
TO CORRECTLY ALIGN THE CRANKSHAFT AND CAMSHAFT TO THE MARKS IN THE FUTURE, INSTALL THE FIRST PISTON TO TDC (REMEMBER, THE CRANKSHAFT MOVES CLOCKWISE, THE PISTON WENT DOWN, THE INTAKE VALVE OPENED)
Let's pay attention to the camshaft. There is a kind of “point” on the camshaft gear - this is a mark
There is a kind of “point” on the camshaft gear - this is the mark.
Remember! When the 1st piston is at TDC, the mark on the gear should be at the top opposite the peculiar arrow
PUT YOUR HEAD IN PLACE!
RATCHET + PIPE = TIGHTEN THERE EXACTLY! Sorry, no photo( CAUTION! Don’t tear off the pins! Tighten everything according to the diagram
First, using a wrench without a pipe, tightened all the studs in order until they stop. Pull calmly, without jerking. Don't overtighten.
It will be useful: Diagnosing the engine cooling system: basic techniques and recommendations
Then with the pipe in order until it stops. Once the bolt stops on its own, don’t pull it yet, pull the next one.
And so on a couple of times in a circle until the bolts stop spinning. First fully tighten all 10 bolts without the 11th. 11th pull VERY LAST, when everything is already tightened.
Pull with a wrench, without a pipe, as this bolt requires a small force (about 3 kg). THE THREAD OF THIS BOLT IS VERY EASY TO RIP. There is a very fine line between “tightened” and “broken”.
Wait 4 hours. The head will “sag” a little. Tighten the bolts again.
Putting the camshaft in place
We screw the valve cover in place, attach all the hoses to the carburetor, and install the ignition.
That's it, the engine is assembled. I think I described everything)
Diagram and procedure for tightening the cylinder head of the VAZ-2106
In order for the VAZ-2106, like any other brand of car, to function perfectly and not let the driver down on the road, you need to regularly inspect the technical condition of the car in order to be able to correct any breakdowns in a timely manner.
The operation of each automotive component must be carefully configured, including the operation of the cylinder head. Quite often, the head bolts become loose after using the machine for a long time, so they need to be tightened periodically. Since this process is not so complicated, you can handle it yourself if you know the procedure and pattern for tightening the cylinder head for a VAZ-2106 car. How to tighten bolts according to the rules and how to cope with this task on your own? Let's try to analyze it in this article.
Signs of Camshaft Wear
The operation of the camshaft is associated with constant exposure to high loads, as a result of which the part gradually wears out and requires replacement. The need for repair arises when characteristic symptoms appear:
- knocking when the engine is running under load;
- reduction in power indicators.
There are a number of reasons why the RV fails:
- natural wear and tear;
- low-quality motor oil;
- low oil pressure in the lubrication system;
- insufficient oil level or so-called oil starvation;
- engine operation at high temperatures, which leads to deterioration of the lubricant properties;
- mechanical damage (wear or broken chain).
The main malfunctions that impair the performance of the camshaft are scuffing on the working surfaces (journals and cams) and deterioration of the limiter.
Over time, the camshaft's cams and journals wear out.
Knock
It is quite problematic to determine from the sounds coming from the engine compartment that the problem is related specifically to the camshaft, but it is still possible. The knocking sound of the engine resembles the dull blows of a hammer, which become more frequent as the engine speed increases. However, the best way to diagnose a shaft is to dismantle, disassemble and troubleshoot it. During inspection, the shaft should not move in the housing relative to the axis, otherwise a dull sound will be produced when hitting the limiter.
Video: reasons for the longitudinal play of the VAZ camshaft
Power reduction
The drop in power on classic Zhiguli cars is a phenomenon caused by wear of the camshaft and rockers. With proper engine operation (timely oil changes, monitoring its level and pressure), the problem only appears over long vehicle runs. When the cams wear out, the required phase width and valve lift at the intake are no longer ensured.
When the shaft and rockers wear out, the motor power may decrease several times
The RV can become deformed under extreme heat, which is caused by problems in the cooling and lubrication systems. At first, the problem may manifest itself as a knocking sound. Therefore, if there is a suspicion of this breakdown, for example, the motor has overheated, then it is recommended to diagnose the shaft in order to avoid more serious troubles with the engine timing belt.