The stable operation of a carburetor engine directly depends on the performance of the carburetor itself. Until recently, cars of the VAZ family were equipped with a fuel supply system using this unit. The carburetor requires periodic maintenance, which is something that almost every Zhiguli owner faces. You can do the cleaning and adjustment work yourself, just read and follow the step-by-step instructions.
- What is it for?
- Carburetor design
- Idle system
- Float chamber
- Econostat
- Acceleration pump
- Transition system
- Starting system
- What carburetors are installed on the VAZ 2106
DAAZ
- Ozone
- Solex
- Signs of a carburetor malfunction
Stalls at idle
- Dips during acceleration
Video: eliminating air leaks
- Video: fixing the stalling engine problem
- XX adjustment
Video: how to make idle stable
- Video: how to clean the carburetor
- How to remove
Video: how to remove a carburetor using the example of a VAZ 2107
Briefly about the features and structure of the “six” carburetor unit
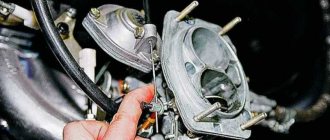
Before adjusting the carburetor on a VAZ 2106, it doesn’t hurt to know its design features. After 1980, Ozone and Solex began to be installed on Tolyatti cars. The purpose of the unit’s operation is to prepare a combustible mixture before feeding it into the car’s cylinders. Down to the subtleties, this is not a driving school, we will not disassemble the design, it is enough to familiarize yourself with the main components that ensure optimal operation of a carburetor internal combustion engine:
- Fuel dosing system.
- Mechanisms for controlling throttle valves and enriching the mixture.
- Idle system.
- Accelerator pump and econostat.
- Float chamber.
A chamber with a float and a needle valve is responsible for the stability of the fuel level. Next, gasoline, flowing through the spray tube, enters the chamber, where it mixes with air from the inlet pipe. The amount of mixture is adjusted by the throttle valve, which is connected to the accelerator pedal.
Precise adjustment allows you to prepare the correct mixture of gasoline and air in a ratio of 1:15. During long-term operation of the car, the settings get lost and you have to think about how to adjust the carburetor on a VAZ 2106 on your own. The adjustment technology is the same for both Solex and Ozone.
Which one to choose for the injector
The main disadvantage of installing an external slot mixer on an injection machine is that you often have to shorten the suction manifold pipe. Also, if a “cracker” mixer is installed, due to explosions, the valve bends in the opposite direction, which makes it difficult for air to pass through.
There are cases of valve tearing off (a common problem with firecrackers with curtains attached to rivets). After which the remains of the rivets and the curtain fly under the intake valve, causing damage to the CPG.
The solution to the problem is to install a flow mixer and separate installation of an anti-cotton valve in the plastic air filter housing. This design is less useful for protecting electronics because the blast wave will pass through the MAF/MAP sensors. Inserting a safety valve into the manifold (made of plastic) will work more efficiently.
Installing an in-line mixer will also require breaking the integrity of the pipe. This mixer is placed inside the corrugation with a hole cut for the fitting.
In terms of performance, all devices are designed for a specific car brand.
When is adjustment needed?
Adjusting the carburetor unit is no more difficult than adjusting the clutch drive on a VAZ 2107 , since it only involves adjusting the jets. In some cases, they need to be cleaned of resins and other contaminants; the presence of contaminants is felt by power dips in the process of accelerating. Many car owners claim that Ozone carburetors are not a very good option and recommend replacing them with Solex.
However, the signs that the device has begun to prepare an enriched mixture and needs to be adjusted are the same for both types of units:
- Increased fuel consumption.
- Frequent overheating of the motor.
- Black smoke from the exhaust pipe and pops.
- Loss of power.
The preparation of a lean mixture is characterized by the following characteristics:
- Popping sounds in the carburetor.
- Loss of power.
- Engine overheating.
Of course, you don’t always need to immediately grab a screwdriver and turn the adjusting screws - perhaps it’s something else. For example, when the idle speed floats, air may leak through the intake manifold gasket, or there may be a breakdown of the brake booster diaphragm. But even the reasons listed are not all the options, so specific recipes for eliminating certain problems cannot be given. The issue should be addressed comprehensively, taking into account the connection between vehicle systems.
Preliminary stage
Before you properly adjust the carburetor on a VAZ 2106 with your own hands , it is important to carry out a number of work steps:
- Adjust the thermal clearances of the gas distribution mechanism.
- Set the optimal ignition timing.
- Open the air damper completely.
All work on setting up the carburetor unit is carried out on a warm engine. Do not forget that during the process you may need new parts and rubber products, so it is better to purchase a repair kit in advance.
How to replace the VAZ 2109 block gasket
Replacing the cylinder head gasket of a VAZ 2109 is carried out according to the same scenario as on the eight, on VAZs of the tenth series, since the engine designs of these cars differ very slightly from each other. We will present the procedure for replacing the gasket schematically, since there is no need to describe the unscrewing of each bolt, and everyone has a Murzilka in the glove compartment. We will dwell only on the most important points that cannot be neglected in order to avoid failure of the entire motor.
The gasket is replaced as follows:
- We remove the terminal from the battery, drain the antifreeze, maybe not completely, if it is in normal condition. Drain the oil if antifreeze gets into it.
- We disconnect the wires from the sensors, remove the thermostat, air filter, timing cover, and disconnect the exhaust pipe of the muffler.
- We align the shafts and gears strictly according to the marks, remove the timing belt, disconnect all the hoses and wires from the carburetor and remove it.
- We remove the cooling system pipes and the timing cover, and then unscrew the cylinder head mounting bolts. After this, carefully remove the head from the car.
Setting idle speed
The process involves two screws that set the quantity and quality of the mixture. For high-quality settings, having a gas analyzer will not hurt. Before adjusting the carburetor on a VAZ 2106, you need to know about the restrictive plastic bushings that are pressed onto the adjusting screws. These plugs do not allow you to violate the factory settings. If this factor prevents you from setting XX normally, then you should break them out with a slotted screwdriver.
Idle speed control technology:
- With the air damper open, set the crankshaft speed screw to 800-900 rpm.
- Rotate the quality screw to set the maximum engine speed.
- Using the quantity screw, set the speed on the tachometer to 950-1030 rpm.
- Use the quality screw to set the maximum speed again.
- Repeat these operations until the speed of 950-1030 rpm does not coincide with the maximum speed set using the quality screw.
- After the moment of coincidence, return the quality screw to the position where the engine speed was 800-900 rpm.
If you have a gas analyzer, use a quality screw to achieve a CO concentration in the exhaust gases of 0.5-1.2%. The final position of the screws must be secured with plastic sealant to prevent spontaneous unscrewing.
Adjusting the rods
An equally important stage in the process of adjusting the “six” carburetor is performed through the transitions:
- Remove the air filter and its housing.
- Measure the distance between the central points of the tips, it should be 80 mm .
- To change the length of the rod, release the tip with a screwdriver and unscrew the lock nut with an “8” wrench, and then perform the adjustment by rotating the tip.
- Tighten the fasteners and install the rod in its original place, start the engine and press the gas pedal all the way. If the throttle does not open completely, the damper has a travel reserve.
When asked how to further adjust the carburetor on a VAZ 2106, experts recommend performing a few more simple steps:
- Remove the end of the longitudinal linkage and unscrew the locknut.
- Reduce the length of the rod, secure it and again check the degree of opening of the damper by pressing the gas pedal to the floor. The damper must be completely closed.
- If it is necessary to increase the rod length, you need to loosen the throttle cable.
What do we have after proper adjustment of the carburetor unit of the “six”?
Checking the adjustments of the fuel mixture preparation unit is the same important maintenance step as monitoring the condition of the car battery . An integrated approach to setting up the carburetor guarantees not only a comfortable mode of movement, but also a lot of useful points:
- An increase in power and a confident increase in speed.
- No failures in the operation of the internal combustion engine in the low and medium speed sector.
- Improved dynamic characteristics - the car picks up speed faster and accelerates in a short time.
- Optimal engine response, which is expressed in the responsiveness of the gas pedal.
The listed qualities make it possible to effectively use the combustible mixture, which is necessary both in urban traffic jams and on country roads. Therefore, proper adjustment of the carburetor unit will help the car gain speed in a timely manner and complete the planned maneuver.
A carburetor is a component that prepares the fuel mixture for the engine. Its task is to ensure the correct proportions of mixing air with gasoline. The ideal ratio is: 1 portion of gasoline per 15 portions of air. During operation, the adjustment of the VAZ 2106 carburetor gradually gets lost, which leads to excessive enrichment or depletion of the fuel mixture with gasoline.
Symptoms of a problem
If the carburetor begins to produce a rich mixture, you will understand this by the following signs:
- Fuel consumption increases
- Loud exhaust is heard from the muffler and the smoke turns black
If the engine receives a lean mixture, you will understand this by the following sign:
- Loud bangs are heard from under the hood.
In both cases, the engine heats up noticeably more, and its power is also lost.
If you encounter a similar problem, remember that it is a natural consequence of using the carburetor. Any element of the car requires care, regular inspection and maintenance. Therefore, the VAZ 2106 carburetor must be adjusted from time to time.
Before proceeding with the adjustment, you need to make sure that the cause of the breakdown is not the failure of any element inside the device. You need to disassemble it, wash it and clean it. And only after you are convinced that all components of the structure are in full working order, you can begin adjustment.
Removing and cleaning the carburetor
Only a complete cleaning of the VAZ 2109 carburetor will give the result that you need. Liquids and aerosols provide a partial effect and serve as means of prevention. They are effective in their work, but you should not rely on such preparations to properly clean the carburetor.
Removing and disassembling the carburetor is difficult, but sometimes you can’t do without it.
Required materials and tools
Prepare tools and materials in advance before cleaning the VAZ 2109 carburetor. You will need:
- Clean, lint-free rags;
- Liquid cleaning aerosol, which we talked about above;
- Rubber gloves that are not afraid of oil, fuel, solvents;
- Protective glasses;
- A compressed air cylinder or compressor to blow out the internal channels and jets;
- Toothpicks or cotton swabs;
- Screwdrivers and wrenches;
- Operating manual for your car;
- A metal container with high edges and large volume.
Adjusting the drive
- Checking the length between the tips. The required size is 80 millimeters.
- If you deviate from this size, remove one tip.
- Loosen its lock nut and by rotating adjust the distance to the desired size.
- Tighten the nut and return the rod.
- You need to check the adjustment. To do this, our assistant presses the gas pedal. We observe the throttle valve to see if it has opened completely.
- If not, then you need to remove the tip from the lever and reduce the length of the rod.
- Now you need to see what position the damper is in when the gas pedal is released: does it close completely. If not, the pull needs to be lengthened a little.
- Next we work with the air damper. We weaken its drive. In the cabin, we completely recess the damper.
- Press the three-arm lever so that the flap opens all the way. In this position, tighten the locking screw.
- Checking the adjustment. To do this, we completely close and open the door from the passenger compartment again. If the damper has not opened completely, we carry out the adjustment again. If the outcome is positive, fully tighten the screw.
Adjusting the starter
These works can be performed directly in the car. But you will have to first remove the filter cover.
- We turn out the plug. Underneath we find the adjustment screw.
- If you carry out the work without removing the carburetor from the car, pull out the choke. If you have the device in your hands, press the three-arm lever. After the damper is completely closed, push the rod down until it stops.
- Let's see what the gap is between the camera and the air damper. A 5.5 mm drill will help us with this.
- If necessary, make adjustments by turning the adjusting screw using a screwdriver.
- We return the plug back.
- Now you need to check the distance between the camera and the throttle valve. The required size is 1 millimeter. A drill with a similar diameter is suitable for this. The gap is adjusted using a rod, which is either rearranged into a different hole or bent.
How to cut a paper gasket for a carburetor.
Watch the video. Gaskets in connections between parts are mandatory in some places and technically cannot yet be replaced with sealing paste or sealing mastic. The gasket installed between the carburetor and the engine of a lawn mower or chainsaw does not have strict technical restrictions. It is enough for it to be a little elastic, tear-resistant, not rigid, gasoline-oil-resistant, and easy to crimp. As for the temperature effect on the gasket, the temperature at the place of its installation, even on the hottest engine, is low.
Due to the specific nature of this technique and the fact that disassembly is carried out frequently in this area, cardboard or pressboard can be used as a gasket for sealing. The paper gasket is convenient because it is petrol and oil resistant, does not stretch, seals well, and at the right time there is always something to replace it with.
To ensure that the gasket matches the contour of the surface being used, an oil print of the same surface can be used. A thin layer of machine oil is applied to the template surface, cardboard is applied and pressed tightly over the entire area.
Using a well-sharpened drift of the appropriate diameter, straight holes are cut for the mounting bolts. The hole for the diffuser is cut with small curved scissors or a punch of the appropriate size.
We apply a thin layer of machine oil to the second surface and get an imprint on which the place for the hole in the pulse channel is already visible.
After starting the engine, the adjusting screws on the carburetor are set to the optimal position, since previously, with the gasket squeezed out, the operation of the carburetor was adjusted during engine operation several times and on the move
Carburetor without gasket on chainsaws.
On chainsaws with budget two-stroke engines, the standard gasket between the engine and the carburetor is often not used. The carburetor is connected to the engine through an elastic rubber pipe, and with sufficient compression the connection seals very well.
According to my observations, the operation of a chainsaw engine with a similar system for connecting the carburetor to the engine is often disrupted due to a poor seal between the carburetor and the pipe. The impulse for the fuel pump passes through an isolated channel, therefore, it reaches the membrane of the fuel pump with an equal force forming it.
But the operation of the dosing system is disrupted, since the discharged air flow passing through the carburetor diffuser is not sufficient to form an optimal fuel-air mixture.
When the throttle valve is closed and in the engine acceleration mode, additional air enters the engine working chamber through a poor seal between the carburetor and the pipe. The air flow passing through the carburetor diffuser weakens and is not able to operate the membrane and fuel valve with sufficient force.
The engine loses low speed and does not hold it steadily when the throttle is fully open. The fuel-air mixture becomes leaner. It can be difficult to start such an engine the first time it is started, and especially when the cylinder is hot.
source
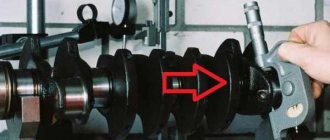
Adjusting the float system
Before you begin this work, you need to make sure that the needle valve is working reliably.
- We take a measurement between the float and the gasket. This distance should be 6.5 millimeters. A slight deviation of 0.25 millimeters is allowed. You can also simply use a suitable drill bit to measure.
- The clearance is adjusted by changing the angle of the float tongue.
- Turn the float all the way. We measure the distance to the gasket in this position. It should be equal to 8 millimeters. Using the tongue we achieve the desired value.
Adjusting the idle speed on a VAZ 2106
First you need to prepare the car. We warm up the engine to a temperature of 900 degrees. We ensure that the engine operates stably at idle speed.
Let's watch a video in which everything is shown in an accessible and understandable way:
The text instructions are as follows:
- Using the quantity screw, we achieve a crankshaft speed of 820 to 900 rpm.
- Using the quality screw, we bring the unit into stable and uniform operation. Then, by tightening the screw, we destabilize the operation of the motor and unscrew it again to restore it. Our task is thus to achieve the most stable engine operation with the leanest possible mixture.
- Using the quantity screw, we again bring the speed to the desired value.
- It is best to carry out the operation two or three times.
Aerosols
It is convenient to work with them, since the aerosol comes out under pressure and additionally clears blockages with a flow of air with the mixture. Sprayers contain propane, acetone and a number of other dangerous components. Therefore, avoid getting them in your eyes and hands. They catch fire easily and can only be extinguished with carbon dioxide fire extinguishers.
Aerosol Abro for carburetor cleaning
Aerosols do an excellent job, but they cannot clean the float chamber.
The cleaning process is the same for all cars:
- Remove the air filter;
- Spray cleaner through the tubes outside and inside;
- After 3 minutes, start the engine at high speed and spray the product intermittently for 2 minutes.
This process will take you a maximum of 15 minutes.
Carburetor Basics
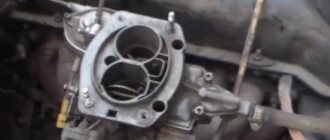
Contrary to popular belief, the suction of fuel from the carburetor does not occur due to the internal operating thrust of the engine. To perform this function, the device is equipped with a diffuser.
This element is not a separate element, but a narrowed part of the carburetor neck. When an air flow passes through it, due to the difference in width, a vacuum occurs, a drop in pressure. Near this place there is a small hole for supplying gasoline. Thanks to the resulting vacuum, atmospheric pressure acts on gasoline by displacing it from the float chamber through a special passage into the carburetor neck. In it, fuel is mixed with air and enters the engine cylinders through the intake manifold. The VAZ-2105 or 2106 engine, like any other automotive power unit, is capable of operating in several modes, each of which requires the appropriate type of air-fuel mixture.
Modification of the carburetor VAZ-2108 (2109)
Car owners modify the carburetor, trying to solve one or another operational problem. The most common are high fuel consumption and poor acceleration dynamics.
Reduced fuel consumption
It's not just the carburetor that affects fuel consumption. It largely depends on your driving style.
Before upgrading anything, you need to check and adjust the spark plugs and other ignition elements, adjust the valves and install a clean air filter.
A significant excess of consumption over the rated value usually indicates a malfunction that needs to be eliminated, and only then the design must be improved. It is useless to turn the carburetor if the cylinders have low compression.
When reducing consumption commensurate with the passport data, you should remember that the acceleration dynamics will most likely suffer. The car will become less playful. The occurrence of failures and other unpleasant phenomena is possible. Will the work have to be done again, eliminating the consequences of the intervention?
You can reduce fuel consumption by 0.3–1 l/100 km by selecting the jets of the first chamber.
- Install a nozzle with a smaller hole cross-section (index) closest to the existing one. Adjust the idle speed and evaluate the driving dynamics.
- If the engine is subjectively operating normally, try the next index. Continue until you encounter problems that cannot be corrected by adjustment.
- Return to the last stable replacement option and try changing the air jets using a similar method. But not to a smaller, but to a larger index than the one set.
By selecting a jet using this method, you can achieve a reduction in consumption by almost 1 l/100 km. The dynamics will inevitably worsen. How much can be judged only by the results of bench tests of the engine. They are not available to the average owner.
Diffuser boring
Diffusers are bored for the opposite purpose. Saving gasoline is not important for lovers of fast cars.
By increasing the diameter of the diffusers, the air flow and vacuum increase, sucking fuel from the carburetor channels into the mixing chamber.
When taking on boring, you should take into account that just increasing the air flow will not solve the problem, as it will make the mixture poorer. Additionally, you will need to select the appropriate jets.
In addition, the experiment is not only irreversible, but also quite dangerous; you can “kill” the carburetor to death by damaging the mixing chambers.
Safe boring - removing obstructions to air flow. Movement is hampered by unevenness and casting marks on small diffusers, as well as protruding screws securing the throttle valves.
- Remove the small diffusers. Clamping it in a vice, remove any unevenness with a file and round the crossbars. Polish surfaces.
Remove the small diffusers. Clamping it in a vice, remove any unevenness with a file and round the crossbars. Polish surfaces - Without unscrewing, grind off the protruding heads of the damper mounting screws.
- Blow and flush the carburetor before installation.
With such a boring of small diffusers, the nozzles do not need to be changed. The mixture becomes slightly leaner, but this has little effect on the dynamics.
Manually boring large diffusers is not very promising. Firstly, it is very labor-intensive, and secondly, using a file, it is difficult to maintain the shape. It's better to find a familiar turner.
Boring has a positive effect on dynamics at high engine speeds. At low and idle speeds, an increase in the diameter of the diffusers causes the mixture to become leaner, as a result of which stability deteriorates, dips appear, and power drops.
The disadvantages are eliminated by increasing the size of the idle jet, the first chamber nozzle and the accelerator pump cam.
All hassle can be avoided if you replace the standard carburetor with a model designed for a larger engine.
After boring large diffusers or replacing the carburetor with a more efficient one, it is better not to think about fuel economy.
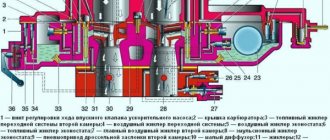
Carburetor design
1. Carburetor heating unit VAZ 2105; 2. Throttle valve of the first chamber; 3. Crankcase gas suction pipe; 4. Accelerator pump drive lever; 5. Accelerator pump drive cam; 6. Accelerator pump diaphragm; 7. Fuel jet for power mode economizer; 8. Carburetor body VAZ 2105; 9. Power mode economizer diaphragm; 10. Solenoid shut-off valve; 11. Idle fuel jet; 12. Carburetor cover VAZ 2105; 13. Fuel supply pipe; 14. Main air jet of the first chamber; 15. Air damper; 16. Accelerator pump nozzles with fuel supply valve; 17. Trigger diaphragm; 18. Adjusting screw of the starting device; 19. Adjusting screw for the amount of idle mixture; 20. Second chamber lock lever; 21. Vacuum supply pipe to the vacuum regulator of the ignition distributor VAZ 2105; 22. Idle mixture quality adjusting screw; 23. Throttle valve drive lever; 24. Adjusting screw for slightly opening the throttle valve of the first chamber; 25. Air damper control lever; 26. Starter rod; 27. Electrical wire for the idle speed economizer limit switch; 28. Choke lever; 29. Main air jet of the second chamber; 30. Emulsion tube of the second chamber; 31. Sprayer of the main dosing system of the second chamber; 32. Fuel filter VAZ 2105; 33. Needle valve of the float chamber of the VAZ 2105; 34. Throttle valve of the second chamber; 35. Second chamber throttle lever; 36. Main fuel jet of the second chamber; 37. Second chamber throttle drive lever; 38. Float.
The design of the VAZ-2105 (2106) carburetor provides a number of structural elements that provide the necessary characteristics of the combustible composition. The engine can operate in various modes: warming up, idling, medium speed and heavy load. Each of the above situations requires a certain consistency of the ingredients of the air-fuel mixture. The carburetor consists of more than fifty parts. Let's take a closer look at each element of the device. It is worth mentioning that all segments are important components of the device; their dismantling can have a negative impact on the operation of the power unit.
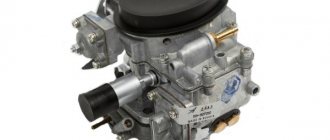
Models of carburetors for VAZ-2108 (2109) cars
VAZ “eights” and “nines” were equipped with licensed Solex carburetors from the Dimitrovgrad Automotive Component Plant. Depending on the volume and other features of the engine, the manufacturer installed one of the seven models listed in the table below.
VAZ “eights” and “nines” were equipped with licensed Solex carburetors
There are no fundamental differences between the models. They all have the same design, but the sizes of the dosing elements (nozzles, diffusers) differ, and there are features of some components.
Table: models and their descriptions
| Carburetor model | Peculiarities | Automobile model | Engine capacity (l) |
| DAAZ 2108–1107010 | VAZ-2108 VAZ-2109 | 1,3 | |
| DAAZ-21081–1107010 | VAZ-21081 VAZ-21091 | 1,1 | |
| DAAZ-21083–1107010 | VAZ-21083 VAZ-21093 VAZ-21099 | 1,5 | |
| DAAZ-21083–1107010–31 | semi-automatic starting device | VAZ-2108 VAZ-2109 | 1,5 |
| DAAZ-21083–1107010–35 | two-stage starting device | VAZ-2108 VAZ-2109 | 1,5 |
| DAAZ-21083–1107010–62 | electronic fuel mixture control | VAZ-2109 | 1,5 |
| DAAZ-21083–1107010–05 | for engines with microprocessor ignition | VAZ-2109 | 1,5 |