| The interior of the LADA Priora does not warm up in cold weather, and the windshield and side windows freeze? There is only one reason - the stove does not heat well . The LADA Priora interior heating system performs a number of functions (heats, cools, ventilates the interior); in this article we will look at the heater design separately. |
The car is equipped with a heating and ventilation system, which serves to create the most comfortable conditions for the driver and passengers, regardless of weather conditions. The heating and ventilation system includes:
- heater
- heater fan.
- cabin air temperature sensor.
- air distributor housing.
- air ducts
- deflectors.
The air from the heater enters the air distributor housing and then into the air ducts. Through them, air is supplied to the windshield and side window vents, to the central and side deflectors on the instrument panel, as well as to the feet of the driver and passengers.
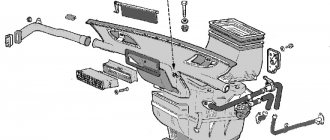
Elements of the heating system LADA Priora
1 — filter cover; 2 — heating and ventilation system filter; 3 — heater housing; 4 — micromotor-reducer of the heater damper; 5 — heater radiator; 6 — additional heater fan resistor; 7 - heater fan
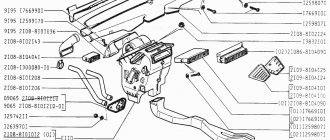
Heater parts: 1 - screw 1/76691/01; 2 — heater radiator 2110-8101060; 3 — left heater casing 2111-8101025; 4 — heater control damper 2110-8101538; 5 — right heater casing 2111-8101024; 6 — air duct housing 2111-8119124 intermediate; 7 — screw 1/76692/01; 8 — lower air intake housing 2111-8119026; 9 — bracket 2108-8101110; 10 — bracket 2111-8119102 right; 11 — screw 2114-5325388; 12 — air filter 2111-8122020; 13 — upper air intake housing 2111-8119025; 14 — filter cover 2111-8119116; 15 — screw 1/76702/01; 16 — screw 1/76691/01; 17 — additional resistor 2123-8118022; 18 — screw 2123-6302332; 19 — screw 2114-5325388; 20 — air supply pipe 2123-8118096; 21 — electric fan 2111-8118020 of the heater; 22 — bracket 2108-8101110; 23 — gear motor 2110-8127200 for the heater damper; 24 - screw 1/76691/01
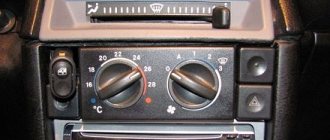
Quick heating of the interior
To quickly warm up the air in the cabin, do the following.
1. Install the air flow distribution regulator 1 as shown in the photo.
2. Turn control knob 2 clockwise to the extreme right position until it stops.
3. Turn the handle of the switch for 3 operating modes of the electric heater fan to position “4”.
| Rice. 1.8. Air flow distribution organs |
4. Open the side 2 (see
rice. 1.8
) and central 5 nozzles.
Ensuring a comfortable air temperature in the cabin
If the windows in the cabin are clear, but the temperature in the cabin has not reached the desired temperature, do the following.
1. Set the desired temperature using regulator 2.
2. Set regulator 1 to the vertical position.
3. Select the required intensity of warm air supply into the cabin using the 3-mode switch for the heater fan.
Useful tips
Regularly clear the fresh air intake openings located in front of the windshield of snow and leaves.
Do not allow the exhaust vents located in the side trim of the trunk to become dirty.
Keep your car windows clean: Dirty windows retain more moisture than clean windows, and therefore take longer to defrost.
Heater radiator
| The heater radiator is connected by hoses to the engine cooling system. Coolant constantly circulates through the heater radiator. The heater control damper directs outside air to or bypass the heater core. In intermediate positions of the damper, part of the air passes through the radiator, and the rest bypasses the radiator. In the extreme positions of the damper, all air passes through the radiator or bypasses it. |
Air conditioner malfunction
A Conder can break down; the reason for this is not always the negligence of manufacturers towards their product. Most often, a small component fails, which can be easily replaced and then continue to use the Conder. If the air conditioner does not turn on, then:
- There is damage in the wiring;
- Thermostat is faulty;
- The fuse has blown;
- Lack of freon in the system;
- Pressure sensor malfunction;
- Excessive system pressure.
If the air conditioner does not work, then this is not a reason to throw it away. All the necessary spare parts for an air conditioner can be found in Lada, they will not cost much.
Heater assembly
1 — micromotor-reducer of the heater damper; 2 — heater control damper; 3 — additional heater fan resistor; 4 — blowing hose for the fan motor; 5 — heater fan; 6 — filter cover of the heating and ventilation system
The heater is installed in the engine compartment under the right windshield trim and is attached to the front panel. A filter is installed at the heater inlet to clean the air entering the heating and ventilation system.
The Surprising Benefits of Avoiding Air Conditioning
Summer hound
We have entered the most wonderful time of the year. No, not Christmas, but the intermediate months between winter and summer when we can drive past without the use of heat or air conditioning. This climate-free period is a great opportunity to save money and get some fresh air. It may seem like a minor shift in daily life, but we relish the opportunity to live without it. Even though we have many methods to keep temperatures below average, we still rely on them in the winter (to prevent frozen pipes and freezing noses) . Therefore, summer is the time for our savings.
Windows and doors (and their proper use)
Our primary mechanism for keeping air conditioning free is the window-n-door method. Yeah, we open the windows and doors. I know, pretty advanced. But there is an element of strategy here: we get up early when it's still cool outside. By opening all the windows and doors with bars (okay, we only have one door with bars) before the heat of the day sets in, we can take advantage of the moderate breeze. Opening the upstairs windows gives us a stack effect and hot air comes out of the house.
We then seal everything tightly before the temperature rises. And, most importantly, we draw all the curtains and blinds to block out the sun. While in winter we throw open all the curtains to catch every drop of sun's heat we can, the opposite is true when we're trying to stay cool.
Our temperature sheriff
When using this patented Frugalwoods window and door method, it is important to designate someone as a “temperature sheriff.” A job not to be taken lightly, the temperature sheriff is responsible for monitoring the external temperature versus the internal temptation and then turns on the megaphone* to indicate when the two are equal. As soon as this happens, the temperature sheriff sends all family members to batten down the hatches. If the outside temperature rises higher than the inside temperature, you will eventually heat up your home.
While we can often repeat this process in the evenings, sometimes it doesn't get cool enough until much later in the night. Hence the beauty of waking up early to take advantage of the fresh morning.
*A megaphone is optional, but think how much your neighbors will appreciate this public service announcement every morning! You will be so popular.
Closeness to partner
I also have to highlight the amazing opportunities for intimacy with your partner when you live with doors and windows open. When your partner is, say, taking a shower with all the windows in the main room open, you can be a good friend and close them before they will come out and say “oops.” Not that Mr. Frugalwoods someone will come out of the bathroom in a towel without first remembering that all the windows are open... Let's just say this is another chance to show your deep love and devotion!
Good morning, let's start cooking!
Doesn't everyone want to start cooking dinner at 7am? I knew what you did! Another key tactic we use is cooking during off-peak times. The oven and stove top heat up the house, so Mr. Frugalwoods discovered the novelty of cooking in the morning. We've also started offering our no-cook summer favorites like homemade hummus with raw veggies, but some dishes still require a little heat. Last Saturday morning Mr. F.W. Made us rice and beans and red pasta sauce from scratch while the doors and windows were open.
An easy, cheap no-cook dinner we love: homemade hummus and fresh veggies!
Even though his culinary excursions made the house a few degrees taller, we were able to cope with it with the help of open windows. If we had delayed cooking until a more traditional hour of the day, we would have been forced to resort to AC to keep the Humble Hound's breath at bay . I swear this dog is only comfortable in the 10 degree temperature range: 60-70 degrees Fahrenheit. Anything short of that and she's either shaking or breathing heavily. It's actually a tragedy.
Acclimatize yourself
Mr. F.W. and I also accept and support the idea that we will be warmer people during the summer months. Traditional culture fights valiantly to push all elements of nature out of our homes, but this is unnatural. It is cold in winter and warm in summer - this should not be a surprise to us.
Mr. F.V. and I are changing our wardrobes and our climatological expectations. Gone are the layered sweaters over sweatshirts we wear in the winter, and gone are the short shorts and tank tops (okay, maybe not exactly, but we're wearing less clothes). This is another complaint about traditional workspaces - they are climate controlled to the point where the season becomes unrecognizable! The air conditioning in my office is so cold these days that I wear tights and sweaters every day... even though it's 80 degrees outside.
Acclimatizing to accept and even welcome each season's temperature changes allows us to save much more money and keep our climate control machines off for much longer.
Not rocket science
Admittedly, none of these tactics are grand or even terribly creative in their approach. They are simply the result of considering your options before immediately switching to an AC circuit breaker. Before Mr. Frugalwoods and I were convinced of the extreme frugality of perverts, we were sometimes guilty of going on autopilot as we cruised through life. If this
.
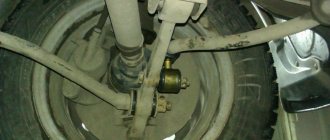
Clogged filter
Experienced Prior owners have developed an algorithm of actions to find out where the heating system is leaking.
First approach
Before all checks, you need to make sure that the fan is working - it would be unreasonable to go deeper if the main element does not spin. The next steps are as follows.
- The engine heats up to the desired temperature;
- The pipes leading to the heater are probed. Both are hot - okay, one is at ambient temperature - which means there is no filler circulation;
- The hood opens, the tap is located and turns to another position. If it gets stuck, you will have to immediately soak it with WD-40.
- The system is checked for leaks. The detected ones are eliminated: a constant lack of coolant is also the cause of cold airflow;
- The tap is working, there is no leak - the plug is removed from the tank and the liquid level is checked. Often an air lock forms in the tank; in this case, the coolant is topped up to normal, and the gas pedal is pressed sharply several times. The fluid circulation will resume and squeeze the plug out of the reservoir;
- To make the last step more effective, it is better to drive the front end onto the nearest hillock so that the car’s radiator is lower than the stove radiator.
Second approach
When (or if) both pipes are filled with hot liquid, we move on to the dampers.
- Again you will have to climb under the hood, this time to observe the operation of the damper;
- If it is warped or jammed, you can try to gently shake it with your hand from inside the cabin. To do this, remove the central deflector and unscrew the plastic guides to reach the stuck element. Access is only possible for a thin limb, so it is advisable to invite a female person to the procedure if she does not mind;
- If there are serious problems with the damper (the fastenings have rusted, the plastic has warped due to temperature or it has cracked), alas, you will be faced with difficult work: you will have to disassemble half of the heating system.
Third approach
The microreducer is a complete headache. First, its status is checked:
- The left handle is moved to the “min” position. After a 15-second wait, the engine starts;
- The controller that monitors the self-propelled guns is disconnected;
- The tester measures readings
on both contacts. The resistance should be 800-1200 Ohms for units 1303.3854; 1313.3854 and 1333.3854; for controller 1323.3854 the norm is 3600-5000; - The same operation is carried out in the “max” position. Now the data is in the range of 3200-3500 for the first group and 1200-1600 for 1323.3854;
- If there is no resistance or its unchangeability, the track on the sensor has been erased. It is not sold separately, so you will have to change the entire MMR. It is clear that not all the reasons why the stove does not work and cold air blows on a Priora can be eliminated on your own.
However, by following the above recommendations, you will at least understand what is preventing you from driving comfortably. And also estimate upcoming expenses. For example, if you have to change the entire SAUO unit, you will have to pay about 1.5 thousand rubles for it. plus the work of an electrician.
Diagnostics of climate control equipment "luxury"
Like all electronic control units (ECUs), the heater/air conditioning computer is diagnosed either with a portable scanner or with a full-fledged motor tester. It should be borne in mind that this system is controlled through a separate ECU called the comfort unit.
Just like standard diagnostics, the climate control system scan is connected via the OBD-2 diagnostic connector under the glove box. In general, these tests are carried out in a similar way to diagnosing an automatic heating system. With air conditioning features. That is, checking the actuators and sensors of this device.
How to diagnose?
In almost most cases, the stove speed controller is to blame; it is designated as J7100 090 and looks like this:
To be sure of this, you need to check it. To do this, remove the frill and get to this detail:
Remove the connector and unscrew the fasteners. We remove this part and disassemble it. We see these two contacts:
We put on the connector and turn on the heater in the car at 1, 2 or 3 speeds. We bridge these contacts and if the stove works, then the problem is 100% in this regulator. It failed because the thermal fuse tripped.
Device principle
Next, let’s look at the Panasonic air conditioner circuit, which consists of the following components:
- The compressor is a single-pass rotary with three blades. This element builds up the required pressure and maintains the circulation of the refrigerant. The compressor is located under the generator.
- A condenser is a heat exchanger that provides cooling to a gaseous refrigerant by turning it into a liquid state. This mechanism is located on the radiator frame.
- The evaporator is also a heat exchanger; its purpose is to cool and dry the air before it enters the cabin. This device is located in the heater housing.
- The receiver has the shape of a metal cylinder, which is connected to the capacitor. This mechanism ensures the accumulation of liquid refrigerant and separation of moisture and debris. There is a filter drier inside the receiver.
- Pipelines.
This is the element that is added to the Priora stove with air conditioning. Now that you know the structure of the stove in the Lada Priora, troubleshooting will be much easier.
Interior ventilation
To ventilate the interior, set the controls and switch of the ventilation and heating control unit to the following positions.
1. Turn the handle of the supply air temperature regulator 2 clockwise until it stops.
| 2. Install the air flow distribution regulator and the heater fan mode switch as shown in the photo. | 3. Open the nozzles by turning the adjustment wheels up. |
4. Set regulator 3 to the desired air supply speed of the electric heater fan.
5. If the windshield fogs up, install the controls for the heating and ventilation system control unit as shown in the photo.
Helpful Hint: If the car is equipped with air conditioning, set the supply air temperature control to the extreme left position. This method is most effective in summer in rainy weather.
Cleaning windows from snow and ice
To quickly clear snow and ice from the windshield and front door windows, do the following.
1. Turn the regulator handle 1 counterclockwise to the extreme left position, and the regulator handle 2 clockwise to the extreme right position until it stops, as shown in the photo.
New Lada: Malfunctions of the fuel injection system of the VAZ 2170 Priora
2. Set the switch for 3 operating modes of the electric heater fan to minimum speed and gradually, at small intervals, increase the speed of the electric fan by turning the switch clockwise to the right to maximum. Gradually increasing the speed of the electric fan will prevent the windshield from cracking as a result of sudden temperature changes.
Quick heating of the interior
To quickly warm up the air in the cabin, do the following.
1. Install the air flow distribution regulator 1 as shown in the photo.
2. Turn control knob 2 clockwise to the extreme right position until it stops.
3. Turn the handle of the switch for 3 operating modes of the electric heater fan to position “4”.
| Rice. 1.8. Air flow distribution organs |
4. Open the side 2 (see
rice. 1.8
) and central 5 nozzles.
Ensuring a comfortable air temperature in the cabin
If the windows in the cabin are clear, but the temperature in the cabin has not reached the desired temperature, do the following.
1. Set the desired temperature using regulator 2.
2. Set regulator 1 to the vertical position.
3. Select the required intensity of warm air supply into the cabin using the 3-mode switch for the heater fan.
Useful tips
Regularly clear the fresh air intake openings located in front of the windshield of snow and leaves.
Do not allow the exhaust vents located in the side trim of the trunk to become dirty.
Keep your car windows clean: Dirty windows retain more moisture than clean windows, and therefore take longer to defrost.
Lada 2110 Shershavyi Ogurets › Logbook › Repair of old-style VAZ-211020 heater
Ladies and gentlemen subscribers! If you have problems with the stove on an old-style VAZ 2110, be careful in detail
and
don’t repeat my mistakes
! The bottom line: after the incident, my adventures with the stove did not end. The stove stopped blowing hot air.
Option 1. The door is broken and the door won't open.
Unfortunately, not my option, it’s easy to check - if the pipes to the stove are hot, but the stove blows cold, it’s a damper. It can be treated by opening and replacing the damper or gear motor or stove control unit.
Option 2: No circulation due to air in the system
.
It can be treated by driving onto an overpass and accelerating, or by removing the hose from the throttle and letting the air out. Unfortunately, it’s also not my option. Option 3: No circulation due to a failed pump
.
determined by the absence of leakage from the return to the expansion tank on the return side of the main radiator or the heater radiator return + periodically the machine boils. Not my option either. Option 4: The cylinder head gasket has broken and is leaking exhaust gases into the coolant.
As a result, airing occurs in the uppermost areas of the system - the stove, throttle and reservoir.
To my great relief, this is also not my option. Option 5: Yes, this is my option
... but I’ll hold back the answer...
let there be intrigue.
It seems like there are no more options. So you ask me what happened to the stove?
I'll tell you in order. 2 months ago I changed the expansion tank, then my stove pipe burst. Replacement of pipes, stove radiator, etc. Seeing that things were bad, I began to reject one option after another. It’s not exactly the damper - the pipes are barely warm, although the rest of the system is hot, the fan is working, but the stove is at a loss. I've been working on the option with airing all week - I'll go up a hill, then up an overpass, then I'll push it off the throttle - no result, it will warm up a little, and then again the same as before. I came to the conclusion that my pump was stuck. damn...my friend leva-83 and I went to Fuchik and bought a TZA-SPORT pump. This is the same TZA, only with increased productivity (stupidly larger impeller). Thanks to him, I installed the pump on the same day... and drum roll - NOTHING, big hairy nothing. The stove blows cold, the pipes are barely warm. I despaired and went to the BOSCH service station under the Nevsky overpass, next to Babushkina Street. The guys poked around for 40 minutes and found nothing. They suggested that the problem could be in the cylinder head gasket. I was upset to learn that they charge more than 8 tuhars for a replacement. It’s good that they didn’t charge anything for diagnostics))
The next day I went to the Saltykovskaya road to see good craftsmen who were familiar to me from previous work done on suspension, brakes and electrical work. People are responsible and attentive.
Within 20 minutes (10 of which I talked about my problem), the technician found the problem. The expansion tank has 2 return entries - from the stove and from the radiator. So, my new tank had a factory defect - the nipple for the return from the stove did not have a hole
.
So it goes. After drilling the hole, the stove began to blow hot and there was a return flow from the heater radiator. The most annoying thing is that I installed the tank myself and did not notice such garbage. Because of a tank for 130 rubles, I spent about 2 thousand on pointless repairs. Conclusion: 5 Option: Other, stupidity, inattention during self-repairs, defective new spare parts
PS Good luck to everyone, take care of yourself and your loved ones!
Issue price: 2,000 ₽
Like 17 Subscribe
Replacement: how to remove (change) the stove on a Priora with and without air conditioning
Replacing a stove completely is rarely done; components are mostly changed. Often the main reason for disassembling the heater on a Priora car is replacing the heater radiator. When it ceases to be airtight and no longer works as efficiently, it is necessary to begin repairs. In order to remove the heater on a Priora car without air conditioning, you will need a set of wrenches (socket and socket wrenches) and a Phillips screwdriver. As the system is disassembled, it is worth inspecting all parts and replacing worn ones. Perform the work according to the instructions:
- Remove the negative from the battery.
- Remove the lower windshield seals and engine sound insulation.
- Loosen the clamps that hold the pipes adjacent to the heater core, and then disconnect them. First place a basin under the pipes to drain the coolant. After the liquid has poured out, cover the pipes with a rag.
- Start wiring. Unclip the latch and disconnect the motor wires. Then de-energize the additional resistor.
- The wires that go to the damper drive motor are secured with a clamp. You need to bite it and then disconnect the wire.
- Next, we proceed to dismantling the heater itself. Take a “ten” socket wrench, remove three screws with it, and remove another screw with an “8” wrench.
- Next, move the wiring harness from the heater to the side (attached to a small bracket).
- Now, from the passenger compartment under the dashboard, unscrew the third nuts securing the brake pedal with the “13” key, and then move it to the side.
- Pull the block towards you.
- Install a new heater instead of the old one if necessary.
- When you are concerned that the heating is not blowing correctly - not in the required mode - you will have to check everything again during dismantling.
- To remove the heater on a car with air conditioning, follow these steps:
- Also remove the negative terminal, then the lower windshield seal, and the engine sound insulation.
- Unscrew the screws covering the heater radiator.
- Also carefully remove the pipes: the coolant must be drained into a prepared basin.
- Slowly and smoothly pull the radiator up until it comes out of the mounts.
- Install the new radiator in the reverse order.
Lada Priora has Panasonic or Halla air conditioners. They differ only in the fastening, so there will be no difficulties when replacing the heater radiator.
The main reasons for a poor electric furnace
VAZ 2110 stoves Before
diagram Before you can directly begin to solve the problem, you must be able to quickly and effectively identify it. First, it is advisable to consider the general structure of the furnace. So, the heater oven consists of the following components:
- mounting block fuse;
- incendiary lock;
- ignition switch together with its unloading relay;
- a special switch that regulates the operating mode of the furnace electric motor;
- additionally built-in motor;
- stove resistor;
- heated rear window which, in the vehicle, contains a heater adjustment button with a light indicator;
- special functional element for heating glass.
VAZ 2110 stove wiring diagram
reasons from one malfunction of the electronic circuit of the furnace, perhaps the lack of functional activity of the electric motor of both the heater at low and high speeds. In this situation, you need to do the following first:
- Therefore, you should make sure that the case has not accidentally burned out;
- If the fuse detects a blown fuse, it will urgently need to be replaced with a new one.
Before. Note: In order to proceed directly to replacing the old fuse with a new fuse, you must first and as a matter of mandatory establish the cause of the burnout. If you do not do this, then the service life of the new fuse will most likely be short.
- There may also be a break or damage to the wiring in its place;
- connections to exclude the above reason, it is necessary to check the electrical circuit according to the furnace diagram;
- after which, it is necessary to eliminate the impulse, if it took place;
- if the switch does not function properly, then the heating is likely caused by jamming or burnt contacts of the pusher;
- To accurately diagnose a fault in the switch, you need to check the level of the side voltage terminals while changing the space position in the switch (to do this, it is enough to apply the main terminal to current);
- if during the diagnostics a change in voltage is detected when the position of the switch knob is changed, then it must be replaced urgently;
- there are a huge number of possible causes for the working functional state of the electric motor: broken electrical connections or armature winding, immobilized cleaning brush, oxidation and/or contamination of the armature commutator;
VAZ 2110 radiator diagram again
- It is not difficult to revive the brush movements of the stoves, just disassemble them enough and then clean them;
- restoring the wires will also not be difficult, because the main thing is to find the localization of the defect;
- if several of the above provisions do not produce results, then the only solution is complete - one replacement of the heater electric motor;
VAZ electric 2110 stove diagram
- sometimes, which is extremely rare, the fault can be caused by the mounting block;
- There are many reasons for the faulty installation condition of the unit, but the main ones are: adhesions, complete or partial electrical circuit break, fire of current-carrying paths;
- Checking the circuits should be carried out according to the furnace diagram; otherwise, it will simply be impossible to detect places of breaks and malfunctions;
- The final practically probable cause may be an internal break in the circuit of the additional (auxiliary) resistor (see How to replace the 2110 heater resistor on a VAZ);
VAZ 2110 stove wiring diagram
To exclude a malfunction associated with the operation of the resistor, it is necessary to check its reduction.
circuits in the electric motor of armature rotation, is the cause of one malfunction in the general circuit of the furnace. In this case, it is necessary to be able to find and eliminate specific, and micro-reasons:
- in case of clogging or oxidation of the commutator armature system, the number of rotations of the electric motor will also be reduced;
- To eliminate the above problem, you will need to perform a general cleaning of the collector sometimes;
- system, a short circuit may occur in the section of turns between the armature winding, and to eliminate this cause, it is necessary to check the amount of incoming current;
- everything is very simple, if there is a short circuit in the turns, then the input current will exceed 4.5A;
Note. It is necessary to carry out incoming current measurements only after checking the preliminary objectivity of the ammeter readings.
Replacement steps
This task is not difficult, but painstaking and difficult for absolute beginners. To avoid any difficulties, you must strictly follow the work plan described below.
- Disconnecting the “−” terminal of the battery and the wire.
- Dismantling the frill.
- Disconnecting the block with wires from the connector on the additional rheostat.
- Removing the fasteners on the resistor using a Phillips screwdriver of the appropriate size.
- Removing a faulty mechanism on the heater.
- Installing a working mechanism according to the same scheme, but in reverse order.
Important points
There are a couple of nuances, without mentioning which this article would be incomplete:
- The old gearbox should be removed very carefully. A long shank sticks out of it. If you remove the gearbox at an angle, you can damage the edge of the hole for the shank. If this happens, installing a new gearbox will not be so easy. Therefore, advice: when removing the gearbox, it should be pulled in a plane parallel to the floor;
- When buying a new gearbox at a car dealership, you should only buy the original VAZ one. Yes, its quality leaves much to be desired. But this is still better than buying a fake gearmotor, which the spare parts market is literally flooded with now. You can spot a fake by price. A normal gearmotor on a Priora costs 700 rubles and more. And a fake rarely costs more than 300 rubles.
So, replacing a heating gear motor is not a very difficult task and even a novice driver can do it. If a person has held a screwdriver in his hands at least once, he can handle it. All you need to do is follow the above recommendations exactly.
Assembly
When installing a new damper, be sure to make sure that the fork located on its axis is clearly engaged with the lever. If the flap is in the raised position, you did everything right. Otherwise, it will be impossible to control the device, so you can forget about restoring the functionality of the stove.
Damper location
After this, reverse the assembly procedure according to the dismantling steps. Refill the system with coolant and check that the new damper is in place.
It is important to ensure that there are no leaks or tight hose connections.
Turn on the stove and check how the heater behaves. If everything is normal, you have carried out competent and successful work, for which we congratulate you.