Interior light is very important when driving in the evening or at night. Bright lamps help the driver to easily see everything inside and minimize distractions when changing gears or changing the handbrake position.
The domestic Priora interior lighting, which differs for different trim levels, does not always satisfy owners with the quality of the lamps' glow. That is why many AvtoVAZ fans will be interested to learn about these differences and the features of replacing burnt out lamps or installing a new ceiling.
Bright corner - LEDs • Interior lamps in Lada Priora
Let's shine a light on our favorite pepelats
Interior lamps in Lada Priora
RZ296 » Aug 28, 2011, 00:02
The car is a Lada Priora in the Lux configuration - two LED lamps, in the front there are two spot lights with 12 mm LEDs and one common with 3 piranhas, in the back there are only 2 spot lights. The spectrum, it should be noted, was neutral, without noticeable blue. The diodes worked in, presumably, prohibitive modes - 30 mA for the point ones and it’s unclear how much for the piranhas (two 33 Ohm resistors, it’s unclear what the drop on the diodes is, I didn’t measure it. First one of the piranhas died - the lamp blinked. Temporarily installed 4 segments LED strip on warm white diodes. Then, with a difference of 2 weeks, both rear diodes blinked. I ordered 3HP2C, removed the shades and began to remodel. From the dealextrimov ceiling lamp with 7 one-watts, embedded in a table lamp with the dismantling of the optics, 7 collimators with a diameter of 20 mm remained. I really didn’t want to glue the collimators with the front plane, but there was no other option, so I did the following: I ground off the tubes of the lamp housing protruding inward at an angle (the original diodes stood at an angle on plastic stands on the boards). In the photo, the left one has already been sawed off. I mounted 3 on the boards radiator made of AMCP sheet 2 mm thick: On the boards, the lead-out elements in the radiator area were raised above the boards so that the leads did not reach the back surface of the board. I glued the diodes onto the radiators with hot glue - one for the spot ones and 2 for the central ones (I also decided to add a central light at the back): I replaced the quenching resistors - with 2 point resistors connected in series with 47 Ohms each, and with central ones - two in parallel with 100 Ohms. The current through the diodes is about 100 mA, you don’t need much more, and there won’t be any problems due to the small area of the radiators. I did not install stabilizers due to the fact that smooth attenuation of light is implemented as standard, and with such a current reserve they are not needed. Installation using conventional MGTF. On the boards near the elements there is not flux, but remnants of the urethane varnish that was used to coat the board at the factory. A disgusting substance in terms of repair. I connected the rear light to the battery from a screwdriver and locked myself in the bathroom with it: I was happy to note that gluing the collimators to the body had virtually no effect on focusing. Now how it shines in the car: The result is excellent, nothing could be asked for better. The last photo shows an example of how the front passenger's spotlight shines. The footwells of the driver and front passenger are illuminated using strips of warm white diodes, switched on in parallel with the corresponding spotlights. RZ296 Flashlight Messages: 26 Registered: Aug 14, 2011, 07:32 pm From: Moscow region, Klimovsk Thanked: 0 times. Thanked: 3 times.
Features of interior lighting on VAZ cars
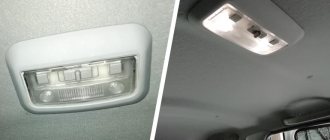
In the simplest configuration of the Lada Priora, there is only one interior lighting fixture. It is located on the ceiling at the front. They are equipped with C10W bulbs, which emit a soft but faint yellow light. Priora owners are not satisfied with such light, so they install an improved unit from the “Lux” version model.
Two lighting fixtures are fully equipped in Priora and Kalina. One is located near the driver. The second is located in the ceiling above the rear seats. Although an LED lamp is used, it shines no worse than light sources installed near the driver.
Additional cabin lighting
Lada Priora Sedan Altair › Logbook › Installation of courtesy lamps for front door sills
More than a year ago I installed lighting in the front driver's door. I didn’t touch the passenger side, because there was no “original” wiring from the factory there, which made installation difficult. Finally, now I have equipped the passenger door and decided to share my experience.
— about 5 meters of wiring, it is advisable to have different colors, I bought red and blue wires. — 2 lampshades (I chose the lampshades for the glove compartment illumination) — 2 counter chips for the lampshade illumination of the glove compartment (if you install original lampshades, then most likely there are other chips there.— harnesses and electrical tape
First, I’ll explain the reason for choosing the glove box lighting. These lampshades have both disadvantages and advantages.
Cons: - the glove compartment lamp is open type, dirt can get in, resulting in a decrease in the brightness of the glow - sits less tightly in the door panel
Pros: + the glove compartment lamp is cheaper than the original ones + it is possible to install any light bulb, the brightness of which will be significantly higher than the diode in the original lamp + The light bulb can be easily replaced in case of malfunction, the original lamp will have to be replaced with a new one assembled, this is more expensive than the light bulb (you can resolder the burnt out diode, but replace a lamp is easier).
I will also add from my own experience. I drove with the glove compartment light in the driver's door for more than a year, no dirt has accumulated in it and it still shines brightly.
Installation in the driver's door.
Almost all the wiring is already there (please note that my Priora is from 2007, in 2009 the circuits are slightly different). The lampshade requires two contacts, one of them is taken from the limit switch (+)
In my Priora they didn’t extend it to the door, so I had to solder it to the wire in the rack and pull it through the corrugation into the door.
The second wire is already there. This is the wire that goes into the security unit connector.
We need the 6th contact of block No. 2 or bus S3 (see diagram).
After laying all the wiring, you need to solder a connector chip to its ends. I couldn’t find this feature; I modified a feature from old LADA SAMARA immobilizers. Maybe someone will remember the sound of activation of this secret police, similar to the takeoff of a rocket in 8-bit version. It was necessary to attach a plastic chip to it to unlock it, otherwise the car would not start)) The father of my good friend, who works in electrical engineering, kindly gave them to me. Then I need to cut a hole for the lampshade along the already marked grooves from the inside of the door card with a stationery knife. We assemble the door and rejoice at the result!
Installing lighting in the front right door.
I had to tinker with the right door a little more, but I can’t call the work difficult.
We need, as in the previous case, to drag (+) from the end of our door. But there is no minus in the door, and the minus is exactly the one that appears when the door is opened. According to the Priora 2009 diagram, it needs to be taken from the S15 tire, but I simply don’t have such a tire in my car, because... There is no illumination of the thresholds (we are just fixing this) and a lamp for the rear passengers (we will also fix this in the near future). There is no bus, but there is a wire that goes from the comfort unit to the central contact of the interior lighting unit (chandelier above the driver or ceiling lamp). This is the wire we need, it is from it that we take what we need so much (-). To do this, you need to remove the trim of the right front pillar, remove the right visor (optional) and remove the rear view mirror with a pocket for documents and everything else that prevents us from running the cable from the ceiling light to the front right door.
We drag the wire into the door corrugation (by the way, I did it “the other way around,” i.e., I first pulled the wire from inside the door into the interior, and then through the interior to the lamp). Next, everything is the same as with the driver’s door, cut it out, assemble it, and rejoice!
This completes the installation of front door sill illumination according to the Priora Luxury scheme. It took me about four hours on both doors (I installed it on the driver's door a long time ago). I studied the diagrams, wondering where it would be better to get power from. You don't need to do this, because... I've already written everything out. I hope my article will help someone.
Instructions for installing new lampshades
To replace lighting fixtures in both the Priora and Kalina interiors, no special knowledge is required, since the procedure is simple.
Photo gallery “Step-by-step installation of lighting shades”
To replace the light bulb, follow these steps:
- First you need to remove the protective cover. This can be done by prying it with a screwdriver from the mounting side and lightly pressing the clip. Now the cover can be easily removed from the ceiling.
- Next you need to disconnect the power wires.
- Having disconnected the old lamp, a new element is installed in its place.
- Assembly is carried out in reverse order.
Installing an additional “Lux” lighting fixture will require care and time. First of all, you need to purchase a new block, which will be placed above the rear sofa.
Lighting connection diagram
The installation procedure consists of the following steps:
- First, you need to apply markings to the ceiling, deciding on the place where the rear lamp will be located.
- Then, according to the markings, a hole is cut in the ceiling covering.
- Next, you need to stretch the power wire from the front light between the roof and the ceiling covering.
- At the next stage, the unit to be installed is connected.
- To ensure that the lid fits tightly to the ceiling, you can cut a frame from some kind of rubber seal.
In the Priora “Norma” configuration, it is recommended to change the front unit installed from the factory. Replacing it is easy, since the characteristics of the devices are the same.
The replacement scheme is similar to replacing a light bulb: a new element will be installed instead of the old light source. When installing LEDs, keep in mind that they differ in brightness color. For the rear light, it is better to make the LED backlight brighter, and put medium-brightness LEDs in front (the author of the video is Repair and Tuning).
After replacing the lighting unit of the Priora Norma configuration with a higher-quality luxury one, the driver becomes more comfortable in the cabin.
Simplicity of installation and low time costs make it possible to replace the standard lighting unit with a more powerful one, or equip the cabin with an additional light source. At the same time, you do not need to have in-depth knowledge of electrical engineering; even a novice driver can perform the replacement.
Price issue
The block (diode) costs 460 rubles. The front Lux package costs 535 rubles.
There are two options to improve lighting by replacing it with LED:
- Replacing a conventional lamp with an LED one. Price 50 rub.
- Replacing a lighting lamp with an LED module - 350 rubles.
To replace the unit you do not need to remove it, just remove the glass.
What kind of lamps are in the headlights of the Lada Priora?
| Lampatip | Lamp type |
| low beam lamp | H7 |
| high beam lamp | AKG12–55–2 (H1) |
| high beam lamp and DRL | H15 |
| turn signal lamp | А12–21–4 (PY21W) |
| side light lamp | А12–5–2 (W5W) |
Also, the process of replacing low and high beam lamps is shown in the video:
Have you ever had to change the bulbs in the headlights of a Priora yourself? What were the challenges during this process? Let us remind you that it is possible to install DRLs yourself.
Found an error? Select it and press Ctrl+Enter..
Typically, car owners who are inexperienced in technology turn to a car service center if the slightest malfunction occurs. In principle, this is correct, but in many cases you can solve the issue on your own. Today we will refuse the services of an auto electrician and will try to replace the license plate light bulb in a Lada Priora on our own.
Delivery by transport company (cash on delivery, no prepayment)
Advantages:
- the cost of delivery of heavy and large-sized orders is much cheaper than that of Russian Post;
- There are practically no restrictions on the weight and dimensions of cargo;
- There is a wooden crate service - this is an additional guarantee of the integrity of the order.
Disadvantages: unfortunately, there are branches only in cities.
The estimated cost of delivery for an order up to 30 kg is 450 rubles.
List of transport companies with which we cooperate:
- TC "PEK" (cash on delivery service available);
- TC "Business Lines";
- TC "Energia";
- TC "KASHALOT" (KIT) (cash on delivery service available);
- TC "SDEK" (cash on delivery service available);
- TC "DPD";
- TC "ZhelDorExpedition";
- TC "VOZOVOZ";
- TC "Baikal-Service".
To send your order by transport company:
- Place an order in our online store by phone or on the website (registration is not necessary);
- After we receive it, our manager will contact you by phone to clarify the cost, delivery time and your wishes. Next, we will pack your order carefully and then send it to you;
- You will receive a shipment tracking number from us via SMS or email (if available). You can monitor the status of the order coming to you using our tracking service, as well as independently, on the transport company’s website using the track number. After the order reaches your locality and the manager of the transport company contacts you, you need to receive the order at their office or order home delivery;
- Upon receipt from the transport company, you pay the cost of delivery and order.
The cost of delivery is calculated based on the volume, weight of the selected product and the distance from the city of Tolyatti.
To send an order you must:
- indicate full name recipient;
- Your locality and region;
- series, number of passport or driver's license;
- Your phone number (contact).
TC "Business Lines" - Urgent delivery of goods from 1 kg throughout Russia. The exact cost can be found on the official website of the delivery service - https://www.dellin.ru
TC "PEK" - Guaranteed safety of cargo for the entire duration of cargo transportation, clear information support, delivery of goods throughout almost the entire territory of Russia, Belarus and Kazakhstan in optimal terms and accurately calculated cost of services. The exact cost can be found on the official website of the delivery service https://pecom.ru/ru/calc
TC "SDEK" - Low tariffs compared to foreign courier companies, while the quality of the services provided meets modern international logistics requirements. Developed network of own representative offices. The exact cost can be found on the official website of the delivery service https://www.cdek.ru/calculator.html
TC "ZhelDorExpedition" - Serves only large cities and towns. The exact cost can be found on the official website of the delivery service - https://www.jde.ru/branch
TC "Energia" - Cargo transportation in Russia, CIS and China. The exact cost can be found on the official website of the delivery service https://nrg-tk.ru
TC "KASHALOT" (KIT) - Delivery of cargo from 1 kg to 20 tons throughout Russia and Kazakhstan. The exact cost can be found on the official website of the delivery service https://tk-kit.ru/calculate
TC "Baikal-Service" - Transportation and delivery of consolidated cargo by road across Russia. The exact cost can be found on the official website of the delivery service https://www.baikalsr.ru
TC "DPD" - Transportation and delivery of groupage cargo by road in Russia. The exact cost can be found on the official website of the delivery service https://www.dpd.ru
TC "VOZOVOZ" - Transportation of groupage cargo by regular delivery routes between Russian cities. The exact cost can be found on the official website of the delivery service https://vozovoz.ru
Interior lighting of Priora: what lamps are installed in “Norma” and “Lux”?
In its simplest configuration, the Lada Priora includes a single lighting unit located on the roof above the front panel. Conventional lamps marked C10W are installed in it. True, in most cases they give a soft but weak yellowish light.
That is why for Priora the ceiling lamp does not seem to be of such high quality and many owners of domestic cars want to modernize and install a unit from the improved model of the “Lux” version.
In the most expensive configuration of the Priora, two units are installed. The first is located as standard near the driver, and the second is located in the ceiling above the rear row seats. This equipment allows not only the driver, but also passengers to feel truly comfortable in the car when driving or boarding in the evening.
The Priora's LED interior lighting for rear-row passengers is in no way inferior in quality to the lighting elements installed in the front part of the cabin.
Turn signal repeaters
Repeaters are installed in the front fender, with the exception of luxury trim levels, where the repeater is installed in the side rear view mirror.
| Installation location | Lamp type | Power, W) | Number in photo |
| Turn signal | W5W | 5 | 8 |
To remove the lamp in the turn signal, you need to pull it towards you and remove it from the wing. Then turn the socket counterclockwise and remove the lamp.
Connection
All the necessary contacts for connecting an additional lamp are in the front lamp. To install the wires, it is not at all necessary to remove the roof trim; just bend it slightly from the edge or move it slightly out of the door seal.
Lada Priora front lamp diagram:
- far left (red) - “mass”
- central (white) - +12V
- far right (black) - ground (door switches)
Diagram of the front lamp of Lada Granta (pre-style) and Lada Kalina:
- far left (black) - “mass”
- central (green) - ground (door switches)
- far right (red) - +12V
Diagram of the front lamp with ERA-GLONASS for Lada Granta FL:
- 11 and 14 - +12V appears after turning on the main relay (turning on the ignition, opening the doors). The power goes out 2-5 minutes after removing the ignition key.
- 15 - “mass”.
- 17 - “ground” (door limit switches), which appears for a while when the doors are opened.
The result of such a connection in the video:
Attention!
Wire colors may vary depending on vehicle equipment. Focus on the contact numbers and check the wiring with a multimeter.
Additional interior lighting for Priora
| The lighting of the VAZ 2170 differs from its predecessor the VAZ 2110; for example, in the Priora’s interior there is no central lamp. As a result, rear passengers often lack light. There are at least two ways to correct a design error. |
Installation of the central lamp in Lada Priora
When the frame and lampshade are found, we proceed to install it. To do this, feel for the edge behind the ceiling upholstery and make a small hole. We stretch the wiring and then fix the lamp frame to the ceiling. If you cannot find holes for installing the lampshade, then it is better to remove the ceiling upholstery.
Another example is when a lampshade from Chevrolet Lanos was chosen as a light source. It is attached to the ceiling upholstery itself (screwed). For this, a couple of metal plates with holes drilled in them were useful.
Additional interior lighting of the Priora in the rear pillar trims
Then unclip the clips and remove the plastic covers on the back of the struts. Cut holes in them for the lampshades, and install them.
Connecting additional interior lighting of the VAZ 2170
It is important that when you lay wires under the headliner, be sure to wrap it in modelin (anti-creaking) to prevent the appearance of new crickets in the cabin.
By the way, upgrading the interior lighting is not limited to the above methods; try installing the lighting in the ceiling handles, as in Grant. And yet, installing a standard Priora lamp in the center of the ceiling will eliminate the problem of sagging upholstery.
Similar materials
How to replace all the lamps in the headlight on a VAZ 2170-VAZ 2172?
Replacing the high beam lamp:
In order to change this lamp, you will need to first disconnect the battery and then get to the back of the headlight, and when you are there, at the beginning of the operation, remove the cover that covers the high beam lamp with your hand (Let us remind you that the lamp is located closer to the center of the car and thus, it can be considered an internal lamp), after the cover is removed (see photo 1) you will see a wire connector (Indicated by a blue arrow in photo 2) which is connected to the lamp terminal (Red arrow), so by pressing the latch which holds this connector, disconnect it from the lamp output, and then remove the spring clip from engagement with the hook (see photo 3) and ultimately remove the lamp itself from the hole in the headlight (see photo 4).
Note! The high beam bulb is installed in its place in the reverse order of removal, but just be careful not to touch the glass bulb of the lamp with your hand!
Replacing the low beam lamp:
To replace this lamp, you will need to do all the same operations that are carried out with the high beam lamp, that is, first look on the back side where the low beam lamp is located (It is located on the outside and further from the center of the car, unlike the high beam lamp ), so when you understand where the light bulb is, use your hand from the back of the headlight to first remove the rubber cover (It is round in shape and its removal is shown in photo 1) which covers the lamp, and when the cover is removed, disconnect the wire connector (Indicated by the red arrow on photo 2) from the lamp output (Indicated by a blue arrow), then remove the spring metal clamp that prevents the lamp from wobbling and falling from the two metal hooks with which it engages (see photo 3) and then move this clamp to the side, and when the latch no longer interferes, remove the low beam bulb from the headlight in which it is located (see photo 4).
Note! Install the new lamp in its place in the reverse order of removal, but when installing, hold the lamp terminal with your hands and not the glass part!
Replacing the side light bulb:
This lamp is located, as mentioned earlier, next to the high beam lamp, so to replace it you will first need to remove the rubber cover from the high beam lamp (How to do this, see above where replacing the high beam lamp is described, everything is described in detail there), and after removal, pull the socket and remove it together with the side lamp from the headlight (photo 1), then, holding the socket in your hand, grab the lamp itself and pull it, thereby it will come out and be removed from the socket (see photo 2).
Replacing the turn signal lamp:
This light bulb differs from all others in the way it is made, that is, it is not halogen but just an ordinary base lamp, it is also marked “PY21W”, it does not burn out very often since we do not always use the turn signal, but only in some cases (When turning, when parking for a long time, we turn on the emergency lights), but in order to replace it you will need to stock up on a screwdriver and use it to unscrew the four screws that secure the headlight trim (see photo 1) and then remove it (see photo 2), and when the trim will be removed and nothing will prevent replacement, find the place where the lamp itself is located and then grab it with your hand and turn its socket counterclockwise (see photo 3), and then pull the socket to remove the lamp completely from the hole in the headlight , and when the lamp is removed, grab the glass part of it with your hand and turn it counterclockwise and thereby remove it from the socket in which it is located (see photo 4).
Additional video clip: On the new second-generation Priors, the light bulbs are replaced a little differently, that is, instead of rubber covers there is one large plastic cover, when you flip it off you can immediately get access to the low and high beam lamp, see the video clip below for more details :
LADA > Priora
Attention! High and low beam lamps are halogen. Do not touch their glass flasks, as fingerprints will darken when the flask is heated
You can remove dirt from the flask with a clean rag soaked in alcohol.
Delivery by Russian Post (cash on delivery, no prepayment)
Advantages: the most widespread network in Russia, delivers to any corner of the country, including remote ones. Flaws:
- high cost of delivery of heavy or large parcels, as well as the weight of one parcel should not exceed 20 kg;
- long delivery times and queues in large cities for receipt.
To send your order by Russian Post:
- Place an order in our online store by phone or on the website (registration is not necessary);
- After we receive it, our manager will contact you by phone to clarify the cost, delivery time and your wishes. Next, we will pack your order carefully and then send it to you;
- You will receive the tracking number of the shipment via SMS from us and from the Russian Post; the message will indicate the full cost of the purchase, including delivery to your locality (that is, the cost of your order plus the cost of delivery by cash on delivery). You can control the status of the order coming to you using our tracking service, as well as independently, on the Russian Post website using the track number;
- To the Post Office, you will only have to pay the cost, including delivery.
Delivery time may vary depending on how far your locality is from Togliatti and usually ranges from 5 to 14 days.
The cost of delivery is calculated based on the volume, weight of the selected product and the distance to the recipient's settlement.
Required for sending:
- indicate full name recipient;
- Your mailing address;
- Your phone number (contact);
- Post office code.
Russian Post commission for cash on delivery service:
- purchase price up to 1,000 rubles. – 70 rubles + 5% of the amount;
- purchase price from 1,000 to 5,000 rubles. – 80 rubles + 4% of the amount;
- purchase price from 5,000 to 20,000 rubles. – 180 rubles + 2% of the amount;
- purchase price from 20,000 to 500,000 rubles. – 280 rubles + 1.5% of the amount.
Russian Post - Delivery of goods up to 20 kg throughout Russia. https://www.pochta.ru
Installing a Lanos lamp on a VAZ 2108 - step-by-step instructions
- First of all, I decided to paint the lampshade black since the ceiling in this case is black, so it was decided to make a “lamp” to match the ceiling. Everything is painted quite simply, we disassemble the lampshade and paint the necessary parts with paint in several layers, then wait until it dries.
- We take out the standard lamp and turn off its power.
- Next, we assemble all the details of the ceiling and begin to integrate it into the G8 ceiling. To complete this step, you need to prepare the seat. To do this, using a sharp utility knife, make a neat hole in the ceiling.
- We connect a new lamp. We remove the standard chip from the ground wire, there is no need to disconnect the “plus”, everything will be connected as is. Now we check if everything works and proceed to attaching the lampshade.
- We attach the new lampshade from Lanos to two self-tapping screws, replace the standard light bulb with a brighter one, in my case “LED”, and then install the protective glass of the diffuser.
This is what the final result looks like. In my opinion, it is more solid and modern, like most foreign cars... Among other things, the lighting has improved, and the constant problems associated with the standard lamp falling out of its socket have disappeared.
Actually, that's all! As I said, installing a new lamp from Lanos on a VAZ 2108 is simple and can be done by any novice motorist.
DIY glove compartment lighting
I encountered the following problem: in the dark, you can’t see anything in the glove compartment. Fixing this problem is as easy as shelling pears, for this we will need: Wires - about 1 meter. Alarm switch (20 rubles). Lamp lamp (I took the figure eight - 70 rubles). “Moms” in the amount of 4 pcs. (12 rubles). Corner (I made it from an aluminum strip approximately 1.5-2 mm thick). Rivets/screws.
1. Drill 3 holes in the corner: 1 for the end cap and 2 for rivets/screws:
2. On the side, inside the glove compartment there is some kind of iron bar. We also drill 2 holes in it for rivets/screws to attach our corner:
3. We end the wire with “mothers” and throw it from the end switch to the “-” of the lampshade:
4. We pull out the toggle switch for turning on the headlights, look for a constant “+” (in my case, the blue-black wire) and, using a thin screwdriver, carefully remove it.
5. We bite off the old “mother” and terminate the two wires (which we pulled out and which will go to the ceiling) with one “mother”. Putting everything in place:
6. Connect the resulting “+” to the lampshade and voila, the lighting is ready:
I attached the lampshade with 3M double-sided tape.
Update dated March 26, 2009, by Lomonosov.
To point 4: “I strongly advise against doing this! A short circuit or loose closure of the glove compartment - and a 5-watt light bulb drains the battery completely in less than a week. I advise you to connect to the wire that has “+” when the lights are on (like in the trunk of a classic) or “+” when the ignition is on (like on Shnivy). Or to both at once through diode isolation.”
After another attempt to find something in the dark glove compartment of my NIF, I finally decided to come up with something to illuminate the glove compartment, and buying anything for this was not part of my plans.
After a short but thorough tidying up in the garage, the following materials were found:
1. Door stops from NIFK, which were dismantled a long time ago because a hole was needed for wiring for acoustics. It’s good that I didn’t throw it away, as I knew it would come in handy:
2. Here’s an LED strip, 12 V, 4.4 W:
Disconnect the battery and get started.
3. Here is our experimental subject, from different angles:
4. I decided to mount the LEDs on these glove compartment brackets, because they don’t interfere there, they don’t hurt my eyes and the lighting will be fine. The only thing is that this tape is a little wider than the guides, so we move the tape so that it does not stick out into the glove compartment opening:
5. Next. We take the wires, a soldering iron and start preparing the tape. Everything is simple here - carefully solder the wires, add additional insulation at the soldering point. Ordinary heat shrink will also work here (I just didn’t have it on hand at that moment), or, as an option, a regular cambric from a female terminal. As I said, the tape is a little wider, so we mount it this way. I also decided that the ribbon should be positioned with the “connection” facing up so that the reins do not interfere:
6. Remove the bottom of the shelf (you will also have to remove the shelf under the glove compartment, it’s more convenient), choose a place to install the limit switch. I decided that this was the place for him. We drill a hole with a diameter of 12 mm, prepare the negative wire for connecting the ground, install the limit switch, secure it with a bolt and nut, four. Don’t forget: connect the previously prepared negative wire to the bolt, the other end of the wire will go under the self-tapping screw securing the bottom of the shelf:
Priora interior lighting: differences between blocks, lamps and replacement rules
Interior light is very important when driving in the evening or at night. Bright lamps help the driver to easily see everything inside and minimize distractions when changing gears or changing the handbrake position.
The domestic Priora interior lighting, which differs for different trim levels, does not always satisfy owners with the quality of the lamps' glow. That is why many AvtoVAZ fans will be interested to learn about these differences and the features of replacing burnt out lamps or installing a new ceiling.
Interior lighting of Priora: what lamps are installed in “Norma” and “Lux”?
In its simplest configuration, the Lada Priora includes a single lighting unit located on the roof above the front panel. Conventional lamps marked C10W are installed in it. True, in most cases they give a soft but weak yellowish light.
That is why for Priora the ceiling lamp does not seem to be of such high quality and many owners of domestic cars want to modernize and install a unit from the improved model of the “Lux” version.
In the most expensive configuration of the Priora, two units are installed. The first is located as standard near the driver, and the second is located in the ceiling above the rear row seats. This equipment allows not only the driver, but also passengers to feel truly comfortable in the car when driving or boarding in the evening.
The Priora's LED interior lighting for rear-row passengers is in no way inferior in quality to the lighting elements installed in the front part of the cabin.
How to install new lampshades in Priora?
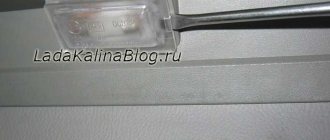
High-quality replacement of a Priora interior lighting lamp is quite simple and does not require special skills from the owner. In particular, the diffuser is attached to the base only with a pair of clips, which are quite easily pressed out with a flat screwdriver.
To carry out the work, you will need to pry the scattering cover near the mount and lightly press the clip. Next, the cover easily comes out of the gaps, and the suitable power cord is easily removed from the socket. Afterwards, the old lamp is unscrewed and a new one is installed; the lampshade is assembled in the reverse order.
Full installation of the lamp in the rear will take much more time and greater care. Since the installation is carried out in the ceiling of the car, you should carefully carry out each stage.
But first of all, the driver needs to buy a Priora Lux interior lamp for the rear row. You can purchase the product at any car dealership. The installation procedure is as follows:
1. Markings are made on the ceiling of the cabin in the place where the ceiling lamp will be installed.
2. The covering is cut out according to the outlined measurements.
3. A wire is pulled from the front lamp (under the covering, of course).
4. The rear seat illuminator is connected.
5. If necessary, a thin frame is cut out of rubber or other sealant to ensure a tight fit of the lampshade to the ceiling.
Experts also recommend replacing the front lamp on the Priora “Norma”. The procedure is quite easy to perform, since the parameters of the elements are identical.
A complete replacement of the lampshade is carried out according to a similar scheme for replacing a lamp, only instead of the old light fixture a new one will be installed (the wire is simply switched). The only thing you need to remember is that the LED elements may differ from each other. It is recommended to purchase lamps with medium brightness for the front seats, and high brightness for the rear seats.
The high-quality and bright lighting of the Priora Lux allows you to conveniently equip the Norma configuration model. The cost of the components is minimal, and the benefits obtained are quite high.
Considering the short installation time, ease of replacement and installation of the rear lamp, even a beginner can do the job. And the result obtained will be positively assessed by both the driver himself and the passengers being transported.
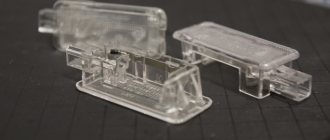
How to disassemble the lampshade and replace the lamp
In this section we will find out how to remove the lampshade of the Lada Priora “Norma” and replace the lamp. To work, we will need a small flat-head screwdriver and, of course, a new C5W lamp.
We insert a screwdriver under the passenger side glass and push it down, overcoming the force of the spring latch. We fold the glass down and remove the latches on the driver's side from engagement with the lamp.
Removing glass from the interior lighting of the Lada Priora “Norma”
In front of us is a light bulb, clamped with spring contacts. We simply pull it out and install a new one in place of the burnt one.
Important! The spring lock is located only on one side of the glass - closer to the passenger. If you try to press the glass on the driver's side, the plastic clips will be broken and the lamp can be thrown away.
As for repairing lamps on the Lada Priora “Lux”, we will not do this, since replacing LEDs will require not only knowledge of radio engineering, but also the ability to hold a soldering iron.
If you have such knowledge, then you can watch a video about replacing LEDs in the Lux rear light.
Possible malfunctions - if the lamp still does not light up
The burnout of the Priora interior lighting bulb, unfortunately, is not the only malfunction. It happens that even though the lamp is working, the lamp does not light up or does not behave as it should. The main reasons for this problem are as follows:
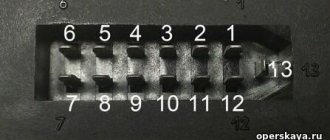
The fuse has blown . We open the interior mounting block - it is located under the dashboard to the left of the driver and is closed with a decorative cover with rotary latches.
Lada Priora mounting block and numbering of fuses in it
Fuse F10 with a rating of 7.5 A (Normal) or 10 A (Lux) is responsible for interior lighting in “Norma” and “Lux”.
Healthy! The same fuse also powers the brake light bulbs. If they are lit, then the fuse is definitely good, and you don’t have to go into the mounting block.
The switch built into the lamp has oxidized . We remove the glass (see previous section), turn it over, and clean the contacts.
As an option, we buy a new switch, but here we will have to unsolder the rivets (the switch is designed to be non-removable).
The limit switch in the door pillar is faulty . We remove the limit switch, unscrew one self-tapping screw, and use a multimeter set to resistance measurement mode. We replace the faulty limit switch with a new one.
Break or short circuit to the body of the supply wire . In the second case, the fuse constantly blows. We inspect the wiring, look for damage, and fix it. If the problem cannot be found, disconnect the damaged conductor and replace it with a new one using a special automotive wire.
Replacing the lampshade “Norma” with “Lux”
And finally, we will find out how to change the standard interior lamp of the Lada Priora “Norma” to “Lux”, since compared to the “Lux” it looks, to put it mildly, not a fountain both in appearance and in functionality.
Lighting lantern “Norma” (left) and “Lux” - the difference, as they say, is obvious
First of all, you need to find the mating part for the Lux flashlight socket, since it is not the same as on the Norma, although the pinout is the same.
The sockets of the “Norma” and “Lux” flashlights are slightly different in size
Healthy! The industry produces “Lux” lampshades with “Norma” sockets specifically for tuning. They are quite difficult to find, but they exist.
The computer cable used to internally connect the front jack of telephones fits perfectly into the new socket.
Cable for internal connection to PC
In order for the cord to be used, it needs to be slightly modified - the contact must be moved from the fourth socket to the third. This is easy to do with a needle.
We press the side lock of the contact and pull it out of the socket along with the wire. We move it to the third one - it will latch itself. We cut off the extra fourth nest with a regular knife.
We bite off the second connector on the cable and strip the wires. So, we have in our hands a lamp from Priora “Lux” with a power cable. You can start replacing. We open the box for storing glasses - it is located immediately above the lampshade. Using a Phillips screwdriver, unscrew the two screws.
There were screws here
- Under the lantern we unscrew two more that secure the mirror.
- Self-tapping screws for mounting mirrors in the cabin
- Disconnect the connectors of the flashlight and temperature sensor and remove the cover together with the flashlight.
Removed trim with interior light
We connect the new connector in place of the old one, focusing on the pinout given below. In principle, it is the same as on the old one.
Pinout of contacts for the Lada Priora “Lux” flashlight socket
The author of the modification did not cut off the old connector, but simply connected a new one in parallel, stripping the wires feeding the old one.
The new connector is connected parallel to the old one
We remove the “Normal” interior lighting lamp and insert the “Lux” one in its place. There is no need to modify anything here - the shape, dimensions, and fasteners are the same.
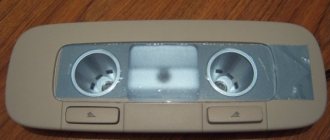
What kind of lamps are installed in the interior lamp?
The lamp itself consists of 3 sections - a central one and two side ones for the driver and passenger. A C5W lamp (AC12-5-1) with a power of 5V is installed in the center. On the sides there is a T4W lamp (A12-4-1) with a power of 4V.
Instead of conventional incandescent lamps, you can install LED lamps with exactly the same bases. In addition to the usual lamp, you can install universal interior lighting in the center; we will talk about it below.
There should be no problems with the c5w lamp; there are a lot of LED analogues, which one you choose depends only on you. If you suddenly find yourself in a professional car lighting store, it is better to buy lamps with 5730 diodes, they will shine brighter than others.
In addition to a regular lamp, you can install universal interior lighting in the central lamp. It comes in different sizes, so you can choose it according to the size of the lampshade. The kit includes 3 different adapters for lamps: c5w, w5w and t4w.
or simple lamps with c5w socket
The side lighting lamps have a different polarity. When installing LED lamps, they will not work and you will not be able to turn the lamp over. Therefore, you will have to remove the lampshade and rearrange the wires directly on the lampshade itself. Swap + and - places. Everything should work.
Responsibility for faulty lighting devices
Traffic rules prohibit operating a vehicle with faulty lighting devices. This is due to safety considerations for all road users. It is also prohibited to use vehicles that use lamps that do not meet the design requirements for the operation of the vehicle.
It is important to remember that you are not the only participant driving on the highway, and it is highly not recommended to install more powerful and brighter lamps in the headlights of your car. By this action you endanger traffic participants moving in the opposite direction.
All changes in the design of the vehicle or non-working lighting devices entail administrative penalties.
Product delivery options
Note! Below are the shipping methods available specifically for this product. Payment options may vary depending on the delivery method.
Detailed information can be found on the “Delivery and Payment” page.
Parcel by Russian Post
Available payment methods:
- Cash on delivery (payment upon receipt)
- Using cards Sberbank, VTB, Post Bank, Tinkoff
- Yandex money
- QIWI
- ROBOKASSA
Shipping throughout Russia. Delivery time is from 5 to 12 days.
Parcel by Russian Post 1st class
Available payment methods:
- Cash on delivery (payment upon receipt)
- Using cards Sberbank, VTB, Post Bank, Tinkoff
- Yandex money
- QIWI
- ROBOKASSA
Shipping throughout Russia. Delivery time is from 2 to 5 days. More expensive than regular delivery by Russian Post, approximately 50%. Parcel weight up to 2.5 kg
Express Parcel EMS
Available payment methods:
- Cash on delivery (payment upon receipt)
- Using cards Sberbank, VTB, Post Bank, Tinkoff
- Yandex money
- QIWI
- ROBOKASSA
Shipping throughout Russia. Delivery time is from 3 to 7 days. More expensive than regular delivery by Russian Post, approximately 100%.
Transport companies
Available payment methods:
- Using cards Sberbank, VTB, Post Bank, Tinkoff
- Yandex money
- QIWI
- ROBOKASSA
Delivery is possible to any locality where there is a representative office of the transport company. Delivery time is from 2 to 10 days. Sending large parcels is approximately 50% more profitable than by Russian Post.
Read also: New Toyota Camry 2022 big test drive
Courier delivery in Togliatti
Available payment methods:
- Cash upon receipt
- Using cards Sberbank, VTB, Post Bank, Tinkoff
- Yandex money
- QIWI
- ROBOKASSA
Delivery time from 1 to 12 hours.
Pickup from our warehouse
Available payment methods:
- Cash upon receipt
- Credit, installments
- Using cards Sberbank, VTB, Post Bank, Tinkoff
- Yandex money
- QIWI
- ROBOKASSA
Pickup times must coincide with store opening hours.
Commuting to work early in the morning and returning home late at night poses particular challenges for motorists due to limited visibility inside the vehicle. Before starting the trip, it is necessary to perform a number of mandatory operations, and the first of them is to find the ignition switch. In winter, you need to find the button to turn on the headlights, turn on the fan to heat the interior, and so on. All this will have to be done by touch and from memory, since in the dark the owner of a VAZ 2171 will face a small problem when searching for the necessary buttons and levers: the lack of sufficient visibility of the elements.
Having a flashlight with a bright LED light helps with the issue, but does not solve the problem. The daily search for working controls is mentally and physically exhausting when a button is pressed by mistake. Installing a permanent traditional source of interior lighting will not only eliminate the need to search for buttons to turn on the necessary options, but will also decorate the interior with even and pleasant light, adding some individuality to the interior of the VAZ 2172 car with warm shades of white light. Car passengers are often also deprived of a sufficient source of lighting for their seats.
Most Priora models are equipped with a standard ceiling light to illuminate the area between the driver and the front passenger seat, providing lighting for tasks inside the cabin. Interior lighting for the occupants of this vehicle can be provided with small additional lighting. To equip the interior of a VAZ 2170 with a constant lighting element above the passenger seat, it is recommended to install an interior lighting kit. The solution to the problem does not look like the simplest, but the darkness of the interior in an underground parking lot and in the dead of night depresses human helplessness when it is necessary to do something inside the car.
Installing a simple ceiling light above the passenger seats is not the latest application of energy-efficient technologies, and does not have a remote control for interior lighting. This element is for those who do not have any special preferences in the form of attractive iridescent bright blue lights located throughout the cabin from the glove box to the installation of lamps under the seats.
How to remove the glove compartment on a Lada Priora yourself
The Priora model car is an inexpensive, popular option for economy class passenger transport. Its interior is made of thin plastic, which is not covered with fabric. The glove compartment is a place to store documents, small digital equipment and other personal items. Consequently, the plastic may become dirty, break, or make annoying sounds. In such situations, the glove box is removed and unpleasant moments are eliminated.
Tools for removing the glove box
If the reason for removing the part was irritating sounds, and the car owner decided to strengthen the trunk, then in this case he may need not only tools, but also materials. For example, superglue and pieces of foam rubber (to eliminate loose metal axles).
How to quickly remove the glove box on a Priora model car
In order not to damage the car interior, you need to know how to remove the glove compartment on a Priora correctly. The design of this part of a passenger car interior is more than simple. The procedure for removing the glove box will take several minutes. Sequencing:
- Open the box lid by pressing the special button and lower it down until it stops.
- There are restraints on the left and right sides of the trunk lid. After opening the lid, you need to release the right stopper with light finger pressure.
- Then you need to do the same procedure with the second, left, limiter. Only after it is released it is necessary to move the part to the left.
- Next, the glove compartment lid can be easily removed. If after all the manipulations it does not want to be released, you just need to gently pull it down.
After all the planned actions have been completed, you need to attach the cover to the front panel in reverse order.
Video “Installing the tail light”
This video demonstrates how to install a rear light in the interior of a Lada Kalina with your own hands (the author of the video is NBI12345).
The popular Russian car Lada Priora is available in 4 body types: sedan (VAZ-2170), station wagon (VAZ-2171), hatchback (VAZ-2172), coupe (VAZ-2173) and in several trim levels, which undoubtedly makes this car convenient for different people. Lada Priora replaced the popular and beloved Lada of the 10th family and was created for our Russian roads and our harsh climate. Safety, efficiency, ease of maintenance, suitability for our fuel - the designers took care of all this.
Lada Priora is equipped with 8-valve (81 hp) and 16-valve (98 hp) engines, with a declared service life of 200,000 km. The new engines have a lightweight connecting rod and piston group, which increases engine power by 10%. A number of trim levels are equipped with tuning options as standard: air conditioning with climate control, light and rain sensor, parking sensors, heated front seats, electric windows on all doors, electric and heated mirrors.
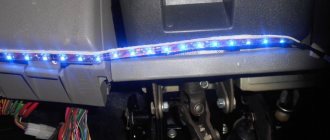
Installing floor (leg) lighting in Priora
Installing footlights in Lada Priora
Floor lighting for the driver and front passenger: the LED strip can be secured using either double-sided tape or plastic ties directly above the pedals. We place the second tape under the glove compartment:
Lighting for rear passengers: We will place the LED strip under the front seats. The most convenient way to secure the backlight is to use a corner from the cable channel, to which we glue the prepared tape. We attach the corner itself to the air ducts with self-tapping screws. It is not at all necessary to remove the seats for this; it is enough to move them as far forward as possible.
Connecting the interior lighting of the VAZ 2170
By the way, do you want to make the Priora’s interior more diverse? Use an RGB controller for the LED strip; it will allow you to change the color of the interior lighting:
To illuminate not only the passengers' feet, it is recommended to install an additional lighting lamp on the ceiling.
Similar materials
You can make payment in one of the ways convenient for you:
- To a SberBank or Alfa-Bank card. The most profitable method for the buyer, as well as the most convenient one, is to use the Sberbank Online service, Alfa-Click, an ATM, or through an operator at the bank. After placing your order, the manager will send you the card details. If you do not have a SberBank or Alfa-Bank card, you can also top up your card using the details at any SberBank or Alfa-Bank branch. Payment is credited within an hour.
- Yandex money. Customers who have Yandex.Wallet can quickly and easily pay for an order in our online store, the commission will be 0%.
- Yandex.Checkout is an online payment acceptance service. A convenient option with a large selection of payment methods for your order: plastic cards of any banks, including credit cards, in cash through terminals, ATMs or phone shops, Qiwi Wallet, Yandex.Money, WebMoney, from your phone balance, purchase on credit (payment in installments) . Please carefully check which email address you provided during the ordering process, as you will receive a receipt for payment for your order. Yandex.Checkout commission for transfer will range from 3% to 6%.
- QIWI wallet. If it is more convenient for the client to use a QIWI wallet or, if it is not available, to pay through the nearest QIWI terminal, the manager will provide you with the wallet number. Commission 0%.
- Payment at any bank using an invoice or receipt (+3% to the cost). If you do not use electronic wallets and plastic cards, we provide the opportunity to make payments at any bank in Russia. The site manager will send you a pre-filled receipt “Form No. PD-4” by e-mail; please carefully check the e-mail address you provide. The bank commission will be approximately 3% and depends on the bank itself
- Cash on delivery upon delivery by the Transport Company (payment for purchase upon receipt of the order).
- Cash on delivery upon delivery by Russian Post (payment for purchase upon receipt of the order). The order arrives at the post office, after which you pay its cost and pick it up, in which case the Russian Post charges a commission.