Replacing starter bushings
When the starter bushings wear out, the load on the electric motor increases. With severe wear, the starter armature begins to touch the stator winding, which immediately drains the battery, this is especially true in winter.
Consequences for the starter when working with worn bushings
If the starter bushings are not replaced in a timely manner, then during further operation of the starter with worn bushings, the armature and stator windings will be subject to strong heating, which will lead to starter failure. This is due to the fact that the bakelite with which the winding wires are processed begins to melt at high temperatures, which first leads to an interturn short circuit of the winding, and subsequently to a short circuit and combustion of the winding. In addition, due to the increased load when turning the starter armature, the starter brushes and armature commutator plates wear out intensively at the point of contact with the brushes, so premature replacement of the starter brushes
.
Starter bushing replacement process
To replace the bushings, the starter is removed from the engine, disassembled, and all its components are inspected. Bushing wear can be determined by the play of the armature shaft in the bushing. To do this, after disassembly, you need to insert the armature shaft into the bushing and swing it from side to side, which will immediately show the wear. The wear of the starter bushings can also be determined by the traces of the armature touching the stator winding, where the contact spots of the armature with the stator winding will be clearly visible, which indicates the need to replace the starter bushings
. The bushing is knocked out with a drift of a suitable diameter or any bolt similar in size to the outer diameter of the bushing.
It is more difficult with a blind, non-through bushing, which is installed either in the clutch housing housing, as when replacing starter bushings on a VAZ 2108-09 and their modifications, or in a blind starter cover, for example, a Mitsubishi starter.
To remove the starter bushing, you will need a puller.
Homemade starter bushing remover
To make it you will need a tap for cutting threads, an impact bushing (massive), a nut and welding. An impact sleeve (striker) is put on the tap and a nut is welded at the second end of the tap to limit the stroke of the striker. The tap is wrapped into the sleeve until it stops and, with the help of strikes with the striker, the sleeve gradually comes out of its seat.
In the absence of a puller, you can use the proven method using a hacksaw blade for metal. The end of the blade is ground on a sharpener until it fits inside the starter bushing. Using the fabric prepared in this way, one or two cuts are made along the entire length of the sleeve, after which it can be easily pulled out of its seat.
Types of bushings for starter repair
For replacement, a repair kit with bushings is available. Typically these are cermet bushings. When working with these bushings, you need a special mandrel, the outer diameter of which must exactly match the diameter of the bushing hole. When pressing in bushings, you must act carefully, since a strong blow can immediately crumble the bushing, since cermets are very fragile and cannot withstand impacts.
Before installing cermet starter bushings, they must be immersed in a bath of engine oil for 5-10 minutes. The pores of the cermet will be saturated with oil, which will serve as a lubricant for the bushings during their operation.
If it is impossible to purchase branded starter bushings, this is especially true for starters of foreign cars, they can be made of bronze. For a sample, you need to give the turner old bushings and a stator armature (the shaft of which may have wear), so that the bushings can be made exactly to the actual dimensions.
Replacing the starter on an 8-valve Kalina
Having found out where the required unit is located, we proceed to replacement. To perform the work (removal, repair and installation), you will need the following tools and accessories:
- keys with dimensions of “8”, “10” and “13”;
- wrench with nozzles 13 and 15 mm;
- screwdrivers, both flat and cross-shaped;
- hammer, vice and pliers;
- drift (made of wood or soft metal);
- ohmmeter;
- a little lubricant of the “CV joint-4” type;
- two metal plates, a block of wood and a fine-grained sandpaper sheet.
After the preparatory work, we’ll figure out how to remove the device.
To make the replacement convenient, we place the LADA Kalina above the inspection ditch.
- We de-energize the on-board network (remove the terminals from the battery terminals).
- We dismantle the air filter housing along with the element.
- Using a wrench (socket) set to “13”, unscrew the nut holding the wire tip to the positive terminal of the battery. Remove the tip.
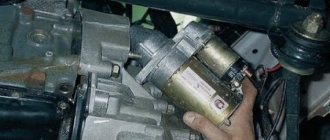
- Using a key set to “15” we unscrew the nuts securing the starter to the engine block. We remove the node.
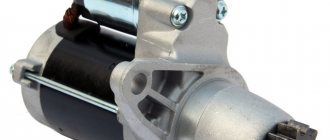
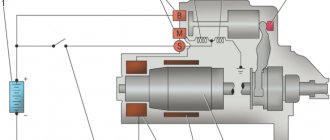
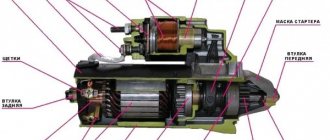
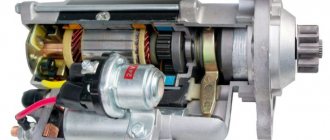
Starter device
How to replace starter bushings? Before getting to the heart of the matter, it is necessary to at least get acquainted with the structure of the unit in general terms. A car starter is essentially a miniature four-lane electric motor that initiates rotation of the crankshaft. It provides the initial rotation speed that is necessary for the internal combustion engine to start. The starter is a DC electric motor that takes energy from the battery. Receiving electrical voltage from the battery, it increases power through the four brushes that are an integral part of it. Starters are:
- Geared;
- Gearless.
Both the first and second have both their advantages and disadvantages.
Geared starters are good because they can provide the crankshaft rotation necessary to start the engine, even when the battery is very discharged.
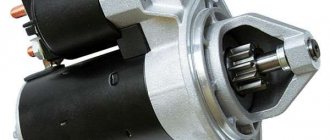
gear starter
In addition, the strength of gear options is the presence of permanent magnets, due to which problems with the stator winding are minimized. Although, with prolonged use of such a starter, the rotating gear may fail. To be fair, it is worth noting that this is most often caused by poor production quality or defects.
Gearless starters have a direct effect on gear rotation.
These devices have a simpler design. It is easier to repair them yourself, without resorting to the help of specialists from a car service center. They are quite reliable, and the probability of their failure due to electrical influence tends to zero. However, at low temperatures, gearless starters can still operate unstably.
Choosing a new starter
According to statistics, when answering the question “Which starter is better for a VAZ 2114?”, most car enthusiasts are advised to choose a geared version. It is smaller in size than the standard one, provides a quick start even with a weak battery, and spins the flywheel better in winter. It is easier and faster to install. The engine of such a device weighs less and experiences less mechanical stress.
Of the gearbox options, KZATE (KATEK) has the most positive reviews. Eldix and PRAMO brands are also popular.
The disadvantage of geared devices is that there may be problems with waterproofing, which cause short circuits and anchor breakages.
Starter KZATE
There are machines with the device fastened not with three, but with two bolts. In this case, a starter from ten is suitable, but you need to replace its Bendix with a gearbox from nine.
In what cases is it necessary to replace bushings?
In the life of any motorist, there may be situations when, for various reasons, it is impossible to start the engine. One of the reasons may be worn bushings. Let's imagine this situation. During starting, the starter with noticeable difficulty tries to turn the crankshaft, every now and then sticking and stopping. At the same time, the uninitiated motorist is perplexed as to why this could be happening, because the battery is in good condition and fully charged. The reason in this case is the armature touching the stator. The gap between the first and second is only tenths of a millimeter, due to this, even the slightest misalignment of the armature shaft relative to the stator will certainly lead to the above problems. This misalignment appears due to the failure of the plain bearings in which the armature rotates. As a rule, the front bearing is more worn out, since the main load falls on it. The bearings in this case are bushings made of brass. The front one is built into a special hole, which is located in the clutch housing. The rear bearing is located on the starter cover.
Bushing replacement
How to remove the starter bushing yourself
Being essentially a 4-band electric motor, the car starter ensures that the crank shaft begins to rotate. The rotation speed must be such that it is enough to spin up the engine. Unfortunately, the starter can malfunction, and some of them are related to the bushings. Let's find out how to remove the starter bushing.
When do you need to replace bushings?
Replacement of bushings is necessary in cases where they wear out and the engine can no longer be started. When starting the engine, the Bendix has difficulty rotating the flywheel, jams and stops. An inexperienced motorist begins to check the battery, since the symptoms of a low battery are the same, but to no avail.
It turns out that the reason is that the armature touches the stator. As you know, the gap between these internal elements of the starter is equal to several millimeters. And even the slightest misalignment of the anchor shaft can lead to interference with the above-described elements.
Misalignment does not occur just like that, but due to the operation of sliding parts. It is on them that the armature shaft rests, they help it to be in a flat plane.
Interestingly, the front sliding element wears out more, because the main load lies on it. And in this case, the role of the sliding part is precisely a bushing made of soft metal. The front bushing sits in the clutch housing, the reverse bushing is on the starter cover.
Dismantling
To easily remove the bushings and replace them, you will need to equip yourself with the necessary number of tools. Be sure to find a long bolt, prepare a sized tap and a light drill.
First of all, experts recommend checking whether the bushings can be removed by hand. The fact is that if the starter has been assembled and disassembled several times, then the sockets in which the bushings sit are probably broken. It is not difficult to squeeze out the sliding elements of the armature - just press with your finger. However, broken sockets are not good; it is advisable to replace such a starter, and the sooner the better.
A starter with broken sockets will periodically jam during operation, even with new bushings. In order not to change the entire starter, it still costs a lot of money, you can do it this way. Measure the diameter of the broken socket and order from a turner a bushing of the required size that would not fit in such a socket. Or, as craftsmen do with their own hands, solder a little metal on the side of the new bushing so that the bushing fits into the socket with a slight interference fit .
On new, normal starters, you cannot remove the bushings with your finger. Here you need to carry out several manipulations that are interconnected.
- De-energize the battery.
- Remove the lower starter bolt (on some cars this same bolt also holds the engine, so it is advisable to jack up the engine).
- Remove the starter.
- Take a drill with a tap of the required diameter (M12 in most cases) and cut a thread in the bushing.
- Then screw the bolt, which was prepared according to the diameter and pitch of the thread, inside.
- All that remains is to remove the bushing by turning the bolt with pliers in the opposite direction.
Disconnect the wires going to the vehicle starter.
Replacement technology
First of all, you need to disconnect at least one of the wires from the battery, as well as all the wires from the starter. Then you need to unscrew the bottom bolt that secures the starter and screw it in on the reverse side to secure the engine to its front mount. Otherwise, the motor may move forward. After this, you need to unscrew the remaining two bolts that secure the starter and remove it from the car. As mentioned earlier, the bushing is built into the clutch housing. To remove it, you need an M12 tap, as well as a drill chuck. The tap will have to be inserted into the chuck, then clamped, after which it must be carefully screwed into the sleeve, thereby cutting the thread. Great care is required due to the fact that the steel of the tap is very fragile and even a slight misalignment with the applied force can lead to its breakage. In this case, the shank will remain in your hands, and the cutting part will remain inside the sleeve. It would seem that the situation is hopeless. However, it is not. The length of the sleeve is approximately 14 millimeters, which means that there is approximately 10 or 20 mm of the cutting part of the tap on the hands. You need to take a regular nut with exactly the same M12 thread and screw it onto the broken tap. In a situation where the tap is broken off so that it is impossible to screw a nut onto it, you can take a bolt with a corresponding thread about 10 centimeters long and grind grooves on it similar to the grooves of the tap. Or you can do it more radically, but at the same time simpler. Go to the store for a new tap. The tap is equipped with three grooves into which you need to insert nails of the appropriate size. This must be done in such a way that their ends protrude beyond the end of the tap by about 10 mm. Try to insert the resulting structure into the sleeve with the broken end of the tap. It may not work out right away, but with the right amount of persistence the operation can be easily accomplished. After this, you can try to unscrew the piece and try to unscrew the bushing again. As a rule, after a few turns the bushing will begin to rotate and can be carefully unscrewed. If the bushing is very stuck, you will have to cut the thread in it approximately 6 or 8 turns. After this, remove the tap, and in its place screw in a bolt of a suitable size and use it to remove the sleeve. When a new one is inserted in its place, it is slightly pressed in.
Starter repair in a Lada Kalina car
In most situations, disassembling a unit in the Lada Kalina model for the purpose of repair is carried out to replace such elements as:
- brush holder in combination with brushes;
- traction relay;
- drive components.
Naturally, repair procedures are carried out on a removed device. How to remove it correctly?
Let's sort it out.
- We take the spike at “13” and unscrew the nut that secures the lower contact bolt of the traction relay, after which we remove the wire tip.
- Using a screwdriver (Phillips), we “defeat” a pair of screws holding the retractor relay block. We remove the element.
- We remove the spring along with the armature from the front cover of the relay.
- Disconnect the housing from the front cover. Here you will need to unscrew a couple of tightening bolts (key set to “8”).
- From the released housing we remove the armature together with the brush holder and the end cover.
- This cover is removed by unscrewing two screws with a screwdriver. The bearing seat contains a wavy spring washer.
- The brush holder itself must also be dismantled, after which the brushes are removed.
- We move on to the planetary gearbox, from which we remove the cover.
- Now we remove the three satellites and the rubber plug.
- We press the end of the drive shaft with our finger, and then remove the drive assembly located in the front cover.
- We arm ourselves with two screwdrivers, with which we open the eyelet present on the support, and then remove the drive lever.
- We use a wooden block against which we rest the end of the ring gear.
- We apply the grips of the open-end wrench (size - “13”) to the ring that limits the travel of the drive gear. We hit it with a hammer, forcing the ring to compress in this way.
- The locking ring must also be removed. We use a flat screwdriver.
- Next, we dismantle the gear travel limit washer.
- We remove the overrunning clutch assembly with the drive gear.
- Using a screwdriver, remove the retaining ring from the corresponding groove on the shaft.
- We also remove the washer.
- We pay attention to the ring gear in the planetary gearbox, which we pull off the drive shaft.
- We proceed to dismantling the bearing. To do this, we use the previously designated metal plates. We insert them between the bearing itself and the armature commutator, and then rest it on a vice. Use a hammer to carefully impact the end of the shaft (a drift will be required) until the bearing is completely pressed.
This completes the disassembly procedure.
Next, we inspect the commutator and armature winding. There should be no charring here. If it is present, then use fine sandpaper to “correct the situation.” When the burning is intense, there is no alternative to changing the anchor.
If we find scratches or material coating on the shaft journal, we also use “all-conquering” sandpaper, after which we polish the treated areas.
We arm ourselves with an ohmmeter to check the short circuit between the core and the windings. We pay attention to the ends of the windings - their soldering to the lamellas must not be damaged. Blackening of the winding or separation of varnish insulation from its surface is not allowed.
If the brushes are worn out, then replace the holder assembly.
The assembly of the starter assembly is carried out according to the reverse algorithm of actions.
Summary
It is worth noting that a starter without a gearbox has a larger gap between the armature and the stator than a geared counterpart. For this reason, its permissible shaft misalignment is also greater.
And one more piece of advice. If the starter is still disassembled, then it would be a good idea to replace the brushes. The parts are cheap, so waiting for them to fail and then dealing with them separately is not worth it. Of course, for all the operations described above, at least a little experience is required. And, as you know, he is a profitable business. In the end, to get it you have to try. Go for it!
Replacing starter bushings and brushes
A starter is an electrical machine designed to start an internal combustion engine. The operation of the starter is based on several elements that have a clear sequence of actions: the retractor relay retracts the freewheel, the starter shaft begins to rotate, and after the engine starts, everything returns to its original position. It would seem that if one of these systems fails, everything becomes clear - the reason is a malfunction of the solenoid relay or power supply to the starter. However, what to do when the starter rotates quite slowly or even gets stuck. After all, such work will not ensure reliable and quick engine starting. Let's try to figure out why this is happening and how to fix this problem.
Faulty starter bushings
The reason the starter turns slowly or even sticks may be due to its armature. The fact is that when the armature turns, its poles touch the pole structure of the starter, which creates a certain friction between these two parts. The occurrence of friction helps to reduce the rotation speed or seizing of the unit. Touching of these elements can be caused either by incorrect design (this is only the fault of the manufacturer) or by misalignment of the starter shaft. Such misalignment can be caused by simple wear of special bearings, which are usually called bushings. These bushings are responsible for reliable axial fixation of the armature shaft and ensure its unhindered rotation. It is very important that the bushings ensure proper alignment of the shaft, otherwise the starter will not work correctly and may even jam.
Replacing starter bushings for VAZ 2109
If the above-mentioned malfunction is detected, both bushings must be replaced. To do this, the starter must be removed from the car, disassembled accordingly, worn parts replaced and the starting device assembled.
Procedure
1. First of all, the car is installed on an inspection hole, and the possibility of its movement is also excluded. Open the hood and disconnect the negative terminal of the battery. This procedure is necessary in order to reduce the risk of an accidental short circuit. Try to make this action a habit whenever you carry out repair work.
2. Remove the wire attached to the starter solenoid relay terminal. After this, unscrew the power contact fastening. After removing it, you will have access to the positive battery cable, which must also be removed.
3. Unscrew the engine protection mounting bolts. This is to get to some of the lower parts of the starter. It is worth recalling once again that carrying out repair work of this level is recommended specifically on an inspection pit or overpass.
4. Find three nuts on the starter to secure it. Two of them are located on the hood side and can be unscrewed directly from the engine compartment, but the last one is located under the assembly, so unscrewing it must be done exclusively under the car. After the nuts are removed, remove the starter from the car engine.
5. The front starter bushing is located in the clutch housing. No fasteners are used to secure it, so it is pressed inside. Take a tap that matches the inner diameter of the sleeve and carefully screw it inward. Once the tap starts to press against the clutch housing, do not stop. Under the action of the thread, the sleeve will gradually be squeezed out.
6. After this, clean the hole in the clutch housing and prepare a new bushing. Try not to use lubricants, as with prolonged use the bushing will begin to rotate and lose all functionality.
7. Press the new bushing into the hole. If it fits tightly, this is a good sign that will ensure its durability.
8. The rear hub is much easier to change. To do this, disassemble the starter and squeeze the bushing out of the cover. After this, a new element is pressed into the cover, and the assembly is assembled in the reverse order. However, this method, although economical, does not provide adequate reliability. To ensure the bushing lasts longer, it must be purchased along with a new starter cover.
After replacing the bushings, the starter is installed in reverse order.
Useful tips
- Before removing the starter, you need to make sure it is faulty. First of all, you need to check the reliability of the terminals on the battery. Oxidized terminals should be cleaned of deposits and re-secured. The reason for the failure may also be poor weight of the engine and the body. You should also check whether the solenoid relay wire has come loose from the connector and whether the positive terminal nut on the starter is tightly tightened;
- When removing a part, you can disconnect the positive wire of the terminal last. In this version, it is more convenient to unscrew the nut of the positive wire. By pulling the starter closer to you, it will be easier to get to the desired nut;
- You need to install the solenoid relay wire in place until it stops. The connector must be fixed, and in this case the wire will not fly off during movement due to shaking;
- Do not forget to first remove the terminals from the battery and turn off the ignition - this will save you from additional problems.
That’s basically all that can be said about how to change the starter on a VAZ 2114.
You might be interested in reading:
- Steering gearbox VAZ 2107 - design, replacement and repair Where is the steering gearbox located? It is located in the engine compartment and immediately under the vacuum brake booster (Indicated by a blue arrow), for…
- VAZ 2107 stove - design, repair, modifications The VAZ 2107 stove creates and maintains a comfortable air temperature in the cabin and prevents the windows from fogging in cold and humid weather...
- The heating system for the VAZ 2115, its design and repair. Connection diagram for the VAZ heating system. Mounting block. Ignition. Unloading ignition relay. Heater motor switch. Additional resistor. Stove motor. Control button...
- For what reason does the VAZ 2115 not start? The starter does not turn. Why does the starter not respond to turning the ignition key? After turning on the ignition, power from the battery is supplied to the on-board electrical systems and the computer...
- The stove fan on the VAZ 2114 does not work - reasons and repairs Mechanical reasons why the VAZ 2114 stove fan does not work First of all, mechanical reasons include clogging of the air duct. Not…
Starter brush problem
Another reason why the starter does not rotate well or sticks is faulty brushes. The voltage is transmitted to the starter rotor winding through a brush device that has contact with the rotor shaft commutator. If the contact is poor, voltage transmission may not be provided (the starter does not turn at all), or it may be provided in insufficient quantities (the starter does not rotate fast enough). The fact is that the brush apparatus works on the basis of graphite brushes, which tend to wear out with prolonged use. If the bushings are in good condition, and the starter still turns very slowly, then it’s time to replace the starter brushes.
Causes of malfunctions
- Does not turn: short circuit of the winding, jamming of the armature on the solenoid relay, oxidation of the battery contacts.
- Insufficient rotation speed of the bendix: break or short circuit of the armature (stator) winding, wear of the brushes.
- It turns, but does not transmit speed to the flywheel: the bendix is faulty.
- Operation after the engine speed has increased: the traction relay is stuck, the freewheel spring is broken.
Also, the causes of malfunction include wear of the unit, increased loads, violation of operating conditions and defects. Most often, the bendix, armature commutator and solenoid relay fail. Sometimes there is a loose fit of the brushes.
If one of the brushes has failed or the gearbox shaft has become skewed, this is usually a sign of impending destruction of the entire assembly, and it is easier to replace it entirely than to repair it.
In cold weather, the engine does not start well, the starter works at the limit and may fail. If the device is poorly secured or operates in conditions of constant strong vibrations, this also leads to its destruction. Sometimes a factory defect of the unit occurs - incorrect distribution of the lubricant composition in the housing, which leads to failure of the solenoid relay.
You can clean the shaft and add lubricant. The device is installed at an angle with the bendix down, white spirit is drawn into the syringe, and, turning the bendix as it extends, the white spirit is squeezed out onto the exposed section of the shaft, wiping it with a rag. Lubricant is added to the wedge-shaped teeth along which the bendix slides out.
For complete cleaning, the assembly is disassembled and washed in gasoline. Then they put new lubricant in the places from which the old one was removed, and assemble the device.
If the starter does not turn the flywheel, clean the terminals and start the car again.
Sometimes the problem with frequent bendix failure lies in the flywheel bushing. It is necessary to check the condition of the bushing and, if it is unsatisfactory, replace it with a new one.
Gear starter VAZ 2114
Procedure for replacing starter brushes
In order to replace the brushes, it is necessary to remove the faulty device from the car engine. To do this, you need to perform the same procedure as when replacing the starter bushings. Once the starter is removed, it must be disassembled.
1. At the starter terminal there is a special cable that must be removed, after which there are special screws intended for fastening the commutator and the shaft cover. Remove all o-rings and washers.
2. Unscrew the nuts that secure the starter rear cover. After removing the cover, pull out the assembly for attaching the brushes.
3. After removing it, the brushes should come out on their own, but will be held in place by special wires. Replace them and reassemble the unit.
4. First, the brushes are installed in the brush holder, then they are centered relative to the shaft, and at the end the pressing springs are installed.
5. Reassemble the components in reverse order and install the starter on the vehicle.
This completes the troubleshooting of slow starter rotation. As you can see, these procedures are performed without special skills using a standard set of tools. Therefore, any car enthusiast who understands at least a little about the structure of a car can cope with it.
Article number and approximate price for the original VAZ 2114 starter
There are two main types of starters used on VAZ 2114 cars. With a carburetor engine, a unit with the factory index 29.3708 is used. Its cost is from 3600 rubles.
On VAZ 2114 cars that have an injector, a starter 5712.3708 is used. It is distinguished by the presence of a planetary gearbox. The presence of a gear in the design made it possible to increase engine speed. Therefore, planetary starters have gained great popularity compared to those previously discussed. At the same time, carburetor VAZ 2114 car owners, when replacing a starter, give preference to units with a planetary gearbox. The price of a new such product starts from 2200 rubles.
In retail sales, original starters are found with article numbers 2108370801006 and 21130370801000. They are interchangeable, but it is recommended to choose a unit with a planetary gear, regardless of the type of vehicle power unit.
Replacing bushings on the starter with your own hands
Wear of starter bushings is a fairly common problem in cars that have been in use for a long time and require maintenance. Despite the fact that at the production stage a significant resource is put into these parts, over time they are still subject to critical wear and tear and become unable to perform their function. That is, metal-ceramic and bronze bushings, in fact, are consumables, the service life of which depends on the quality of manufacture and intensity of use. Therefore, sooner or later the car owner has to contact a car service for a replacement or resolve the issue independently. But to do this, you need to know how to change the bushings on the starter without damaging the parts themselves and their seats.
How to determine that the problem when the engine starting mechanism malfunctions lies precisely in the bushings that are unsuitable for further use? First of all, if they are worn out or completely destroyed, excessive axial runout of the rotor appears. This, in turn, causes loss of contact and lack of mass on the rotor winding. As a result, the starter may simply stop working, and if the engine manages to start after a while, then extraneous noises can be clearly heard during the process.
The bushings wear out, so they will need to be replaced for normal operation of the starter.
How to replace VAZ-2109 starter bushings
Before you change the bushings on the starter, you will have to dismantle it, but first remove the terminal from the battery. Then you need to disconnect two wires from the solenoid relay. If to disconnect the thin one (which powers the relay winding) you just need to pull it, then removing the thick conductor requires using a “13” wrench to unscrew the fixing nut. Next, using the same wrench set to “13”, unscrew the three nuts that secure the starter to the clutch block.
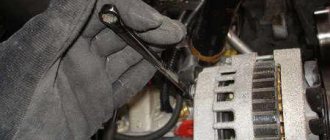
Disconnect the wires at the back of the relay
After removal, the device must be disassembled, which will allow us to determine whether the cause of the malfunction really lies in worn bushings. To do this, first disconnect the solenoid relay by unscrewing the two bolts using a screwdriver. Now you need to remove the rotor from the bendix plates. Using the key set to “10”, remove the rear cover of the starter, after which access to the rotor axis will open. The retaining ring on it must be removed using a flat-head screwdriver. At the last stage of disassembly, all that remains is to unscrew the nuts on the two studs so that all three parts that make up the starter housing are disconnected. This completes the disassembly process. You will learn further about how to replace the starter bushings without resorting to the help of a specialist.
Replacing the rear starter bushing
If, as a result of an external inspection, it was revealed that one or both bushings are worn out, they must be removed from their seats and functional analogues installed. Even in cases where only one part turns out to be unsuitable for further use, both the front and rear parts are usually replaced. First, let's look at how to correctly replace the bushing located in the rear cover of the VAZ-2109 starter.
The dismantling technology is not much different from how the rear starter bushing is replaced on all classic VAZ models. In other words, you just need to remove the back cover and knock out the old part and its remains. After this, the new bushing is pressed in, and the work is completed. True, very often the installed sample fits into the mounting socket too tightly. In this case, its outer diameter should be slightly reduced - you cannot push it in with great force, since the lid may burst. Therefore, simply sand the part with sandpaper. It is not recommended to use lubricants during installation, otherwise the bushing may rotate and break the seat.
Replacing the front starter bushing
The front starter bushing bears a larger portion of the load when starting the engine, and therefore wears out much faster. If the starter on your car has failed for the same reason and you are interested in how to replace the VAZ-2109 starter bushing located in its front part, just take into account the information below.
First, I would like to draw your attention to the fact that, unlike the classic VAZ, the front bushing of the Nine is not located in the starter housing - it is pressed into a special seat in the clutch housing. Therefore, to remove it, you do not need to disassemble the starter, but you will still have to dismantle the device to gain access to the mounting socket. You won't be able to remove the part with your bare hands - for this you will need a tap with a diameter of 14 mm with a welded handle. It is also advisable to put a heavy metal clip on the tool, which will facilitate the extraction process.
After screwing the tool in until it stops, try to pull it out along with the bushing
The tap must be inserted into the hole in the bushing and tightened until it rests against the crankcase. Next, try pulling the handle. If you can’t remove the product with your hands, then you can definitely knock it out of the holder by hitting the holder with a hammer. Before replacing the front bushing on the starter, thoroughly clean the seat of any dirt.
Do not rush to install the part in its place without making sure that it fits in size. Quite often, after pressing, the bronze bushing shrinks, its internal diameter decreases and the starter shaft does not fit into the hole. After installation, it will not be possible to increase the diameter in any way, so adjustments should be made in advance using a special tool - a reamer.
How I changed the starter bushing (a lot)
Well, what can I say... the story is cool, and so are the conclusions. I'll summarize. NL, but your hands are crooked.
You select the tap so that it can be screwed in without damaging the old bushing. You screw it in, it rests against the crankcase wall and the bushing comes out. You take it (the tap along with the bushing) and go home. Warm at home. drinking tea.