January 11, 2018 Lada.Online 285 208 23
E-GAS or electronic gas pedal is installed on all Lada models (XRAY, Vesta, Largus, Granta, Kalina, Priora and Niva 4x4). Owner reviews about it are not reassuring; many complain that the e-gas pedal is “dumb” (less sensitive and informative than a conventional cable). Did you know that in some cases the electronic accelerator pedal can be adjusted to be more responsive and a little livelier?
We determine the model of the accelerator pedal; this can be done by the catalog number, which is glued to the side of the body. If you cannot access the sticker, you will have to remove the electronic gas pedal:
- Disconnect the block with wires next to the gas pedal;
- Unscrew three nuts using a 10mm wrench;
- Remove the housing and pedal assembly.
The manufacturer installs at least two types of electronic gas pedals on Lada cars (depending on the year of manufacture):
- Old model (catalog number: 11183-1108500);
- New sample (article: 11183-1108500-01).
Each block is modified differently. Attention! You do all further actions at your own peril and risk. In addition, you may lose your warranty.
Refinement of a new electronic gas pedal
The pedal assembly (11183-1108500-01) does not have oval holes, which does not allow adjustment in the manner described above. Instead, it is proposed to cut off the protrusion (by 2-3 mm), which prevents the pedal from moving completely. This modernization made it possible to increase the pedal travel, which made acceleration with “pedal to the floor” more active. It is also noted that there is no hesitation when pressing the pedal sharply.
What I don’t like about the pedal assembly (8450008980), which is installed on Lada Vesta:
- tight gas pedal;
- large free play of the gas pedal (about 8 mm at the tip of the pedal).
What was decided to do:
- remove one of the return springs to make the pedal softer;
- Place a spacer to reduce the free play of the pedal.
How to measure pedal free play:
- Let's start the engine.
- Place a ruler at the tip of the pedal.
- Smoothly press the pedal until the engine begins to gain speed.
- We remember the distance on the ruler.
We remove and disassemble the electronic gas pedal:
- Disconnect the connector (by pressing the inside of the upper part of the latch)
- Unscrew three nuts (head “10”).
- Remove the top cover by unscrewing the fastening screws.
- Remove the rheostat slider by unscrewing the screw.
- Remove the spring (holding them with a screwdriver from the outside).
- Remove the white support spacers, remembering how they were installed.
- We measure the distance between the support pad of the return spring lever and the support rubber in the body, retracting the pedal to the amount of free play (indicated by an arrow).
- We glue the material of the same thickness (in this example we use 4 mm stickers for furniture legs and doors) using glue or double-sided tape.
We assemble the pedal assembly and install it in the car. The idle motion of the pedal should be minimal, about 1 mm. If the engine idle speed is higher than usual, and there is no free play of the pedal at all, then too much has been added. You will have to repeat the adjustment operation, adjusting the thickness of the lining. The same thing applies if the free play after adjustment remains more than 1-2 mm.
Why did AvtoVAZ need E-gas?
As I already said, environmental standards are becoming stricter every year, in order for the exhaust to comply with the standards, the cable had to be removed. This made it possible to get rid of the driver’s empty gasping, as well as other unnecessary actions that increase the toxicity of exhaust gases. The electronic pedal, as it were, regulates “at its own discretion” how to open the throttle. Even a sharp press on the pedal will be processed in such a way that as little harmful CO2 as possible is released into the atmosphere.
How it works?
An electronic pedal consists of three main elements: pedal, electric pedal. damper, as well as a sensor located on the pedal itself. The sensor reads the degree of pressure on the pedal, and then sends the data to the electronic unit. It receives the data, analyzes it and sends a signal to the electronic damper, which opens to the required degree.
What advantages does E-gas have for the motorist?
- First of all, the electronic pedal helps reduce fuel consumption.
- Despite the widespread belief that E-gas “presses” the engine, statistics show that electronics, on the contrary, improve dynamics. Although there is indeed a slight “stupidity” at the beginning.
Now about the disadvantages of E-gas
- Most often email. The pedal is criticized for its pause (“stupid”) at the start, when you press the pedal sharply and try to accelerate. According to many, the engine interacts poorly with the pedal, as a result of which approximately one second is lost. Although we have learned to correct this shortcoming.
- E-gas does not allow serious engine tuning, since the pedal negates all efforts. Installing a cable drive solves the problem. I would also like to note that we learned how to customize and customize the pedal for specific needs.
- The electronic pedal causes a lot of trouble during operation.
The main problems of E-gas
In addition to shortcomings with dynamics, other problems are also observed, for example, floating speed, “sticking” pedals, unauthorized throttle application. Main errors of the electronic pedal: (P2122-P2123, P2127-P2128, P2138).
In the office AvtoVAZ reports that when replacing the controller or removing the battery terminal, the electronic pedal requires adaptation.
To adapt E-gas, you must do the following:
- Connect the battery terminal if it was removed;
- Then turn the key in the ignition switch to the “ignition” position. You will see indicator lights on the dashboard. Wait half a minute and start the engine. The air temperature must be at least +7°C;
- After this, we adapt the ignition diagnostic function. We accelerate at second speed, after which we brake the engine from 4000 rpm to 1000 rpm. We perform six such cycles in one run.
Useful video: How to adjust the electronic pedal
Our service center is often visited by GAZelle cars, because this is a commercial vehicle that plows like a workhorse day and night. Every day, many GAZelles hit the roads of our country and sooner or later certain breakdowns arise, which we try to eliminate! Today is no exception. A GAZelle Business with a UMZ engine came to our repair zone! Well, let's help business!
After listening to the client: the car does not pull, the check light is on. After you turn the ignition off and on again, the car sometimes starts to work as it should, but then the problem repeats. The rpms don't rise above 2000.
Here it is, a workhorse!
Fig.1
Where to start repairs? Of course, with computer diagnostics. We connect the diagnostic equipment and read the errors that are registered in the engine control unit.
Fig.2
We are interested in the current error P2138 Throttle/Pedal Position Sensor/Switch “D”/”E” Voltage Correlation. What does it mean? This error literally stands for: P2138 incorrect voltage ratio “D”/”E” of the throttle position sensor or accelerator pedal. Our throttle valve is electronic, as is the gas pedal. That is, both the damper itself and the pedal may be faulty. In order to defect a pedal or throttle valve, you need to understand how they are designed, so first let’s look at their design features, structure and figure out what is the difference between a mechanical throttle valve and an electronic one.
The operating principle of the system with an electronic throttle valve and an electronic gas pedal.
Lada Granta 2012, 87 l. With. - other
Lada Granta, 2018
Comments 23
Pedal adaptation helps me personally! When I came for diagnostics, about six months after purchasing the car, the diagnostics showed that the gas pedal was not adapted! I performed the above operation on rpm from 1000 to 4000 and it adapted! These failures, if you suddenly give the gas to the floor even for a second, are annoying! After chipping there was not a single failure at all, you press sharply and it immediately slips without delay! For some reason, about a month later, a small failure appeared again!
This is not an adaptation! What you described is enabling the misfire diagnostic function.
Throttle valve adaptation is done as follows:
1. Ignition on 2. Wait 30-40 seconds. 3. Start the internal combustion engine. 4. Turn off the ignition 5. Wait for the main relay to turn off. 6. Everything
But only then we go to the track and adapt the passes.
But before this, you need to warm up the internal combustion engine until the fan turns on three times.
initialization, and then the above written by the author! Helps! ) BC State1 for help or diagnostics
The staff transfers to 95th without training, many ride on 92nd
You read more carefully (— adaptation of the throttle position zero. For this, the first turn on of the ignition switch after replacing the controller) after replacing the controller. Removing the terminal from the battery or resetting the settings by the staff does not affect anything. Again, we carefully read (adaptation of the misfire diagnostic function of the controller in order to avoid damage to the catalytic manifold and possible fire of the car) misfires have nothing to do with the pedal in general. In the first case, all this is done at the factory. This is only necessary when the brain changes or the throttle assembly.
or by “resetting” it with initialization using diagnostic equipment, my B.K can do initialization, so for whom how
If the staff resets it, won’t it work?
I think no! The state only resets the values to zero! This is different!
I’ll try this during the day, otherwise I’ve already sinned on the filter, you press the pedal, from 2 to 3 there are dips, that is, no!
try! Let me know if it helped or not!
I need to try it, otherwise there are holes in my guts
everything is clear, I just changed the firmware, I did it! But when I drove around after buying the car for about six months and stopped by for diagnostics! It revealed that for some reason the pedal was not adjusted! And even after the firmware, the car was tearing out from under itself, and about two weeks ago small gaps appeared again! I tried from 1000 to 4000 as it was written to do everything, the pedal became more responsive! But it’s still not the same as right after the firmware!
When repairing vehicles equipped with an electronic throttle actuator and associated with replacing the ECM or “resetting” it with initialization using diagnostic equipment, as well as during a trial installation of the controller, it is necessary to perform: - adaptation of the throttle position zero. To do this, the first turning on of the ignition switch after replacing the controller must be accompanied by holding the key in the “ignition on” position for at least 30 seconds before starting the engine. In this case, the temperature of the ambient air and the engine must be at least +7ºС. Otherwise, the engine will operate in emergency mode; — adaptation of the controller’s misfire diagnostic function to avoid damage to the catalytic manifold and possible vehicle fire. To do this, it is necessary to reproduce engine braking on the car 6 times from 4000 to 1000 rpm when driving in second gear in one trip. This is all done when the brain changes. And from the factory, I think everything should already be done there.
Replacing the gas pedal on Grant
The replacement procedure is quite simple and does not require special technical means. In order to dismantle the unit you will need: - A key for 10.
Sequential steps to replace the gas pedal of a Lada Granta:
1. The first step is to remove the negative terminal from the battery. 2. Next, you need to move to the driver’s side of the car. 3. Above the gas pedal, find and disconnect the contact chip that is connected to the sensor connector. 4. After that, take a 10mm wrench and unscrew the three fastening nuts. When there is insufficient internal space, it is most convenient to use a socket wrench. 5. Remove the pedal from the special mounting pins. Reinstallation is carried out in a mirror sequence.
Adjusting the sensitivity of the gas pedal
"Note! Not only the pedal and its module take part in controlling the operation of the throttle valve; the throttle control unit plays an important role. Therefore, this product should also be given special attention in cases where the MPG is in a known good condition, but problems with engine speed remain.”
The throttle cable (gas cable) is the connecting link between the gas pedal and the throttle; when you press the pedal, you do not act on the cable, which in turn opens/closes the throttle valve. This way you regulate the flow of fuel to the cylinders, as well as the engine speed and vehicle speed.
A poor (untimely, delayed) response to pressing the gas pedal is most often a sign of problems with the throttle cable. The problem may lie in the fact that the throttle cable is incorrectly adjusted, its tension has weakened, in addition, the throttle cable may have stretched or completely failed and requires immediate replacement. If, when pressing the gas pedal, you feel resistance similar to friction, or pressing the pedal has become hard and not smooth, you need to lubricate the cable.
In this article I will talk about how to adjust the throttle cable, as well as how to lubricate the gas cable on a Lada Priora at home.
How to Diagnose a Throttle Position Sensor Using a Multimeter
- Find the TPS on your car. Since it monitors the position of the throttle valve, look for the sensor on the throttle body.
In the picture below, the red arrow points to this sensor.
For demonstration purposes, I removed the air supply pipe so you can see how the throttle assembly works. This will help you when checking the sensor.
- In older cars, a mechanical lever is used on the throttle body, which is connected to the gas pedal in the cabin via a cable drive (newer cars use an electronic accelerator pedal).
- The throttle body has a plate (circular disc) installed that acts as a door for air to enter the engine.
- When the throttle is closed (the gas pedal is not pressed), the throttle is in a fully closed state.
When the throttle is wide open (the gas pedal is pressed to the floor), the throttle is fully open, allowing maximum air flow into the engine.
- The next step is to ensure conditions for the correct operation of the TPS. To do this, start by disconnecting the electrical connector from the sensor.
Connect the black lead of the multimeter to the negative terminal of the battery and set the meter to DC mode.
Start measuring on one side of the three-wire plug. Turn the ignition key to the ON position, but do not attempt to start the vehicle. One wire should read about 0 volts. Typically this is the leftmost or rightmost pin in the plug.
Measure the voltage at the middle pin where the signal wire is usually connected. It should also display approximately 0 volts.
Connect to the third pin, which should show about 5 volts. This is our reference voltage. If, when connecting to the third contact, you do not see 5 volts on the multimeter, the throttle position sensor is not receiving the required voltage, and this is a sign of a wiring defect on the way to the sensor. Check it for mechanical damage.
It is important to note that as long as there is 5 volts on one contact and approximately 0 volts on the other two, you do not have to worry about the integrity of the wiring. Remember that the signal pin is usually the middle pin in the connector and remember where 5 volts and ground are located
- Connect the wiring connector to the TPS and connect the multimeter probes to the signal and ground contacts using paper clips (see photo below).
- Connect the multimeter's positive (red) lead to the signal wire (middle pin) and the black lead to the ground wire. Set the multimeter to constant current (DCV) mode
With this connection, the multimeter should read approximately 0.9 volts
Exact numbers may vary depending on the car model. Rotate the throttle body lever and notice the voltage change. If you are not comfortable doing this, you can place the multimeter on the windshield with the screen facing the car's interior, sit behind the wheel and press the gas pedal
The result will be similar. If the throttle position sensor is working correctly, you will see a smooth change from the base voltage (in our situation about 0.9 volts) to the maximum value (about 4.47 volts). Turn the lever or slowly press the gas pedal, try to see the voltage “peaks”. Sudden surges or drops in voltage are what interests us. For example, if you press the gas pedal about halfway and the display shows about 2.5 volts, sharp spikes above 4 volts or drops to 1 volt indicate a faulty TPS.
This occurs due to physical wear and tear on the throttle sensor. If you find an area where the voltage jumps every time you pass it (either on the way up or down), this is a sign that the resistor is worn out. Information about this voltage surge is transmitted to the electronic control unit, causing the computer to think that you suddenly pressed or released the gas pedal.
If the TPS check shows that the sensor is faulty, replacing it will not be difficult. As a rule, it is secured with only two bolts. You just need to disconnect the electrical connector, unscrew the mounting bolts, pull out the sensor and install a new one.
Design and principle of operation
The principle of operation of the electronic gas pedal is not very complicated in theory. Essentially, this device works on the principle of a rheostat that monitors the position of the lever. Inside there are track contacts that duplicate each other for greater reliability. Depending on the position of the lever, data is transmitted to the electronic control unit of the ECU, which controls the position of the carburetor damper, opening or closing it. This is done by a small electric motor with a gearbox. Of course, the design of an electronic gas pedal is much more complex than such a simple circuit. It includes many sensors and control mechanisms. They control the fuel supply even when the pedal is in one position, adapting to the slightest change in the vehicle's speed and environmental conditions. Today, there are no problems starting the engine in any season and maintaining its optimal operation, since almost all modern cars have an electronic gas pedal. Thanks to this simple device, the life of car enthusiasts has become much easier.
Design for Russians
I wrote this post not because I discovered something new, just to show what is inside. Of course, the device is already outdated. Many similar structures are equipped not with mechanical brushes, but with a Hall sensor, which operates in a non-contact manner. And we still use contacts - it’s good for Russians!
I drove around, but nothing really changed. True, the speed seems to have become more stable. Most likely, you can’t change anything about this electronic pedal; when it wears out, you’ll have to throw it away and buy a new one.
All the best, I look forward to your questions and advice!
Toyota gas pedal
Toyota Motor Europe has confirmed that it has carried out a comprehensive repair of the gas pedals on 8 Toyota models scheduled for recall in Europe. Toyota engineers have developed and extensively tested a solution that involves strengthening the pedal assembly to eliminate the potential risk of excess friction that can, in rare cases, lead to a stuck pedal. The first shipments of parts needed for this repair will begin arriving in Europe next week.
At the same time, plans are being implemented to communicate with the owners of damaged cars. In addition, Toyota has already implemented an efficient production solution for vehicles sold in Europe. “Toyota is committed to putting the customer first under all circumstances,” said Tadashi Arashima, president and chairman of Toyota Motor Europe. “We understand that the current situation creates problems and we deeply regret this.” We also want to reassure our customers that a potential problem with the gas pedal is very rare. The announced action is a preventive measure to ensure that the highest safety standards are maintained for all customers.”
“We at Toyota are fully committed to safety standards, we know what the problem is and how to solve it, so now we are focused on solving it as quickly as possible. We carry out the necessary checks to ensure that customers do not purchase problematic vehicles in the future,” added Mr. Arashima.
In case the driver feels that the gas pedal is stuck in the partially open throttle position or slowly returns to the idle state, the car can be driven by pressing the brake pedal firmly with constant force. Do not press the brake pedal more than once in a row as this may weaken the brake booster, requiring you to press the brake pedal harder. You must stop the vehicle in a safe place, turn off the engine and contact an authorized Toyota dealer or Toyota Assistance Service for assistance.
has no information about any traffic accidents in Europe caused by this defect in the design of the gas pedal. In addition, this problem is in no way related to the defect in the driver's floor mat, which was previously identified in the United States.
On January 28, Toyota Motor Europe announced a recall of 8 Toyota models in Europe to address a potential problem with the gas pedal. Below is a list of models and their production periods:
AYGO (Feb 2005 - Aug 2009) iQ (Nov 2008 - Nov 2009) Yaris (Nov 2005 - Sep 2009) Auris (Oct 2006 - 5 Jan 2010) Corolla (Oct 2006 - Dec 2009) Verso (Feb 2009 - 5 Jan 2010) Avensis (Nov 2008 – Dec 2009) RAV4 (Nov 2005 – Nov 2009) The exact number of cars is still being determined, but could reach about 1.8 million units. Other Lexus and Toyota models are not included in this group.
How Toyota will repair recalled vehicles
Experts have identified a problem that, in rare cases, can cause the gas pedal to stick when pressed on the recalled vehicles. The problem arises due to the friction mechanism of the gas pedal, which is necessary to ensure its “information content”. This mechanism increases the pressing resistance and makes it smooth and stable. The design of the mechanism includes a slider that rubs against the surrounding surface during normal operation of the pedal. Due to the nature of the materials used, the degree of wear and weather conditions over time, rubbing parts may stick briefly and not work effectively. In some cases, friction may increase so much that the pedal will be slower than normal to return to its original position, or, in rare cases, the pedal may become stuck, leaving the throttle valve partially open.
The solution found by experts is simple and effective. The unit will have a steel reinforcing bar inserted into it, machined with a particularly high precision cutting tool, which will reduce the surface tension between the ram and the surrounding surface. This redesign eliminates excess friction that can cause pedal sticking. Our company's specialists have confirmed the effectiveness of the modified gas pedals by conducting thorough tests of gas pedal assemblies, which previously showed some tendency to stick.
Source
Engine lost power: common causes
- Ignition problems. An ignition timing angle that is too early will mean that the fuel-air mixture is prematurely ignited. As a result, the expanding gases counteract the upward piston rather than pushing it down. Under such conditions, engine power will drop noticeably. The same is true for retarded ignition. Late combustion of the fuel-air mixture leads to the fact that the expanded gases “catch up” with the downward piston, useful energy is wasted. It turns out that in both the first and second cases, the driver intensively presses the gas pedal, fuel is consumed, but the full return from the engine does not occur. Also worth mentioning are problems associated with the vacuum and centrifugal ignition timing regulator. The fact is that malfunctions of these solutions affect the ignition timing and its change in relation to different operating conditions of the internal combustion engine. For example, when the speed increases, the regulator shifts the ignition angle. In other words, the degree of opening of the throttle valve and the increasing speed of the crankshaft at the same speed do not allow the engine to develop full power. On injection engines, a loss of power may be observed after flashing or chip tuning of the ECU in order to save fuel.
- Cylinder-piston group and timing. As mentioned above, loss of engine power is caused by wear of the CPG, failures in timing settings, or accumulation of carbon deposits in the combustion chamber. As for the gas distribution mechanism, improper valve adjustment, coke and carbon deposits can disrupt the normal operation of the valve mechanism. More precisely, the tightness of the combustion chamber is compromised due to the loose fit (adhesion) of the valves to the seats. The fit may be compromised if the valves are too tight. Engine coking also prevents the valve from closing normally. The fact is that the carbon layer prevents normal adhesion. As a result, some gases break through loosely closed valves, causing overheating, burnout of the valve, valve seats, etc. Coke deposits can additionally smolder under the influence of high temperature, causing the effect of uncontrolled ignition of the mixture, that is, glow ignition. All this leads to malfunctions and a decrease in the power of the power unit. As for the CPG, piston ring wear is a common cause of low cylinder compression. As a result, gases break through into the engine crankcase, that is, the energy of fuel combustion is again consumed with great losses. Determining the cause is not particularly difficult. It is enough to remove the crankcase ventilation hose and evaluate the degree of smoke intensity. The presence of strong smoke that pulsates will indicate problems with the rings.
- Filling with fuel-air mixture and mixture composition. Problems with the filling and composition of the fuel charge can reduce engine power even if the engine is in good condition and the ignition is set correctly. The most common cause is a dirty throttle valve or a malfunction of the throttle opening mechanism itself. Let us add that running on a lean mixture will not allow the engine to develop full power. Leaning can be caused by air leaks that occur both at the intake and in the fuel system. Another reason is contamination of the jets on the carburetor or fuel injectors/fuel pump mesh/fuel lines of the injection internal combustion engine. The air intake also deserves special attention. The first step is to check the air filter. Then you should diagnose the fuel system. To begin with, it should be ruled out that the tank is filled with fuel with a low octane number for a particular type of engine. The next step is to check the injectors and their performance, as well as the fuel pump.
Article on the topic: Comparative characteristics of summer tires - what do you need to know when choosing?
Advice
Today, all manufacturers are moving to electronic pedals in one way or another, and you shouldn’t refuse to buy a specific car just because its gas is not controlled by a cable. Just keep in mind that electronic throttle control will delay engine response. You must always keep this delay in mind and press or release the gas a little earlier than required (it is clear that this is not always possible). Only the car manufacturer can influence the delay time by changing the algorithms for operating the gas pedal, or by installing faster hardware in the engine control unit.
WE RECOMMEND ALSO READ:
The main “miscalculations” of VAZ
Of course, no matter how much VAZ praises e-gas, this mechanism also has serious drawbacks. For example, if it fails, this device cannot be repaired. A complete replacement will be required, which will be very expensive. Although today there are “traditional craftsmen” who have adapted to repair the device themselves, this is not always effective - driving with such e-gas is even dangerous.
As for the responsiveness of the car, not everything is clear here either. Many motorists claim that the old Kalinas were much easier to pedal and responded better to pressure. E-gas responds to them with a delay, and this can become a critical problem, especially if you need to quickly avoid a collision or simply quickly overtake.
Thus, the famous e-gas Lada Kalina is not a panacea for poor car handling, but rather another unfinished system in the car that engineers will have to improve.
Diagnostics
Most often, drivers complain about the following problems with electronic gas:
- The speed fluctuates (standby mode);
- The engine does not respond to gas (emergency operation);
- Pedal play.
If in the latter case the malfunction may be purely mechanical, then in the first two there is clearly a problem with the electronics. In this case, the initial diagnosis of the electronic gas pedal can be carried out independently, but for this it must first be dismantled:
- Disconnect the block with wires;
- Using a “10” wrench, unscrew the three nuts securing the pedal;
- Remove the pedal.
To check the condition of the moving contacts and conductive paths of the gas pedal position sensors:
- Using a multimeter in ohmmeter mode, check the resistance between contacts “4” and “2”. Slowly move the gas pedal, at this time the resistance should change smoothly.
- We also check the resistance between contacts “4” and “3”.
- To check the conductive paths of another sensor, we measure the resistance between two other pairs of contacts: “1” and “6”, as well as “6” and “5”.
If there is an abrupt change in resistance on any of the pair of contacts described above, we can say with confidence that the E-gas pedal is faulty. It will need to be replaced as a whole with a new one.
Other articles on diagnosing faults on the Lada Granta.
Body problems on the Lada Granta Installing an armrest from Alamara on the Lada Granta Removing the fender liners on the Lada Granta Removing the door of the Lada Granta and Lada Kalina Gearbox Lada Granta
Replacing the fuel filter on Lada Granta
Principle of operation
The electronic gas pedal design involves transmitting a signal through built-in sensors to the control unit. This allows you to regulate the supply of air mixture to the engine compartments, which, accordingly, directly affects the speed of the vehicle.
How the electronic gas pedal works:
There are sensors on the accelerator pedal. They transmit information about the angle of pressure to the car's ECU. The control unit instantly analyzes the received data and makes a decision about the need to open the throttle valve to the required amount. The need to change this value is also accepted automatically
This is important when choosing a comfortable operating mode for the engine.
It is the possibility of automatic adjustment that often confuses experienced drivers. Driving a car is not 100% dependent on driving skills, which presents certain difficulties. With some practical experience, this drawback is quickly smoothed out, but at the beginning of “acquaintance” with the electronic pedal it represents a noticeable inconvenience.
Cleaning the remote control
If the cause of unstable engine operation is a dirty damper, you should move on to cleaning it. To do this, you can contact a reliable service station. Among the large number of workshops, you can find one that specializes in specific brands (Audi, Volkswagen, Toyota, Mercedes and others). However, the owner can do all the work himself, since much experience and skills are not required in this matter.
At service stations, the cost of the procedure may depend on a number of factors:
- complexity of the work - for some cars, access to the remote control will require the dismantling of many parts;
- service station service level - as a rule, the larger the organization, the more expensive it is;
- location – in large cities you can leave more money than in the periphery.
Cleaning the throttle valve is a simple procedure, after which you usually need to think about how to adapt the throttle valve on a Nissan or any other car.
Any car owner can perform this procedure independently. No special knowledge or skills are required here. All you need to get to the damper are tools and rags (preferably soft ones). You also cannot do without a special product - mainly the carburetor cleaner “Carb Cleaner” is used.
The car pulls to the side
It is clear that not only the brakes can be to blame for a car drifting off course - the wheel alignment angles, the wheels themselves, and the steering can also be to blame. However, quite often questions arise specifically about the brakes, especially if the car pulls sideways when braking. Most often, jammed pistons in the cylinders of one of the circuits are to blame. It is possible that the wheel may brake due to the loosening of the bolts securing the pad guide to the steering knuckle, as well as the pads getting oily or getting brake fluid on them.
Perhaps an ice or salt crust has formed on the surface of the pads, or the pads are simply wet. Or one of the circuits of the brake system does not work - the pedal is low and the braking efficiency is low. Brake disc runout, wheel bearing wear, and brake drum out-of-roundness may also be to blame.
Very hard pedal
The pedal is tight, the stroke is short when pressed... When braking, the car loses directional stability, trying to go to the side. Most often this happens when the caliper cylinders jam in one of the system circuits. If the car does not skid anywhere, and the trouble is expressed only in a sharply increased force when braking, the vacuum brake booster or the vacuum supply hose may be to blame.
Sometimes increased pedal effort is caused by the use of low-quality brake pads, as well as excessive contamination and oiling of both the pads themselves and the surfaces of the discs or drums. But this happens quite rarely.
It is also possible that the brake pads may completely wear out or break. It happens that an ice or salt crust forms on the surface of the disks. It is also possible that the brake pad linings are of poor quality, as well as severe corrosion of the brake disc (often more on the inside).
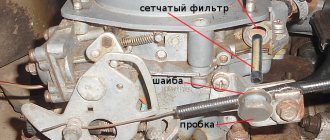
Adjusting old-style E-gas
Disconnect the negative terminal of the battery.
Use a screwdriver to loosen the screw, remove the clamp and rubber air duct from the throttle body.
Use a 10mm wrench to loosen the cable lock nut on the sector.
From the side of sector 3 of the throttle valve, you need to pull out cable 1 until it stops. The upper lever 5 of the accelerator pedal should rest against the buffer 4 on the bracket. Tighten nut 2 securing the cable to the sector.
Loosen the tightening of nut “A” and move the limiter “B” of the pedal lever until it stops in the pedal bracket. Tighten nut “A”.
If we fully press the gas pedal, the throttle should be fully open, and the lower lever of the pedal should rest against the mat
After adjusting, tighten nuts 2.
Read more: The brake pedal has become hard or soft: the main reasons
If necessary, repeat the adjustment. Once the adjustment is complete, replace the air duct.
- The adjustment is carried out using a clamping bracket, which we previously removed. This bracket is a tensioner for the casing in which the cable moves.
- Remove the bracket and tighten the throttle cable so that it sags about 1-2 mm near the throttle drive.
- Now you need to install the fixing bracket into place in the casing. Make sure that the cable is tensioned optimally and that the gas pedal is not open at zero position. A cable that is too tight will cause constant high voltage. Squeeze the gas pedal several times and check how everything works.
- Start the engine and make sure the throttle cable is adjusted correctly and the idle speed is normal.
The block cover (11183-1108500) is fixed with bolts that are inserted into oval holes. The improvement is this. to loosen the 4 screws and turn the cover in the desired direction:
- Economy mode (counterclockwise). To drive smoothly, to accelerate, you should press the pedal a little more than before. Gasoline consumption is reduced;
- Active mode (clockwise). The car reacts even with slight pressure on the gas pedal. Gasoline consumption increases. The pedal becomes more sensitive and informative.
In other words, we get the same effect as after installing JETTER (Jetter or spur).
If necessary, you can easily return to the original position (mark it in advance).
Feedback on the E-Gas modification
Car enthusiasts who have already completed the adjustment note that if you move the pedal assembly cover clockwise, the car becomes a little more lively. If you press the pedal as before and the car starts to move, you have to get used to it and not press the gas so hard. When you press the pedal to the floor, you can't feel the difference.
Those who adjusted the E-gas for a quieter ride noticed that driving on the highway became more comfortable. Now, to maintain speed, you need to press the gas pedal a little harder, which allows your leg to not be as tense as before.
Other motorists do not believe in the positive effect, saying that it is all self-hypnosis. The operation of the electronic gas pedal is based on changing the resistance difference. And even if you move the cover, when the engine starts, the ECU will still consider it to be zero and adjust the throttle from this point. And if you increase the sector stroke, the E-gas error “signal outside the permissible limits!” will appear.
Have you encountered such modification of E-gas? What feedback can you leave about such adjustments? Is there a positive effect or is it all at the level of self-hypnosis? Let us remind you that if necessary, you can check the E-gas yourself. By the way, an alternative to modifying the electronic gas pedal is chip tuning.
Photo: Rivo in-flight magazine and LADA VESTA group in OK
Keywords: granta fret pedals | Lada Priora pedals | fret Kalina pedals | 4x4 pedals | fret vesta pedals | pedals lada xray | fret largus pedals | Lada Granta engine | Lada Priora engine | Lada Kalina engine | 4x4 engine | Lada Vesta engine | Lada Largus engine | lada xray engine | Niva pedals | Niva engine | universal article
0 0 0 0 0 0
Share on social networks:
How to check E-gas
If you have doubts about the performance of the product itself, you should dismantle and check the unit using a multimeter.
Main symptoms of a malfunction:
- “Chek” lighted up on the dashboard (error 0504 during diagnostics);
- when you press the gas pedal, the responsiveness disappeared;
- increased engine speed is diagnosed when changing gearbox speeds.
If we talk about the causes of malfunctions, the most common of them are:
- failure of one or both MPG sensors;
- malfunction of sensors as a result of oxidation of contact tracks, their contamination.
As mentioned earlier, in order to check E-gas grants, you need to use a multimeter. To carry out diagnostic measurements of electrical circuits, the module must be dismantled by first disconnecting it from the contact chip.
After that, you need to switch the operating position of the measuring device to ohmmeter mode. The point of the test is that it is necessary to alternately measure the condition of the contacts and conductive paths of the MPG sensors. For example: connect one probe of the device to contact No. 2, and the other to No. 4. While keeping both probes attached, slowly step on the gas pedal and observe the readings on the meter. A normal reaction is considered to be a smooth decrease in electrical resistance when pressing the accelerator. An abrupt, unstable decrease indicates a possible sensor malfunction. A similar sequence of actions is taken for the remaining contacts.
Replacing the idle speed sensor (video)
Dismantling the IAC
- First of all, before starting the replacement, turn off the engine and open the hood.
- The regulator itself is located on the throttle body, slightly lower than the damper position sensor.
- This photo shows how to find it visually by simply looking a little further under the hood.
The idle speed control is marked with a red marker.
Next, remove the wire block by first unhooking the latch from its body. And then unscrew the two bolts using a regular Phillips screwdriver
(Please note that you should choose a screwdriver with a short blade, otherwise it may simply not fit in a limited space).. Remove the unscrewed screws in a safe place
We put the unscrewed screws in a safe place.
When the bolts are unscrewed, we simply pull the regulator body towards us, and it calmly gives in.
IAC inspection
Now that the device has been dismantled, you can easily determine and decide whether to replace the sensor with a new one or start cleaning it. If there is carbon deposits on the regulator, but there is no mechanical damage, no parts are falling off its body, and its condition inspires confidence in you, then you can easily simply clean it. For this we only need carburetor cleaner and a clean rag. Using it, fill all the holes and niches, clean everything with a rag and let it dry for a certain time.
This is what a “dirty” IAC may look like.
And so after cleaning.
If the IAC has damage to the working mechanism, then it will only have to be replaced with a new one. The catalog number of the factory idle air regulator is 2112-1148300-04. Of course, there are analogues, but you should go to the store with a previously removed spare part.
IAC assembly
After the device has been cleaned or replaced with a new one, we reassemble it in the same manner as removal. Do not forget to connect the wiring harness to it and check that it is securely secured.
Replacing the gas pedal on Grant
The replacement procedure is quite simple and does not require special technical means. In order to dismantle the unit you will need: - A key for 10.
Sequential steps to replace the gas pedal of a Lada Granta:
1. The first step is to remove the negative terminal from the battery. 2. Next, you need to move to the driver’s side of the car. 3. Above the gas pedal, find and disconnect the contact chip that is connected to the sensor connector.
4. After that, take a 10mm wrench and unscrew the three fastening nuts. When there is insufficient internal space, it is most convenient to use a socket wrench.
5. Remove the pedal from the special mounting pins. Reinstallation is carried out in a mirror sequence.
Causes of the phenomenon
Drop in speed and failure of the gas pedal
There are few reasons for the phenomenon of “failure” when pressing the gas pedal. It often appears after unsuccessful engine chip tuning and is accompanied by an increase in fuel consumption, but there are other problems directly with injection. So, let’s look at the main reasons for the “failure” effect:
- Injectors. The fuel distribution system directly affects engine performance.
Identifying and eliminating ECU errors
Condition of the candles. On the left the mixture is too rich, on the right it is too lean.
These are all the main reasons that can lead to gas pedal failure.
Dips during acceleration
Once the causes are considered, we can consider how to deal with the problem. So, let’s describe step by step what needs to be done when the gas pedal has dips during acceleration:
- The first step is to check the spark plugs. The appearance of carbon deposits or spark plugs that are too clean indicate that the mixture is not adjusted correctly. It is worth adjusting the correct amount of fuel mixture.
- Ignition wires can also cause the vehicle to malfunction.
- A clogged throttle can lead to failures during acceleration.
- The condition of the air filter affects the formation of the mixture, so it is worth changing it on time.
Air filter clogged
Dirty fuel filter
Dirty fuel filter
- ECU errors can also lead to accelerator failures.
- The last reason is clogged injectors. They need to carry out diagnostics, check functionality, and also clean and replace faulty elements.
Thus, the causes of failures during overclocking have been identified and can be eliminated.
Gas leaks at idle
At idle, there are fewer reasons for failures, but they will have to be eliminated, since the car simply will not start normally, or stall after starting the engine. So, let's look at the work plan step by step:
- Checking the spark plugs. If the element fails, it is necessary to replace it.
Attention! It is recommended to change all four spark plugs to ensure smooth engine operation. Before installation, you should adjust the gap using a feeler gauge, which should be 1 mm for 92 gasoline
Checking and adjusting the spark plug gap using a feeler gauge
- We change the fuel filter, it is located under the bottom of the tank, and also carry out diagnostics on the fuel pump. If malfunctions are identified, they should be eliminated.
Clogged filter in the gasoline pump
All these reasons can cause dips to appear at idle (more precisely, when switching from idle to driving mode).
Symptoms of a faulty electronic throttle
Like any other part of the car, the throttle control system can also be subject to damage and wear.
There are signs and symptoms to watch out for to protect your vehicle from further damage.
- The car may have jerks and dips during acceleration, and it may jerk when accelerating. Possible misfires. If you notice any of these symptoms or rough shifting, there may be a problem with the electronic throttle.
- Problems with the electronic throttle control can cause problems when shifting gears. This could be a sticky feeling or slow shifting between gears. There may be a problem with getting out of a certain gear, as if it is stuck.
- Another sign of an ED malfunction is problems with displaying power characteristics. This means that the car will display incorrect data or data that is not possible in the current situation.
- The engine may stall for no apparent reason. This could be a sign of a serious problem and could even cause engine damage, so this problem needs to be fixed as soon as possible.
- An additional sign that may indicate you need to have your E-Gas checked is if you experience rapid and unintentional increases in speed while driving. This is a big safety concern because it can happen when you are behind another car or on a turn.
- The Check Engine light may be on on the dashboard. This is a sign of some kind of malfunction detected by the ECU. You can find out the error and the cause of the malfunction using a diagnostic scanner or an ELM327 adapter with the Torque program.
- The final symptom of a faulty electronic throttle control is a sharp increase in fuel consumption. If you realize that you cannot drive as many kilometers on the same amount of fuel as before, this is a clear sign that you need to have your car diagnosed.
Diagnostics
Most often, drivers complain about the following problems with electronic gas:
- The speed fluctuates (standby mode);
- The engine does not respond to gas (emergency operation);
- Pedal play.
If in the latter case the malfunction may be purely mechanical, then in the first two there is clearly a problem with the electronics. In this case, the initial diagnosis of the electronic gas pedal can be carried out independently, but for this it must first be dismantled:
- Disconnect the block with wires;
- Using a “10” wrench, unscrew the three nuts securing the pedal;
- Remove the pedal.
To check the condition of the moving contacts and conductive paths of the gas pedal position sensors:
- Using a multimeter in ohmmeter mode, check the resistance between contacts “4” and “2”. Slowly move the gas pedal, at this time the resistance should change smoothly.
- We also check the resistance between contacts “4” and “3”.
- To check the conductive paths of another sensor, we measure the resistance between two other pairs of contacts: “1” and “6”, as well as “6” and “5”.
If there is an abrupt change in resistance on any of the pair of contacts described above, we can say with confidence that the E-gas pedal is faulty. It will need to be replaced as a whole with a new one.
Expert answer
The following two tabs change content below.
About the expert:
Lada expert An expert on Lada cars with many years of experience. I own a Lada Granta car, I collect cramps based on the Priora. Sometimes I stay overnight in the garage. My wife is more jealous of cars than of women.
I can assume that due to power surges, the engine control system “glitched” and went into emergency mode. It’s a pity that we didn’t look at the error code, but most likely the error was: “Low signal level of the gas pedal sensor.”
In this case, you did everything right. We found a box in which it does not rain and removed the battery.
>
Removing a battery terminal in heavy rain is dangerous; the battery may short out and explode! Yes, this is not a joke, batteries explode!
If you have a similar situation when the engine does not respond to the gas pedal and an error appears on the instrument panel screen, then try the following:
- turn on the ignition and sharply press the gas pedal all the way several times.
Press the gas pedal all the way down - Start the car, if it idles steadily, then again sharply press the gas pedal all the way.
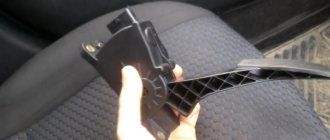
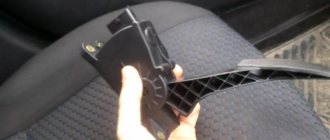
- Next to the pedal there is a so-called “frog” - this is the contact block with the wires. Move it, take it off and put it on again (just before doing this, remove the terminal from the battery).
- The brake pedal frog could also be stuck. This is easy to check; if this happens, the rear brake lights should be on. The brake pedal may also squeak when driving. This is what the brake pedal frog looks like
Detailed video about removing the frog pedal
If all else fails, then you need to contact the dealer or an experienced diagnostician. Most likely, your ECU (electronic control unit of the car) has been flooded with water, or a short hole has appeared in the area from the pedal assembly to the rear dimensions. Or the electronic gas pedal could even break down.
More about that!
One of the symptoms of a faulty frog (pedal limit switch) is failures during acceleration, but failures can also be caused by a clogged fuel filter.
>
In connection with the introduction of European exhaust emission standards, at the beginning of 2011, the AvtoVAZ concern began equipping Lada cars with the E-gas system. Subsequently, the manufacturer provided Grant with an electronic gas pedal.
The general meaning of the operation of the electronic system is that by moving the gas selector pedal, special sensors are activated, which are located in the gas pedal module (hereinafter referred to as MPG). With each change in the force exerted on the MG, the resistance of the sensors also changes. After which an electrical signal is generated, which enters the ECU, is read, processed, and depending on the degree of pressing and the results of processing, the final operation of the throttle valve is regulated.
Signs of engine tripping
Regardless of the reasons, engine tripping is associated with the presence of various problems, which can be solved after finding out what caused the stoppage of one of the cylinders of the internal combustion engine.
The main signs of engine tripping include
Signs
1 uneven idle speed, as well as shaking of the engine
2 darkening of one of the spark plugs
3 change in exhaust sound
4 weak acceleration dynamics of Priors at any speed
5 increase in fuel consumption
6 floating revolutions, displayed on the tachometer by jerking the arrow
7 jerks when accelerating or moving
Auto mechanics identify several reasons why jerking occurs and the engine begins to stall. The main ones are: incorrect ignition timing, faulty spark plugs and installed condenser, broken piston rings, piston and valve burnout, rocker wear, clogged air filter, and others.
The cause of the jerking must be sought in the cylinders
To reduce the search for the cause of engine tripping, it is recommended to determine which cylinders are not working correctly or have stopped functioning. To do this, you will need to remove the high-voltage wire from the spark plugs one by one.
This procedure must be performed carefully, as there is a risk of electric shock. Before performing this work, you will need to place a dielectric base in the form of rubber or wood under your feet.
It is recommended to remove by the wire. Then the engine speed increases to 1500 rpm. The valves are removed from the cylinders one by one. If the sound of the vehicle changes when removed, then the cylinder is working correctly. Otherwise, it must be replaced.
conclusions
The main cause of failures are spark plugs, but they are not the only ones that influence the appearance of this effect. Some car enthusiasts may not be able to cope with the occurrence of such malfunctions on their own, and it is necessary to go to a car service center, where they will carry out high-quality diagnostics and also fix the problem. But it is worth considering that you will have to be generous, since neither computer diagnostics nor repairs will cost a penny.
The brakes, of course, were invented by cowards - any reckless driver will tell you that. But when you realize that there is “something wrong” with them, it becomes scary to get behind the wheel: the trip may be your last. We drive thoughts like “it will do” away: the jokes are over
It is important to determine the type of malfunction - at least in advance