We continue to study the capabilities of cars from AvtoVAZ. The topic will be simple - how to set the clock in Lada Vesta. I recently found out that it turns out that they can be configured by time zone. But I couldn’t find information about this anywhere – neither in videos nor on websites. Everything shows only about manual time setting.
I recommend setting the time zone settings so that the time is shown more accurately. And it’s easier and faster to set up. This is done using the on-board computer control buttons.
I'll tell you which buttons to press:
- Press and hold the top key. The numbers on the instrument panel will begin to flash.
- Click it again and go to this menu.
- This means that time synchronization across time zones is disabled. To turn it on, press and hold the top button again. Instead of “OFF”, “ON” will appear.
- Press the top key again. The time zone addition setting icon will appear and the clock will blink. If synchronization had not been enabled, this step would have shown setting the hours and minutes.
- To install your specific belt, press the top button again and install it.
- Now hold down the top key and the clock will blink again.
To exit the setup menu, press the bottom button. The result will be the correct local time. In my opinion, setting the clock in Lada Vesta this way is much more convenient; you don’t need to count the minutes.
If someone finds it unclear, write, ask questions, and we’ll figure it out together. I think that the review will be useful to many.
LadaOnline 68 662
The Vesta instrument cluster has a built-in trip computer (MK), which has a number of useful functions that are not found in the on-board computers (BC) of many cars (including those of competitors). For example, you can find out the voltage of the on-board network or the speed limiter. Read the instructions for using the bookmaker.
Setting the clock (time display)
General information
1. In Lada Vesta, the clock is located (can be displayed) both on the display of the on-board computer (instrument panel), and the radio (radio), or the screen of the multimedia system.
2. The time can be set either manually or synchronized automatically: on the on-board computer via the GLONASS system, in the radio - via RDS (radio station), in the multimedia system - via GPS signals.
3. If automatic synchronization is enabled, then you need to set the time zone (except for settings in the radio).
4. Manual, precise time adjustment is possible only when synchronization is disabled.
Question: Why does the clock keep getting lost and showing the wrong time? — due to enabled synchronization (see points 3 and 4 above)
Note: To configure the permanent display of the clock on the Lada Enjoy Pro MMC screensaver, see here
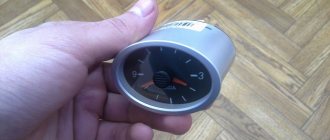
SETTING THE CLOCK (TIME) ON THE BOARD COMPUTER DISPLAY
Note: for a complete description of how to control information display modes on the on-board computer screen, see here
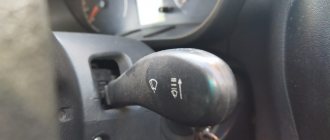
Settings are controlled on the right steering column switch using buttons 1 and 2 . The buttons can be pressed briefly or for a long time.
Initial state (example):
Long press key 1 to enter settings mode. The mileage mode will blink on the left side of the display:
Next, perform one short press on the same button 1 . This is the mode to enable/disable time synchronization (UTC SYNC):
“on” — enabled “oFF” — disabled
Switching between “on” and “oFF” is carried out by long pressing the button 1.
(If the setup is complete, then briefly press the button once to exit 2.)
If, after turning on time synchronization, you need to set the time zone , then after “on” lights up, briefly press button 1 . In this mode, the clock icon blinks and the current time zone is displayed on the right.
A long press on button 1 turns on the editing mode (the time zone digit will start flashing simultaneously with the clock icon). Decrease or increase the time zone value by briefly pressing buttons 1 and 2 . After setting the desired value, long press button 1 - this will save the setting. Then briefly press button 2 to exit the settings completely.
If you have turned off synchronization and want to set the time manually , then while in the “oFF” (off) mode, briefly press button 1 to enter the time setting mode:
To move between tens, units of hours and minutes, long press the button 1.
watch
minutes
To increase or decrease values, briefly press buttons 1 and 2 . To save and exit the settings, after the minute units editing mode (Fig. above), a long press of button 1 will return the display to the initial settings mode:
A further short press of button 2 will return the display to its original state
Note: if you do not press any buttons for a minute in the settings mode, the display will return to its original state automatically.
SETTING THE TIME ON THE OLD TYPE MMS (with the CityGuide navigator)
In order for the clock in MMS to correctly display the current time, you first need to decide in which mode the clock will operate: either manual settings or GPS synchronization. If the settings are manual, then synchronization must be disabled. (see below)
Enabling/disabling synchronization and setting the clock
In order to enable/disable automatic time synchronization, it must be enabled/disabled both in the main settings of the multimedia system and in the settings of the CityGuide navigator:
Go to Menu → Miscellaneous → Settings
Next, select System → Time ...
Next, check or uncheck the box next to “Install by GPS”
If you enabled this feature, then immediately set your time zone.
Click the Time to save the settings.
Exit Navigator to the MMS main menu.
Click the Settings
Next is the General Settings
Then enable/disable synchronization (indicated by the arrow below)
If you have disabled synchronization, then adjust the time (circled) using the left-right arrows.
SETTING THE TIME ON THE RADIO (RADIO)
To start setting the time, you need to enable/disable RDS CT time synchronization (i.e. via VHF channels of the radio station).
Press and hold the encoder (large main button) while in the main window (playback window)
You will be entered into system settings. Rotate the encoder knob to select the RDS CT
Turning RDS CT on and off occurs by briefly pressing the encoder.
Now, if you have disabled synchronization, rotate the encoder knob until the SET TIME
Select this parameter by briefly pressing the encoder. The hours and minutes setting will open.
Rotate the knob to set the hours, and with a short press, change the setting to minutes and their value. Return to the main screen by briefly pressing the DSP button and check that the time is displayed correctly.
Note: If you do not press anything for a long time during the settings, the settings will exit automatically
Video
Source
How to set the time on the Priora on the dashboard
The clock in the Priora or how to set the clock in the on-board computer and on the dashboard. Our set includes two pairs of watches. While we rarely use the onboard ones, we use the clocks located on the dashboard very often.
How to set the clock on a dashboard?
— Everything is very simple, there is a single button that allows you to switch arrows. If you go a little overboard, you'll have to do another round. By holding the button, the clock hands increase the speed.
How to set the clock on the Priora on-board computer?
We find the clock, press reset, switch to the time we need, press reset again to activate the clock. profit
Yes, this video may seem banal, but for the first time we spent a lot of time figuring it out. Good luck to all.
The topic will be quite simple, but at the same time, not every car owner knows how to set the clock on their Priora. This is done quite simply and it will take a maximum of a couple of minutes to complete such a procedure. Below we will consider the procedure for a car with an old-style instrument cluster, that is, the first releases up to 2012.
Setting the clock on the standard on-board computer of the Lada Priora
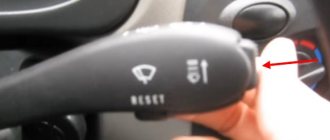
- First of all, using the button at the end of the right steering column switch, select the “current time” item on the instrument panel display.
- Next, you need to press and hold the “Reset” button, which is located at the bottom of the switch until the readings (time) on the dashboard begin to blink.
- Now, using the buttons that were described in the first paragraph, we set the current time.
- By pressing the upper key we adjust the minutes, and the lower key – the hours.
- After setting the required data, you can exit this menu item by clicking on the “Reset” button.
As you can see, everything is banal and simple, and to explain some points it’s worth taking a couple of photos.
If this process is not clear to anyone from my description, then a video from my YouTube channel will be embedded below specifically for this purpose.
Video on setting the clock on the Priora instrument cluster
The review was prepared using the example of the dashboard of the Kalina car, but there is absolutely no difference between them with regards to this function.
Below you can leave comments or ask your questions if you have any questions on this topic.
Make your life easier and brighter
Tricks of Life
Make your life easier and brighter
Add or remove custom text here.
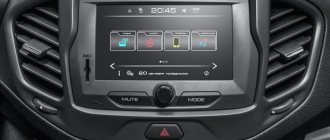
Lada Vesta setting the clock on the radio
Almost all modern cars come from the factory with multimedia systems with a display that are multifunctional and easy to use. You can additionally connect a rear view camera to such MMCs, watch videos, and use the navigation system. In simple configurations, such an option is most often absent, so the standard Lada Vesta radio comes without a display. However, for comfortable listening to music and radio it will be quite enough.
The radio is located in the center of the front panel and fits harmoniously into the overall design of the cabin. Even the radio itself is made using an X-ray design, as evidenced by the X-shaped aluminum-look inserts around the RADIO and AUDIO buttons. I'm glad that the designers worked on even such minor details.
Comments
Sergey thank you very much
Please tell me, RDS CT OFF the clock still disappears?
@Sergey Stigankov Thank you, otherwise I misunderstood you. It’s certainly not convenient that they disappear.
rds is if there are problems with time, they do not show correctly when you press the DISP button. The clock should always disappear when the radio is turned on; if you need to see the time, press the DISP button, the clock is displayed for a couple of seconds and back. The clock is displayed when the radio is in standby mode, essentially turned off.
Thank you very much Sergey!
Tell me, my radio won’t turn on. not from the power button and not from the button in the center which is round. What's happened ?
The radio is turned on by the RADIO button and you can press it several times to switch between FM1, FM2, AM,
To save a station to a button, find the desired station and press the button number, say 1, and hold for 5 seconds, the frequency will be assigned to the 1st button
Sergey, thanks for the video. But I didn't succeed with the phone book. I do not see her. It is entered manually or automatically. Whereas? Thank you.
no longer relevant, but still. The phone book is taken from the phone, and you need to give permission to access the device when you connect the radio to the phone, but it seems to me that this radio does not know how to use it.
Main functions and capabilities of the Lada Vesta head unit
Firstly, the radio tape recorder 100% fulfills its purpose - it plays music files and radio. Music can be listened to via AUX, SD card or via USB devices that can be connected as a file drive. You can also connect the radio via Bluetooth to your phone and play music on your car speakers.
Secondly, the radio displays the time on a monochrome display.
Thirdly, it has a Hands free function.
As you can see, the radio has all the necessary functions for comfortable listening to sound.
Powerful audio player
SinglePlayer is a powerful audio player for consoles running WINCE 6.0. Made for an alternative shell for SingleMenu and NewMenu.
Using an audio player will make the sound more interesting (there is an equalizer). The player also has an Internet radio (an access point can be made using a smartphone). You can also listen to radio stations on your smartphone and transmit them to MMS via bluetooth.
All player features:
- High performance and speed - Finger-oriented - Powerful design engine, allows you to create any skins - 13-band equalizer. Fine-tuning equalizer parameters. - Effects: reverb, echo, horror, flanger, tempo, pitch, compressor, distortion, phaser, freeverb, autowah.
Fine-tuning effects. - Filters: high, low, bandpass, peakingEQ, notch. Fine-tuning filters. - Anti-banner corrector - Full playlist (adding, moving, sorting, deleting from disk, playing, navigation, cleaning)
– Search for tracks, allows you to search for tracks in the current or all playlists, in titles and tags. - Built-in keyboard, supports up to 10 layouts. - Play queue, allows you to create a list of tracks that will play regardless of the playlist.
– Supports multiple playlists, up to 20- Supports id3v1, id3v2, vorbis(flac) tags- Rewinding tracks- Favorite tracks in a playlist- Favorite tracks in a separate folder- Switching playback of tracks by album- Multiple selection of catalogs and tracks to add to a playlist- Saving positions and track numbers for each playlist and automatic playback when switching to the desired playlist - Swipe through the explorer and playlist - Search for USB drives and quickly play their contents - Play mp3, flac, wav, ogg, aiff, m4a (aac, alac) formats
, mpc - Displaying the album cover and Internet radio logo in the screensaver/player - Adding one track, directory, subdirectories to the playlist. - Sorting the playlist using the quick sort method - Saving the track position when exiting - Playing tracks scattered, in a row, one track.
– Playing playlists scattered or one by one.- Removing a track immediately from the disk – Internet radio- Smooth sound fading when you stop playback and increasing when playback starts- Fast and convenient navigation through the file system, displaying files and folders in a grid or list- Playing tracks according to the set genre in the equalizer.
The genre is read from the tags and if it matches the current equalizer style, it is played. - Automatic adjustment of the equalizer to the track genre - Output of visualization, in the form of a Spectrum, in the splash screen and the main window of the player - Support for skins (set via the menu) - Display of processor load - Broadcasting and receiving control messages
How it looks on the MMC Lada Vesta (photo by Sardar-Kerimov):
Control elements for the standard Lada Vesta radio
In the usual place for everyone - in the upper left corner of the radio there is a button to turn the radio on and off.
To the right of it there is a microphone for communication when the Hands free function is turned on, as well as a Reset button to reset the device settings. Even further to the right is a monochrome display that serves to display various information – track name, radio station and its frequency, time, etc. In general, here is everything that we are used to seeing and expecting from the radio display.
To the right of the radio there is an SD card slot and a DISP clock display key.
In the bottom row we can see the buttons:
MUTE – mute the sound Green and red tubes – accept and reject calls, SCAN – multifunction key.
A little lower we see the RADIO and AUDIO keys, which perform the functions of switching playback modes - either radio or audio from a storage medium.
In the very center of the radio there is a puck for scrolling through various functions, but most often it is used to increase or decrease the volume.
Below are keys with numbers from 1 to 6. These are used to quickly navigate to saved radio stations. In addition, in audio mode they can be used for other purposes. So, for example, key 1 can scroll through folders on a flash card.
Let us dwell on the main characteristics and management features
The manufacturer has allocated a traditional seat for the head unit - on the center console of the Lada Vesta.
The device has the following list of controls:
- button to switch to radio mode and return to playback from the “RADIO/AUDIO” media;
- monochrome screen;
- buttons that allow you to move to the next track in the recording tracks (forward and backward);
- “MUTE” key, which provides instant mute;
- “SCAN” option, capable of combining several functional modes simultaneously;
- the “DISP” element, through which the clock is displayed;
- keys numbered “1” to “6”, which allow you to quickly turn on a memorized station in radio program mode;
- multifunctional washer;
- “Hands free” option, which is an indispensable assistant during telephone switching;
- the “RESET” function, which is responsible for resetting the current set of settings and rebooting the local system;
- microphone and connector for SD card integration;
- ability to connect with external sources via an AUX connector;
- A progressive USB connector that allows you to easily connect with cutting-edge mobile devices.
Interesting! The car radio in the LADA Vesta car has a fairly powerful battery, which allows you to save the entire list of settings for a 10-day period when the main energy source (battery) is turned off.
Head unit Lada Vesta price
It happens that the installed radio tape recorder breaks down, so you urgently need to find out the price of this product. The price of a standard Lada Vesta radio is approximately 13-35 thousand rubles. Now you are probably thinking, why is there such a difference in cost? Let me try to explain to you.
The fact is that this device is produced under the ITELMA brand. You should know this brand by the E-GAZ system, which is installed on AvtoVAZ, as well as by a number of ECUs that are installed on Lada cars. Now let's get back to the essence of our conversation. The original article number for the standard radio is 8450007949.
If you order goods online, you can find this radio under this article number. But the manufacturers will be different. If it is ITELMA, then the price will be 12-14 thousand rubles. And if LADA is already 34-36 thousand. Although there will be the same product inside the box. Such are the things. A small life hack on how to buy an original Lada Vesta head unit at a discount.
Auxiliary equipment
If the Lada Vesta is not equipped with a BC, it can be purchased and connected at one of the service centers, where it will be configured. All options will be supported. However, some models have a function for displaying error codes.
The cost of BC for Lada Vesta varies from 5 to 10 thousand rubles. The price will depend on the manufacturer and build quality.
The BC has become an indispensable device in cars in our time.
It monitors and corrects a number of important indicators, which include speed or fuel consumption, and also diagnoses the car for faults.
Buy a Lada Vesta head unit
You can purchase a standard Lada Vesta radio either from an official dealer or by visiting any car dealership. Or you can use third-party auto stores. We recommend shopping online. To search, you can use article number 8450007949. Shopping on the Internet allows you to save from 10 to 40% of the cost of the product. In terms of money, the savings will be very good.
If you want to save even more, then you can resort to searching for a radio on specialized forums or message boards such as Avito.ru. In this way you can save an impressive amount. In our case, the factory radio is most often sold because it is not needed. Many car owners change it to a more advanced one in order to get better sound quality from the audio system. Let's try to find some good deals.
Replacing the Lada Vesta head unit
If the standard Lada Vesta radio does not suit you for some reason, then you can always replace it. Fortunately, now you can find anything on sale. The simplest option would be to install a multimedia system from more expensive models, and in particular the DVM 2117 iQ Multimedia Center with Navitel software is suitable. It can be ordered from officials at a price of about 35 thousand rubles. Or find it on the same Avito. You can also use article number 99999021174700 and order this system in the online store. In the last two cases, you will be able to save a lot.
But, unfortunately, not everyone can or wants to spend 30-35 thousand rubles on MMS. For those who want to save money but get the full functionality of the Lada Vesta multimedia system, there is a way out. You can install almost any 2DIN radio on a Lada Vesta car. To do this, you only need to purchase a special frame, which can also be found in specialized online stores. This frame looks like this:
And now we invite you to familiarize yourself with the three best radios in terms of price and quality, which can be easily installed on a Lada Vesta instead of the standard one. So, let's go.
1. AD-UNI707 is a Chinese radio that can be found on AliExpress. Here is the link to the product. Its advantage is that it runs on Android 6.0 OS, has a 7-inch display with a resolution of 1024x600 pixels, and 1 GB of memory. The price of this device is approximately 13 thousand rubles. Plus, this radio tape recorder fits organically into the interior design. How it works - look at the video.
2. MEKEDE MKD is another Chinese radio. It costs about 16 thousand rubles, but is designed for Lada Vesta cars, i.e. There will be no need to be tricky with the frames. You can immediately take this radio and install it instead of the standard one. It will fit perfectly into the seat. It also runs on Android OS, has an 8-inch display and 2 GB of built-in memory. The screen resolution is the same as the previous one - 1024x600. How it works - look at the video.
You can order here: link
3. 7021G. And China is in touch again. Another radio from AliExpress. It seems that the Chinese are ahead of the rest. We are looking for the necessary electronics and will definitely end up in China. But let's return to our radio. 7021G is the most budget option for those who want to get a standard set of functionality for such devices and a display on which something will be visible. So, 7 inches, 800x480, Windows CE6 OS. How it works - look at the video.
You can order here: link
Fake carbon fiber and a real pipe
The bucket seats are surprisingly comfortable. You sit deeply, as if you were not in a Lada car. Red accents enliven the rustic interior of the Vesta, but the carbon fiber inserts look cheap; it would be better if they weren’t there. The steering wheel is trimmed with pleasant leather, the finish of the lever is rougher, and the lever itself, with its length and strokes, seems to come from another, not at all sports car.
The rear bench is also trimmed in a red-black leather and Alcantara combination, but that's the only difference. Vesta Sport has the same 480-liter trunk as a regular sedan, so cargo and passenger capabilities have not changed. However, towing a sports trailer with the Vesta is not provided.
The interior of the Hyundai i30 N is decorated sparingly - a little chrome, a little black gloss, but it looks expensive and of high quality. The fact that this is a sports version is indicated by the letter N on the dashboard, gear lever, seats, and floor mats. Plus frivolous buttons in gray-blue color, like the body. They select driving modes.
The driver's seat, upholstered in leather and Alcantara, looks more modest than West's, but when cornering it holds the body tighter and is more comfortable during normal movement. It even has an adjustable cushion length. The back row of the i30 N seems more cramped, but the sofa in the Korean hatch is more comfortable and, unlike Vesta, is equipped with a folding armrest. Between the backrests and the trunk there is a tubular strut that strengthens the body. It seems to be deliberately exposed and limits the loading capabilities of the car. However, it is unlikely that anyone will carry a refrigerator in the i30 N.
Head unit Lada Vesta connection
If we are talking about factory wiring, then connecting the standard Lada Vesta radio should go without problems. You just need to correctly insert the chips on the back of the radio and assemble everything into place. The simplified connection diagram looks like this:
ISO 1 – a chip with power wires is connected to power the radio. ISO 2 – a chip with wires for the speakers. USB 3 – output to USB connector. Needed so that you can listen to music files from a flash drive. Antenna 4 – antenna connection connector for radio.
At number 5 is the radio itself, if you didn’t understand.
Radio tape recorder with LCD screen
Unlike the first version of the Lada Vesta acoustic device, the second has practically no buttons. They are replaced by a 7-inch touch screen. Of course, such a step on the part of the Lada Vesta manufacturers was not very clear, since using the radio with a stylus is very inconvenient, especially while moving.
Unlike some VAZ models, the Lada Vesta does not have a special visor to protect the screen from sunlight. At the same time, the tilt angle of the display is also not chosen in the most successful way, and catches all the reflections of the sun. The sensor itself is quite fast and responds to touch perfectly.
Also, on the Lada Vesta model, for the first time, additional acoustic system control buttons are installed on the steering wheel. The standard radio in the Lada Vesta, with a screen, can operate in four modes:
- FM/AM radio;
- Audio system;
- Navigation;
- Telephone;
For the first time on the Vesta model, AVTOVAZ began installing controls in the steering wheel
Just like the previous version of the Lada Vesta car’s acoustics, it has the ability to interface with various types of gadgets via a USB connector. Moreover, when you connect the phone, a charge of 1.5 volts will come from the device.
When connecting a memory card, you must ensure that its file extension is at least FAT 16. The maximum number of files available for reading on the speaker system is 1024, and the number of folders is 256.
Thanks for subscribing!
Also, depending on the type of portable device, the radio of a Lada Vesta car can read information only with a certain maximum volume of the device itself. For example, when pairing a storage device with an SDHC extension, the maximum allowable capacity of a flash drive can be up to 32 GB, and when pairing with a USB 2.0 or 3.0 device, the maximum capacity will be 64 GB.
In the standard settings of the Lada Vesta radio, there are several modes that automatically adjust the tone of the music. Also, the Lada manufacturers made sure that you can view video files on this device. Resolutions supported by the radio: AVI, MP4, MKV and MOV. A very pleasant surprise is that while playing a video, you can pause it and exit to the main menu, and when you return to viewing mode, continue playing the video from where you stopped it.
Also, on the audio device of a Lada Vesta car with a display, it is possible to view photographs and pictures with the extension: JPG, JPEG, JPE, BMP and animation in GIF format.
When talking on the phone, installing additional devices on the Lada radio is not required. The sound coming from the driver is picked up by the built-in microphone, and incoming sounds are played back using a dedicated speaker.
In newer versions of the speaker system, there is an additional “rear camera” mode. It allows the driver of a Lada Vesta to easily see the situation behind the car, and makes it easy to reverse maneuvers.
Comparing two standard devices for this model, you can make a certain choice in favor of the second option, with a display. It is much more practical, and despite minor disadvantages, such as screen glare in sunny weather, it deserves more attention.
The advantage of the first option is that it is quite simple in its design and control. Also, due to its lower functionality, the occurrence of any malfunctions in it occurs much less frequently. So, when buying a Lada Vesta car, you should think carefully: “should I overpay for a speaker system with a screen or not?”
Manufacturer of Lada Vesta head unit
If you carefully read our article, you could read above that the manufacturer of the Lada Vesta head unit is ITELMA. Searched by article number 8450007949.
On this note, it’s time to end our article, as it is getting quite long. Thank you for reading to the end. See you again on our website.
Owners of a Lada Vesta car sometimes encounter difficulties using the on-board computer, as the software that monitors all the main functions of the car is proudly called. Using the BC, you can adjust the volume of the turn signal, find out the current fuel consumption, monitor the operation of the cruise control system, and even have a complete understanding of the voltage of the operating network.
To cope with this difficult task, it is enough to use the manual for regular use of the car, a copy of which is usually provided with the new Vesta.
Radio without screen
The standard radio of the Lada Vesta car “Standard” and “Norma” has a fairly user-friendly interface and large, convenient buttons. At the top of the radio, there is a small display that displays information on the music being played or sound settings. Its connection to the power supply occurs in such a way that it is in contact with 4 factory speakers installed on the Lada Vesta model.
The standard functions of the radio include a built-in telephone. Therefore, on the external panel of this device there is also a microphone and buttons to accept/reject calls. During long-term use, cases were observed when the radio in a Lada Vesta car froze and refused to work. This may be due to system overload when a large number of functions are running simultaneously.
To fix this problem, simply press the “RESET” button, which is located next to the device’s power button. The “RESET” button is located in a special hole, and it can only be pressed using a thin object: a needle or a match.
Also, the radio options for the Lada Vesta car include a slot for a micro-SD card. Based on the internal characteristics of the device, it is possible to install a memory card with a maximum capacity of 16 GB. If the Lada Vesta car is disconnected from the battery power, the radio will be able to retain the original receiver settings for 10 days. This is ensured thanks to the built-in battery.
New Lada: Why doesn't the reverse light come on on the Grant?
The capabilities of this device include:
- pairing with gadgets of any type via USB connector;
- support for MP3 and AUX formats;
- built-in Bluetooth.
After using this radio for some time, the owners received only positive feedback.
Setting up the on-board computer on the Lada Vesta
We probably won’t find answers to all our questions there, since the menu is a service menu. It is necessary primarily for diagnostic specialists.
According to AvtoVAZ's plan, there is no need to provide the car owner with access to the functions of the Lada Vesta on-board computer . If the owner of the car mistakenly turns off the sound of the turn signal completely, then this mistake can be costly; in the event of an accident, it will be considered a breakdown.
Practice shows that many have independently figured out the hidden functions of the built-in software, adjusting the tone and volume when the turn indicators are triggered, and hazard alarm settings. The purpose of the review is not to unravel secrets that are inaccessible to the average car user. Our topic concerns the classical difficulty. What should I do if the current time is shown on the dashboard? How to fix it?
Introducing metrics display features
To select the control function of the parameter we need, we need to use a special joystick.
It is located on the right side immediately under the steering wheel, attached to the steering column. This is the lever at the end of which our control panel is located. There are two arrows on it indicating the direction “up” and “down”, between them there are two rows of white dots, three in a line.
On-board computer functions.
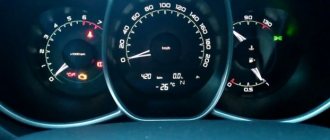
If you briefly press the up or down pointer, the dashboard will sequentially display changes in various indicators: instantaneous, current fuel consumption, temperature, and the latest mileage indicators. The display occurs on the right in the second row from the bottom of the main display. By briefly pressing the joystick in the middle with your thumb, you can switch the display in the bottom center line of the panel. The readings of the ambient temperature, odometer and time can be changed sequentially in a circle.
Related options
On-board computers have a hidden menu that adjusts the turn signal clicks. To do this, press two buttons together. Next, go to the auxiliary menu. The next step is to turn on the alarm system, sound control is carried out using the upper and lower buttons. By briefly holding two keys, the driver can change the tone of the sound.
Direct time setting
The time is set according to this scheme.
You need to enter edit mode . To do this, you need to press and hold the “up” arrow for about three seconds. At this moment, only the numbers “0.0 km” in the second line from the left of the display will start flashing on the screen. While in edit mode, you need to press the same arrow once. The clock indicator on the screen will blink, for example, “08:35”.
You will need to hold down the top key again for a few seconds to start changing the clock.
Only the first digit “0” from “08:35” will begin to pulsate. Now you can use the arrows to change the readings of tens, of which we only have two. To go to the hour units, hold down the “up” button again for a couple of seconds, after which “8” will begin to pulsate. Using the joystick we set the numbers we need from “0” to “9”.
Final nuances and completion of work
Using the same scheme, we change the values of tens of minutes and minutes.
The current time has been set, all that remains is to record it . To do this, it is important to correctly exit the editing mode without resetting the device readings again. You need to hold the arrow up not for a short time, but for a long time. Everything is ready, the time is set, the clock is set.
According to its principle, the procedure for setting the clock on the Lada Vesta is not very difficult. If you have basic skills in using “antediluvian” electronic watches from the end of the last century, then everything will work out great. You don’t have to turn to specialists, but set it up as needed with your own hands.
In a Lada Vesta car there is an on-board computer with a small screen located under the speedometer. This device increases engine efficiency, reduces fuel consumption, the concentration of harmful emissions, optimizes the operation of the gas distribution system, and synchronizes the interaction of units. Setting up the computer helps the Lada Vesta driver navigate the technical data/parameters. Read the article and find out more about the on-board computer.
Comments 31
Hmmm, either everything is fine with me or I just don’t notice which is simpler. You can check the time on your phone, and while traveling there are no problems with the time on MMS.
You may have ST turned off in the settings. It was initially turned off for me.
here they have already written correctly - when the CT is turned on - synchronization occurs via RDS with the radio station signal, I noticed a long time ago that we have some normal stations. the time is “transmitted”, and some are left-handed, so it turns out to be “out of sync”. So not only on the Lada, my father in Nissan has the same garbage, and it can hardly be any other way. I did this: synchronized according to the “correct” ” station, and then CT turned off.
tell me one thing, why do you need 2 time indicators, why? One per MMS is enough. I personally displayed the temperature on the dashboard and I don’t care about the time, which is in synchronization or not, I don’t see it at all and I don’t care. Yes, if there is no MMS, it’s another matter, time is needed there, but, again, no MMS - no problems with out of sync)
I don’t have mms, but there is a problem))) If the ST is not turned off, then the time during the trip may change several times, and both the minutes and hours change
The (precise) time signals are transmitted by the currently turned on radio station. Who knows what time they live by?
But why then do these same radio stations broadcast the correct time on other machines?
Don't know. Maybe these are the right machines and they make the right ̶m̶ё̶d̶ receiver.
tell me one thing, why do you need 2 time indicators, why? One per MMS is enough. I personally displayed the temperature on the dashboard and I don’t care about the time, which is in synchronization or not, I don’t see it at all and I don’t care. Yes, if there is no MMS, it’s another matter, time is needed there, but, again, no MMS - no problems with out of sync)
That's exactly what I did