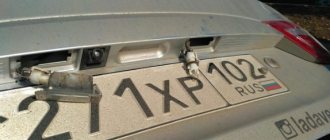
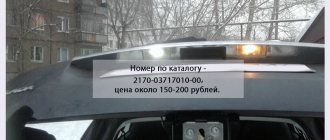
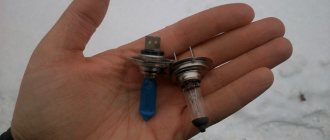
Two license plate lights are located in the recesses of the rear bumper. If the license plate is installed in a plastic frame, it is better to remove it for ease of use.
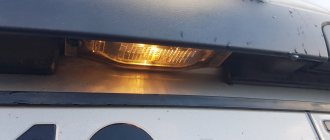
Using a Phillips screwdriver, unscrew the two self-tapping screws securing the flashlight. Remove the light from the hole in the rear bumper. We slide the protective rubber cap off the flashlight and disconnect the tips of the two wires from the terminals of the flashlight. Use your finger to press the latch... ...and remove the flashlight lens. Remove the lamp from the lantern housing. We install the new C5W lamp in the reverse order. Similarly, we change the lamp in the other license plate light.
Replacing the license plate lamp on a Chevrolet Niva will not cause much difficulty even for novice car enthusiasts. The lampshades are screwed on with two self-tapping screws, they are very easy to reach, and all we need is a Phillips screwdriver.
What lamps are used
The factory equips the car with standard lamps with a 12V/5W C5W base. And if the lamp burns out, you can replace it with the following:
If the installed lamp causes an error on the dashboard, then it must be replaced with an LED with a blende, an example would be the MTF company and its price for the entire set is around one thousand rubles.
Replacing license plate light bulbs for Niva Chevrolet
Two license plate lights are located in the recesses of the rear bumper. If the license plate is installed in a plastic frame, it is better to remove it for ease of use.
Using a Phillips screwdriver, unscrew the two self-tapping screws securing the flashlight. Remove the light from the hole in the rear bumper. We slide the protective rubber cap off the flashlight and disconnect the tips of the two wires from the terminals of the flashlight. Use your finger to press the latch... ...and remove the flashlight lens. Remove the lamp from the lantern housing. We install the new C5W lamp in the reverse order. Similarly, we change the lamp in the other license plate light.
Replacing the license plate lamp on a Chevrolet Niva will not cause much difficulty even for novice car enthusiasts. The lampshades are screwed on with two self-tapping screws, they are very easy to reach, and all we need is a Phillips screwdriver.
VAZ-2123 diagram until 2009
General diagram of the electrical equipment of the Chevrolet Niva VAZ-2123 produced before 2009.
1 — right headlight; 2 — right fog lamp; 3 — sound signal; 4 — engine compartment lamp; 5 — engine compartment lamp switch; b — VAZ-2123 starter; 7 - battery; 8 - generator; 9 — outside air temperature sensor; 10 — left fog lamp; 11 — left headlight; 12 — power window switch of the right front door; 13 — electric window motor-reducer; 14 - switch for interior lighting in the door lock; 15 — gear motor for door lock; 16 — connection blocks to the right front speaker of the audio system; 17 — heater electric motor; 18 — vehicle speed sensor; 19 — electric motor for windshield washer; 20 — windshield wiper electric motor; 21 - switch for interior lighting in the driver's door lock; 22 — gear motor for locking the driver’s door lock; 23 — brake fluid level sensor; 24 — connection blocks to the left front speaker of the audio system; 25 — power window switch of the right front door; 26 — power window relay; 27 — sound signal relay; 28 — power window switch of the left front door; 29 — fog lamp relay; 30 — connection block to the wiring harness of the engine control system; 31 — diagnostic block; 32 — mounting block; 33 — connection block to the wiring harness of the front seat heating system; 34 — control unit for the door lock system; 35 — instrument cluster; 36 — right side turn signal; 37 — glove box lighting lamp; 38 — switch for the glove compartment lighting lamp; 39 — ignition switch; 40 — brake signal switch; 41 — reverse light switch; 42 — differential lock activation sensor; 43 — control lamp block; 44 — headlight electric corrector regulator; 45 — instrument backlight brightness control; 46 — steering column switch; 47 — left side direction indicator; 48 — heater motor switch; 49 — additional resistor of the heater electric motor; 50 — parking brake sensor; 51 — rear fog light switch; 52 — fog light switch; 53 — switch for heating the glass of the luggage compartment door; 54 — external lighting switch; 55 — alarm switch; 56 — connection block to the right rear speaker of the audio system; 57 — fuel pump with fuel level sensor; 58 — backlight lamps for the heating and ventilation control unit; 59 — cigarette lighter; 60 — cigarette lighter lamp; 61 — control unit for the automobile anti-theft system; 62 — interior lamp; 63 — lamp for individual interior lighting; 64 — connectors for connecting to the head audio reproduction device; 65 — connection blocks to the left rear speaker of the audio system; 66 — right rear light of VAZ2123; 67 — trunk light; 68 — license plate lights; 69 — electric motor for the tailgate glass washer; 70 — tailgate glass wiper relay; 71 — electric motor for the glass cleaner of the luggage compartment door; 72 — heating element for the glass of the luggage compartment door; 73 - additional brake signal; 74 - left rear light.
Connection diagram of the engine control system of a VAZ-2123 car produced before 2009
Scheme for switching on the exterior lighting of a Chevrolet Niva VAZ-2123 produced before 2009
Headlight connection diagram for Chevrolet Niva VAZ-2123 produced before 2009.
Scheme for connecting the electric headlight corrector to electrical equipment. Until 2009 release.
Diagram for switching on direction indicators and hazard warning lights. Until 2009 release.
Wiring diagram for the VAZ-2123 windshield cleaner and washer. Until 2009 release.
Diagram of the electric motor of the heater fan and the heating element of the glass of the tailgate until 2009.
Diagram for switching on the sound signal, before 2009.
Diagram of power windows for doors up to 2009.
Diagram of the door lock system for VAZ-2123 until 2009.
Instructions for replacing license plate lamps
So, two backlights are located in the recesses of the rear bumper, but getting to them will not be difficult.
Using a Phillips screwdriver, unscrew the screws securing the lampshade. If they are rusty, spray them with any penetrating lubricant or WD40 and wait.
After unscrewing the two screws, take out the lampshade and disconnect the power wires from it.
The lampshade is in our hands. Gently press the latch and remove the diffuser.
We take out the old lamp, clean the lampshade and diffuser if necessary, and install a new lamp. It is very important that the lampshade is sealed and no moisture gets into it. If necessary, it can be coated with silicone sealant.
This completes the lamp replacement.
Scheme of VAZ-2123 Niva with injector
Electrical diagram of VAZ-2123 (Niva) cars with an injector. Together with the letter designation of the color of the wires, the designation of the number of the circuit element to which this wire is directed is used, for example “–4–”. The symbols “–S–” and “–G–” mean that the element has a connection to several circuit elements or to a grounding point, respectively.
Front harness connection diagram
1 — right headlight; 2 — right fog lamp; 3 — sound signal; 4 — air temperature sensor; 5 — left fog lamp; 6 — left headlight; 7 — VAZ-2123 starter; 8 — rechargeable battery; 9 - generator; 10 — windshield wiper motor; 11 — electric motor for washers; 12 — battery and starter harness pads and front harness; 13, 14 — front harness pads to the instrument panel harness; 15 — engine compartment lamp switch; 16 — engine compartment lamp; 17 — brake fluid level sensor; A1, A2, A3, A4 are the grounding points of the front harness.
Ignition system connection diagram
Connecting the instrument panel
1 — block of the instrument panel harness to the ignition system harness; 2 — instrument panel harness block to the rear harness; 3 — instrument panel harness block to the front harness; 4 — fog lamp relay; 5 — power window relay; 6 — sound signal relay; 7 — seat heater relay; 8 — instrument panel harness block to the front harness; 9 — external lighting switch; 10 — mounting block; 11 — instrument cluster; 12 — diode VAZ-2123; 13 — headlight range adjustment control; 14 - potentiometer; 15 — brake signal switch; 16 — sound signal switch; 17 — switch for headlights and direction indicators; 18 — windshield wiper and washer switch; 19 — diagnostic block; 21 — automobile anti-theft system; 22 — cigarette lighter; 23 — control lamp block; 24 — alarm switch; 25 — rear window heating switch; 26 — fog lamp switch; 27 — rear anti-fog light switch; 28, 29 — blocks of the instrument panel harness to the radio; 30 — glove box lighting; 31 — glove box lighting switch; 32 — heater electric motor; 33 — additional resistance; 34 — pads for the instrument panel harness and the lighting harness; 35 — heater motor switch; 36, 37 — heater lever illumination display; A1, A2 — grounding points of the instrument panel harness; X1, X2 — instrument panel harness pads to the instrument cluster; Ш1-Ш5 — instrument panel harness connectors to the corresponding connectors Ш1-Ш5 of the mounting block.
Rear harness connection diagram
1 — rear harness block to the right front door harness; 2 — rear harness block to the instrument panel harness; 3 — rear harness block to the left front door harness; 4 — right side direction indicator; 5 — hand brake sensor; 6 — individual lighting lamp; 7 — interior lamp; 8 — door lock control unit; 9 — differential engagement sensor; 10 — left side direction indicator; 11 — rear harness pads to the rear right loudspeaker; 12 — vehicle speed sensor; 13 — electric fuel pump VAZ-2123; 14 — trunk lighting; 15 — reverse light switch; 16 — electric mirror lamp control unit; 17 — rear harness pads to the rear left loudspeaker; 18 — rear harness block to the right rear door harness; 19 — block of the rear right door harness to the rear harness; 20 — right lamp; 21 — blocks for the rear harness and the license plate lamp harness; 22, 23 — license plate lights 24 — rear harness block to the seat heating harness; 25 — block of the seat heating harness to the rear harness; 26 — rear harness block to rear additional harness; 27 — left lamp; 28 — rear harness block to the left rear door harness; 29 — block of the rear left door harness to the rear harness; 30 — signaling device for opening the lock of the right rear door; 31 — electric lock of the right rear door; 32 — electric heater of the right seat; 33 — electric heating control unit; 34 — electric heater of the left seat; 35 — signaling device for opening the lock of the left rear door; 36 — electric lock of the left rear door; A1, A2, A3 — grounding points of the rear harness; A4 is the grounding point of the FONZ harness.
Engine control system ECM
1 — ECM controller; 2 — electric fan of the engine cooling system, right; 3 — electric fan of the engine cooling system, left; 4 — ignition module; 6 — nozzles; 7 - resistor; 8 — block of the ignition system harness to the injector harness; 9 — injector harness block to the ignition system harness; 10 — oil pressure warning lamp sensor; 11 — mass air flow sensor; 12 — coolant temperature sensor; 13 — throttle position sensor; 14 — idle speed regulator; 15 — oxygen sensor; 17 — knock sensor; 18 — solenoid valve for purge of the adsorber; 19 — coolant temperature indicator sensor; 20 - additional relay; 21 — right electric fan relay; 22 — fuse for the litany circuit of the right electric fan; 23 — left electric fan relay; 24 — fuse for the left electric fan litany circuit; 25 — electric fuel pump relay; 26 — fuse for the electric fuel pump litany circuit; 27 - ignition relay fuse; 28 — ignition relay; 29 — controller power supply fuse; 30 — block of the ignition system harness to the instrument panel harness; 31 — block of the instrument panel harness to the ignition system harness; 33 — automobile anti-theft system; 34 — vehicle speed sensor; 35 — electric fuel pump; 36 — instrument cluster; 37 — mounting block; 38 — diagnostic block; 39 — control lamp block; 40 — instrument panel harness block to the rear harness; 41 — rear harness block to the instrument panel harness; A - to the negative terminal of the battery; B - to the “plus” terminal of the battery; C1, C2 - grounding points for the ignition system harness; СЗ — grounding point of the instrument panel harness; C4 is the grounding point for the rear harness.
Instructions for replacing license plate lamps
So, two backlights are located in the recesses of the rear bumper, but getting to them will not be difficult.
Using a Phillips screwdriver, unscrew the screws securing the lampshade. If they are rusty, spray them with any penetrating lubricant or WD40 and wait.
After unscrewing the two screws, take out the lampshade and disconnect the power wires from it.
The lampshade is in our hands. Gently press the latch and remove the diffuser.
We take out the old lamp, clean the lampshade and diffuser if necessary, and install a new lamp. It is very important that the lampshade is sealed and no moisture gets into it. If necessary, it can be coated with silicone sealant.
This completes the lamp replacement.
Number plate illumination lamp Niva Chevrolet
The license plate light bulbs on a Niva Chevrolet are replaced every time they burn out. To carry out repair work, prepare a standard set of tools and perform the following sequence of actions:
What lamp is used to illuminate the license plate? — Lamp C5W — 5W (used lamps in a car)
To replace the lamp in the license plate light, remove the license plate light.
The license plate lamp section presents spare parts for the CHEVROLET NIVA. To purchase parts, select the optimal period and cost of the part. Please note that prices and terms are indicated taking into account delivery to Ufa.
The spare parts indicated in the list do not cover the entire range of manufacturers of original and non-original CHEVROLET NIVA spare parts available for order in the PROFICARS.RU online store.
Contact our managers to select a license plate lamp group part for CHEVROLET NIVA or its analogues. To do this, you can write to an online consultant (bottom right on this page) or come to the PROFICARS.RU store
For a more accurate selection:
Source
Location and appearance of the part
Not all drivers know where the Niva Chevrolet starter relay is located. For this brand it is located on the left side for ease of maintenance . You need to look for it near the steering column. You need to look below the dashboard. The relay dimensions are small. Feature: the element is created in such a way that it cannot be removed. Visually, the starter relay resembles a small box (its color is black).
There are various reasons for breakdowns:
- contacts are burnt out;
- worn out from time or duration of use;
- parts inside the mechanism were destroyed.
If the starter relay is broken, I report the following malfunctions::
- characteristic buzzing under the hood. It begins when the engine starts;
- the starter works, but the engine does not start;
- The starter makes clearly audible clicks, but does not start.
How to change the license plate lamp in a Chevrolet Niva yourself
And if the lamp burns out, you can replace it with the following: If the installed lamp provokes an error on the dashboard, then it is necessary to replace the Chevrolet Niva license plate lamp with an LED lamp with blende, an example would be the MTF company and its price for the entire set is around one thousand rubles.
How to replace This light is located above the license plate in a small recess in the rear bumper, and you can get to it without any difficulty.
We take a Phillips screwdriver and use it to unscrew the two screws that hold the lampshade lighting in place. If they are covered with corrosion and are difficult to unscrew, they can be sprayed with an anti-corrosion agent, for example, WD40. After the rust has corroded, unscrew the screws located above the license plate, then remove the lamp from the hole and disconnect the power wire from it. When we have the element in our hands, carefully We press the latch on it, and we remove the diffuser. We take out the old lamp from there, if necessary, clean the diffuser with the lampshade, and install a new bulb there.
In order for the work to be done, it is necessary to take into account such differences. Use a screwdriver to pry off the cover in the handle that closes the trunk. Despite the resistance provided by the latches, open the lid. Using a Phillips screwdriver, unscrew both screws that secure the handle and remove. Using the same screwdriver, unscrew the pins that secure the upholstery in the trunk lid and remove them, after which the upholstery is removed.
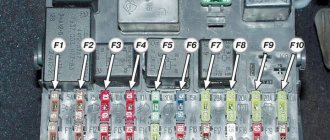
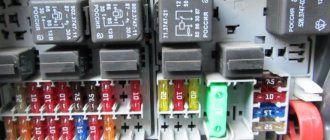
Relay and fuse box:
Please note that in the schematic diagram of the block, two rows of fuses are located at the bottom, and the relay is at the top. Under the panel cover, the fuses will be located opposite the top, so do not confuse the numbering. If you notice a discrepancy in the numbering of fuses or relays, then you have a different Chevrolet Niva model, newer or older, in this case, find the corresponding diagram and troubleshoot using it.
K1 - Relay for monitoring the health of lamps.
K2 - Windshield wiper relay . If the wipers do not work, check this relay and fuse F9. If they are working properly, the problem may be in the wiper motor, its brushes, mechanism and gears, as well as in the interior switch and its contacts.
K3 - Relay-breaker for direction indicators and hazard warning lights . If the turn signals do not work, check fuses F16, F19 and this relay. Also check the contact of the wire going to ground. Located to the left of the fuse box, in the back (to access you need to remove the mounting block panel).
Another issue could be the steering column switch, its contacts and connector. If the emergency lights do not work, check the button for turning it on, its contacts, as well as the lamps in the turn signals; there may be a short circuit somewhere or the lamps have burned out.
K4 - Low beam headlight relay . If the low beam in one of the headlights does not work, check fuses F2 and F12, as well as the lamps in the headlights themselves. If both low beam headlights do not work, check this relay, as well as the light switch and its contacts. Also note that the low beam headlights only work when the ignition is on.
K5 - Headlight high beam relay . If the high beam in one of the headlights does not work, check fuses F3 and F13, as well as the lamps themselves. If both high beam headlights do not work, check this relay, as well as the steering column switch and its contacts.
K6 - Additional relay.
If you have problems turning on the ignition, check this relay, as well as the contacts in the ignition switch and the contact group.
K7 - Rear window heating relay . If the rear window fogs up and its heating does not work, check this relay and fuses F8 and F9, the power button and its contacts, as well as the contacts on the terminals to the elements on the rear window (to get to them, you will most likely have to remove the trunk door trim).
It also happens that the mounting block board itself melts under the specified fuses, because the load when turning on the heating of the side mirrors and rear window is large. In this case, you need to inspect the damage to the board, and it is possible to replace the entire fuse box assembly. To prevent failure of the circuit board and fuses, do not forget to turn off the heated rear window when not needed. The wire under the left threshold could also have frayed.
K8 - Backup relay.