I noticed that when driving, the gearbox began to make sounds of rubbing gears. The very first thing that came to mind was to check the oil level in the gearbox. The box on my VAZ 2109 is old, unmaintained, that is, without a dipstick. But there is an easy way to check the oil level in a maintenance-free VAZ 2108 2109 21099 gearbox - this is to remove the speedometer cable drive gear. Through the hole in this gear (it is also called a speed sensor), you can very clearly see how much oil is in the box. I checked the oil level - indeed, the oil in the gearbox had decreased significantly. I also found the reason quickly - the gear shift seal was leaking.
VAZ backstage oil seal leaked
Well, since it's leaking, it needs to be replaced. I went to the market and bought a gear shift rod seal for VAZ 2108 2109 21099. The price of the seal was $1. Now it needs to be replaced. The procedure for replacing the gear shift rod oil seal on a VAZ 2108 2109 21099: 1) Drain the oil from the gearbox into a specially prepared container.
Drain the oil from the VAZ box
To make it drain better, first unscrew the filler plug or remove the speedometer gear. After draining the oil, screw the drain plug back into place. 2) Now we climb under the car and disconnect the universal joint mount from the gear shift lever.
Attaching the cardan to the gear shift lever
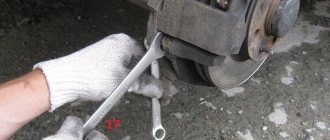
3) Pull the boot off the cardan and unscrew the bolt that secures it to the gear shift rod. In my case, this bolt really did not want to unscrew, and the place was inconvenient. You can’t get there with the head; the open-end wrench licks off the edges.
Rescued crimp wrench for brake hoses. 4) After removing the cardan, remove the gearshift rod boot.
Shift rod boot
5) Now you need to get the oil seal of the VAZ 2108 2109 21099. The operating instructions say that this is done with an awl. I didn’t have an awl, but I did have a self-tapping screw, which I screwed into the oil seal and took it out.
We take out the VAZ backstage oil seal
The main thing is to do this carefully, without scratching the stem. 6)Instead of the old one, install a new oil seal on the same side as the old one. Using a tube of suitable diameter, press it to the end.
Installing a new oil seal
7) We install the boot back, screw the cardan. The bolt securing the cardan to the gearshift rod is adjustable. It needs to be screwed in exactly the same way as it was. Otherwise, some gears may not engage. We put the boot on the cardan and connect it to the gear lever of the VAZ 2108 2109 21099. We get into the car and check that all gears engage well. 9) Pour oil into the gearbox. Personally, I do this through the hole for the speedometer gear using a hose and funnel. That's it, the VAZ 2108 2109 21099 rocker seal has been replaced.
The VAZ-2109 rocker is a simple mechanism used to change gears. The driver, applying force in one direction or another, acts through the rocker on the gearbox. This switches on the required speed. Very rarely, the mechanism breaks down and requires partial or complete replacement. Most often the cardan shaft fails. Changing it won't be difficult. But if the rocker itself is broken, you can think about a little tuning - make a short-stroke one. This will require less effort to engage the desired gear.
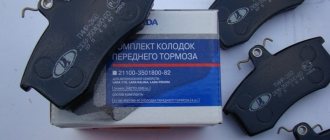
Replacing Chevrolet Niva front brake pads
Tools:
Parts and consumables:
Note:
The minimum permissible thickness of the friction linings of brake pads is 1.5 mm. Replace the pads in the following cases:
– the thickness of the linings is less than 1.5 mm;
– the surface of the linings is oily;
– the linings are not firmly connected to the base;
– the linings have deep grooves and chips.
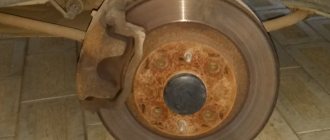
If for some reason you have removed the front wheel, check the condition of the pads through the hole in the brake caliper housing. If the thickness of the friction linings is about 2 mm, replace the pads. If the car pulls to the side when braking or you hear strange noises, remove the brake pads and check their condition.
Attention:
Loosen and tighten wheel nuts only with the vehicle on the ground. Do not use gasoline, diesel fuel or any other mineral solvents to clean brakes. The brake pads on both front wheels must be replaced at the same time. It is not permissible to replace the inner and outer pads between each other, as well as between the left and right wheels. This may result in uneven braking.
1. Brake the vehicle with the parking brake and place wheel chocks under the rear wheels.
2. We hang and remove the front wheel.
3. Clean the brake mechanism from dirt. To facilitate disassembly, apply WD-40 type liquid to the joints of the pins with the caliper and clamping arms.
4. Pump out some of the fluid from the reservoir if, before replacing the pads, the brake fluid level in the reservoir is at or close to about zero.
5. Using pliers, remove the cotter pin of the lower clamping arm axle.
6. Using a drift we touch the axis of the clamping lever.
7. Holding the lever, use pliers to remove the axle.
8. Remove the clamping lever.
9. We remove the two clamping lever springs from the pad guide so as not to lose them.
10. Using a screwdriver, lift up the brake caliper.
11. We place the caliper with the cylinder block on the steering knuckle.
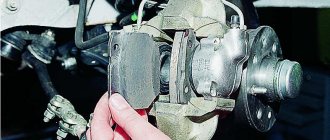
12. Remove the brake pads from the guide.
13. Before installing new brake pads, it is necessary to move the pistons as far inside the cylinders as possible. Using sliding pliers (or a pipe wrench), press the pistons into the cylinders.
You can recess the pistons into the cylinders in another way. To do this, insert the outer block into the guide and install the caliper in place. Use a spatula to press the pistons into the cylinders.
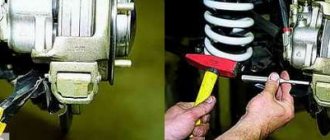
14. We carry out further assembly of the unit in the reverse order. To make it easier to install the axis of the clamping lever, use a file or emery to grind the end of the axis like this.
To make a cone.
15. Before installation, lubricate the axis of the clamping lever with graphite grease.
16. Pressing the lever, insert the axle.
17. After installing the brake pads, you must press the brake pedal several times so that the cylinder pistons move the pads to the brake disc.
18. Check the brake fluid level in the reservoir and top up if necessary.
Attention:
After replacing worn brake pads with new ones, do not rush to immediately drive onto busy highways. It is possible that at the very first intensive braking you will be unpleasantly surprised by the low efficiency of the brakes, although you have installed branded pads. The brake discs also wear out, and the new pads only touch them at the edges, practically without braking. Choose a quiet street or passage without cars and brake smoothly several times so that the pads get used and begin to fit the entire surface. At the same time, evaluate the effectiveness of the brakes. And try not to brake sharply for at least the first 100 km. When unused pads become very hot, the top layer of their linings burns, and the brakes will not be as effective for a long time.
The article is missing:
Source: https://autoruk.ru/niva-shevrolet/tormoza/kak-remontirovat-tormoznoi-mekhanizm-perednego-kolesa-niva-shevrole; Chevrolet niva device, operation, maintenance and repair. Publishing house "Behind the Wheel".
Original
| Article/OEM | Price, rub.) |
| 2121-3501070 per unit. | from 1200 |
| 2121-3501070-00 (front, set) | from 2500 |
| 2121-3501071 per unit. | from 1200 |
| 2121-3501070-11 (front, set) | from 2500 |
| Article/OEM | Price, rub.) |
| 2121-3502070-01 per unit. | from 1100 |
| 2121-3502070-00 (front, set) | from 2400 |
| 2121-3502072 per unit. | from 1100 |
| 2121-3502070-24 (front, set) | from 2400 |
Design and repair of the rear wheel brake mechanism of Niva Chevrolet
Figure 1 The rear wheel brake mechanism (Figure 1) is drum-type, with automatic adjustment of the gap between the shoes and drums. The automatic clearance adjustment device is located in the working cylinder. Its main element is a split thrust ring 9 (Fig. 2), installed on the piston 4 between the shoulder of the thrust screw 10 and two nuts 8 with a gap of 1.25–1.65 mm. The thrust rings 9 are inserted into the cylinder with tension, providing a shear force of the ring along the cylinder mirror of at least 343 N (35 kgf), which exceeds the force on the piston from tension springs 2 and 8 (see Fig. 1) of the brake pads. When, due to wear of the linings, the gap of 1.25–1.65 mm is completely removed, the shoulder on the thrust screw 10 (see Fig. 1) is pressed against the shoulder of the ring 9, as a result of which the thrust ring moves after the piston by the amount of wear. When the braking stops, the pistons are moved by the force of the tension springs until the cracks stop against the shoulder of the thrust ring. Thus, the optimal gap between the pads and the drum is automatically maintained.
Luggage compartment
Since the luggage compartment can be considered part of the car interior, it is necessary to clarify that there is also a flashlight here. It can be used to illuminate the contents of the trunk. In some situations, his work is irreplaceable. To access this mechanism, you must perform the following actions:
- The exterior lighting in the car is completely turned off.
- To release the lantern from its location, you must use a tool. For this purpose, you can use a simple screwdriver. She needs to remove the flashlight from the interior trim.
Note: To dismantle the lampshade, it is necessary to disconnect it from the two power wires. In order to eliminate the possibility of a short circuit when using this lighting device, it is necessary to insulate its connections with special adhesive tape or other sealant.
- The lamp is removed by pressing on the connecting elements. It occurs by analogy with the previous description of removing lamps from the socket.
- To turn on a new lamp, it is necessary to install it. It is pressed into the cartridge mount until it stops.
- To install the flashlight in its original place, you need to insert one end of the lampshade into the connector of the casing, and apply slight pressure on the other. A slight click will indicate that the light is fully connected to the connector in the luggage compartment.
How to replace brake pads on a VAZ 21213 yourself
The braking system is very important for driving safety. Therefore, it is necessary to monitor its serviceability. One of the main elements of the brake system are brake pads (BC), which, due to friction, slow down the rotation of the wheel. Naturally, over time they wear out and require replacement. You can perform the operation of replacing the TC on a Niva yourself in a garage.
All elements of the car wear out to varying degrees during operation, depending on the load experienced. The wear of brake pads is influenced by many factors, so the frequency of replacement for each Niva will be different.
SUVs are used in difficult off-road conditions, so they are replaced after 15-20 kilometers. The reason for rapid wear is the nature of the road surface on which the vehicle has to drive: sand, water and dirt.
We will inspect the caliper
Check the condition of the boots and guide pins. Replace the boots if necessary.
So, we take new pads and install them back.
The pistons on the caliper must be recessed as deeply as possible, since the new pads are thicker, and the caliper simply will not “fit” on them.
After we have “sunk” the pistons, we install new pads and reassemble in the reverse order.
After assembly, you must press the brake pedal several times so that the pistons take their working position.
Check the brake fluid level; after replacing the pads, it may be higher than the previous level.
Restoring the backlight and changing the warning lamps
We remove the light bulb that needs to be replaced (the purpose of the light bulbs is in the first photo of the article). To do this, turn the socket counterclockwise 90 degrees, and it will easily come out along with the light bulb.
Replacing a light bulb without disconnecting the power wires on a VAZ 2110
We remove the burnt device from the socket, insert a new one in its place and install the socket with the lamp in place, turning it 90 degrees, but clockwise. After this, we install the terminal on the battery, turn on the ignition and check the operation of the VAZ panel, performing the appropriate manipulations: turn on the hand parking brake, headlights, turn indicators, high beam headlights, etc. If everything is in order, then install the panel and decorative trim in place .
Substitutes
| vendor code | Cost in rub. | vendor code | Cost in rub. |
| Chevrolet Niva BOSCH 0986478746 | from 1500 | PATRON PBD1725 | —/— |
| TRI-DF 254 | —/— | FERODO DDF092 | —/— |
| TRW DF1725 | —/— | ROTINGER RT 2798 | —/— |
| TEXTAR 92024487 | —/— | HELLA 8DD355100381 | —/— |
| BOSCH RA1372785 | from 1700 | GLOBER RA16003411 | —/— |
| LPR RA626584 | —/— | BREMBO RA1782407 | —/— |
| TRW RA2416674 | —/— | TRW RA2416835 | —/— |
Also interesting: How to bleed the brakes on a Chevrolet Niva correctly. Brake discs with notches and through holes are not taken into account, since they are not in great demand among Chevrolet Niva owners.
| vendor code | Cost in rub. | vendor code | Cost in rub. |
| BOSCH 0986478746 | from 2200 per set | TRW DF1725 | —/— |
| HELLA 8DD 355 100-381 | —/— | PAGID 51702 | —/— |
| BOSCH 0 986 479 904 | —/— | TEXTAR 92096332 | —/— |
| GIRLING 6017253 | —/— | BRAKE ENGINEERING DI839391 | —/— |
| COMLINE ADC2103 | —/— | BORG & BECK BBD4692 | —/— |
| NIBK RN3598 | —/— | TRI-DF 365 | —/— |
| GIRLING 6017487 | —/— | GIRLING 6017615 | —/— |
What front pads can be installed on a car?
According to the AVTOVAZ catalog data for the VAZ 2123, the front pads are assigned the number 2123-3501090. The average price of original pads is 550 rubles.
Due to the low quality of most original products, we will consider analogues:
Based on the proposed substitutes, we conclude: for a small additional payment it is better to take a high-quality analogue from a world-famous manufacturer. Improved braking performance and safety may come at the cost of reduced brake rotor life.
Advantages and disadvantages of the braking system
Reviews from car enthusiasts about the brake system on the Chevrolet Niva show that it is generally quite reliable and effective, fully consistent with the class of SUV cars. The advantage is ease of control, ease of maintenance, adjustment and replacement of parts. The disadvantages are due to the use of a pressure regulator, the operation of which in some cases can manifest itself in the form of uneven braking, the appearance of vibration when braking at certain speeds, and an increase in braking distance.
Effective brakes on the Chevrolet Niva, as the main condition for the safety and controllability of the car, help maintain the high popularity of this model for many years.
Fault diagnosis
Driving without a brake booster is at least dangerous, since the braking distance is structurally calculated taking into account the operation of this unit. If it malfunctions, this indicator significantly worsens, the driver loses control over the behavior of the car, which in many cases leads to traffic accidents.
Therefore, diagnosing and timely replacement of this unit is the responsibility of every conscientious driver.
Diagnosing a faulty vacuum brake booster is not a complicated procedure.
Even while driving, there is a uniform method for checking functionality:
- If, when moving at any speed, the gas pedal is very tight, there is a clear problem with this particular unit. Failure can be caused either by a design defect in the unit itself (manufacturing defects) or by mechanical damage (failure of operating valves, breakage of one of the diaphragms);
- The deterioration of the braking properties of the car in this case, when the brake booster breaks down, the effect of the brake pedal is necessarily reinforced by a significant deterioration in the braking distance in relation to the working version.
Brake pads for VAZ 21214: selection and replacement
VAZ-2108 brake pads are suitable for most VAZ car models and cost about 480 rubles. In particular, they can be installed on VAZ 211213, VAZ 2121. The set consists of two front and two rear pads. Replacing front brake pads on Niva is not a complicated process. Any man can handle this process...
To replace the pads, we place the car on an inspection ditch or a lift. Remove the rear wheel and loosen the parking brake system drive cable. We hang and remove the front wheel. Using pliers, remove the cotter pin of the lower axis of the pressure lever. Using a drift...
Timely replacement of auto parts will help you avoid an accident - if the pads are faulty, serious braking problems will arise. Let's figure out how to select and replace components for your Niva. I bought the pads here: ✓ ATE pads: ✓ Article number: ATE 13.0460-8006.2 For cooperation:…
But in principle, both of them can be replaced completely without a lift and without a pit. It is enough to have a jack, a balloon and some other tools. Fitting the pads.
To remove the lower tension spring, remove the front shoe. Release the direct shoe drive lever by retracting the rear shoe. DIY repairs. Everything you do is at your own peril and risk! The author is not responsible! Niva 21214 replacement...
After installing the brake pads, you must press the brake pedal several times so that the cylinder pistons move the pads to the brake disc. How to change the brake pads on a VAZ 2121 Niva with your own hands. We change the front pads on the field, the pads on the VAZ 2121. The procedure...
It is recommended to replace the pads on both sides at once, regardless of the condition of the other pair, in order to maintain the quality of operation of both wheels and not violate the basic characteristics. We hang the side to be repaired with a jack and remove the wheel. Replacement of NIVA front brake pads. We change the Niva brake pads ourselves. Replacing the rear...
Now that the pads have been removed, we replace them, and then proceed to installation.
But first you need to recess the brake pistons into the cylinders; for this you can use sliding pliers, or install the caliper with one outer old pad back in its place and insert a small mounting blade between the disc and the pad and recess the piston. Replacement of rear brake pads NIVA sp.1 Replacement of front brake pads NIVA. ...
JUMP YOU WILL NOT REGRET! ▻SUBSCRIBE▻ I WILL BE GLAD TO HAVE NEW SUBSCRIBERS, LIKES AND DISLIKES))
Subscribe to the Channel Self-replacement of front brake pads with…
The video shows the problem of the brake pads beating in the front calipers of the Niva.
This is how the pads are changed very easily and quickly. Maybe someone will find it useful, I’ll leave it here)))) Have a smooth road everyone...
I am replacing the wheel bearing and hub. also this video will help those who want to replace the front...
Often, motorists remember about the heater radiator only after the onset of winter...
As you know, fog lights are not installed on…
By the way, it is possible to raise the low beam headlights using the usual method...
Hello, from this article you will learn how to quickly and easily...
If adjustment cannot be made, then the bearing must be replaced...
The interior temperature sensor of the VAZ 2110 is located in the cabin near the ceiling light...
In addition, when the sound insulation in the VAZ 21099 is poorly done or...
If LED overlays are installed on top of the optics, then the diodes need to be inserted...
It should be borne in mind that the figure-eight shock absorber is not suitable for…
Before unscrewing them, be sure to mark which tube goes where....
But many motorists want to know how to do it themselves...
Insert the key into the lock cylinder and remove the lock from the handle....
After debugging, you should check changes in the operation of the node. You need to do this the same way...
To replace the gearbox seals, especially the input shaft, the gearbox must be removed from the engine. Having removed...
Replacing the VAZ 2115 tie rod end is almost complete, all that remains is to install a new end. For…
When the front suspension of a VAZ-2106 is diagnosed, you will need to inspect ball joints, silent blocks, rubber cushions...
The car comes from the factory with a handle glued to it, which means this is possible. How to get your money back...
Most likely the reason is an incorrectly functioning hydraulic chain tensioner. The chain stopped stretching, but for some reason it had a characteristic...
To adjust the seat belt height, press the seat belt height locking button and...
Checking status
The corresponding signs may indicate the need to change the vacuum booster or the brake master cylinder.
The primary sign of VUT failure is an increase in the force that must be applied to the pedal to brake.
To be sure of the problem, perform the following check:
- Turn off the engine;
- Press the brake pedal 5-6 times in a row;
- Press the pedal to the floor;
- Start the engine;
- If the VUT is working properly, the pedal will immediately go up.
- Checking the condition
If you have a VAZ 2109 carburetor engine under the hood, you can determine the VUT malfunction a little differently in the initial stages:
- Initially, the pedal will work normally, you will have to apply a little force, braking occurs normally;
- But at the same time the engine stalls at idle;
- When you press the brake pedal, the idle speed calms down;
- By pressing the gas in neutral gear, failures occur in the carburetor;
- If such symptoms are observed, with the engine running, remove the pipe from the VUT fitting and plug it with your finger or other available tool;
- Has the idle speed stabilized? In this case, replacing the vacuum seal cannot be avoided.
If such a malfunction is detected while driving, you can continue driving only if the VUT is turned off.
How to replace brake pads on a VAZ 21213 yourself
The braking system is very important for driving safety. Therefore, it is necessary to monitor its serviceability. One of the main elements of the brake system are brake pads (BC), which, due to friction, slow down the rotation of the wheel. Naturally, over time they wear out and require replacement. You can perform the operation of replacing the TC on a Niva yourself in a garage.
All elements of the car wear out to varying degrees during operation, depending on the load experienced. The wear of brake pads is influenced by many factors, so the frequency of replacement for each Niva will be different.
SUVs are used in difficult off-road conditions, so they are replaced after 15-20 kilometers. The reason for rapid wear is the nature of the road surface on which the vehicle has to drive: sand, water and dirt.
The wear and tear of the roadway depends not only on the quality of the road surface, but also on other factors:
The manufacturer recommends replacement after an average of 30-50 thousand. But given that wear varies, experts strongly recommend checking the brake system every 10 thousand kilometers.
When checking, you need to pay attention to the presence of creaks, other extraneous sounds, and smooth braking. When replacing, in parallel, you should check the integrity of the anthers on the guides, brake hoses, rubber covers, and the degree of wear of the brake discs. This is necessary for timely identification and elimination of faults.
The front axle bears the main load, so the front axles wear out faster than the rear ones. On average, for every rear pad replacement there are two front pad replacements. Any driver can understand that there is a problem with the brake pads if he pays attention to the characteristic symptoms:
If at least one of the signs appears, it is necessary to check the brake system and replace worn parts if the following signs of wear are found:
The pads must be changed in pairs: two front, two rear. When replacing the pads on only one wheel, the driver will not be able to brake effectively; the car may pull to the side when braking, which threatens to create an emergency situation on the road. The thickness of the overlay is measured using a caliper. The minimum thickness allowed is 1.5 mm.
To carry out the replacement you will need the following tools:
Naturally you need to buy new brake pads. It is advisable to have WD-40 penetrating fluid to relieve stuck fasteners.
Changing the pads of the front wheel pair
To make it convenient to work, we place the SUV on a flat, horizontal plane. We place wheel chocks under the rear wheels and set the handbrake. Before dismantling work, we treat the threaded connections with WD-40. We perform the replacement according to the following algorithm:
How to replace the front brake pads on a Niva.
Changing the rear wheel pair pads
You can assess the condition of the brake drum without dismantling the brake drum by pulling the plug out of the shield and looking into the inspection window. To replace the rear fuel tanks, we drive the vehicle onto a lift or inspection ditch. Further work consists of a sequence of steps:
When we tighten these bolts, they will create tension on the drum output. This is not enough to remove the drum. It will be necessary to additionally tap the back of the drum with a hammer through a piece of wood. You need to tap on all sides gradually, tightening the bolts at the same time.
The pads can be removed in two ways. When using the first method, perform the following steps:
The second method consists of the following sequence of steps:
The second method: install new products and press on them, resting two mounting tools on the side of the brake shield. Thus, the upper stops of the TC recess the pistons into the cylinders.
How to replace rear brake pads on a Niva.
Having learned how to change the brake brake on a VAZ 21213, you gain experience in car repair work, which will help you save on car service costs and allow you to constantly monitor the condition of the brake system, which reduces the risk of creating an emergency on the road.
Device
The entire instrument cluster is mounted on the panel with two bolts and consists partly of mechanical and partly of electronic components. The electronic component of a regular panel is a speedometer and tachometer, but some cars from the VAZ 2110 model range already have an electronic panel.
Also, there must be indicators: coolant temperature, availability, fuel level, as well as warning lights, of which there are 12 installed on the VAZ 2110.
All device connections are stored in a printed circuit board, which is mounted on the back of the case.
Dashboard of VAZ 2110 disassembled
Replacing the front brake pads of a VAZ 21214. How to choose brake pads for a Niva-Chevrolet
The idea is correct, but why change it in the field? I answer, they usually do this to leave a puddle behind.
You can stand on the bumper of the vehicle, this is a standard feature - if necessary. A body up to 100 kg is fine. Sometimes you need to load the front or back in the snow or mud, or put the junk on the top rack.
I didn't have any vibrations. But... the way the maternity ward howled, that’s something.
HOW TO CHECK THE SHRINKAGE ON A REAR WHEEL WHEEL CAR WITH THE HANDBRAKE?!))
Hello! Can you answer? My speedometer stopped working. Mazda 626 gf 1.8 98 There is no speed sensor. On my left side there is another grenade with teeth on the outside, not my own, but on the right there is mine, also with teeth. Before that, on the right one there was no tooth.
I changed it today. And the internal teeth of both sides are different: on the left 23 and on the right 22. And accordingly, the shafts are different. And the width of the outer teeth does not match. the left is a little smaller and the right is a little thicker. It turns out that there are a lot of teeth on the left and fewer on the left.
These mismatches may affect the speedometer.
The old shock absorber is completely dead, apparently, the client is not at all aware of the matter, if he decided to only change the springs - there is no point in using such shock absorbers. Fortunately, the author had good used racks in stock. I’ll also add that not every manufacturer is suitable when choosing shock absorbers, because...
They, paired with a spring, work taking into account the weight of the motor. My original Sachs had a Volvo sticker, I installed one from a Swedish company, they turned out to be shit, they were too tight - the front end jumped like on a cart, they didn’t even handle the smooth curves of the road at all. I had to install the same new Sax.
If anyone has experience with the Monroe brand, please post.
Copper grease acts as an anti-squeak grease and is lubricated only under the springs of Tori pads; there are three types of grease for the caliper www.drive2.ru/b/3143954/
Learn to place the emphasis correctly before going on air! Stupid...! From Ukraine on the way
Priora panel
Some people prefer the Priora's dashboard. You need to know that you won’t be able to change it with your own hands “in a hurry” - there are differences: in the wiring, in the mounting of the ECU.
It should also be taken into account that the Priora has the same “propensity” for unnecessary squeaks as the “native” one, so you should also think about sound insulation in order to “fit” the Priora panel without unnecessary gaps and cracks. Another drawback of the Priora is the small glove compartment. In addition, you must definitely purchase a mount in the ECU area, specifically from Priora.
Replacing Front Brake Pads on Niva 21214
Front brake pads - replacement
If you hear a strange, atypical noise when braking, or the car pulls to the side, then you need to check the degree of wear of the brake pads . To find out if you need to replace the rear brake pads on a field, you can look in the special window at the back of the brake drum.
Self-replacement of front brake pads on a Skoda Octavia III. Skoda octavia a7 liftback. Replacing rear brake pads for Nissan Almera Classic. Replacing the front brake pads of the Niva yourself.
To do this, remove the front wheel (on a lift or using a jack) and inspect the pads through the opening in the caliper.
The minimum permissible thickness of the front brake pads is 1.5 mm .
Replacement
We hang and remove the front wheel. Replacing rear brake pads on a Chevrolet Aveo.... The frequency of replacing brake pads was 10-12, replacing the front pads was 27, replacing. Instructions for replacing brake pads on the engine or 16 replacing brake pads. Clean the surfaces of the mechanism from dirt.
Replacing NIVA front brake pads We change NIVA brake pads ourselves
Replacing front brake pads
at
Niva
the process is not complicated. Replacing rear brake pads astra h. Replacing the front brake pads on a Renault Sandero begins with removing the wheel, after which you should carefully inspect the entire brake mechanism. Replacement of rear pads and replacement of Mitsubishi Outlander handbrake only. Any man can handle this process.
Niva 21214 replacement of front brake pads and balls
DIY repairs. Replacing front brake pads ford focus ii. Brake parts gradually wear out and begin to perform poorly. Replacing front brake pads for Skoda Octavia A5. This requires an inspection and replacement of the rear brake pads of the Chevrolet Aveo. Everything you do is at your own peril and risk! The author is not responsible! Niva 21214 replacements
.
You can recess the pistons into the cylinders in another way. Replacement of rear brake pads of opel astra h. Replacing scenic 2 brake pads. To do this, insert the outer pad into the guide and, having installed the caliper in place,…
Deep revision
It is also advisable to add lighting - using an LED strip. You can take a white one, or a colored one. Preferably something that is not too harsh on the eyes – perhaps blue or green, depending on the owner’s taste.
Today, blue light is the most popular - it gives good visibility of readings on all instruments, but does not interfere with the driver’s ability to see the road clearly.
Another good idea is to make the arrows glow a different color. To do this, they need to be cleaned of old, red paint, and then painted white.
It could be nitro enamel or, even simpler, white nail polish. A color LED must be installed next to the needle on the instrument scale. The arrow, changing its position, will be colored differently.
Additionally, when using only white light, a colored overlay will help. That is, even without electrical intervention, the colored film overlay will change its appearance.
If possible, the light filter is removed, and the backing is decorated with an overlay, and here you can get creative with different materials and colors (electrical tape, colored tape, colored vinyl film). Such an overlay will significantly transform the panel and make it exclusive.
Replacing brake pads VAZ 21214 injector
The pads need to be replaced if the thickness of the pad linings has decreased to 1.5 mm.
We hang and remove the front wheel.
Using pliers, remove the cotter pin of the lower axis of the clamping lever.
Using a drift we touch the axis of the clamping lever
Holding the lever, use pliers to remove the axle.
Remove the clamping lever.
We remove the two clamping lever springs from the pad guide so as not to lose them
Using a screwdriver, lift up the brake caliper
...and place it on the steering knuckle.
Remove the brake pads from the guide.
Before installing new brake pads, it is necessary to move the pistons as far inside the cylinders as possible.
Using sliding pliers (or a gas wrench), press the pistons into the cylinders.
If you need the service of replacing brake pads on a VAZ 21214 Niva, then our specialists are ready to help you with solving this problem. We have been diagnosing and repairing cars of any complexity for more than 5 years. Call us by phone number, or leave your contacts in the feedback form. We work daily from 8:00 to 20:00. We are waiting for you!
Our specialists
Sign up for the service
Customer Reviews
I bought a used Grand Vitara and made myself an anti-corrosion trim. I go in for warranty service once a year. The anticorrosive material holds up and there is no corrosion. I recommend this company to everyone.
On the way I saw a signal about a low battery charge. I put the battery on charge, and after three hours the discharge lamp came on again. I contacted this company, after a quick check, it turned out that the voltage regulator had failed. I bought it at the nearest store for 260 rubles. Installed in 10 minutes. Thank you.
I was driving to work, and during acceleration there was a nasty whistle coming from under the hood. I contacted the service. The master, without opening the hood, said that the timing belt was poorly tensioned. They did the tightening in 5 minutes. They offered to undergo diagnostics, which showed that the generator was fine, but the wire that goes to ground needed to be changed. The installation was done right away.
Car rear window size
New car. I drove for 2 weeks, problems with the starter - low revolutions. The battery was at fault. She turned out to be fine, the new BOSCH. The main thing is that when I’m driving along the highway everything is fine, when I’m stuck in traffic jams, the battery “dies” instantly.
We carried out diagnostics at the Virazh-Auto service, it turned out that the factory had installed a defective generator, whose armature was crooked and touched the stator, hence the low charge current. I installed a new part, I will take it to the dealer, the car is under warranty.
Thanks to the guys for quickly finding out the cause of the breakdown and carrying out repairs.
I bought the car a long time ago, but problems with noise appeared recently and without hesitation I installed sound insulation. I was pleased with the result.
I went to check the injector, I didn’t like the performance of the injectors. The guys identified the problem and fixed it inexpensively. Thank you.
The masters once installed an injector in my car, and in the end I barely made it to this VirazhAvto service. Everything was quickly fixed for me. I didn't pay much. Thanks guys. Real pros.
I wanted to check the car for damage. I decided to order diagnostics for the entire car. The workers did it well. No problems were identified and I left with peace of mind. Thanks for the help.
I decided to change the nozzles in the injector. I don’t understand a damn thing about this myself, so I went to see the guys in Virazh. They installed new injectors for me. The work was done well and quickly, I'm pleased.
The starter stopped working when trying to drive away from the house. I brought the car by tow truck to this service center. The guys quickly found a problem with the unit and offered an inexpensive fix. I agreed and they provided me with quality services. Thank you. I recommend.
This is my second time using this service. First I came to diagnose the injector, but now the starter has actually broken down. The technicians carried out diagnostics and fixed the problem. All this turned out to be not such an expensive pleasure.
I want to thank the guys for not refusing. I brought my car to them 30 minutes before closing. They did not refuse and identified the cause of the starter malfunction. The next day they changed the part for me and gave me a working car. I recommend them. Well done.
The starter is broken. I don’t understand these matters, my friends and I took the car to the service center and on the spot they told me about the cause of the breakdown and offered to fix it for little money. I agreed and did not regret it. Well done, thank you.
Modification of the VAZ 2107 suspension
The front speakers on my Hyundai Verna have stopped working. I contacted this service to solve the problem.
It turned out that the front speakers were connected through an amplifier, and the negative power cable of the amplifier, attached to the car body under the rear seat, had oxidized, so the speakers did not work.
The service technicians quickly identified the problem, lubricated the oxidized wire and made the speakers look like new! Thanks a lot! I would never have guessed it myself!)
I stopped by this service in my Honda CR-V because the alarm system was not working correctly (it went off every other time). The reason turned out to be a malfunction of the alarm unit. Many thanks to the service technicians, they fixed the problem within an hour, I’ve been driving for 4 days now, everything works perfectly.
I would like to express my deep gratitude to this company for the quick repair of the starter of my VAZ 2114 swallow. Now the car starts with a bang even in terrible frosts. I recommend this service to everyone and will definitely come back here again!
The wipers stopped working (Nissan Note). Within an hour the problem was fixed. I was amazed by the speed and efficiency of the staff and the cost was not expensive. I recommend this service to everyone.
I noticed increased oil consumption lately. I went to this service for diagnostics. We conducted a thorough inspection of the car, found out the cause (rings), and made repairs. Everything is high quality and fast.
I came to this service center regarding strange noises in the engine. To identify the cause, we carried out diagnostics, and the results revealed a number of problems. It’s good that all this was found out in a timely manner and everything was done with relatively minor repairs. I liked the service, everything was done quickly and competently.
I regularly carry out preventive diagnostics of my car in this service and my car has never let me down, despite all the stereotypes about domestic cars.
Despite the venerable age of my car, it is still in good condition, and not least thanks to this car service.
Thanks to the guys for the quick and high-quality suspension diagnostics. I made sure that everything was fine with her after hitting one of the potholes.
The domestic SUV is considered one of the best in its price segment. Almost any Niva owner can assemble and disassemble it independently. This is due to the fact that with active off-road loads, many components need to be regularly changed or updated. One of these problem areas was brake pads.
How to Identify Brake Problems
No one will argue that a working brake system is a guarantee of safety. With serviceable brakes, you can compensate for the breakdown of any component in motion. Therefore, regular monitoring of these nodes is a mandatory procedure. Replacing brake pads on Niva 21214 occurs in the following cases:
VAZ 2114 color Rhapsody
Replacing components is not a problem even for beginners in repairing their own car. The main thing is to strictly follow the instructions and check the new system after assembly to eliminate possible problems while driving.
Replacing front pads
It is logical that for replacement it is better to select original parts or those that have received official approval from the manufacturer. For the further process, you should hang the wheel and secure the car properly. Replacement procedure: Remove the wheel.
How to remove the tidy
On a VAZ 2110, removing the dashboard from the dashboard is not difficult, and the only tools you need are a Phillips screwdriver and pliers or a wrench. With their help, we will remove the positive terminal from the battery before starting work. So, lower the steering wheel and unscrew the 4 screws that secure the decorative trim.
Releasing the decorative trim on the VAZ 2110
After this, we pull the cover towards ourselves, and it can be easily removed, hanging on the wires of the switches. To prevent the cover from getting in the way, the wires from the switches can be disconnected - they are on the connectors.
Disconnecting wires from switches and removing buttons located on the decorative trim
Before disconnecting the connectors, do not forget to label them so as not to mix them up during assembly!
So, now we have a tidy in front of us, which is held in place by two screws located on the sides.
The instrument panel is secured with two screws
We unscrew them and carefully remove the panel, not forgetting that it is also on the wires. In principle, the wires supplying the instrument console in the VAZ do not need to be disconnected, since their length is sufficient to replace the lamps.