What you need to know about Granta Sport pads
In the Sport modification, all four calipers are disc type. Friction linings are metallic and semi-metallic. Ceramic and organic friction linings are not installed on the Lada model. The difference between the last two types is the presence of ceramic and Kevlar fiber.
There is no need to mention the advantages of organics and ceramics, since everyone knows that they are developed using the most modern technologies and provide maximum braking effect. The exorbitant cost is a significant drawback, which for many becomes a stumbling block.
Which is better - grooving or replacement?
If the parts do not correspond to the specified dimensions from the manufacturer, a reasonable question arises - grind or change. Grooving for a ventilated brake disc is possible if the remainder is at least 4 mm. Since if a part is worn out, the manufacturer revokes the warranty, many advise replacing it with a new one. After turning a disc on a lathe, runout may occur. If the grooving is carried out using specialized equipment, this problem will not arise.
You definitely need to replace it if the following symptoms occur:
- cracks, scratches, chips;
- beating, grinding;
- wheel locking when braking;
- drop in brake fluid level in the system;
- increased braking distance;
- increased brake pedal travel.
In all these cases, there is no point in saving, since driving with such brakes becomes dangerous.
Comparative characteristics
To understand which model from the rating to select for your vehicle, you need to carefully study the comparative characteristics of the models.
Table. Comparative characteristics of brake discs.
| Model | Disk type | Peculiarities | Installation side | Diameter mm | price, rub. |
| Alnas Sport 2112-3501070-01 | Ventilated | With perforation | Front axle | 260 | From 1,750 |
| ATE PowerDisc | Ventilated | Notched | Front axle | 300 | From 1 850 |
| BREMBO MAX 09.8903.75 | Ventilated | Notched | Front axle | 260 | From 2 250 |
| Bosch 0986479346 | Ventilated | Notched | Front axle | 260 | From 1 000 |
| TRW DF7257 | Full | Varnished | Rear axle | 288 | From 1 880 |
| BM BDV 292 | Ventilated | Notched | Rear axle | 285 | From 1 740 |
General questions about replacing pads on a Grant
Let's consider the main points on the frequency of replacing brake pads and their choice for the car.
Replacement frequency
According to the factory regulations, the front pads are checked for maintenance without replacement. Change only when the following factors :
- Strong squeak/whistle when braking.
- Thickness 1.5 mm or less;
- Delamination, charring and staining;
- Brake vibration when driving;
Often they are coated with a layer of material that begins to squeak when braking. This happens as the pad wears out. This is how the mechanism itself signals the need for replacement.
Please note: Brake material may vary depending on the manufacturer. This is fraught with the following:
- Early brake failure;
- Painting of wheel rims in dust from crumbling material;
- Squealing from brakes immediately after replacement;
- Increased wear of brake discs.
New brake pads and old ones
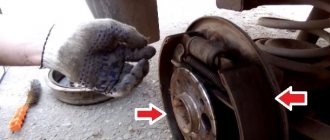
For clarity, we will give examples of wear on the front brakes during operation of the machine.
Wear is visible on the brake part of the old pad. If you do not change it for a long time, severe wear may appear on the disk.
This is what happens to discs when driving for a long time with worn out pads. Sooner or later, such wear will lead to cracks in the disk.
How to independently determine the wear of brake discs
- We install the machine within the perimeter of the repair area. Jack up and remove the wheel, having previously activated the parking brake;
- We carry out troubleshooting of the brake caliper, inspect for cracks, chips, and corrosion;
- We check the integrity of the fluid supply line, rubber boots, cuffs;
- Using a caliper we measure the actual thickness of the disc. We compare the obtained data with the parameters specified in the operating instructions.
We make a final decision on the advisability of grooving and replacement with a new disc.
The need for prevention will also be indicated by the following:
- increase in braking distance;
- applying force when pressing the brake pedal;
- stopping is accompanied by a creaking, grinding sound in the area of the front axle;
- liquid is systematically drained from the expansion tank of the master cylinder;
- The brake pedal vibrates when pressed.
In a car service environment, the process looks similar. Except for minor additions.
Common mistakes when replacing pads
With any multi-step operation, errors can occur. To avoid them, you must adhere to the following recommendations:
- Changing the front pads on a Lada Granta must be done on two wheels at once. This way the mechanism will work longer.
- If the front pads of the Lada are equipped with thrust springs, they must be periodically lubricated. This will keep the braking mechanism operational, and will provide acoustic comfort to those inside the car.
- The driver should avoid sudden braking for the first few hundred kilometers after replacing the front pads. At this time, it is also recommended to periodically check the degree of heating of the wheel rims on the Lada and pay attention to dust loss.
- If you are not confident in your abilities, you can invite a friend more experienced in this matter as a consultant or go to a car service station.
Replacing the front brake pads on a VAZ Granta Liftback and all other cars of this family is not a complicated procedure. Most motorists carry it out no more than once a year.
Diagnostics of friction lining wear level
Most modern cars are equipped with special digital wear sensors. When the programmed level is reached, an indicator light is activated on the central instrument panel, indicating a breakdown of the brake circuit.
Unfortunately, the Lada is not yet equipped with digital sensors; you need to navigate by the actual thickness of the body of the lining. The maximum permissible threshold for using the body is 1.5 mm. Above the specified limit, the operation of the technical device is not safe. The degree of wear can be determined by removing each wheel and measuring the thickness with a caliper.
Alternative option: turn the steering wheel to the extreme left/right position, visually assess the thickness without resorting to dismantling work. The above recommendation applies exclusively to the front contour. For rear wheels, unconditional removal of discs.
Replacing brake pads on Lada Granta
Selecting brake pads for Lada Granta
Brake pads are a consumable part of the car, in other words, they are changed quite often. The front brake pads bear the brunt of the load when braking, so they wear out three times faster than the rear ones.
Not only the braking efficiency, but also whether they will creak during operation depends on the quality of the brake pads. Do you know which front brake pads are best to choose?
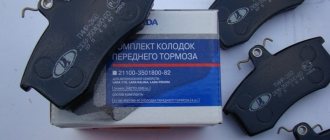
Lada Priora, Granta, Kalina cars are equipped with the same brake pads having catalog numbers: 21100-3501080, 21100-3501089.
The brake pad consists of a metal plate and a special lining made of friction materials. The quality of this material determines the wear resistance, rigidity and friction coefficient of the brake pad. The higher these important parameters, the better.
Original or non-original
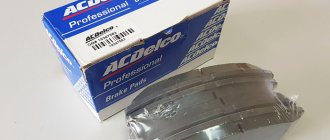
There is an opinion that original brake pads are more effective, and their service life is much longer than non-original ones. In addition, original brake pads are made without the use of asbestos, which is hazardous to the environment. Why do many people choose non-original brake pads? The main reason is the low price for acceptable quality. And in some cases, for a low price you can find non-original brake pads that are not inferior in quality to the original.
Replacing rear brake pads in Lada Granta
Replacement of rear brake pads, disassembly and assembly of the rear brake mechanism of Lada Granta.
If they are worn out, and this usually happens after a mileage of 60,000 km.
1. Securely secure the car so that it does not roll away.
2. Remove the handbrake from the brake and make sure it is in the down position.
3. Raise Grant using a jack.
4. Remove the rear wheel.
Comparative characteristics
To understand which model from the rating to select for your vehicle, you need to carefully study the comparative characteristics of the models.
Table. Comparative characteristics of brake discs.
| Model | Disk type | Peculiarities | Installation side | Diameter mm | price, rub. |
| Alnas Sport 2112-3501070-01 | Ventilated | With perforation | Front axle | 260 | From 1,750 |
| ATE PowerDisc | Ventilated | Notched | Front axle | 300 | From 1 850 |
| BREMBO MAX 09.8903.75 | Ventilated | Notched | Front axle | 260 | From 2 250 |
| Bosch 0986479346 | Ventilated | Notched | Front axle | 260 | From 1 000 |
| TRW DF7257 | Full | Varnished | Rear axle | 288 | From 1 880 |
| BM BDV 292 | Ventilated | Notched | Rear axle | 285 | From 1 740 |
Pad replacement process
- Turn the steering wheel in the direction you want to replace it. It will be more convenient to work this way.
- Clean any dirt from where the caliper attaches to the disc.
- Take a chisel or a flat screwdriver with a small slot in your hands (I don’t know if this word can be conjugated). Bend back the locking plates that hold the bolt. I recommend bending the bottom plate, then it will be convenient to lift the brake mechanism up and replace the pad.
You don't have to touch this bolt.
Installing new pads
Reassemble in reverse order.
Attention! After you have replaced both brake pads, you need to bleed the brakes. Place a block or something similar under the rear wheels to block the wheels from moving. Start the car and operate the brake pedal.
Video of replacing front brake pads
Inductive type sensors
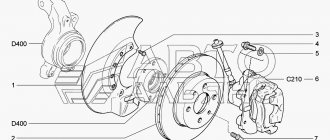
To operate the sensors installed in the front brake mechanisms, gears are made on the housings of the external hinges of the front wheel drives.
To operate the sensors, master discs are installed in the rear mechanisms under the brake drums.
Rice. 4. Rear wheel speed sensor
Pulse signals from the sensors enter the control unit.
When one of the wheels is blocked, the hydraulic modulator, at the command of the control unit, limits the pressure in the corresponding channel.
If a malfunction is detected, the control unit informs the driver using a warning lamp on the instrument panel.
The problem can be determined by the fault codes.
An ABS malfunction may be caused by a failure of the wheel rotation sensors or a malfunction of the hydraulic valve block itself.
If the ABS fails, the braking system remains operational, but braking efficiency is reduced.
Removing the ABS hydraulic unit
We install the car on a lift or inspection ditch.
Disconnect the plug block of the wires from the hydraulic unit.
We disconnect the brake pipes going to the brake mechanisms from the hydraulic unit of the anti-lock braking system. We install plugs on the tubes and holes in the hydraulic unit.
Disconnect the primary and secondary circuit pipes of the master cylinder from the ABS hydraulic unit.
Using a 13mm socket, unscrew the two bolts securing the hydraulic unit bracket to the front side member.
Remove the hydraulic unit with the bracket assembly.
Using a 10mm wrench, unscrew the hydraulic unit from the bracket.
Hydraulic unit installation
We install the hydraulic unit on the bracket and secure it with nuts. The tightening torque of the nuts is 7 – 10 Nm.
We install the hydraulic unit with the bracket assembly on the car body and tighten the two bolts with washers securing the hydraulic unit to the left side member.
We remove the plugs and attach the tubes to the ABS hydraulic unit. The tightening torque of the tube fittings is 15 – 18 Nm.
Attach the plug block. Install the battery. We bleed the brake system.
Removing and installing the front wheel ABS sensor and rotor
We install the car on a lift or inspection ditch.
Disconnect the front wheel speed sensor harness connector from the front wiring harness.
Using a flat-head screwdriver, remove the speed sensor harness block holder from the hole in the car body.
Remove the sensor harness from the brackets on the front suspension strut and the car body.
Using a TORX E8 socket, unscrew the bolt securing the speed sensor to the bracket on the steering knuckle and remove the sensor.
Installing the front wheel speed sensor
Before installation, apply AZMOL LSC-15 lubricant to the mating holes. Install the sensor in reverse order. The tightening torque of the sensor mounting bolt is 6 – 9 Nm (0.6 – 0.9 kgcm).
If it is necessary to replace the ABS rotor of the front wheel, then replace the drive assembly: (right front wheel drive part. 11180-2215010-10, left front wheel drive part. 21700-2215011-00) or the outer hinge assembly (part 11186-2215012 -00).
Removing the speed sensor and rear wheel rotor of Lada Granta
We install the car on a lift or inspection hole.
Disconnect the rear wheel speed sensor harness connector from the wiring harness.
Using a flat-head screwdriver, remove the speed sensor harness block holder from the hole in the car body.
Remove the rear wheel speed sensor harness from the mounting brackets located on the rear suspension arms and vehicle body.
Using a TORX E8 socket, unscrew the bolt securing the speed sensor to the bracket.
Remove the rear wheel speed sensor.
Before installing the speed sensor, lubricate the mating parts with grease.
The tightening torque of the sensor mounting bolt is 6 – 9 Nm.
Removing the rear wheel rotor
Place the car on a lift and remove the rear wheel.
Using a 7mm socket, unscrew the guide pins securing the drum.
We insert the pins into the threaded holes of the brake drum and screw the pins in sequence. Thus, compressing the brake drum.
Removing the brake drum
Removing the rear wheel rotor
In the rear block of a car with an ABS system there is a hole into which the tip of the speed sensor fits.
Installation
Apply grease to the hub seating belt, install the brake drum and tighten the guide pins. The tightening torque of the pins is 7 – 15 Nm. Install the wheel.
Why did it happen so?
Perhaps the automatic requests do not belong to you, but to another user accessing the network from the same IP address as you. You need to enter the characters into the form once, after which we will remember you and be able to distinguish you from other users exiting from this IP. In this case, the page with the captcha will not bother you for quite a long time.
You may have add-ons installed in your browser that can make automatic search requests. In this case, we recommend that you disable them.
It is also possible that your computer is infected with a virus program that is using it to collect information. Maybe you should check your system for viruses.
If you have any problems or would like our support team, please use the feedback form.
Let's summarize
As you can see, the process of replacing brake pads is not complicated; it is important to initially understand how to fix it. The work will not take much time - half an hour, and the second or third time you will do it even faster
Pay attention to the sounds when braking: if there is a whistle, grinding or creaking, you feel kickback in the pedal, the system begins to “beat” - it’s time to install new pads. Practice shows that on a Lada Granta, for a driver with a calm driving style, the service life of the kit increases to 50 thousand kilometers, for motorists and reckless drivers it decreases to 30 thousand kilometers
In general, this is the case, I drove on factory TIIR pads, you all know them very well, and I think I’m sick of this creaking sound when I press the brake! A friend recommended pads from the Markon company (I think that’s what they’re called), they didn’t creak on his Chevrolet Niva!
After driving about 1 thousand km they whistled like a cop's UAZ! After about another 300 km they began to whistle like a suu... gopher! I later realized that the factory ones were just whispering and not whistling compared to Markon. I thought about putting the factory ones back but then I remembered that I threw them away! =)
Just a song and not pads, but imagine in traffic jams for half an hour to an hour and a half! My mind just explodes! Yes, it's a shame =)
I was searching on the Internet and found out what kind of pads do not creak on the Grant. A lot of people wrote about Feradoo (green, they are soft and brake worse) and Ferado (red, they brake better but wear out the brake disc faster), everyone says that the green ones squeaked after a certain mileage, then everyone apparently started buying red ones. But the result is that they still creaked sooner or later.
When I saw a Lada Granta passing in a traffic jam on the street, I wanted to run out of the car and ask, “What brand of pads do you have!” =))) I then heard this creak from everyone, like a block maniac =))))
Read more: Negative camber spacers for rear wheels of VAZs
But after searching on the Internet, I found a video recording of one dude who was talking about TRW GDB 1446 pads.
Then I found a blog post for Daseros (Lada Kalina) and asked him about the creaking, he answered me “I drove 15 thousand, there wasn’t a single creaking... these are pads for Europe. Excellent))) I’m shocked)”
The next day I started looking like crazy for TRW GDB 1446 pads, we didn’t have them in the car markets and in stores either! But after searching the Internet I found it on the website www.exist.ru/price.aspx?p >
Now they cost 1,228.33 rubles due to the dollar jump. And then they came, I immediately checked the license via my mobile phone using the QR code, everything was fine and not a fake =)
Working on the brakes on a Grant is required when the car begins to wobble when braking, and extraneous noises are heard in the area of the rear wheels. What’s worse is if one of the wheels starts to jam when stopping. This article describes a step-by-step replacement of Grant's rear brake pads.