Print this article Font size 16
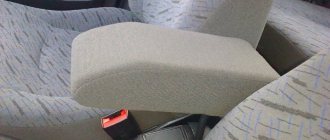
An armrest is a very convenient thing inside a car. Some companies produce their cars with already installed armrests, but sometimes owners have to search for, make and install these elements with their own hands. This also applies to the VAZ 2110.
It doesn’t matter, today there are many options for different armrests on the market that can satisfy you in terms of price, functionality and quality.
Convenient and practical
Video
This video shows in detail how to make a car armrest with your own hands.
⚫ DIY ARMREST. HOW TO MAKE AN ARMREST with your own hands. ♦DIY CAM♦
Armrest option for the Renault Sandero Stepway car (Renault Sandero Stepway).
DIY armrest for Renault Sandero Stepway
How to reupholster the armrest with your own hands on a Priora.
https://youtube.com/watch?v=FiANYBM43kk
How to make an armrest from plywood and cover it with leather.
1. How to make a leather armrest for a car with your own hands from leather plywood
Ready-made new car armrests.
Armrests for cars 2022 2019 2022 2017 2016 Video
How to install hinges.
armrest!
During the trip, one hand spontaneously rests on the door ledge. If there is hard plastic in this place, then it becomes uncomfortable to hold your elbow in this place. In this case, you can make the car more convenient to use by simply modifying the doors. Let's figure out how to make a soft armrest for a door.
The manufacture of the armrest is shown using the example of the Lada Vesta sedan. For other LADA cars (XRAY, Granta, Kalina, Priora, Largus and Niva 4x4) the process looks similar.
- hardboard (thick pressed cardboard) or fiberboard;
- foam;
- leatherette;
- glue;
- Double-sided tape.
We make a template using newspaper.
DIY car armrest: 15 drawings of different models
We transfer the dimensions of the template onto the hardboard. We glue foam rubber to it, cut it around the perimeter with a margin of a few millimeters.
We tighten it with leatherette. You need to pull the material firmly so that the armrest does not lose its shape over time. We glue the edges with glue.
We secure the armrest to the door trim using double-sided tape. The surface on the door is pre-degreased.
Now your elbow will be on the soft armrest and will not get tired. If necessary, a homemade accessory can be quickly dismantled. The door trim can be supplemented with decorative leather inserts, as well as covers for the standard armrest, gear knob and seats (details).
Let us remind you that we previously looked at other accessories for LADA cars, for example, how to make a flip key yourself.
The final stage
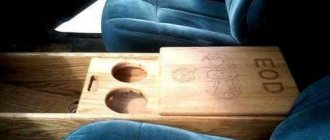
At this stage, it is necessary to install the prepared product directly into the machine itself. To do this, it is best to use a polypropylene pipe with a steel rod and an M8 pin, designed for fastening plastic elements in the machine.
After this you need:
- Insert the pins into the holes.
- Install a metal plate on the reverse side and secure with a wrench.
- Cut a rectangle out of plywood, cover it with leatherette and make a couple of holes in it.
- Install the part and put on the tubes.
- Mark holes on the armrest and make them.
- Install the finished product between the seats and secure it with nuts.
Fastenings can be designed at your discretion. Some car owners simply fix the armrest between the seats. If it holds tightly, then additional manipulation may not be required. However, it is worth pressing the product several times to make sure that it does not fall out.
How to tighten a car armrest with your own hands (using the Priors as an example)?
If the car owner experiences discomfort when using the made armrest, then it is better to remove it or remake it.
⚫ DIY ARMREST. HOW TO MAKE AN ARMREST with your own hands. ♦DIY CAM♦
Unfortunately, not all modern cars are equipped with such an important part as an armrest for the driver. Car owners are trying to eliminate this drawback in different ways: some buy ready-made devices, others try to make them with their own hands
We will try to understand the last option in more detail.
Seat tuning
If a person has a keen eye for aesthetic “blunders”, he will notice that there are some holes in the seats of the VAZ 2110. In particular, there are no covers that would cover the air ducts and filter outlets. This can be easily modified. Since there are no overlays for the “ten” on sale, you can use a similar one designed for Priora. The standard fastenings there are:
- Self-tapping screw directly on the seat frame.
- Bolt on the back (the back needs to be folded back).
It is better to make an additional hole on the back side of the pad and attach it to the seat with an elastic band. This way we will get rid of the need to make additional fasteners and holes.
Making a table with a cup holder
Measure the armrest of the sofa and decide on the size of the table. Calculate the length and width of each of the three planks.
In our case, the length of the top and side planks was 350 mm. To determine the width of the top plank, you need to add two thicknesses of the side planks to the width of the armrest. The width of the sidewalls is chosen arbitrarily; it is advisable to choose it so that you can use a board of standard sizes.
The dimensions of the plywood should approximately correspond to the width of the armrest. The plywood should completely cover the hole in the top plank.
On the top board, mark the center point of the future hole, after trying on the hole saw. If the hole saw is wide enough, you are unlikely to be able to cut the hole with a regular drill. In this case, you will need a drilling machine. Alternatively, you can use a jigsaw.
Sand the edges of the cut hole with sandpaper, and also sand the surfaces of the boards. There is no need to sand the corners and edges, otherwise gaps may form when joining the parts.
If you have a jig for drilling countersunk corner holes, secure it with a clamp on the side board (see photo). Drill pilot holes. Do the same with the second side. If you don't have such a device, you can skip this step.
Review of viburnum armrests
Apply a thin layer of wood glue to the top edges of the side boards. If you have drilled pilot holes, screw the three pieces of wood together. Glue deposits must be wiped off immediately.
If you decide to do without screws, simply tighten the parts using clamps. Let the glue dry.
When the glue has completely dried and you are confident that the joints are secure, you can sand all surfaces again. This time you can smooth out the corners.
Cover the wood with a stain of a suitable color. Let it dry for 12 hours. Then the surface can be carefully treated with the finest sandpaper to remove protruding wood fibers that have risen from exposure to moisture. If the color of the wood is not saturated enough, you can reapply the stain.
Using wood glue, secure a piece of thin plywood under the hole in the top plank. Press the plywood down with clamps. Wipe off any excess glue. Let the glue dry.
Cover the table with glossy or matte varnish. This will protect the wood from moisture.
This table can be installed on the armrest of the sofa, with a cup of hot coffee and a book on it. What else is needed for happiness?
Painting, ceiling covering
Over time, the ceiling in the VAZ 2110, and frankly speaking, in any other car, gets dirty, damaged, and generally becomes unsightly and spoils the appearance of the interior. Reupholstery or restoration costs a lot of money, and it must be admitted that it is quite labor-intensive.
Therefore, now many drivers decide on such tuning as painting the ceiling, especially since you can choose a color and tone to suit every taste. What are the options for ceiling paints?
- Universal paint in aerosol cans (you will need about five pieces). You can choose matte paint or shimmer. The only thing you need to remember is that the top may “crumble” a little, plus the interior must be ventilated for several days.
- Universal and water-based paint. They are mixed to soften and better adhere the paint to the soft ceiling material.
- Paints for velor, suede, textiles in the form of aerosols. These types are best used for the ceiling, since painting with them will not make it hard, and the paint will apply more evenly and without stains.
Replacing the sun visor
In the VAZ 2110, the sun visor is nothing special, while now there are a lot of offers for very beautiful, and most importantly functional visors. They are transparent and also have an anti-reflective function, meaning they can be used both day and night.
In addition to helping when driving in fog or at night with oncoming cars, this accessory also looks very stylish. Installs on a standard visor with two clicks in a couple of seconds.
Deciding on the mounting method
Think about the mounting method. Car armrests can be placed tightly between the seats or fixed using special fasteners.
If you decide to stick with tight fixation, you will need to prepare grooves in the lower part of the structure that correspond to the parts in the area of the intended installation location. You immediately need to decide on the upholstery material and take its thickness into account when marking the project.
Making your own fasteners is not an easy task, but the result is worth your effort and time spent on this process. The elements of the armrest in its lower part must be tied to the structural elements of the interior of the car or to pre-created fasteners.
Each of your decisions must first be transferred to a drawing, and only then brought to life. This way you can avoid errors and inaccuracies.
Materials for construction
Once the layout is checked, you can buy everything to bring the idea to life. Will need:
Plywood, chipboard, fiberboard or pressed cardboard for the base. There is no need to take sheets thicker than 8 mm; Self-tapping screws for fastening parts. You can put them on glue, but the structure will be more flimsy; Door hinge - so that the top lid can be folded back and the interior space can be used to store small items; You can simply make it removable, but using the box will be less convenient, and the lid may slide off when you steer; Sheathing material. Suitable: leatherette or thick fabric for furniture; Place foam rubber under the lid cover to make the armrest softer.
Enthusiasts can stock up on wires and light bulbs - make a backlight inside the box or move the cigarette lighter, power window buttons, etc. into it.
Manufacturing
This work is quite simple for those who have held a jigsaw at least once in their life. If all the measurements were made correctly and you have made a good drawing of the future product, then all you have to do is follow these steps:
- Cut out all the details on graph paper, thereby creating patterns.
- Attach the patterns to the plywood and use a pencil to draw the outlines of the future parts on it.
- Using a jigsaw, cut out the parts from plywood.
- To make it easier to make curves, use hot water or steam to soften the plywood.
- Now it's time to fasten the individual parts with self-tapping screws. It is better not to use glue - the connection is unlikely to be of high quality.
- If you wish, divide the internal space of the product with partitions, thereby creating several compartments.
- Glue a piece of foam rubber onto the top of the lid, which will create a soft and comfortable feeling for your elbow.
The product can be considered almost finished. All that's left is to tighten it up and put it in place.
Sheathing
First you need to make the structure softer. To do this, you need to cut out pieces of foam rubber that will fit the upper parts of the armrest. It is not necessary to cover the areas that are attached to the seat with foam rubber; in the lower part the armrest comes into contact with the seat adjustment elements. If there is foam rubber in this place, it will quickly tear.
For upholstery you need:
- Apply glue to the places where the foam rubber will be and glue it.
- When the material sticks firmly, you can cover it with felt (this is optional).
- Cover the structure with velor or leather. It is best to use a construction stapler for this. If you use glue, then in the future the question may arise of how to tighten the material.
- Perform the same manipulations with the lid.
- Cover the inside of the armrest with fur or any other material.
- Install a furniture magnet. This is necessary so that when driving over bumps the armrest does not accidentally open. To do this, a magnet is installed on the cover of the product, and a metal element is installed in the armrest itself.
- Install the hinges, thereby connecting the lid and the main structure. Fastening is also carried out using small self-tapping screws.
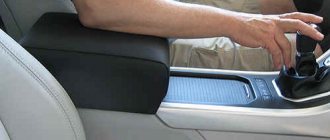
Do you need an armrest in a car?
Some models of cars in the budget segment are sold without a special elbow rest. Drivers quickly get used to it and don’t even notice that their car is missing something. Therefore, a logical question arises: is there any benefit at all from the armrest?
In fact, there is, and it is quite noticeable. The armrest significantly reduces the strain on the arm and back muscles during frequent use of the gear lever. This is especially true in cars with a manual gearbox. When traveling long distances and even in regular traffic jams, the hand becomes tense and tired, in some cases the muscles begin to cramp, which can lead to an accident.
the armrest in the car significantly reduces the load on the muscles of the arm and back
Another nice feature is the ability to use the armrest as a place to store useful little things. A water bottle, wallet, car documents, sunglasses case and more can be placed inside and will always be at your fingertips (literally and figuratively). Expensive models often have armrests equipped with control buttons for some vehicle devices.
In addition, an ordinary armrest can create an atmosphere of home comfort in a car and make your stay in it more comfortable.
AndRCZ
www.drive2.ru
Taking measurements
Here you need to show maximum care and concentration. The accuracy of measuring the distances and dimensions of the space for the future armrest will affect the parameters of the finished structure and its location. It is necessary to carry out these actions only in your car, because in two cars of the same brand there may be discrepancies in the interiors.
All the data that you obtain must be written down, preferably immediately on a sketch of the future product. Thus, the measurements will not be confused and will be recorded clearly, accurately and without errors. You will need to measure the following parameters:
- at what distance from each other are the front seats;
- find out the distance at which the position of the driver’s hand is most comfortable (sit in the car, grab the steering wheel with one hand, and bring the other to a relaxed state and place it in its usual position);
- turn on the handbrake and measure the distance from it to the back surface of the backrest on the seat (the comfort of rear seat passengers cannot be ignored);
- Take into account the distance between the seat belt latch mechanism.
Make a visual comparison of the location of the future structure and its dimensions, stopping at the handbrake. I'm interested in the relative position of the handbrake and armrest. If the last element extends into the territory of the handbrake, then at the stage of taking dimensions it will be necessary to measure the lifting height of the brake lever.
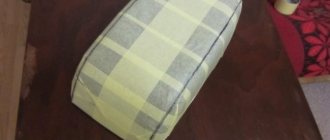
Re-upholstery process
When the box design is ready, all the elements are in place, all that remains is to give the armrest a completed look. Therefore, it will need to be re-upholstered with the selected material.
Let's assume that you have chosen faux leather.
To get the job done, prepare a kit consisting of:
- material;
- scissors;
- masking tape;
- silk threads;
- sewing machine;
- marker.
The sequence of operations will look something like this:
- Take the finished armrest and cover it with masking tape. In the areas where you want to make seams, draw lines with a marker;
- Along these lines, carefully cut the tape from the armrest;
- Apply the resulting patterns to the artificial leather and trace. There should be a margin of about 2 centimeters along the contour, so that later everything can be hemmed and done as carefully as possible;
- Blanks are cut from the material used. It is best to sew them on a typewriter. It is extremely difficult to do this manually;
- As a result, you get a cover that fits onto the base of the armrest.
The edges are hidden inside. They can be glued or simply fixed with a stapler.
I can’t say that the work is very simple and anyone can do it. This is wrong. And if an adult man can assemble the structure, then much more serious problems can arise with the production of patterns and templates.
Therefore, think in advance whether it is worth taking on the production of an armrest, or whether it is better and easier to purchase it from the manufacturer.
For those interested, you can use this link to read useful material about the nuances of choosing an armrest in a car.
The element seems ordinary, but if selected incorrectly, some problems arise.
Watch this video on YouTube
We will say goodbye to you. But we'll see you again soon.
Subscribe, leave your comments, ask questions and tell your friends about us!
Why is this necessary?
By the way, we have already talked about how to choose an armrest. Therefore, I advise you to follow the link and re-read this material. An option for those who do not want to pick up drawings, draw diagrams, saw or cut something out.
The main thing here is to choose the right model, based on the key characteristics and your own requirements.
Oddly enough, not all drivers understand why an armrest is needed. A regular one, or a folding one, inside of which you can put various small things, the same car fragrance, money, a flashlight, etc.
They have several functions:
- This is a support for the hand, allowing you to rest during the trip;
- if there is a built-in drawer, the armrest becomes additional storage;
- the design may have a stand for water and coffee;
- This is a platform for additional buttons.
The functionality is really extensive. But still, the main task is to ensure comfort and relaxation.
Handmade
To create an armrest for the VAZ 2114 you will need drawings. You can find them on the Internet, or you can do them yourself, taking into account your personal wishes and preferences.
There shouldn’t be any serious problems with making your own armrest. The main thing here is to have a good mood, a set of tools and materials.
- Prepare your work area.
- Take measurements of the area of the cabin where you plan to place the armrest. Place it directly between the front seats. The design can be compact or as large as possible. It all depends on your wishes.
- After taking measurements, proceed to drawings.
- Next, buy upholstery material that will go well with the car's interior.
- Chipboard is ideal as a material for the frame.
- Cut out the necessary structural elements, sand them so that there are no irregularities or sharp corners that could cause the skin to tear when tensioned.
- The chipboard elements are connected to each other with self-tapping screws. It is difficult to do this manually, so arm yourself with a screwdriver.
- Consider the presence of internal space, shelves and compartments. They should be provided for at the stage of drawing formation.
- The upper cover of the armrest must be slightly larger than the body itself. About 2-5 centimeters, or whatever is more convenient for you. The main thing is not less than 20 millimeters. You will also need a cover for the armrest itself, which you can rest your hand on while driving. Its length is usually chosen to be 20 centimeters longer than the body. Although your personal requirements are also taken into account here.
- As for covering the armrest body, for this you can use everything that you have available - leather, leatherette, velor, films that imitate carbon, natural carbon, and so on.
Device and purpose
The armrest is a product that is designed to support the driver’s right hand, and in some cases, to store personal items (documents, phone, etc.). The device is placed between the two front seats. There are models on sale that differ in the following parameters:
- type of lid (opens, does not open);
- manufacturing materials (plastic, wood, MDF);
- quality of upholstery (leather, substitute, fabric);
- dimensions (width, height, depth);
- design.
In addition, armrests can be factory-made or made independently, which is very common among some car enthusiasts.
How to make an armrest for a VAZ 2114
Of course, you can buy a good product at the auto market or in a specialized store, but not everyone is ready to pay several thousand rubles for lower quality items. Moreover, if you have a great desire and a small amount of time, making it yourself will not be a difficult procedure.
In order to make a high-quality and functional product yourself, you will need a drawing of the armrest for the VAZ 2114. You need it so that the final result is a smooth and neat design.
As can be seen from the figure, the material used for the production of the armrest is eight-millimeter MDF and solid oak.
Next, consider the process of self-production:
- First of all, let's estimate all the dimensions indicated in the drawing in relation to our free space between the seats. You don't want to end up with a frame that won't fit between the seats.
- Purchase all necessary materials. In order to make an armrest for a VAZ 2114 with your own hands, prepare the following tools:
electric jigsaw; coarse and fine grain sandpaper for sanding wooden surfaces; self-tapping screws; screwdriver (if you don’t have one, a screwdriver and a drill will do); pencil and ruler; good, high-quality glue (which is very important); upholstery; foam; nylon threads (if you use stitching); powerful hair dryer.
- Now that everything is ready, we need to make the frame of the structure. To do this, take the material and, according to the dimensions in the drawing, using a pencil, outline the contours of the walls, base and cover of the workpiece.
- Using an electric jigsaw, cut out all the necessary structural parts.
- Take sandpaper and sand the sharp and uneven corners of the workpieces.
- Mark the joints for further fastening of the workpieces using self-tapping screws. Apply markings to organize the internal space in the future armrest.
- Using a screwdriver and self-tapping screws, fasten the component parts of the product together. If you do not have an electric tool, manual screwing will be very difficult. To make the process easier, using a drill with a drill of the required diameter, you can make small guide holes, after which it will be easier to screw in the screws.
- Install the necessary fittings (hinges for the folding armrest).
- Now is the time to sheathe the resulting structure. It is recommended to select upholstery materials depending on the texture and color palette used in the interior of your car. Typically used for upholstery: leather, velor, leather substitute, Alcantara. For the top cover, on which the driver’s hand will be located, it is necessary to adapt (glue) a full-size piece of foam rubber (later it will be sheathed).
- After selecting the material, we cover the walls and cover of the armrest. In order for natural or artificial leather to stretch well, it must be heated with a powerful hair dryer and, without allowing it to cool, be pulled onto the frame. In addition, from a practical point of view, it makes sense to sheathe the internal sections of the armrest (so that the objects inside do not rattle when moving). A material such as carpet is perfect for this.
- Now all that’s left to do is install the finished product into the car’s interior.
Select materials and complete the work
To create the body and supporting parts, you can choose any wood-based material. Its thickness should be 8 mm. If there are no curves, you don’t have to limit yourself in the choice of material; otherwise, it’s better to go with plywood, which can bend under the influence of water vapor. To cut out the structural elements of the required shape, you need to have a hacksaw on hand, or even better, a jigsaw. Any material that you like is suitable for cladding. But remember that it must be resistant to wear, have a durable color and match the design of the car.
So, the parts are cut out and prepared for assembly. Make patterns in advance on paper for upholstery material. Using glue or fixing elements, we assemble our homemade armrest into the car. If no mistakes were made previously, then problems will not arise.
Using the previously made patterns, we cut out the elements for the upholstery and attach them using a furniture stapler or glue. We are working on the lid, which should be soft and slightly rounded. You will need foam rubber or regular dishwashing sponges. We place the selected material, glue and cut off unnecessary elements. Cover with felt, which we carefully glue along the edges. All that remains is to cover the finished armrest and...
To some, this work may seem difficult, impossible and very time-consuming, but it is difficult just to start, and then the work will begin to boil. Before you know it, your car will already have a brand new armrest with a universal design and organization of internal space. Try it yourself and tell your friends how to make an armrest for a car.
An armrest is a very convenient thing inside a car. Some companies produce their cars with already installed armrests, but sometimes owners have to search for, make and install these elements with their own hands. This also applies to the VAZ 2110.
Installation
Most often, the armrest is installed as follows: it is clamped with bolts that hold the seat belt buckles. The seats will have to be moved forward, the mounting bolts will need to be unscrewed, the fork-shaped brackets for attaching the armrest will be inserted there and the bolts will need to be tightened back. Some people make special corners with which the armrest is attached to the floor with self-tapping screws.
AvtoVAZ has equipped some Vesta configurations with an armrest, which is attached to the driver’s seat and has an angle adjustment. According to statistics, about 80% of owners are dissatisfied with this accessory and prefer the classic design (attached to a tunnel). Let's look at how to make an armrest for Vesta yourself.
Required:
- remove the standard armrest
- plywood 8 mm and 18 mm thick
- jigsaw
- furniture corners
- door hinge 125 mm – 2 pcs (for opening the armrest)
- guides 250mm long (so that the armrest can extend)
- material for upholstery
- glue or furniture stapler
How to make an armrest for a car with your own hands
If for some reason it is not possible to buy a ready-made element, there is only one way out: make it yourself.
Preparation for the process
First of all, using a tape measure in the cabin, you should measure the place where the device will be installed. Moreover, measurements must be taken in the cabin of your own car. Even for two cars that look identical, the interior layout elements may differ in size. The difference may be only a few millimeters, but it is this that will ultimately interfere with normal installation.
The following parameters are measured:
- distance between driver and passenger seats;
- the level at which the seated driver's elbow is located;
- the distance from the engaged handbrake lever to the back of the driver's seat. This is done so that passengers sitting in the back do not touch the armrest with their feet;
- the maximum height to which the handbrake lever rises when it is turned on (this dimension is removed only if the armrest structure partially covers the brake lever);
- You also need to know how far apart the seat belt latches are.
Choosing material
As a rule, homemade armrests are made from either plywood or chipboard. Sometimes a solid board 7–9 mm thick is used. If it is expected that there will be curved parts, then only plywood can be used, since only this material can be given the necessary bend by holding it over steam. As for upholstery materials, they can be very different: artificial leather, genuine leather, dermantine, etc. The choice here is limited only by the imagination and financial capabilities of the car owner.
We design the main elements
All above dimensions must be recorded. Based on them, a simple sketch is created in three projections. You can even do this by hand, on a regular piece of notebook paper.
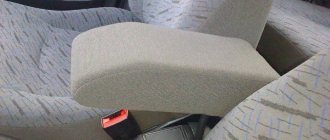
The simplest sketch of a homemade armrest, made on a notebook sheet
It is necessary to clearly imagine what the future armrest will look like.
The following points must be indicated on the sketch:
- all sizes;
- if the armrest contains parts with figured bends, the sketch should indicate the radii of these bends;
- location of mounting holes with mandatory indication of their diameter;
- the type and parameters of the fastener that you plan to use (for example, if these are self-tapping screws, then you should indicate their diameter and thread pitch);
- the depth to which the fastener penetrates into the body parts or into intermediate structures (often armrests are screwed with screws to wooden substrates, so knowing the penetration depth of the fastener will allow you to more accurately calculate the thickness of the substrates);
- if you plan to assemble an element with a hinged lid, then you should indicate where and on what the furniture hinges holding the lid will be attached. Also, do not forget about their size.
At the design stage, you should definitely consider how exactly the armrest will be fixed in the cabin. This could be a set of screws, or the piece could be held in place simply by a tight fit between the seats.
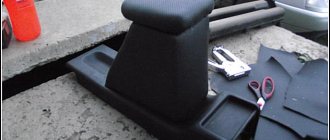
Manufacturing process
Having a ready-made sketch with all the necessary dimensions at hand, you can begin assembling the armrest.
- The selected material is marked in accordance with previously determined dimensions, then parts of the armrest are cut out of it (for these purposes it is best to use an electric jigsaw). Tools and some details of the future armrest
- If some parts need to be bent, they are heated over water vapor, bent and fixed in a bent position until they cool completely.
- After preparing all the parts, the body is assembled. The structure can be fixed either with self-tapping screws or with ordinary wood glue. The armrest is assembled, the structure is fixed with self-tapping screws
- The assembled structure is covered with previously selected material and installed in the machine (the reupholstering process is discussed in more detail below). Homemade armrest installed in the car interior
Measure seven times
Before you start drawing a sketch, you need to figure out what type of armrest you are interested in. Decide whether it will extend onto the handbrake, how far you can extend the box towards the rear sofa, whether you will make it stationary or removable, whether you will divide the internal volume into compartments. Based on all the data, measurements are made:
- distances between the front seats;
- the height of the armrest from the floor at the back and from the console at the front - so that, if necessary, the wall can be extended at the back for a more harmonious appearance. You can determine the comfort level by sitting behind the wheel and holding your hand alternately: either the steering wheel or the gear knob;
- the distance between the seat belt anchorages on the driver's and passenger's seats;
- the lifting height of the handbrake if it is partially hidden in the box;
distance to the gear shift lever.
Creating a Project
So, the measurements have been recorded and checked, it’s time to create a paper prototype of the future design. Don’t be lazy and make several options that will reflect the car armrest from different angles. Transfer all dimensions to each drawing and make sure they are completely consistent.
Now you can start marking the parts and finely drawing each element that will make up the future design
We pay special attention to the following points:
- we indicate the dimensions on each element, if it is figured, then we determine the radius;
- we mark the attachment points, choose the method of connecting one element to another and indicate the length of the screws, if any;
- calculate the distance that remains to the edge;
- for the top part, which will serve as a support and a cover at the same time, you will need to mark the location of the mount with tilt-and-turn functionality (you can make a sliding top, but it will be a little more complicated).
Selecting materials and making your own armrest
To make your own armrest body and cover, any wood material 8 mm thick is ideal. It can be plywood, board, chipboard or fiberboard. If the support pad and/or front wall must be curved (rounded), then only plywood is suitable for their manufacture - it can be bent over steam. To cover the armrest with your own hands, you can choose leatherette, leatherette, leather or other material.
We cut out all the details with our own hands from the selected material using a hacksaw, or better yet, a jigsaw (it will ideally handle all shaped elements). Then we steam the parts that need to be bent and wait until they cool down. Only after this can the necessary cutouts be made in them, if provided (for example, for a handbrake in the front wall).
When all the body parts are ready, we fasten its structure with self-tapping screws or wood glue. If its fixation should be based on the spacer principle, then we decide on the thickness of the cushioning material, which can be thinner plywood or craigs. We glue the cut overlays to the sides or place them on self-tapping screws. Then we cover the body with the material chosen for this. It is advisable to first make patterns for the body from graph paper, and then use them to cut the fabric for fitting and sew a cover from the resulting pieces, which will need to be stapled over the body.
We give the support pillow softness and the desired rounded shape. To do this, we glue foam rubber or sponges for washing the body or dishes onto its top. We place the latter with their side ends facing the armrest cover and tightly to each other, and after gluing, we sew them together, cutting off the excess and protruding parts. Felt of suitable sizes is glued on top of such a lining, which is then attached along the edges to the lid. After that we tighten it. We install the lid and hinges for opening on the body. Finally, you can cover the inside of the drawer.
Expert opinion Ruslan Konstantinov Expert on automotive topics. Graduated from Izhevsk State Technical University named after M.T. Kalashnikov, specialty "Operation of transport and technological machines and complexes"
More than 10 years of professional car repair experience.
When purchasing an armrest, you should first of all pay attention to the reliability of the design and fastening. The body must withstand a load of up to 120 kg, because drivers come in all sizes
Universal models must have a height adjustment function for a comfortable fit for a driver of any height, and the armrest should tilt back as needed.
A universal armrest must match the dimensions of the vehicle and not interfere with the parking brake, seat belts, or gear shifting. Wear-resistant and durable options should be used as materials, for example, genuine leather or high-quality leatherette. Cordura and Oxford have also proven themselves well; these materials can be washed and washed if necessary. The armrest body must be metal or plastic. The color should match the overall design of the upholstery; in the absence of such an opportunity, it is better to give preference to the universal black color.
armrest!
Home →
Operation → Accessories →
Interior tuning
Basically, the Gazelle is needed not for beauty, but for business. Therefore, car owners strive to improve their cars to their advantage. A useful addition is the installation of a security alarm. For a workhorse, an anti-theft system with auto start would be a good idea. Drivers of commercial vehicles need their car to start in the morning without problems in any frost. Autostart will come in handy here.
For the convenience of driving in the cabin, drivers change the steering wheel - with a sports steering wheel, it becomes more convenient for some to control the car. But the convenience is debatable - most likely, many people like the appearance of such a steering wheel.
Original tuning of the Gazelle interior
The interior of the Gazelle Farmer is often subject to tuning. For example, an additional table is installed in front of the rear row of seats. Of course, they don’t forget about installing an audio system with good speakers - it’s bad without music on a long journey. Tuning also includes installing wood-look inserts on the instrument panel, illuminating the instrument cluster with LED lamps, and installing a steering wheel braid. Motorists do a lot with their own hands.
To prevent road noise from entering the cabin, sound insulation is installed.
To apply soundproofing material, the entire interior is dismantled; the most popular “noises” are “Splen” and “Vibroplast”. Another type of tuning is the installation of an additional stove in the cabin. Additional heating is especially necessary on cars with an all-metal body GAZ 2705 and minibuses GAZ 3321.
Roof hatches are installed on Gazelle vehicles. The hatch can be either with a mechanical opening drive or with an electric one. Even if the car has air conditioning, a sunroof will not be superfluous - it can be installed on the roof of a cab or an all-metal body. The only negative is that the hatch can leak. But it has many advantages:
- Significantly brighter interior;
- In hot weather, the car is comfortable, and the wind does not blow from the road;
- There is virtually no road noise, much less with the side windows down;
- There is visually more space in the cabin.
Operating principle of the air conditioner
The main task of the air conditioner is to ensure constant circulation of freon in the cooling circuit. In essence, it is not very different from an ordinary household refrigerator in the kitchen. This is a sealed system. Inside it is freon mixed with a special oil that does not freeze even at very low temperatures.
By turning on this device, the driver actually turns on the compressor, which begins to pump pressure into one of the tubes. As a result, the refrigerant in the system enters the condenser, and from there, through the dryer, it reaches the ventilation system in the cabin and enters the heat exchanger. Once there, the refrigerant begins to intensively remove heat from the cabin. At the same time, the freon itself becomes very hot and passes from a liquid state to a gaseous state. This gas leaves the heat exchanger and enters the ventilated condenser. There, the refrigerant quickly cools down, becomes liquid and goes back into the cabin heat exchanger.
Video: how the air conditioner works
The best armrests for VAZ 2110, 2111: comparison of prices and characteristics
An armrest is a special part of a car on which you can rest your arm while driving. It helps to avoid early fatigue on the road, as it relieves stress from the arm muscles.
Armrests for the VAZ-2110 are manufactured by Alamar and Varta. Also for this car model you can choose Chinese-made armrests or universal armrests.
Armrests Alamar
The Alamar company produces quite a lot of models of armrests for the VAZ -2110, made in black and gray colors of various shades: light gray, graphite, black, black metallic, etc. These armrests have two modes of operation - hidden and working, and are also equipped with removable covers with zippers. Alamar armrests fit perfectly under the required console and at the same time have a fairly affordable price!
Pricefrom 460 rubles - out of stock
Varta armrests
These armrests allow you to easily use the handbrake, as they are easily and simply installed in the rear cup holder. In addition, they are available in black and gray colors with high quality leatherette upholstery (“eco-leather”). Also, these armrests have a removable top cover, under which there is a convenient compartment for storing all sorts of small items!
Universal armrests
As the name suggests, a “universal” armrest should fit any vehicle, regardless of make or model. But in fact, such “versatility” is rather a clever advertising move by armrest manufacturers. In practice, having bought such an armrest, you will most likely finish it yourself and file it, twist it and try in every possible way to fit it into its regular place, which will be quite difficult to do. Therefore, in order to avoid unnecessary waste of money and time, we strongly do not recommend that you buy such armrests.
Price: from 916 rubles - out of stock
Chinese armrests
Chinese armrests delight the eye with their variety and low prices, but you should be careful when choosing them. Thus, on the packaging of a Chinese armrest it may often not be indicated for which car model it is intended or by which company it is produced. However, you shouldn’t completely abandon Chinese armrests. If you want to choose a high-quality Chinese armrest, you can contact our company. We will quickly and efficiently select exactly what you need!
Price: from 300 rubles - out of stock
If you want to be 100% sure that the armrest you choose will serve for a long time and faithfully, then it is best to choose products from Alamar and Varta as the most reliable.
Kinds
There are two types of armrests on the market:
- Universal. They can be installed on almost any car, since the dimensions and fastenings are designed in such a way that the driver can carry out installation without unnecessary manipulations.
- Model. They are manufactured by the factory and third-party companies for specific car models.
If we take into account the designs, there are also two types:
- No bar;
- From the bar. These are structures with a lifting top, under which there are compartments for storing all sorts of small items.
Today we will look at several different options for armrests that can be installed on your VAZ 2110.
Chinese universal armrest
The manufacturer is not known exactly, but similar designs can be found in almost all automobile accessory stores. The main difference is the pentagonal decorative flap on top. For installation, self-tapping screws are used to secure the structure to the tunnel.
The advantages of this solution include:
- Availability of a bar;
- Availability of a convenient cup holder;
- Attractive appearance;
- Wide palette of colors;
- Affordable price - about 500-700 rubles.
But there are also disadvantages that will force many to abandon this option:
- No access to buttons, it closes;
- The quality is far from perfect. You can do much better, but alas. China is China.
Delta Pro product
Overall, it turned out to be a good armrest, a little better than the previous version. But there are a number of comments. For example, if you open the lid, you can see how it starts to walk. Therefore, problems arise with the clarity of closure. You can buy it, but then we advise you to slightly modify the design by gluing vibration-isolating material and improve the lid fasteners a little.
Standard installation is carried out using self-tapping screws to the tunnel.
| Advantages | Flaws |
| Large capacity tank available | The quality is not up to the desired or even average level |
| Attractive appearance of the product | Access to buttons is blocked |
| Affordable price up to 700 rubles | The fastenings are not done well |
| ____________________________________ | Uses thin plastic that can be damaged |
Armster
The well-known company Armster, which has been specializing in the manufacture of various armrests for quite a long time. In their assortment you can find a number of universal designs. The possibility of installing them on different models is due to the use of individual fastenings for each car variant.
The company did not ignore the VAZ 2110 model, for which the owners of this car can only be grateful.
Strengths include:
- Attractive appearance, very much in harmony with the interior of the dozen;
- The quality is conscientious, there are no complaints about the assembly;
- There is a comfortable, spacious bar;
- The upholstery is made of soft, attractive material;
- The bar inside is soft and pleasant to the touch.
There are no downsides as such. Besides the price. Today it is about 2000 rubles. Yes, you can spend 700 rubles on dubious China, or you can pay more, but get a really good, comfortable armrest. The choice is yours.
Alamar
The Alamar company is becoming more popular and in demand every year. Especially among owners of domestic cars. Their range includes armrests, headrests, Euro handles, mirrors and much more.
If we take the statistics of buyers of armrests for VAZ, then it is the Alamar company that appears most often. The company has its own website where you can place an order according to your taste and wallet.
Considering models specifically for the VAZ 2110, we can draw some conclusions regarding the advantages and disadvantages of these designs.
The positive aspects include:
- A well thought out design that will appeal to many;
- The fastening is carried out directly to the driver’s seat, therefore, when the seat is moved, the armrest will also move, which is convenient for the driver;
- The range is presented in a wide palette of colors. This makes it possible to choose a product to match the color of your interior or car;
- Attractive price;
- The armrest can be folded back.
As for the shortcomings, there is only one significant disadvantage here - the lack of a bar. So you will have to look for other places to place all kinds of little things. In general, Alamar armrests make a very good impression.
From Priora
If you have ever driven in a Priora, the direct successor of the VAZ 2114, then you probably noticed the armrest. Nice appearance, good performance.
The advantages of the option with installation of the Priora armrest on the “ten” include:
- Availability of a good bar;
- Attractive design appearance;
- Good quality when compared with the first presented options.
As for the disadvantages, there is only one - problems with the search. Although today, in the age of the Internet and online stores, finding it will not be so difficult.
For installation you will need to make a couple of holes for the mounting bolts. Nothing complicated if the hands grow from the right place.
Console bar "tens"
There is such an armrest on the market called “BAR console for VAZ 2110”. The problem is that it is quite difficult to find.
But if you manage to find it, consider yourself lucky. This is due to a wide range of advantages. Although with one amendment - it is suitable for short drivers, since in practice the armrest turns out to be too low.
Now let's look at the positive qualities. These include:
- Attractive appearance of the product;
- Originally thought out design;
- Availability of a bar. We only recommend that you immediately modify it by gluing the inside with some material so that the contents do not rattle during movement;
- Affordable price. Today it is sold for about 200 rubles.
But let's highlight a couple of shortcomings.
- Search problems. It’s not easy to find; not every store has it. We recommend searching on the Internet.
- Low position. If your height is 180 cm or more, you will not be able to lean normally; you will have to bend over.
For installation, a fastening of three self-tapping screws is provided. Therefore, if you decide to install it, then with an eye to long-term operation. The product already has chamfered areas for fasteners. The necessary fasteners are provided in the kit, so you don’t have to look for anything.
Summarizing
So, the work is done, which means we can sum up its results. The process of creating armrests for a sofa takes a limited period of time. Everything can be done in a short time. Of course, you can go to a furniture store and buy a new sofa, but this requires a lot of money. You can simply remove the old armrests and install new ones in their place. This will significantly transform the interior of any room.
How to make a tray for a sofa and bathroom - an original idea
When working with wood, it is very important that the dry part is used. It should not have high humidity, as this will lead to its swelling and subsequent drying out.
The entire structure may be damaged. The varnish can also be applied with a roller, but you should do it very carefully, since the armrests are already installed on the sofa.
If they have not been pre-installed, you can even use a spray gun. By the way, it is not at all necessary to coat the surface with varnish. You can also use paint.