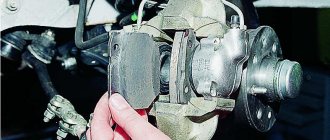
One of the most important mechanisms of the Lada Kalina car that guards the driver and his companions is the braking system. It includes quite a lot of elements, the state of which directly affects the braking efficiency. These include the front brake pads. The front mechanisms have a disc design. Here, when you press the corresponding pedal, the specified pads are pressed against the working area of the disk, thereby providing the effect of braking the wheels.
If a pad malfunction occurs, then neglecting to replace them creates a very high risk of creating an emergency. The owner is required to pay increased attention to the brake components, which will allow timely identification of worn-out system components and prompt replacement operations. Therefore, many car owners are interested in how to change the pads.
In our material today we will take a detailed look at the process of replacing the pads in the front brake units of the Lada Kalina. When this model comes off the assembly line, its brakes have pads that are inferior in their service life to products from well-known world brands. Such consumable components will not “live” for long, after which the owner will be faced with the need to make the right choice. Operation shows that the “native” front brake pads in Kalina can wear out the working surface of the disc with a fairly high intensity, causing its premature failure.
Replacement must be done simultaneously on both sides of the front end. This allows you to ensure vehicle stability during the braking process.
Tools for changing pads
In order for the replacement of brake pads to be successful, the owner will need to bring to the event the following set of tools and tools:
- A key that allows you to unscrew the wheel rim fasteners.
- Jack and wheel chocks. You can hang the car using a lift, but it is not always available.
- Pliers and flathead screwdriver.
- An open-end wrench with a size of “13” and a head with a size of “17”.
- Clamp (recommended).
- Syringe.
Replacing brake pads cannot take more than an hour of time, provided the owner has experience in maintenance.
General information
First of all, it should be said that all work on organizing a sewage system in a house comes down to the following work:
- Arrangement of external sewerage - this includes everything that is located outside the house. This is a pipeline and a septic tank or cesspool. If there is a centralized sewerage system, the work is greatly simplified.
- Installation of internal sewerage - this work includes the installation of a riser, a drain pipe and wiring to the bathrooms. First of all, you should deal with the arrangement of the internal system.
Of course, to build the system, you can turn to specialists for help, however, if you do this work yourself, you can save a lot of money. There is nothing overly complicated about this, the only thing is that you must strictly adhere to certain rules and requirements that apply to such installation work.
Vertical elements of internal sewerage
The layout of the sewer system must correspond to the layout of the house. True, even when planning it, it is desirable to compactly arrange the premises to which water will be supplied and drainage will be carried out.
Such premises include:
- Kitchens;
- Bathrooms;
- Bathrooms;
- Laundries, etc.
The compact arrangement of these rooms will simplify the installation of the system. The best layout option is when all plumbing fixtures can be connected to one collector, through which the wastewater will flow into a septic tank, cesspool or central sewer.
Horizontal sewerage elements
If the house is large and there are several rooms with a water supply and drainage located in different parts of the building, experts recommend using a sewer system with several septic tanks or cesspools. In addition, if the house has two or more floors, it is necessary to install risers.
Which pads to choose?
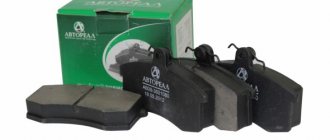
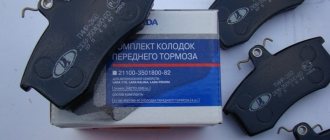
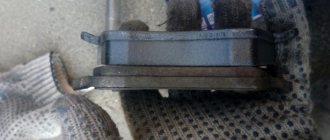
Factory consumable components produced by TIIR (visible in the photo) have metal inserts. They have few advantages, except for a tolerable price, but we have already talked about the disadvantages.
A good option for products are pads from the Lucas TRW brand. These products have already been tried and tested by many owners. Reviews about this product are overwhelmingly positive. The quality aspects are also excellent. The packaging has a seal combined with a hologram. This small nuance confirms the authenticity of the product and indicates the serious approach of the specified manufacturer to protecting its product.
Brake system "Lada Kalina": diagram, mechanism and system design
One of the disadvantages of the ABS of this car, like many others, is the possible failure of the electrical part of the control unit. Bad roads and shaking may destroy the soldering (or the soldering from the factory was initially of poor quality), and the ABS will fail. If liquid gets into the block, a short circuit occurs, oxidation and subsequent rotting of the components. The main thing is not to hesitate and immediately take it to a service center or manually clean the board and solder the questionable elements. ABS repairs are carried out by automotive electricians.
Lada Kalina, Granta and Priora became cars of a new generation, replacing the Sputniks and Samaras. Let's figure out whether the Kalina's braking system is different from these old cars, and how it works.
Replacing brake pads
- First we act on one of the sides of the LADA Kalina car.
- We loosen the tightening torques of the wheel and hang the corresponding side of the Lada Kalina. We install the lifting lever of the jack in a strictly designated place on the body in order to avoid the risk of distortion or “jumping” of the car.
- Don’t forget to install anti-roll stops under the stern wheels.
- Open the brake reservoir and use a syringe to remove some of the fluid (to the “min” level). This is necessary to prevent it from spilling out of the reservoir while the piston is forced into the brake cylinder so that the new pads (they are thicker) fit into the caliper.
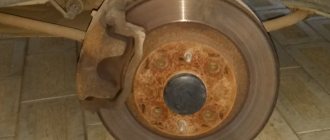
- The photo clearly shows the damage to the disc left by the standard pads. This is a good confirmation of our words.
- For convenience, turn the steering wheel to the maximum in the appropriate direction.
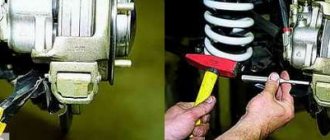
- Unscrew bolt “1” (use the specified key on “13”) and lift the caliper bracket.
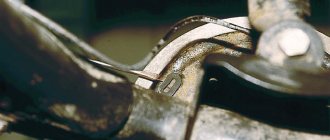
- We arm ourselves with pliers paired with a screwdriver. They are needed to press out the locking plate. In this case, nut “2” must be kept from turning with a 17-size wrench.
- We remove old consumables.
- Before installing new pads, we “press” the piston inside the cylinder, thereby freeing up space in the caliper. To do this, we use a clamp, or, in its absence, an adjustable wrench.
- We insert new products into the caliper bracket and lower it.
- Tighten the bolt to the required torque. We return the plate to its place.
- We install the wheel, but do not tighten its fasteners to full torque.
- We lower the side of the Lada Kalina car and now proceed to tighten the wheel fasteners.
- We move to the other side of the car and perform all the manipulations indicated here.
- Add liquid to the tank until the level reaches o.
The brake pad replacement is complete. Now you know how to change the pads yourself step by step.
How to tension the Kalina generator belt
Replacing the heater Lada Kalina
Low beam Lada Kalina
Recommendations
Comments 20
This is the first time I’ve seen the pads changed like this...
Well ok, I boosted my drive :)
Why unscrew the bracket fastening? there are two bolts, they seem to be 13 or 14, you unscrew one bolt and everything is removed to the side
These are innovative repair methods.
By the way, a good method!
It may turn out that one of the best and most faithful!
Current Torxes tend to sour there so much that they eventually break off(
There was sarcasm above!) There, the initial tightening force of these bolts is 15 kgf.m each, which are also M12x1.25 (plus the boiling of these bolts, as you correctly noted), versus 3.8 kgf.m each with M8 threads and which should be changed every replacement pads ))))) So this is innovation as it is!)
I have pads in front. They've been running for over 60 tons now and now they brake well and don't whistle, I bought them in Ukraine in 2013. I’ll change the company, I’ll have to remember the company)
Everything is correct and beautiful, but the pads themselves are crap, they don’t really have brakes, and the disc eats up a lot.
I always took Ferodo in green packaging, the pads are soft without asbestos, the discs do not eat or buzz. The only negative is that they generate a lot of dust, and they last for 20-25 thousand.
Sorry for interfering in someone else's conversation. Ferodo-Target Federal Mogul has not released for many, many years. Everything that is sold is a bare and unsafe counterfeit.
Come on, tell tales, these pads are installed from the factory as the first pads on Kalinas, Prioras, Grants. Does the factory knowingly accept counterfeit products?
They have never installed this on a VAZ... Only Ferodo-Premier. And not for long...
I say again, don’t tell me what you don’t know.
I say again, don’t tell me what you don’t know.
There really don’t seem to be any green or red ones www.autodela.ru/main/top/news/Ferodo_new_pack if you see any, check for authenticity kontrafakta.net/Ferodo/ko…odki-diskovye-fdb527.html and in general they write that the products are dangerous , they really wanted to supply them to VAZ, but VAZ refused them as low-quality dangerous non-braking products, info from here www.tiir.ru/upload/smi_o_nas/avto_r_0116.pdf
Sorry for interfering in someone else's conversation. Ferodo-Target Federal Mogul has not released for many, many years. Everything that is sold is a bare and unsafe counterfeit.
I support. Ferodo-govngo. I installed it once and then when I was drunk, I drove 25,000 after my family.
I skated 115 thousand on green Ferodo, and I never regretted that I installed them.
In conclusion, about the important
Replacing the pads on LADA Kalina should only be done as a complete set. This action allows you to avoid incorrect redistribution of braking forces between wheel units, otherwise the car may drift off the trajectory. Immediately after the replacement procedure, the pads will not be sufficiently effective, because they require some time to optimally grind into the disc surface. Also, at first (about 200 km), avoid sharp braking so as not to cause scuffing in the working area of the disk.
Now we are convinced that replacing the pads in the Lada Kalina is very easy. Even an inexperienced owner who will need the tool we have indicated can dare to do this.
We do not recommend skimping on safety and purchasing brake pads for LADA Kalina of dubious origin. Trust only proven brands.
see also
Brakes jerkily
- 72 0 83k
Lada Kalina cars of both generations have front disc brakes and rear drum brakes. As original front brake pads for Kalina 1, the catalogs indicate 21100-3501080-00 and 21100-3501080-01, for Lada Kalina 2 the article number is 11180-3501080-00. The same catalog numbers are used for Lada Priora.
Factory brake pads TIIR
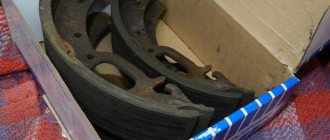
Rear drum brake pads are specified as 21080-3502090-01 or 11180-3502090-10 (with ABS) for Kalina 1 and 2.
Many of these part numbers are invalid; instead, online parts stores offer other original part numbers or equivalents. This makes sense, since in the case of the Lada Kalina (and LADA in general), the original is often inferior in quality to its substitutes.
| Front disc brake pads Lada Kalina | ||
| With dimensions - length: 104.4 mm; width: 62.1 mm; thickness: 17. mm. | ||
| Manufacturer | Catalog number | *Price, rub.) |
| Brembo | P41003 | 780 |
| ** Ate | 13046029652 | 703 |
| Ferodo (Premier) | FDB527 | 640 |
| Hankook Frixa | FPE103 | 626 |
| NiBK | PN0223 | 536 |
| TRW | GDB469M | 495 |
| Ferodo (Target) | TAR527B | 405 |
| Lada | 21083501080 | 380 |
| Finwhale | V218 | 363 |
| Allied Nippon | ADB0173 | 330 |
The most popular brake pad analogues are Ate, Brembo, TRW, TSN, Finwhale and Ferodo. The latter are divided into two types according to the color of the box - “red” and “green”. “Green” ones, with the prefix Target in the name, are positioned by the manufacturer as an improved replacement for factory pads, but they are not intended for heavy loads. Red, with the prefix Premier, are considered premium pads that can withstand extreme loads.
The best-selling disc brake pads for Lada Kalina are products from Ate, followed by TRW. Drum brake pads for Kalina are most often purchased from TSN due to its favorable price. They are slightly inferior in popularity to TRW and Ate pads.
| Rear drum brake pads Lada Kalina | ||
| With dimensions - diameter: 200 mm; width: 41 mm. | ||
| Manufacturer | Catalog number | Price, rub.) |
| Ferodo | FSB240 | 860 |
| Ate | 03013702312 | 815 |
| Sangsin | SA183 | 715 |
| TRW | GS8210 | 672 |
| Finwhale | VR318 | 658 |
| Bosch | 0986487813 | 610 |
| Profit | 50010240 | 650 |
| Allied Nippon | ABS1701 | 612 |
| Trialli | GF231 | 547 |
| TSN | 232 | 460 |
According to the rating of brake pads for Lada Kalina on PartReview dated 04/02/20, owners prefer TIIR products. Manufacturers TRW, Trialli and Ferodo also stand out.
The brake pads indicated here are also suitable for other VAZ cars: 2110, 2114, Lada Granta and others, with R13 and R14 brake discs.
Front brake pads are replaced approximately twice as often as rear brake pads. The exact frequency of replacement is quite difficult to establish, but the front pads are changed at intervals of 30-50 thousand km, and the rear pads at intervals of 60-90 thousand. To more accurately determine when Lada Kalina brake pads need to be replaced, it is worth checking the thickness of the friction linings every 15,000 km. A thickness of about 2 mm is considered critical.
Drivers are often motivated to change brake pads on Kalina by squeaking brake pads. Special plates installed on the disc brake pads from the outside help significantly combat this. They are called anti-squeak plates. Such plates can often be found in more expensive brake pad sets. However, you should choose brake pads not based on the presence or absence of anti-squeak plates, but on the basis of reliability and braking efficiency.
*The price of Lada Kalina brake pads is given as of April 2017 for Moscow and the region. **Bold indicates those pads that are most popular in a particular case.
If you need to replace the roller or brushes?
When, during operation of the engine, the owner of a Lada Kalina hears a distinct “rustle” coming from the rotating roller of the tension unit, then a detailed inspection of this element will be required and, if necessary, replaced.
To carry out this repair operation, it is recommended to stock up with ordinary keys and a screwdriver with a flat-tipped tip. All replacement procedures do not cause any difficulties, so we act with confidence.
- First, we resort to loosening the degree of belt tension. To do this, unscrew the stem.
- Using the designated screwdriver, carefully pry up the protective cap of the roller and unscrew the bolt holding the bearing.
- From the worn-out roller we remove the bushing together with the washer (they are necessary for installation in conjunction with a new product).
- The entire assembly is mounted in its proper place and secured with a bolt.
- We tighten the belt and start the engine. We make sure that the new product functions correctly.
One of the factors characterizing weak battery charging is wear on the brushes of the generator set. In order to eliminate this negative aspect, the generator brushes will need to be replaced. To monitor their condition, they will need to be dismantled. Replacing generator brushes is available both on a removed generator set and on one installed on a Lada Kalina car.
In order to achieve safety of work and eliminate the risk of a short circuit in the circuit, before repair work it will be necessary to disconnect the network from the battery (remove the terminals). Now you need to dismantle the protective cover and remove the plug. This can be done conveniently using the previously designated screwdriver.
At the final stage of the process, unscrew the bolts, after which we remove the regulator itself with the brushes present on it. Replacement of generator brushes is complete. Brush wear is assessed by measuring their height. This parameter should not be less than 5 mm. If the brushes are worn out, then replace them and the regulator included.
Recommendations for selection
Rule one and very important: you cannot change the front or rear brake pads one by one. It is necessary to install a set of new elements on the front or rear axle, otherwise when braking the car may seriously drift to the side
Even when one pad is worn out, all four must be replaced. As a temporary option, it is possible to install 2 new parts on one rear wheel.
When choosing new pads in the store, use the following recommendations:
- Products must match the car model and be sold in high-quality packaging with included instructions. The inscriptions on the box are clear and without errors indicating Chinese origin.
- Make sure that the friction material is the same color, without foreign inclusions.
- The surface pressed against the plane of the disk must be flat. Small chips along the edges and depressions are allowed if they occupy no more than 1% of the total area of the working plane.
- Cracks at the interface between metal and friction material are unacceptable.
Ideally, you should buy original products in original packaging. This will save you from unpleasant surprises, unscheduled replacements and emergency situations when operating your car.
Service
Maintenance consists of inspecting all components and replacing them in case of wear. All service looks like this:
- checking the brake pedal travel;
- checking and possible adjustment of the parking brake (Kalina has a handbrake from “nine”, so it must be tightened often);
- inspection of all tubes and hoses;
- inspection of the condition of brake discs, drums and pads;
- checking the brake fluid level and replacing it approximately every 40 thousand kilometers.
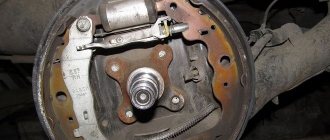
Drum brakes
Drum brakes are less efficient than disc brakes, but they are cheaper, have lower maintenance costs and have a longer service life without replacing consumables. On modern passenger cars, this type of brake is used exclusively on the rear axle.
Brake pad wear
During smooth braking, even worn-out drum brake pads may not show themselves, since they are less involved in the braking process. But when braking sharply, the car may begin to slow down unexpectedly weakly.
To determine the level of pad wear:
- Remove the wheel;
- Remove the brake drum;
- Measure the thickness of the brake pad.
The thickness of the pad must be at least half the thickness of the new pad. Replace if necessary.
Brake drum wear
When measuring brake pad wear on drum brakes, you have already removed the drum. All that remains is to measure its internal diameter; it should be no more than that allowed by the manufacturer (with wear, the internal diameter of the drum increases). If necessary, replace the drum.