Seals play an important role in sealing closed car doors. If the door does not close tightly, both excess air will enter the cabin as a flow, as well as the most common moisture particles that settle on the glass, seats and disturb the general climate in the car interior. In this article you will learn how to replace the rear and front door seals, as well as in what cases this is done.
Lada Granta door seals: installation recommendations
Car owners often face the problem of dirt getting into the car interior. As soon as it rains outside, a huge amount of dirt begins to accumulate on the thresholds, which gets inside the car and stains the driver and passengers. To solve this problem, you can install additional Lada Granta door seals yourself.
This car model has another problem: when driving, noise appears in the door area. It is created by a stream of air flying towards it. Of course, the interior is perfectly ventilated
But not everyone is satisfied with such a soundtrack: the noise begins to irritate and distract the driver’s attention. But in Russia the roads leave much to be desired
In addition, with the onset of cold weather, the temperature in the Lada’s interior begins to rapidly decrease. This is why there is a need to improve door seals.
Recommendations for modifying seals
To do this work, you need to prepare in advance:
You can use rubber that is used to cover apartment windows. First, the material is inserted into the gap between the guide and the windshield rubber. The operation starts at the top of the windshield and ends at the bottom of the hood. The inserted part needs to be glued. Gluing is done from top to bottom. The work begins at the junction of the car's roof and its frame. This place has a small recess, which makes it possible to hide the new seal.
Very often its edges do not look very impressive; they spoil the appearance of the Lada Granta car. They need to be trimmed with a utility knife. Then a dropper is installed in the gap. It is advisable to use silicone. This modification makes the seal much more reliable. For a better design, the installed sealing rubber bands can be supplemented with special seals. After installing them, Lada doors will close much softer.
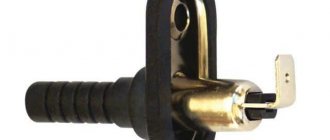
You can also use a very ordinary dropper. To carry out the work, the standard seal remains in place. If you don't have a dripper, you can use a watering hose. A total of three meters of material will be required. If the work is done carefully, the door noise will be reduced by approximately 40%. This will be immediately noticeable: the door will make a dull sound when closing.
The quality of the seal made on a Lada Granta car is easy to check. You need to accelerate the car, light the lighter and hold it near the door. A calm flame indicates a correctly installed seal, which blocked the flow of wind from entering the interior.
Which one is suitable for a Chinese metal door?
Such designs are of poor quality, so they gradually lose their shape and dents appear on the surface. It is better to use a rubber seal on a metal entrance door. If the gap is minimal, it is permissible to use a foam strip. To prevent the material from failing ahead of schedule, it is recommended to apply an additional layer of glue to the rubber tape, which will ensure increased reliability of fastening. If the seal is made of foam rubber, it is better not to do this, otherwise it will be difficult to dismantle it.
Lada Granta door seals: installation recommendations
Car owners often face the problem of dirt getting into the car interior. As soon as it rains outside, a huge amount of dirt begins to accumulate on the thresholds, which gets inside the car and stains the driver and passengers. To solve this problem, you can install additional Lada Granta door seals yourself.
This car model has another problem: when driving, noise appears in the door area. It is created by a stream of air flying towards it. Of course, the interior is perfectly ventilated
But not everyone is satisfied with such a soundtrack: the noise begins to irritate and distract the driver’s attention. But in Russia the roads leave much to be desired
In addition, with the onset of cold weather, the temperature in the Lada’s interior begins to rapidly decrease. This is why there is a need to improve door seals.
Recommendations for modifying seals
To do this work, you need to prepare in advance:
You can use rubber that is used to cover apartment windows. First, the material is inserted into the gap between the guide and the windshield rubber. The operation starts at the top of the windshield and ends at the bottom of the hood. The inserted part needs to be glued. Gluing is done from top to bottom. The work begins at the junction of the car's roof and its frame. This place has a small recess, which makes it possible to hide the new seal.
Very often its edges do not look very impressive; they spoil the appearance of the Lada Granta car. They need to be trimmed with a utility knife. Then a dropper is installed in the gap. It is advisable to use silicone. This modification makes the seal much more reliable. For a better design, the installed sealing rubber bands can be supplemented with special seals. After installing them, Lada doors will close much softer.
You can also use a very ordinary dropper. To carry out the work, the standard seal remains in place. If you don't have a dripper, you can use a watering hose. A total of three meters of material will be required. If the work is done carefully, the door noise will be reduced by approximately 40%. This will be immediately noticeable: the door will make a dull sound when closing.
The quality of the seal made on a Lada Granta car is easy to check. You need to accelerate the car, light the lighter and hold it near the door. A calm flame indicates a correctly installed seal, which blocked the flow of wind from entering the interior.
Repair of door seals and installation of additional ones on Granta
AvtoVAZ produces many good cars. However, the door seals on them fail very quickly. We have to repair them. To do this, first clean the seal. The surface is degreased, for which you can use:
That part of the area that needs to be glued is coated with glue, for example, universal “88”. Sometimes the tire manufacturer specifies the exact brand. There should be several layers of glue. The first is considered preparatory. It prepares the surface for future gluing. The initial layer should dry. This will take 15 minutes.
Moreover, during drying, the surface must be protected from dust or dirt. There should be no mechanical damage present. Then the operation is repeated. A layer of glue is applied again and left for another 15 minutes. After this, the third, main adhesive layer is applied. It will hold the seal, which must be pressed firmly to the surface and wait 12 hours.
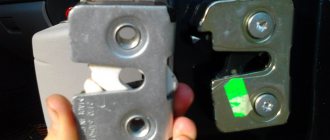
To install additional seals on the Lada door, you first need to remove the pistons covering the factory seal holes. Sometimes they are not there because they were removed by the dealer when additional anti-corrosion work was carried out. In order to remove the plugs, you will need a self-tapping screw. It is screwed into the plug and then pulled out.
As a result, the door remains scratch-free. The seals are mounted in finished holes using pistons installed on them. The seal is placed with the wide side towards the interior. If it is laid the other way around, no effect will occur. To install the RKI-19 brand seal on a Lada Granta car, you need to cover the end of the rear door with double-sided tape. After the operations and test, you can notice:
- The noise in the cabin has decreased by about half;
- the door closes very quietly.
How to install
The installation procedure should not cause problems, since it is quite simple and even a beginner can perform it. Although you still need to know how to use glue. It is also necessary to install the seal carefully and carefully, this will allow you to achieve comfort in the cabin for a long time.
To correctly install VAZ 2110 door seals , the following steps should be taken:
This procedure will significantly improve the noise and sound insulation of the car interior.
After installing the new seal, passengers and the driver will immediately feel changes for the better. Extra noise, whistling, knocking will disappear. It will also become warmer, since cold air will no longer penetrate inside and blow through your feet.
Why is the door trim removed?
Most often, the trim of the rear or front doors is dismantled in order to get to the internal cavities where the window lift mechanisms are installed. Although during the entire period of operation of the car there are other situations when it is necessary to remove the trim:
- for installing acoustic speakers built into door cards;
- in case of failure of the electric window lift buttons;
- for dismantling glass for the purpose of tinting or replacement;
- to repair or lubricate window lift mechanisms;
- to replace facing panels that have become worn or scratched over the years of use of the machine.
Front door cards Lada Kalina
It is also necessary to remove the trim during body work, when it is necessary to weld rotten elements, renew the car’s paintwork, or carry out anti-corrosion treatment.
Lada Kalina rear door trim
Grant door seals. RGI 135 and RKI 19
However, hello! Finally got around to it and I installed additional door and sill seals on my Granta Liftback. Namely: RGI-135 (horizontal door seal) and RKI-19 (vertical seal between doors). Let me note right away that the “Lux” grants already have such seals and nothing else needs to be molded. There are no seals in the lower configurations. But let’s say “thank you” for the fact that the manufacturer left us the opportunity to install them.
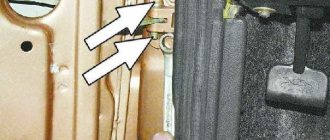
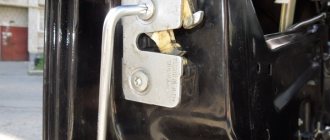
The doors have special holes for installing door seals, which are neatly covered with special plastic plugs. The plugs can be pulled out in two ways. Either by prying them off with something flat (screwdriver, plastic card, ruler), or by screwing a self-tapping screw into the plug a couple of turns and simply pulling it out. I chose the second method, because... it is the safest for the paintwork of our beloved car. And the plugs won't be needed anyway. The picture was borrowed from one good magazine and a user from the network:
Now let's look at the door seals themselves. The RGI-135 seal is designed for installation specifically on doors in special standard places. Four rubber bands for each door with fastening clips. Serves as protection for thresholds from excess dirt and dust, and eliminates wind whistling when driving. One important and most crucial point when installing the RGI-135 door seal is that the seal must be installed with its WIDE side towards the threshold. Take a closer look at the photo and make no mistake at this stage. If you install the seal the other way around, there will be absolutely no effect. There will still be dust and whistling from the wind.
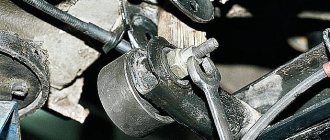
The RKI-19 seal has an adhesive base such as 3m adhesive tape and is glued to the pillar between the front and rear doors, removing the empty gap between them. Again, saving us from excess dirt and noise when driving. Installing RKI-19 will not raise any questions. Peel off the protective film of a few centimeters, apply the seal to the top of the pillar on the car and begin gluing it from top to bottom, gradually removing further the protective film. Having reached the bottom of the rack, cut the seal and move to the other side!
With seals, the doors close much more pleasantly, one on one, like on a good foreign car. They slam shut, without knocking, creating a “sense of vacuum.” At first, the doors may not close the first time, but this is a matter of time. You will get used to the new doors, and the seals will develop and become softer.
For those who have not yet installed or doubt the usefulness of installing door seals on Lada Granta, definitely install them! Well, I bet you, you won’t regret it
blogonoob.ru
Dense, even denser.
(I’ll say right away that you shouldn’t glue the lower door seals. Why? Answer from the link: Lower door seals: not everything is so simple.
I was sorting out the pantry and Kalinovsky RKI-19 seals caught my eye. I bought them a long time ago on the advice of a seller on the Internet, who convinced me that they would also go to the Priora.
But my suspicions did not let me down and they did not go to Priora. The profile of this seal is such that there is no way to install it between the doors of the priors. No, of course you can install it, but in this case this seal will be a priority, like a saddle for a cow. I decided to either use it somewhere or throw it away. Since it was a shame to throw it away, I thought very persistently. As a result, one single thought came to mind: on a Priora, this seal is only suitable as a seal for the lower part of the door. By the way, for these purposes there is an almost standard VAZ-2110 seal, which is also suitable for us. It looks like this:
This picture was on both front doors. Everything was sanded, then treated with zinc, then degreased, then painted with 3 layers of primer, 3 layers of paint and 3 layers of varnish.
After which, within a day, a Kalinovsky seal was glued somewhere.
This seal does not cover the drainage holes (it is glued below them). Also, it additionally protects the front lower edges of the doors from subsequent rubbing of the paintwork. And everyone seemed to be happy, if one circumstance did not become clear: it does not compact anything. In short, in the area of the front lower edges of the doors, the distance between the door and the threshold is practically zero and therefore the door always rubs against the plastic threshold when closing. But as you move away from this place to the middle pillar between the doors, this gap increases specifically. It turns out that RKI-19 seals only a small area at the front bottom of the door, and in the remaining areas there is still a gap, albeit of a smaller size. Priora is such a Priora... I started looking for something to replace it. I didn't like everything I found. Until I saw a seal with this profile on Ebay:
I liked it. Ordered. And at the same time I ordered this clever seal with a Z-profile in order to close the gap between the doors:
And this one, to seal the rear doors from the arches:
So far only the first two have arrived. So, the door bottom seal is made of very soft rubber, which was nice. Glued it without problems.
And here's what it looks like with the door closed:
Since this seal has a noticeably larger profile compared to the Kalinovsky one, it actually covers the entire gap at the bottom of the doors from start to finish. The door closes with it almost the same as without it, thanks to the soft rubber from which it is made. Well, the drainage holes are not closed. In general, some advantages. The thresholds are now always clear. Well, the sound insulation has become a little better. A simple newspaper test. This is how it was before:
And this is what happened after installing the seal:
Before applying the sticker, thoroughly degrease everything. It was enough for the openings between both doors + the openings between the front doors and the wings and there was still a little left. Here's the result:
Well, that's all for today. When the tubular seal arrives, I’ll write more about it. All the best. Continued here.
Source
Removing the rear door glass
Remove the rear door trim. We lower the glass so that we can unscrew the screw securing the decorative glass trim.
Use a flat-head screwdriver to pry up the edge of the inner glass seal.
. lift it up, applying the necessary force, and remove the inner glass seal from the inner door panel. Bend the edge of the seal.
. Using a Phillips screwdriver, unscrew the self-tapping screw securing the decorative glass trim.
Using a slotted screwdriver, press out the upper corner of the decorative trim. . and remove it.
Remove the lower part of the seal from the door. We raise the glass.
Using a 8mm head, unscrew the bolt securing the glass guide at the end of the door.
. and remove it. We lower the glass.
From the outside of the door, use a slotted screwdriver to pry up the decorative retainer of the glass seal. To avoid damaging the paint, place a soft material under the screwdriver, for example, a piece of fabric folded several times.
Pull out the retainer from the outer seal. . and take it off
We remove the outer glass seal by pulling it off the front decorative clamp and lifting it up.
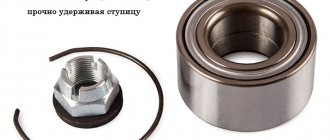
Manufacturers and prices
A linear meter of profiled thermoplastic sealant brand Deventer (Germany), costing 200 rubles, is a long-lasting and durable material;
Self-adhesive tape seal brand Victor V702, Moscow, elastic and durable material, with good thermal insulation properties. The cost of a bay of 3 linear meters is 330 rubles.
Additional door seals for Priora
When the heat and sound insulation system in a car is compromised, and in addition the door gap is more than 2 mm, you should think about making additional door seals. Why is this being done?
1. Additional door seals on Priora are needed if the car’s sound insulation leaves much to be desired. Nobody likes constant noise or whistling inside the car;
2. The same can be said about thermal insulation, since in winter you can freeze in Priora;
3. In order to increase the tightness of the car interior, additional seals will also be necessary.
Door seals for Priora come in different types. Often, car enthusiasts try to save on these elements and do not turn to specialized services, but come up with and implement convenient designs that help seal door gaps. Let's look at a few common options.
K-FLEX tube
This tube is intended for thermal insulation and can be purchased from departments specializing in air conditioning systems. Such a tube is attached with super glue, double-sided tape, or is already sold with a strip of contact glue. Before applying the tube to the surface of the body, it must be cleaned and degreased.
Glue the seal starting from the bottom corner of the windshield, along to the rear door. In addition, do not forget to glue the racks, reaching the door lock. At first, the doors will close quite tightly, but over time, the seal will become more pliable.
Polyurethane sealant
Just like the K-FLEX tube, polyurethane sealant is also suitable as a Priora door seal. Of course, it cannot become a sealant on its own, but it can help seal the sealing tubes of a car. As a rule, it is in such a tube that moisture accumulates, which destroys the metal. Therefore, the surface is treated with an anti-corrosion coating, and then the seal is secured with polyurethane sealant.
Conventional rubber seals
Construction sealant, in the form of rubber strips with an adhesive base, can be bought at an ordinary hardware store. It is used to glue the doors of the Priora and the body. However, in the lower part of the body, you need to constantly monitor the seals, because over time, dirt or moisture may accumulate under them and the metal will begin to rust. In this case, you should replace the seal with a new one, not forgetting to treat the surface with a degreaser.
An additional door seal for the Lada Priora will not only serve as part of the easy tuning of the car, but will also help improve thermal insulation and will not allow heat to escape from the cabin, and in addition, the noise level will be significantly reduced.
priorapro.ru
Seasonal care of car seals
Depending on the time of year, you need to monitor the rubber elements:
- In summer, it is best to treat seals with products containing talc. Thanks to this, it will be possible to avoid squeaking, melting and sticking of the rubber to hot metal parts. However, there is no need to split hairs here either. It is enough to buy talc for children (ordinary powder) at the pharmacy and treat the gum with it.
- In winter, rubber elements require much more attention, as they can crack. To prevent this, it is necessary to periodically wipe the elements with a dry, clean cloth and treat them with special compounds that will prevent freezing.
Healthy! In winter, it is recommended not to leave the car so that the driver's seat is on the leeward side. This way you can avoid problems with opening doors in cold weather.
Silicone compounds are the best for caring for seals in winter (they are inexpensive and have a long lifespan, up to 2-3 weeks). They are available in several types.
Types of silicone grease for seals
Today there are several varieties of these compositions:
- Pastas. Such lubricants should be applied with a napkin to previously cleaned rubber bands. The main disadvantage of such products is the difficulty of using them in hard-to-reach places.
- Gels. They are also problematic to apply to small or remote parts. But the gel has a thinner consistency, so the application process will be a little easier. One of the advantages is that those parts that do not require processing remain clean. However, some gels spread too much.
- Aerosols. Such liquids are considered the best. They are easy to use and allow you to process all the necessary elements. But, due to spraying, they can contaminate the surfaces adjacent to the seals (greasy stains will appear on them). To solve this problem, it is enough to purchase aerosols that are equipped with special long “spouts”.
It is also important to decide on the manufacturer. There are many products on the market today. Let's look at the most popular of them.
The best means
Car owners identify several high-quality compounds:
- StepUp (USA). Excellent water and dirt repellent (also contains WetOut moisture displacer). The operating temperature of the product is from -50 to +220 degrees. The product is suitable for seals of any vehicles (including snowmobiles and even jet skis). The composition is made on the basis of silicone, isopropanol, propane-isobutane and additional additives. The canister is equipped with a convenient thin tube. The cost is about 400 rubles.
- Very Lube (from the Ukrainian company XADO). Silicone spray for plastic and rubber elements costs about 220 rubles. The composition has excellent insulating properties, penetrates well into chips and cracks, preventing their contamination. The lubricant contains no fatty components, it has a water-repellent effect and prevents freezing to metal elements. Very Lube can withstand temperatures from -62 to +250 degrees. The composition is not washed off with hot or cold water.
- Eltrans (Russia). This is a universal lubricant that can be used to treat rubbing parts (including rubber seals). The cost of the composition is in the range of 160-190 rubles. After treatment, a thin protective water-repellent layer is formed on the surfaces. The operating temperature of the liquid ranges from -30 to +60 degrees, so this product may not be suitable for regions with harsh winters.
- NanoProTech (Russia). The cost of this penetrating lubricant is 300 rubles. For this money, the car owner receives a composition that is capable of displacing moisture up to 100%. The validity period of the lubricant (as stated by the manufacturer itself) is at least 3 years. After treatment, the seals stop squeaking. A protective layer is formed on them, which penetrates deeply into the structure of the elastic band. The composition retains its working qualities at temperatures from -80 to +140 degrees.
It’s also worth paying attention to a few more good formulations.
Lada 2110 Autobiography › Logbook › Door seals from Priora
Good day everyone. Everyone knows the problem with factory door seals. Up to a speed of 110, it was more acceptable in the cabin, but after that you could already hear the wind breaking into the cabin, and after 140 it was generally felt like it was walking around the cabin) And in winter there was a fair amount of cold air blowing in, and the cabin cooled down very quickly. I started looking for solutions on the drive, forums, asked other owners of the tenth family how they dealt with this problem, etc. And here opinions were divided. Some said that the prior seals were awesome, others said that it was all garbage (supposedly it blows in even more, the rubber bands don’t cover the ceiling, they don’t fit well, they slide and a lot of other things), the third that you should install three-chamber ones from Viburnum, and the fourth generally advised from Chevrolet Niva. After all these conversations, I gave up on this problem a little, and I didn’t like the price of the factory seals, but in the end the whistling and blowing wind in the cabin got to me. I went to the market and looked and felt all the seals and decided that I needed to take the Priora factory seals (precisely the factory seals that are soldered!). As it turned out, two companies supply these seals to the conveyor: Balakovo and the Ural RTI plant. Well, Balakovo costs 100 rubles cheaper and the sealing rubber itself, which is in contact with the door, is a little narrower, and the seller assured me that the Ural ones are better. After thinking about it, I took the Ural ones, having agreed with the seller that if suddenly something went wrong, he would exchange them for me in Balakovo. At the same time I also bought a trunk seal (300 rubles).
The installation took about an hour and a half. After removing the old seals, I removed the remaining sealant from the openings, washed them and dried them, after which I put on the new one. First I put it on by hand, then I tapped it along the entire length with a hammer so that the seal would fit better on the door and would not move out later. During installation, one problem arises, since the seal is welded, it turns out to be a hump. In order to easily remove it when putting on the seal, firstly we compress it, and secondly we place it well in the corners of the opening. But if there is still a hump, you need to divide it into several small ones in different places of the opening and use a hammer to seat them. No need to cut anything!
To say that I am pleased with the result is to say nothing. If earlier even at a speed of 110 you had to raise your voice, now even at 140 you can calmly talk without straining. The noise from the cabin is gone, the wind is no longer blowing)
Now the next step is the glass seals and velvet covers from Priora, so that it would be generally quiet))
Regarding those who told me that the prior seals are garbage, I will say the following: They installed counterfeit seals that are split. Factory seals must be welded! As they say, the miser pays twice.
Lada Granta Jaguar))) › Logbook › Installing additional seals on Granta doors!
Vertical seal between the front and rear doors of the Lada Granta! As a door seal, you can use any suitable material (for example, flex, which is used as a seal on the VAZ 2110), which is secured with double-sided tape, but it is best to buy a vertical door seal RKI-19 (for Kalina and Chevrolet Niva), it is also suitable for the Lada Grant.
The procedure for installing a vertical door seal: The seal is self-adhesive, so it should be installed indoors at a temperature not lower than -15°C. The door seal is installed from top to bottom. Before installation, it is recommended to warm the seal for at least 2 minutes at a temperature of 40-50°C to give it elasticity .Degrease the surface of the rear door flange with gasoline or alcohol, then dry. Peel off the protective tape at a length of 50-70mm from one end of the seal. Fix the upper end of the door seal at the top point of the rear door flange, and gradually tear off the protective tape 50-100mm apart, without stretching , glue the seal in small sections to the bottom edge of the flange. Install the door seal tightly against the end of the flange and the door flange. On a curved section, carefully press the seal along the entire length of the section. After installation, additionally press the seal at the upper and lower ends for reliable gluing.
Advantages: Reduction of aerodynamic noise (sound insulation). Protection from contamination of the front door lock area and rear door hinges. Additional sealing (thermal insulation) of the car interior. More silent/pleasant door closing. Disadvantages: Not found. Rubber seal for Lada Granta doors They speak Lada Granta Luxury configuration, such door seals are installed standard from the factory. On cheaper versions of this car, only holes for its fastening remained in the doors. But is it stopping us from buying a Granta door seal separately and installing it ourselves?
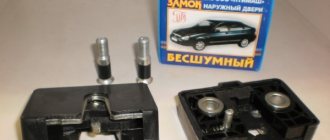
Front doors: 1118-6107028 Front door sill seal (2 pieces per 1 door). 1118-6107066 Fastening button (14 buttons per 1 door). Rear doors: 1118-6207028 Rear right door sill seal. 1118-6207029 Rear sill seal left door. 1118-6107066 Fastening button (11 buttons for 1 door). So, we know the catalog numbers. Plastic pistons are included with the door seal, and we use them to install (the process will take no more than 5 minutes). See the diagram for which side to install these rubber seals correctly. This is what happened))
Selection of replacement
You won’t find any kind of advice for naive and gullible car owners on the Internet. Some suggest installing window seals on the VAZ 2110 instead of rubber bands intended for this model, others suggest inserting tubes from droppers inside. In general, there is no limit to skillful imagination.
We will try to focus on the most acceptable options, with proven effectiveness in practice.
So, to replace rubber bands you can use:
Priorovsky door seal
Tip: Before choosing a seal, you need to very carefully measure the internal length of the rubber bands on the front and rear doors. It’s better to take a little more if you’re not using a “native” set, because shortening is always easier than sharpening.
In addition, if you plan to modify it for tighter insulation, you will also need a tube for additional door sealing, about 8 mm in diameter made of silicone or polyurethane.
For fixation, disposable pins and glue are used.
Foreign and domestic cars: sound insulation
If you compare the sound insulation of a foreign car and a Lada Priora, you will notice significant differences, which are primarily due to the fact that the foreign car has a more competently designed body and better located seals. Thus, in order to achieve the maximum effect of isolating extraneous noise, it is necessary to install additional seals in the right places on the car body and doors.
If you look closely, on foreign-made cars the door gaps do not exceed 2 mm, while on domestic cars this size is sometimes increased by 5 times, that is, it can be up to 10 mm. This makes you wonder how to install new seals on the Priora.
Additional seals should not be purchased at random, because they may not fit your car. For example, the RKI-19 door seal is suitable for a Lada Kalina car, but for a Priora it will be too small, since the distance from the pillar to the edges of its doors is greater than that of the Kalina.
Which material is better
You need to select insulation for the front door based on your goals: to ensure tightness, temporary insulation, long-term use.
For example, if you plan to replace wooden structures with metal-plastic ones, then you can use inexpensive foam rubber insulation, the service life of which is 1 year. Further, under the influence of temperature changes and dust, the foam rubber loses its properties and crumbles. Such insulation will be inexpensive, but will not last long, especially in outdoor conditions.
For heavy metal doors, it is necessary to glue durable rubber. Its shelf life is up to 15 years. A correctly installed product does not stretch, shrink or peel off during use. Rubber, which is used for entrance iron structures, is usually porous, which makes it possible to retain heat in the room . You can determine the end of the product’s service life by the appearance of the rubber layer: it will begin to peel off in some places.
For internal structures, silicone or rubber linings are the best. They have the same properties and last a long time. For small gaps, you can buy thin rubber or silicone. At the beginning of the process, you need to measure the width of the gap and select a specific brand of product in the store.
Grant door seals. RGI 135 and RKI 19
However, hello! Finally got around to it and I installed additional door and sill seals on my Granta Liftback. Namely: RGI-135 (horizontal door seal) and RKI-19 (vertical seal between doors). Let me note right away that the “Lux” grants already have such seals and nothing else needs to be molded. There are no seals in the lower configurations. But let’s say “thank you” for the fact that the manufacturer left us the opportunity to install them.
The doors have special holes for installing door seals, which are neatly covered with special plastic plugs. The plugs can be pulled out in two ways. Either by prying them off with something flat (screwdriver, plastic card, ruler), or by screwing a self-tapping screw into the plug a couple of turns and simply pulling it out. I chose the second method, because... it is the safest for the paintwork of our beloved car. And the plugs won't be needed anyway. The picture was borrowed from one good magazine and a user from the network:
Now let's look at the door seals themselves. The RGI-135 seal is designed for installation specifically on doors in special standard places. Four rubber bands for each door with fastening clips. Serves as protection for thresholds from excess dirt and dust, and eliminates wind whistling when driving. One important and most crucial point when installing the RGI-135 door seal is that the seal must be installed with its WIDE side towards the threshold. Take a closer look at the photo and make no mistake at this stage. If you install the seal the other way around, there will be absolutely no effect. There will still be dust and whistling from the wind.
The RKI-19 seal has an adhesive base such as 3m adhesive tape and is glued to the pillar between the front and rear doors, removing the empty gap between them. Again, saving us from excess dirt and noise when driving. Installing RKI-19 will not raise any questions. Peel off the protective film of a few centimeters, apply the seal to the top of the pillar on the car and begin gluing it from top to bottom, gradually removing further the protective film. Having reached the bottom of the rack, cut the seal and move to the other side!
With seals, the doors close much more pleasantly, one on one, like on a good foreign car. They slam shut, without knocking, creating a “sense of vacuum.” At first, the doors may not close the first time, but this is a matter of time. You will get used to the new doors, and the seals will develop and become softer.
Installation of filler
In order to forget about the sounds behind the door, you can replace the old filler with a more current one, which is only possible with a collapsible door. Let's talk about the order of work:
- Remove the door from its hinges. We place it so that the outer part of the door is at the bottom, and the inner part is at the top (where the work is to be done).
- We remove the fittings.
- We dismantle the inner door leaf.
- We remove the filler that is currently present in the structure.
- We install the current filler. If you need to place the material on glue, degrease the surface and apply the adhesive in thin strips.
- As a result, the filler will have joints, which we foam or fill with mineral wool.
- We return the sheet removed from the door to its place.
- We install the fittings.
- We hang the door.
Removal
When you have purchased the required number of seals, you can begin to work.
Article on the topic: Do-it-yourself noise insulation of VAZ 2110 (Video)
The first step is to remove the old rubber elements, after which the installation of new parts begins.
Let's tell you more about the dismantling procedure.
- Remove the plastic trim panels installed on your vehicle's door sills. To do this you will need a thick screwdriver. Remove carefully, being careful not to damage the plastic caps. But it’s better to buy new ones in advance if you can’t carefully dismantle the threshold.
- Now remove the old pieces of rubber from the seats. Simply tear off the sections that are torn off by hand.
- Remaining rubber can be cleaned off with any available tool. Only be careful with sharp objects so as not to damage the metal and paint layer.
- Very small residues and traces of glue are removed using solvents. Make sure that the solvent you choose will not damage your paintwork.
- Go over the doorway with a vacuum cleaner, remove all dust and dirt. Take special care to clean the bottom part. If wet cleaning was used, wait until everything is thoroughly dry.
Upcoming work
Installation
This process cannot be called complicated. You are not required to have any special training or extensive experience. Although you should at least be able to handle glue.
Working with the back door
Each stage is performed consistently and carefully to achieve the desired result and create comfort inside the cabin.
- Even if you have already measured the required length of the seals for your doors, we advise you to do it again. Anything can happen.
- Cut the required length, plus leave a couple of centimeters of reserve. Although if we are talking about a ready-made set of rubber bands, you won’t have to cut or leave anything. Skip the first two points.
- Insert a tube made of silicone or polymer inside the sealing tape. They are sold everywhere, so there should be no problems finding them.
- The length of the tube must match the length of the rubber. This tube will serve to create the necessary elasticity and allow the elastic to press more tightly to the door. This way, ventilation gaps will not appear, and the cabin will become much quieter.
- A shaped side rubber seal is glued to the bottom.
- If the tape is solid, you can start putting it on from either side, as is more convenient for you.
- If it is a measuring rubber band, then start from a point between the door overhangs, or 30 centimeters from the bottom of the threshold. Moving up or down is a personal choice for each master. There is no difference here.
- Push the figured profile all the way down. To do this you will need a rubber or wooden hammer. He's a mallet.
- When the seal is installed around the entire perimeter, an extra piece will be revealed. Cut the tube straight and end-to-end, and make the elastic itself seem slightly deformed. It's like you tore it off by hand. This will avoid the unpleasant phenomenon of siphoning through the joint.
- Replace the pistons; if some were damaged during removal, replace them with new, intact ones.
- Replace the plastic cladding removed from the threshold.
- The second contour of the seal is glued along the edges carefully, but as tightly as possible, after which time is given for the glue to dry completely.
Article on the topic: Self-replacement of the crankshaft oil seal on a VAZ 2114
Almost immediately you will feel the difference between the old and new seal. This is a useful exercise that allows you to get rid of unpleasant sounds, knocking, whistling and cold air flowing directly onto your feet.
Door seals, replacement...
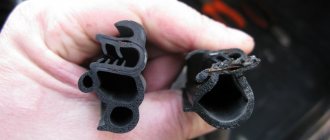
I changed the door seals... when buying, I didn’t notice that they were different from the factory ones, they had some kind of shape... reminiscent of a sausage)))
but they do their job with a bang! the doors close with a pleasant dull sound... and now the doors don’t hang around on bumps or holes...
Below are photos of old and new seals...
the old seals were all worn out and torn...
a few words about the installation... I installed it... but it’s a bit damp and hasty... because... you need to remove the trims of the pillars, where the seat belt drum is... there you need to put a seal under the plastic, but the seal locks on this trim, due to lack of time (again, I did everything during working hours), I installed the seals, and I will remove the trims on the weekend and finish it properly ...
By the way, they advised us to install seals from Our Nexia... they seem to fit, but! their price tag is the same, but the Neksiev seals will have to be increased for the rear passenger door openings... I won’t say anything regarding their survivability, but I have heard a lot about the poor quality of the Kalinov seals...
Selecting a seal, correct fastening of the material
Having decided to install a certain sealing layer of material on the door of your car, in no case should you buy the first suitable material you come across, since only a certain additional door seal is suitable for each car.
Therefore, you need to familiarize yourself with all the information regarding the material used to seal car doors, and only then can you purchase components. For the Lada Kalina, material of the RKI-19 brand is suitable, but this sealing material is absolutely not suitable for installation on the Lada Priora. To install it on Priora you will need a little more material than RKI-19.
The right choice allows you to increase the life of the car and significantly reduce the level of noise entering the Priora’s interior. Installing additional seals on the doors allows you to carry out a kind of “sealing” of the car interior and protect the door locks and hinges from a variety of contaminants that can easily get through the door gap.
Classification: main types
Seals are produced by many manufacturers and differ in the following parameters:
- Material type. It can be rubber, silicone, polyethylene foam, plastic, foam rubber.
- Construction . The material in question can be made entirely of one material or be equipped with a metal clamping strip.
- Fastening system . The seals are self-adhesive (an adhesive substance is applied to one side, protected by paper tape) or attached to self-tapping screws. But the latter can only be installed on wooden doors.
For reference. You can make a seal yourself by wrapping a strip of foam rubber in leatherette or artificial leather. Another option for eliminating door gaps is to insulate the entire structure (see How to insulate a metal entrance door) and install an overlap around the perimeter of the door leaf.
As a rule, the seal is sold in the form of a roll, the length of the tape is about 6 meters - this is just enough for installation on a standard door. In the package you will find installation instructions and fasteners, if needed. But for a metal door, self-adhesive seals are mainly used.
Additional seals on Priora doors
Seals for Priora doors can be purchased at a hardware store. This D-shaped seal is self-adhesive, so you don’t need to buy additional glue. You can install an additional seal on the Priora door in different ways. The photo shows one of the options, which, according to the majority, is the most advantageous.
We also install a seal at the bottom of the door (photo by author). They are installed on special clips that come complete with the lower seals:
Advantages:
- Reduction of aerodynamic noise (sound insulation).
- Protection of the interior and sills from dirt.
- Additional sealing (thermal insulation) of the car interior.
- More silent/pleasant door closing.
Disadvantages: if you do not take care of the lower door seal, then over time it begins to rust and rot under the rubber bands.
Why do you need to seal a door?
- From the penetration of excessively cold or hot air flows;
- From the occurrence of a draft effect - a dangerous phenomenon that causes illnesses in households;
- For a better fit of the canvas to the frame of the doorway. This is a kind of lock that protects the locks from play, and if the door is constantly in what is called free flight, then ultimately the key will not be able to get into the keyhole.
What basic requirements must a high-quality seal for an iron door meet?
- Possess exceptional sealing properties;
- Ensure the smoothness of the chassis - good to help open and close;
- Provide breathability and be a good door shock absorber;
- Withstand sudden changes in temperature;
- Be elastic and pliable - do not harden or soften under any influence.
The video shows a seal for a metal entrance door:
Which ones are used for a metal entrance door?
There are several types of seals on the construction accessories market, differing in the following indicators:
- Type of material of manufacture . The most common are products made of rubber fabric, silicone base, plastic, foam rubber bands or products made of polyethylene foam material;
- According to the method of fastening . This group includes self-adhesive sheets, magnetic or pressing, with special glue applied to one side, or installed on additional fasteners.