The driver's door central locking actuator on the Priora has failed. We need to change it.
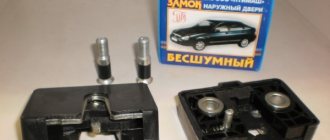
I purchased a gear motor for the electric lock of the driver's door lock (4 wires) on a Priora in the store.
Article: 2170-6512110-10. Price 350 RUR
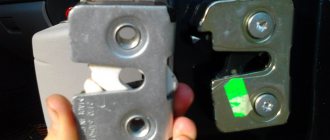
This is the culprit. Served for 4 years.
I'll take it apart later and post a photo report.
Tags: replacing the central locking actuator on a Priora, standard central locking actuator on a Priora, electric door lock motor gearbox on a Priora
To add comments you must log in or register on the site
The Priora car has managed to establish itself as a reliable and trouble-free vehicle, the characteristic feature of which is ease of operation and ease of maintenance. However, even with him, unfortunately, problems sometimes occur. Among the most common breakdowns that occur with this car are problems with the central locking. This device has a number of features, without knowing which it is unlikely that it will be possible to eliminate the problem.
In this article we will tell you what to do when the central locking in the Lada Priora does not work properly, and what exact reasons lead to its failure.
Replacement of the Priora Door Lock Electric Drive
Remove and install reversing door lock Lada value
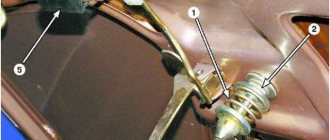
- Locking, pulls and handles dark entrance
- 1 - Pull the outside handle
- 2 - external handle
- 3 — intermediate rod lock lock
- 4 - intermediate locking lever
- 5 - Pull the lock key
- 6 - internal handle
- 7 — pull inner handle
- 8 - internal lock
- 9 - external lock
- 10 - cost overlay
Lock, traction drive and rear door .
You will need: an “8” wrench, flat-blade and cross-blade screwdrivers, and pliers.
- 1. Disconnect the wire from the negative terminal of the battery in advance.
- 2. Replacing the rear door lock. Lada Priora owner's story ›Replacement of electronic door lock, turn. How to remove and install a priority window with a priority sin, Management for replacing and adjusting the door lock for primer, Repairing a window regulator. Trim of the rear door of the VAZ 2170 (see “Removing and replacing the rear door trim”).
3. Squeeze the lock...
4. ... and disconnect the cable block of the door lock gear motor.
5. Closing the lock on the car door has stopped working. Up to 10 replacements. Remove the three screws that secure the inner handle.
6. Slide the handle from the inside of the door tab panel.
Repair of the drive (electronic door lock) Itelma Lada Priora.
The main purpose of the video is to show the internal drive mechanism of Itelm and how it works to add value.
Irritation of the rear door Activator Priora replacement without removing the rods and closing
This video points out that just because you corrected something in a Russian square, it doesn't mean everything is fine. I love yours.
7. Tighten the drive stop clamp...
8. ... and disconnect the stubborn tip from the handle of the internal lock of the VAZ 2171.
9. Replacing the electric door lock drive. Use a screwdriver to remove the middle latch from the door.
10. Unscrew the screw that secures the intermediate lock lever.
11. Slide the intermediate lever down and remove the lock from the bracket hole.
12. Remove the glass guide mounting bolt...
13. ... and remove the control
14. The door lock drive does not work. The motor blockage is to blame. Using a screwdriver, remove the stubborn tip of the outer handle of the VAZ 2172 and disconnect the stop.
15. Lada Priora Hatchback Antares ›Logbook› Repair of door locks. Remove the mat.
16. Replacement of the side windows of the entrance doors of VAZ 2110-2112, Priora. The procedure for removing and installing entrance door windows on VAZ 2110-2112 and Lada Priora. Remove the two mounting screws...
17. ... and remove the lock.
18. Screw for securing the internal lock.
- 19. ... and remove the internal lock using the clips and the internal handle.
- 20. Install the lock in reverse order, having previously lubricated all rubbing parts with lubricant. Check the ease of opening and the safety of the door lock. If necessary, adjust the locking, as well as the front door lock setting (see “Adjusting the front door lock acceleration”).
Source: vivauto.ru
Peculiarities
Unlike other models coming off the assembly line of the Volzhsky Automobile Plant, the Priora does not have a separate control unit on the central lock. Its functions are performed by a single electrical package controller. In addition to this unit, the vehicle protection system installed at production also includes an APS-6 type immobilizer. Thanks to this, the car owner does not need to install an additional security system on his car.
In reality, there are quite a lot of reasons for the central locking malfunction. Problems often arise due to:
- controller;
- keys;
- immobilizer;
- driver's door lock;
- broken wiring;
- shorting it to the ground of the car, etc.
If this or that problem occurs, you should pay attention to the window regulators, as well as the adjustment of the mirrors. If they do not function, then, most likely, the failure occurred due to a malfunction of the signal wiring coming from the 5th pin of the driver's door module or from the 5th pin of the HZ terminal, which supplies the controller itself.
Replacement
The replacement process will take you no more than 10 minutes; the most difficult thing will be to unscrew the bolts securing the lock to the door. There is no need to adjust the lock after replacement, since the adjustment is made only on the hinge, and during operation the hinge will not unscrew and, therefore, will not change its position.
Tool
The only tool you need is a ratchet (driver) with a TORX T40 bit or a T40 wrench.
Step-by-step instruction
- Using a T40 socket wrench or a key, loosen the two bolts securing the lock to the door.
Attention: Under no circumstances unscrew both bolts at the same time; if you unscrew two bolts at once, the inner part of the lock (drive) will fall into the door and then you will have to remove the door trim to get it out.
- Unscrew one bolt and remove it
- Then unscrew the second bolt, but not all the way, pull the lock towards you and turn it to the side, or use a pin as shown in the picture.
Why does the central locking system not work?
Quite often a situation arises when the central lock cannot be opened with a key or key fob. As a rule, the problem here is solely due to a faulty relay or due to damaged wiring.
If the key normally opens the central locking system, but the key fob does not, then most likely the battery in the latter is simply dead or its button needs to be cleaned. Experienced specialists note that in their practice, signal receiver or transmitter failures have occurred extremely rarely. You can check it simply - just use a spare remote control or insert a new power supply into the existing one.
The inability to open with the key is due to incorrect operation of the activator. This device is located directly in the driver's door, and it is responsible for distributing the signal through the locking mechanism. First of all, in this case, check:
- wiring;
- circuit breakers;
- terminals.
To inspect the activator, you will need to remove the trim from the previously mentioned door.
Removing the interior lock, lock cylinder and outer front door handle
We carry out the work when replacing the lock, its cylinder mechanism and the external door handle. Remove the front door trim (see “Removing the front door trim”).
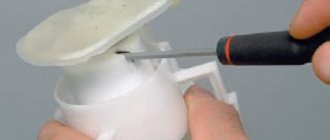
Use a slotted screwdriver to disconnect the rod from the cylinder mechanism of the lock.
Use a slotted screwdriver to pry up the mounting bracket for the cylinder lock mechanism...
...and remove the bracket.
We take out the cylinder lock mechanism along with the rubber sealing ring. Disconnect the lock rod from the outer door handle.
Using a 10mm socket, unscrew the two nuts securing the outer door handle...
...and remove the handle.
Using a slotted screwdriver, unfasten the clamp securing the wiring harness of the electric locking drive.
By pressing the latch... ...we disconnect the wiring harness blocks of the electric locking drive.
Using a Phillips screwdriver, unscrew the three screws securing the base of the inner handle...
...and the screw for securing the internal lock. Remove the external lock (see “Removing the external door lock”).
We remove the internal lock of the front door with rods and an electric drive for locking the lock through the technological clearance of the inner door panel.
Front door lock with electric locking, external and internal door handles
Use a slotted screwdriver to disconnect the rod end of the outer handle from the lock lever.
Using the same method, we disconnect the rod of the cylinder mechanism of the lock.
Using a slotted screwdriver, we open the spring bracket that secures the rod of the inner handle...
...and remove the bracket. There is a spring washer under the bracket, remove it, and then the rod.
Using a slotted screwdriver, press out the plastic locking rod lock of the locking key, turning the lock around its own axis.
Using the same method, we remove the locking electric drive rod.
Using a Phillips screwdriver, unscrew the two screws securing the electric drive to the lock bracket and remove the electric drive.
We remove the rod from the hole in the electric drive rod of the lock.
Front door internal lock mechanism
Installation of the internal door lock, cylinder lock mechanism and external door handle is carried out in the reverse order.
Before installing the door trim, we check the functionality of the door lock mechanism. If the external door handle or lock cylinder mechanism does not work correctly, the length of the rod should be adjusted by rotating the plastic tip of the rod.
Source: wiki.zr.ru
Circuit breakers
If the lock stops working, you need to check if there is power in the circuit. Most often the fuses blow. They can fail not only due to a short circuit, but also due to overload. The latter often occurs if the rods do not work properly (for example, they have not been lubricated for a long time or have frozen if the breakdown occurred in the cold season).
Meanwhile, if burnout occurs regularly, then you need to find out what exactly provokes this breakdown. Often it is the activator that causes frequent short circuits.
Wiring
In general, the wires remain a weak point in Priora, and so far the manufacturer has been unable to do anything. For this reason, it is extremely important to regularly check their integrity. This is a labor-intensive task, but very necessary.
They start testing them from the doors - it is at the points of their entry that the insulating layer is most often damaged, which, in turn, provokes a short circuit. The procedure looks like this:
- the wires are disconnected from the activator;
- use a key fob to close the lock;
- the power wire must be live;
- If you open the door, the electricity will flow through another vein.
Adjusting the door position
- Users
- 7 messages
- Car make: LADA Priora
Today I noticed such a nuisance: at the top, near the roof, at the junction of the front and rear doors, the paint from the back door has peeled off a little, the very corner looks like a scratch about 5 mm long. When closing the front door, it catches the rear door with its upper corner. If you close the front door as if lifting it up, then nothing catches.
I compared the gaps between the rear edge of the back door and the small window. On the side (left) where the paint peeled off, this gap is larger than on the other side. On the other hand, there is no such peeling of paint.
Two schemes (simple and complex)
First of all, before connecting the alarm, you need to study the instructions included with it. The main unit always has relays installed: one of them closes when the locks are locked, the second acts on opening. The connector to which the relay contacts are connected usually has 6 pins. There is nothing complicated here.
In the first case, we will use only this connector. The second circuit uses another contact, called “signal output for 2-step lock opening”. Find it on the main unit.
We connect the alarm in a simple way
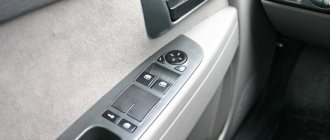
A push-button module is installed in the driver's door of the Lada Priora. The door trim must be removed and the connector for this module must be found:
We will need a brown cord from the connector. It is a signal, and the alarm relay is connected to its break:
Two wires connected to each side of the cut cord will have to be pulled to the main unit. The common contacts of the relay are connected to one of the wires.
It must be remembered that when carrying out any installation work, first disconnect the negative terminal of the battery.
All wiring in the considered circuit is signal, but this does not mean that the connection points need not be isolated. Wires should not touch metal parts of the car. If contact occurs, it is necessary to use additional protection: electrical tape, heat-resistant tube, etc.
The best option for connecting to the central locking system
Having made the connection, as discussed above, you can notice the following: all locks are activated from the key fob for closing, and only one, the driver’s, is activated for unlocking. This defect can be eliminated 100%, which will require 2 or 3 additional relays. First, let's look at where the connection points are:
The block that is visible in the photo is designated BUS-2170. It is equipped with three connectors, but we need one (three-row).
Find three wires in connector X1:
- Sixth (red-black). The cord goes to the actuators and is the power one.
- Thirteenth (green-black). Front right power window control cable.
- Eleventh. Same as “13”, but for the rear window lifter.
How to connect an alarm system to the central locking of a Priora Lux? Three wires are broken (all indicated), and the cables from the break points are pulled to the signaling unit. If you don't have rear power windows, the last cord will be missing. And if there are no power windows at all, cables 3 and 2 do not break (they are still missing).
How to remove a door on a Priora and not damage the paintwork of bolted joints
Before resorting to the direct process of dismantling the entrance products on Priora, you should prepare for this action thoroughly. Almost always, unscrewing the bolted connections of door hinges is accompanied by damage to the paintwork of the fasteners. As a result, when selling a car, a potential buyer has a lot of additional and unnecessary questions.
It is almost impossible to unscrew the door bolts with a 100% guarantee that their paintwork will not be damaged. However, there is a way to minimize the likelihood of negative consequences. For this you will need masking tape. To avoid damaging the paintwork coating on the fastening bolts, you must perform the following steps:
- Cover the bolt heads with a double layer of masking tape.
- Put on the head, and then carry out manipulations to unscrew the bolts.
- After unscrewing them, do not remove the tape from them. The process of tightening bolts is carried out in a similar way.
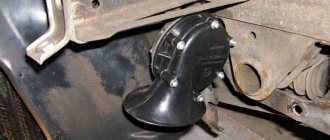
The video below shows how this can be implemented using the example of removing a tank flap.
Having thoroughly prepared to carry out the relevant work, you can begin.
Notes on implementation of schemes
Let us immediately note: if there are no window lifters, the second diagram will not contain parts K2/K3. Then you only need to cut one wire. Sometimes only the rear windows are missing. This means that relay K3 is excluded. And the diodes connected in parallel with the winding can be absolutely anything.
Now we list the requirements for an element called “relay”:
- Operation voltage – 12 Volts;
- Switching current – 10 A or higher;
- The current consumed by all relay windings should not exceed the value specified in the instructions for the signaling. Usually it is 200-300 mA.
It is the last requirement that is often violated.
In order for “scheme 2” to work, it is necessary not only to assemble it, but also to program the main unit: you need to enable the “2-step unlocking” option. And be that as it may, control impulses cannot be made too long. Use values of 0.7-1.1 seconds.
Power cables (cord X1-6) can only be connected using twists.
The cross-sectional area of the wire must be sufficient to withstand a current of “10 Amps” (this does not apply to signal circuits). A fuse protecting the power circuits must be installed. And of course, before installation, remove the negative terminal of the battery.
Why is everything so difficult?
It would seem that we only need to manage the locks. Why then connect to the window lift motors?
The opening of the passenger doors is carried out by the second impulse (relay K1 is activated). And elements K2 and K3 at this moment block the power windows. If they are not blocked, the windows in the doors will lower during the entire control pulse. And even in 0.8 seconds they will open noticeably.
Of course, connecting the signaling system in a Priora is more difficult than in many domestic cars. At the same time, the “Grant” in the “Norma” configuration uses a similar scheme. Be that as it may, the Lada Priora is the flagship of VAZ. And probably, difficulties with the electrical part should not confuse a competent car owner. It is also known that the standard control unit can be reprogrammed, and then unlocking occurs in one step. In this case, the connection is made according to “Scheme 1”.