Lada Priora sedan › Logbook › Trim for torpedo, tunnel Priora2: Detailed replacement.
Hi all!
And so, we finally got around to installing this cover. All prices, articles and where I ordered will be in the text. I will try to explain everything in as much detail as possible.
— Dismantling the torpedo and tunnel.
It was August 17, I got up early in the morning, drank coffee and started dismantling (started at 9 am, finished around 7 pm).
I completely removed the tunnel and 8 bolts on the dashboard, and in about an hour the torpedo and tunnel flew off the car. — Dismantling the old lining.
Brought home a torpedo.
We see that the top plate is soldered to the frame. We arm ourselves with a screwdriver with a 3-3.5mm drill and drill out more than 100 points. It took me about one and a half to two hours to dismantle the old cover, because... The overlay is soldered conscientiously.
— Installing a new trim:
:
— The overlay itself — (art. 2172-5325181-00 price 2100 rubles, bought at plastautobamp.ru, comes with varnished inserts on the sides);
— Plug (dummy) of the passenger airbag (art. 2172-5325058 price 286 rubles. plastautobamp.ru); — Visor (art. 21720532512500 price 239 RUR. Autopiter.ru), — Visor mounting brackets (art. 21230532512800 10 RUR/pcs. got from Autopiter); — Glove box body (rear wall of the glove compartment) — (art. 21725303014 price 261 rub. Autopiter); — Lower air duct (art. 2172-8101344 taken from plastautobamp.ru); — Side nozzles (art. 2172-8104040/41, left one bought on plastautobamp.ru price 250 rubles, right group VK AutoLuxury price 350 rubles);
Next, we connect the trim and the frame of the torpedo itself; they fit perfectly, no need to tighten anything. We take a soldering iron, in my case it was from FixPrice with 40W, no more powerful is needed. I turned the tip over and went to solder along the drilled points (soldering took about 30-40 minutes), turn it over and look at the intermediate result:
— Central console. Installation.
— I took the center console in varnish (luxury type) — (1200 rubles, I took it from the VK AutoLuxury group);
— Central nozzle (art. 2172-8104092 price 350 rubles, bought plastautobamp.ru);
— Intermediate housing for central ventilation (art. 21720-8104200-00, connected to the central nozzle, bought at plastautobamp.ru price 100 rubles); — Emergency button (art. 2172-3710010 price 197 rubles, bought at emex.ru); — A container for attaching the console (so to speak, an “adapter”, without which the center console cannot be connected to the frame, art. 21720790102300 price 208 rubles. Autopiter); The frame of the Priora1 and Priora2 torpedoes at the mounting location of the center console are slightly different, and so on in order: In order for the center console to stand up, you need to saw out/cut/remove the plastic (indicated in the photo):
This is what it turns out:
It should look something like this:
— Tunnel. Installation.
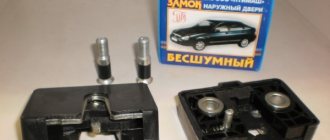
— Top of the tunnel — (art. 21720510915400, price 1400 from VK AutoLuxury); — Cup holder (black varnish) — (800rub, took VK AutoLuxury); — Gearbox cover with chrome frame — (art. 2172-65109070-00 price 450 rubles, bought from VK AutoLuxury); — Bracket for fastening the lower part (art. 21720510911100, price 307 rubles, bought at Autopiter); — Armrest — (art. 21720-5109504-00 price 550 rubles, took plastautobamp.ru); — Plugs for heating, handbrake — (price 50 rubles, bought plastautobamp.ru).
— Cup holder mat (art. 21720510932200, price 63 rubles, bought at Autopiter).
And so, with the above parts, in terms of access, it’s normal, they are available for sale, but with the lower part of the tunnel it’s bad - it’s out of production, so it’s difficult to find it (salesmen, hucksters), and therefore the prices for it... Therefore, we collectively farm the lower part from priors1. It fits right up to the air ducts for the rear passengers, so we cut it off.
The back part of the tunnel is wider, about 1cm, so we saw it in half, cut off a part on one side and adjust it in width, solder it together and connect it to the bracket.
Next, I cut off the protruding parts of the bottom and installed them in place.
Next, we install the tunnel at our new place of residence.
The new tunnel was connected to the frame using the old holes, and two holes were made in the tunnel.
Fastening the upper part to the lower part, in the area of the air ducts for the rear passengers' feet, out of 4 holes only 2 fit - no problem, we make two new holes.
We drill a hole on the right side.
Next, we complement the interior with a new Vesta-style gear knob in eco-leather and a handbrake handle, also in eco-leather. Gear knob - 800 RUR, handbrake - 200 RUR.
Well, here's a photo of the final result:
I changed my mind about installing the tablet, there will be something else. The radio is still lying there, soon I will remove it and there will be a pocket.
Special thanks to foks91 for detailed posts, articles) and brother rusl29 for support in this difficult matter) Ask if anyone doesn’t understand something. That's all for now, good luck everyone!
Removing the floor tunnel lining
We carry out the work by removing the cigarette lighter, parking brake lever and trunk lock control button. We tilt both front seats back (see “Removing the front seat”). For clarity, the work is shown with the driver's seat removed.
Using a 10mm socket, unscrew the nut securing the air duct to the legs of the passengers in the rear seat...
...and remove it. Similarly, remove the air duct on the right side.
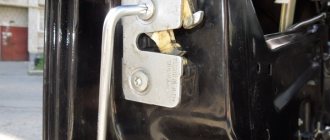
Raising the armrest, we pry up the decorative trim of the armrest hinge...
Disassembly procedure
- Unscrew the 3 screws securing the windshield defroster
- Removing the deflector
- Unscrew 2 screws...
- ... and remove the left nozzle of the ventilation and heating system.
- In the same way, remove the right nozzle.
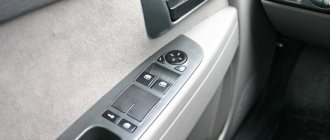
- Use a screwdriver to pry the rear window heating switch out of the console trim.
- Disconnect the wiring harness connector from the heated rear window switch.
- We remove the ashtray.
- We remove the pins of the glove compartment cover from the holes in the console trim and remove the cover.
- Unscrew the 4 screws securing the console trim.
- We pry it off with a screwdriver...
- ...and take out the radio from the panel.
- Disconnect the wiring harness connectors from the audio system.
- We unscrew the 2 screws securing the console trim, which are located on the sides of the window under the radio.
- Remove the console trim.
- We squeeze out the emergency gang from the reverse side.
- Remove the hazard warning switch.
- Press the clamp of the wiring harness block
- disconnect the block from the switch.
- Disconnect the wires from the clock.
- Disconnect the wires from the heater motor switch.
- Disconnect the wires from the heater control unit.
- Press the latch
- We take out the clock from the console trim.
- Unscrew the 4 screws securing the heater control unit to the console trim.
- Remove the heater control unit.
- We unscrew the 2 screws securing the central nozzle of the ventilation system to the console trim.
- Press the 4 fasteners on top
- Press the 4 fasteners from the bottom of the nozzle.
- Remove the nozzle.
- Unscrew the screw securing the fuse and relay box
- Removing the fuse box
- Disconnect the wires from the glove compartment light switch.
- Unscrew the screw securing the switch.
- Let's take it off.
- Using a screwdriver, remove the glove box light.
- Disconnect the wires from the lampshade.
- Unscrew the 2 screws securing the left air duct of the ventilation system.
- Remove the left air duct.
- In the same way, remove the right air duct.
- Unscrew the 2 screws securing the air flow distribution damper gearmotor. We remove the gear motor.
- Disconnect the wires.
- Unscrew the 2 screws securing the foot heating duct.
- We remove the air duct.
- Unscrew the 2 screws securing the air heating distributor.
- Remove the distributor.
- Reassemble the instrument panel in reverse order.
Removing and installing the panel (dashboard) Priora
If you decide to install sound insulation for the engine shield, or paint or reupholster the panel, then carefully study the instructions on how to remove and install the Lada Priora dashboard yourself.
Necessary tool . Phillips and flathead screwdrivers, 10mm head, pliers with narrow jaws.
Before starting work, you should disconnect the negative terminal from the battery. Then remove the steering column switches.
Remove the fuse box cover:
- Turn the three locks of the mounting block cover 90°.
- Unclip the fuse box cover.
Disconnect the wires from the ignition switch. Then remove the instrument cluster. and remove the central floor tunnel. Disconnect the wires from the electric power steering:
Then in order:
- Unclip the plastic clips and remove the left A-pillar trim. Remove the right A-pillar trim in the same way.
- Pry off the left door glass blower nozzle using a flat-head screwdriver with soft material underneath to avoid scratching. Similarly, remove the blower nozzle on the right side.
- Unscrew the nut of the upper fastening of the Priora panel, it is located in the cavity under the door glass blower nozzle, using a “10” socket. Unscrew the nut on the right side in the same way.
- Unscrew the bolt securing the ends of the ground wires of the dashboard using the same key.
- Disconnect the connectors with the instrument panel wires from the connectors located on the bracket above the fuse block.
- Disconnect the wire block located on the right end of the bracket.
- Disconnect the engine control wiring connector from the instrument panel connector.
- Unscrew the nut securing the ground wire terminal using a 10mm socket.
What tool will you need?
There is no single scheme for attaching and removing the elbow support. Most modern cars have different designs of seats and central tunnels. All this complicates the work of installing a new instance. But, if you arm yourself with all the necessary tools and detailed instructions, then all the work can be done quickly and efficiently.
List of required tools:
- Flat blade screwdriver;
- Ten socket head;
- TORX T20 – T30.
In some situations, a more extensive list will be needed, but this is the necessary minimum that every driver who wants to do all the work on his car without significant time investment should have.
Network voltmeter - instead of a clock
You can actually put a voltmeter in the Priora instead of a clock! This device helps monitor the mains voltage and generator operation.
It doesn't end with the voltmeter! You can add a voltmeter and a thermometer to the electronic clock discussed above, which will show the temperature inside the cabin. You can choose the display color of these models - fortunately there is a choice. The backlit device also looks great in the evening when dusk sets in, adding coziness to the Priora’s interior.
How to remove the center console (panel trim) of Lada Priora
The interior of Priora 2 (after the latest restyling) is significantly different from the previous version of the car. The interior now has a more stylish dashboard (dashboard) with the ability to install a modern multimedia system. If you are engaged in independent modifications or repairs of your car, then you will need instructions for removing the central lining (together with the tunnel, it is also called the “beard”).
The plastic center console is attached to the panel (dashboard) with 6 screws. To gain access to the lower two mounting screws, you will have to remove the tunnel cover:
- Remove 2 screws under the heater and air conditioning control unit;
- Remove the gearshift knob cover by prying it off with a flat screwdriver and remove the 3 screws under the cover;
- Unscrew the 2 lower screws securing the center console .
screws for fastening the tunnel cover of the Lada Priora; screws for fastening the tunnel cover of the Lada Priora; lower screws for fastening the center console of the Lada Priora
To remove the remaining four screws securing the center console:
- Remove the upper block of buttons and the plug by prying them off with a flat screwdriver or a plastic spatula;
- Remove the 2 upper console mounting screws;
- Remove the 2 middle console mounting screws .
plugs for the center console of the Lada Priora, upper mounting screws for the center console of the Lada Priora, middle mounting screws for the center console of the Lada Priora
All that remains is to pull the center console towards you and disconnect the connectors with wires at the back. Installing the plastic cover is done in the reverse order. The process is also shown in the video:
Let us remind you that after removing the center console, it can be covered with vinyl film.
Interior details of Lada Priora, Lada Priora
Salon Lada Priora
Cigarette lighter
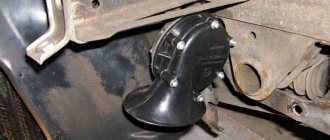
The domestic auto industry is in no hurry to replace the cigarette lighter with sockets, so all our cars are equipped with its classic version.
Lada Priora is no exception. Here it is located in a place of honor - the central floor tunnel, next to the parking brake handle. This arrangement of the device was not chosen by chance. It is always in sight, you can reach it with your right hand without bending, it does not interfere, and it is impossible for your pant leg to get caught on it. For greater convenience, it is also equipped with a backlight, which makes it easier to find in the dark.
It is worth noting that the Priora’s cigarette lighter differs from previous models not only in location, but also in configuration: its socket is somewhat smaller than that of other VAZs.
Design and operating principle
The Priora's cigarette lighter is no different from the cigarette lighters of other cars.
Structurally, it consists of a socket (a hollow metal cylinder) and a metal cartridge with a nichrome spiral inside. The cartridge is equipped with a plastic button, when pressed, the “plus” is connected to ground through the spiral. The principle of heating the coil here is exactly the same as in an electric stove or iron, but unlike the latter, the Priora cigarette lighter does not have a thermal relay. Its task is performed by bimetallic “ears” inside the cartridge, which, when heated, expand, and the spring ejects the cartridge, setting it to its initial position.
Malfunctions
Like any other electromechanical device, the Priora cigarette lighter tends to break. Sometimes this can be caused by design defects, sometimes by malfunctions in the machine's on-board circuit, and sometimes by the fault of the user himself. Common cigarette lighter malfunctions include:
- sinking of those same bimetallic “ears”;
- burnout of the spiral;
- broken contact in the connector;
- fuse blown.
Malfunctions can also include the burnout of a backlight lamp, however, this is more related to a decrease in the level of comfort than to serious breakdowns. In addition, it does not in any way affect the operation of the device itself and can be easily eliminated by replacing the lamp.
The sinking of the lugs is characterized by the lack of fixation of the cartridge in the pressed position. It can be caused either by the low quality of the metal from which they are made, i.e. defect, or high intensity or long period of use of the cigarette lighter.
The problem is solved by bending the “ears” inward using a thin screwdriver, naturally after de-energizing the on-board circuit. If after a short period of use the problem occurs again, it is better to replace the cigarette lighter.
When the spiral burns out, the cartridge is fixed when pressed, but does not heat up. The fault is diagnosed by ringing it using a car tester. It is not recommended to restore the spiral, as this may lead to a decrease in its resistance, which will make unwanted adjustments to the operation of the on-board circuit. In this case, the cigarette lighter also needs to be replaced.
Contact failure can be easily determined by removing the tunnel lining and checking the condition of the connector. This malfunction is not critical and can be fixed independently in a few minutes.
But as for the fuse, it makes sense to consider this malfunction separately, since its malfunction is most often caused by the human factor.
Replacing the cigarette lighter and its backlight
The cigarette lighter itself is not difficult to replace, you just need to pry the antenna inside the cigarette lighter with a screwdriver and pull out the inner part, and then we take out the plastic itself with the lamp, prying it with a thin screwdriver on both sides and pressing on the antenna. In principle, if you have already purchased a new cigarette lighter, you can simply look at how it works and everything will become clear.
Main process
Using a screwdriver, remove the windshield blower nozzles. Then the upper fastener, consisting of three clamps and bolts holding the instrument panel, is removed. The next step will be dismantling the amplifier. After a visual inspection of the bottom of the console, remove the corresponding screws that are located at the bottom of the panel. Next, the wiring of the instrument assembly is dismantled by unscrewing the pads and clamps.
The wiring system associated with the ignition switch is also inspected and removed. Together with it, the ground fastening, the power supply structure of airbags and other components with an electrical connection are disassembled. The final step is to dismantle the Priora dashboard itself with the center console. The part in question is a rather weighty part; it is advisable to have an assistant to remove it from the cabin. At this stage, the operation to remove the center console can be considered completed and further planned work can begin.
Installing a torpedo on a VAZ 2110 - step-by-step instructions
In order to install the instrument panel of a VAZ 2110 (torpedo), you must perform the following steps:
- Install the instrument panel so that the guide pins fit into the holes on the instrument panel.
- At the same time, move the steering column adjustment knob into the hole on the instrument panel.
- Using a screwdriver, drive the threaded rods into the holes on both sides of the panel.
- Install the foot warmer air duct so that the air duct fits into the hole in the air distributor housing.
- Connect all terminals to wires in reverse order. Secure the panel and reinstall all components that were removed during disassembly. After completing the work, check the operation of all devices.
Peculiarities
Despite the fact that removing the element in question is a fairly simple process, you should remember some nuances. Disassembly must begin by dismantling the radio. For this procedure, special pullers are used, which are inserted into the sides of the tape recorder until it clicks. Then you just need to pull the element towards you, and then disconnect all the connectors that appear. The metal niche where the radio was located is removed. Then the two console trim fasteners are unscrewed.
In order not to miss all the fastening elements, it should be taken into account that the console is fixed with two hidden screws under the Open cover and four similar screws under the ashtray and radio. In the upper part, the cladding is secured with additional metal brackets. To remove it you will need to apply some force.
If the center console is dismantled to eliminate an unpleasant squeak, after dismantling the cladding, you need to paste over the edges of the panel with a special insulator, which acts as protection against extraneous noise. In addition, you should treat in a similar way all areas with which the console interacts and make sure that the element is securely fixed and will not rattle after assembly.
Messages 4
1 Topic by Tryberlink 2012-11-23 14:05:54 (2012-11-23 14:12:59 edited by Tryberlink)
- Tryberlink
- New member
- Inactive
- From: Volgograd region.
- Registration: 2012-11-23
- Messages: 32 Thanks : 4
- Car: VAZ 21104
Topic: Resolved: How to set the clock and why it sometimes stalls
Please tell me how to set the clock on the instrument panel (electronic) on Europanel-1, where the mileage is shown.
And another question is why sometimes the car stalls for no reason, without load.
I forgot, I was advised to try turning the pin on the dashboard left to right, no changes
Guys, great...tell me how to set the clock on the Europanel Priora 2...I don’t know what to press anymore, damn it...((((Thanks in advance...explain in detail, please. And as luck would have it, I lost the instructions.
I have a 2010 Priora with standard equipment
by Adminrive · Published 03/27/2014
Makita is currently produced only in China and Bosch is pure German
by Adminrive · Published 02/02/2017
conclusions
Reupholstering the Priora armrest is a somewhat labor-intensive and painstaking process. However, almost anyone can do this on their own with minimal investment of time and money. And you will get much more pleasure from tuning yourself than by doing reupholstery “with someone else’s hands.”
Hi all . How to remove the trim from the armrest cover.
Taped the hood with 25 cm of transparent film
by Adminrive · Published 02/17/2013
How do you like it?
by Adminrive · Published 10/01/2016
Who needs a good day at work today
by Adminrive · Published 04/22/2016
- Comments 9
- Pingbacks 0
cut it off and that's it. I glued leather directly onto the material
Is this top not removable?
Anton, I did it as described in this link)
removed. if you warm it up from the inside with a hair dryer.
Mikhail, I did it at the first Priora, I didn’t find any photos or anything at that time, the guys from the Priora forum just suggested that you need to heat it with a hairdryer. To be honest, I got tired of separating the top part, it was glued tightly.
I tore it off like that, without a hair dryer. But you need to be careful, it can break
and I stupidly covered the new material on top and that’s it) the old one remained inside) I didn’t even glue it) I just pressed it in the corners with a screwdriver)
Console equipment and instrument purpose
The instrument panel on the center console is the place where the interconnection of all devices occurs, correcting and reading the performance of most components of the car. As a rule, the top of the panel is covered with a protective layer. Main instruments located on the console:
- Tachometer;
- Fuel level indicator;
- Turn signal;
- Motor temperature mode sensor;
- Other indicators of vehicle systems being turned on;
- On-board computer display;
- Additional sensors.
The tachometer indicates the number of revolutions of the engine shaft. The scale is graduated in 0.5 increments from 0 to 7. The frequency of readings is calculated by multiplying the data per minute by 1,000. The divisions marked with a red line indicate excessive load above 6,000, which negatively affects the condition of the machine and the power unit.
The left turn sensor signals its operation by flashing the indicator green. Also, the indicators are duplicated with an audio message. The speedometer shows the speed of the vehicle. The coolant heating indicator indicates its temperature. Exceeding 115°C indicates a dangerous level of overheating, which is accompanied by an audible signal and the arrow moving into the red zone.
The instrument panel is removed along with the unit in question. After carefully studying the operating instructions, you can find out how to remove the center console on a Priora correctly. To avoid the possibility of a short circuit, the battery must be disconnected before starting work.
Network voltmeter - instead of a clock
You can actually put a voltmeter in the Priora instead of a clock! This device helps monitor the mains voltage and generator operation.
It doesn't end with the voltmeter! You can add a voltmeter and a thermometer to the electronic clock discussed above, which will show the temperature inside the cabin. You can choose the display color of these models - fortunately there is a choice. The backlit device also looks great in the evening when dusk sets in, adding coziness to the Priora’s interior.
Characteristics
| Model | Lada Priora |
There is a hole for the on-board computer on this panel
I bought this kit. The quality is normal. But there are several pitfalls that sellers are silent about. If you replace the old panel from the Priora with a new one, then there will be a little less problems, if you install it on the tenth family, then everything is sad. The kit does not include the following parts, which are not available in retail sales at all. 1. Air ducts (left, right) 2. Glove box lid lock latch 3. Glove box lid axle. In addition to this, the panel does not fit into the old style floor tunnel. There is a new sample for sale. But only its upper part, which also does not fit with the old lower part. But the lower part is not on sale anywhere, nor is the tunnel lining bracket.
Selection of material for reupholstery
Before you start reupholstering, you should decide on the material in which you will “dress” your armrest.
There are not many options on the market today. The best, of course, is leather. The armrest will look good in appearance. And in terms of wear resistance, it is much superior to other types of material. However, to cover the armrest with leather, you will have to tinker more. Moreover, it is not cheap.
You can also take a good leather substitute. Outwardly, it will not be much different from leather, but it has several disadvantages, including a tendency to damage and wear, and an unpleasant odor. In addition, leatherette is more elastic. This makes the re-upholstery process somewhat easier, but during operation this factor has a negative effect.
There is also Alcantara - a fiber material that is quite thin. It is durable, soft and silky. Has dirt-repellent properties.
When choosing a material, before purchasing it is worth checking its uniformity and at least looking at its quality externally. Also pay attention to the fact that it is in harmony with the interior color.
Tunnel without armrest
To remove the rear lining of the floor tunnel, you will need to unscrew two fastening screws (No. 3) using a Torx 20 sprocket and remove the plug (No. 1). We pull out the lining, removing the parking brake lever from it.
The process of removing the front tunnel lining: remove one screw (No. 3) on each side and remove the side panels.
Remove the gear knob cover using a flat-head screwdriver. Remove the floor tunnel lining by disconnecting the block with wires. If AMT then remove the trim like this.
Unscrew the screws (No. 2) securing the lining and remove the front part of the tunnel.
The process of removing the Vesta tunnel is also shown in the video:
Dismantling
It all starts with disassembling the interior. Removing the Lada Vesta dashboard yourself is not so difficult, but you need to work very carefully.
The first is the battery, from which you need to remove the negative terminal.
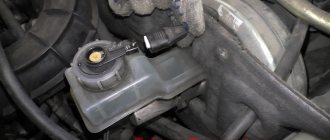
Drain the antifreeze and remove the pipes
Next comes the turn of draining the coolant. To do this, you need to drive the sedan onto an overpass, a pit, or simply drive the front wheels onto supports and wait until the engine cools down, then unscrew the drain tank plug to relieve excess pressure.
When everything is done, you need to tighten the plug so that the flow of antifreeze at first is not so powerful. Next, all that remains is to place a drain container under the radiator, and use pliers to tighten the clamp securing the pipe from the bottom of the radiator. When some of the liquid has flowed out, you should unscrew the cap of the expansion tank so that the antifreeze drains completely.
Then you need to drain the fluid from the cylinder block. To do this, you first need to dismantle the starter, since it prevents access to the drain plug, and during the draining process, antifreeze will get onto the starter itself. The element is secured with three screws, which must be removed using a 10mm socket. After removal, the starter must be moved to the side and secured with a piece of wire.
This opens access to the drain plug, which is unscrewed with a 13-point head. You need to unscrew it and wait for the antifreeze to completely drain.
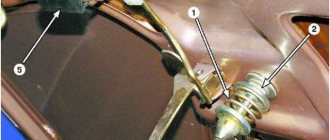
When this is done, the pipelines should be disconnected from the evaporator block, which requires unscrewing the bolt marked in the figure as number 2, and then putting plugs on both the holes in the block itself and on the pipelines. Next, you need to use pliers to squeeze the clamps indicated by numbers 3 and 4 and remove the hoses going to the heater radiator.
Facing
It also needs to be dismantled. The front pillar trim is held on by clips that snap off. The front sill shield (right) is secured with a screw (No. 3 in the figure) and clips.
Floor tunnel
Soundproofing the Lada Vesta dashboard involves removing the central tunnel of the sedan floor, which is divided into 2 parts:
- The front one is a massive plastic component that fits directly to the dashboard. It contains the cigarette lighter, transmission selector, seat heating buttons, etc.
- Rear – the parking brake is located on it and this section is significantly smaller.
It all starts with the back section. First, unscrew 2 bolts on the sides of the handbrake using a Torx 20 sprocket, and also remove the plastic plug under the parking brake handle. All that remains is to carefully remove the section.
Let's move on to the front. First you need to remove the side panels, each of which is held on by one screw.
Next, using a knife or thin screwdriver, you need to dismantle the gearbox selector cover, then disconnect the plug from the wires and remove the floor tunnel lining.
When everything is done, all that remains is to unscrew the screws marked with the number 2 and remove the floor tunnel.
The video shows how to remove the Lada Vesta floor tunnel yourself.
The dismantling of the cladding continues by unscrewing 2 bolts that secure the entire panel to the floor tunnel.
Steering column
First you need to unscrew the 3 screws that secure the column casing and remove it.
Next, when the casing is removed, you need to unscrew the 4 nuts, marked in the figure with the number 2. With them, the steering shaft (together with the amplifier) is attached to the cross member of the tidy.
Then you need to disconnect the plug with the wiring, and then lower the steering shaft to the floor, setting the steering wheel adjustment lever to the locking position to eliminate the possibility of the shaft being disconnected from the electric booster.
The next step in independently removing the Lada Vesta dashboard is to disconnect the plugs with wires, marked with the number 1, from the instrument panel, brake and clutch pedal switches, as well as from the electronic gas pedal. Only after this the 2 nuts (No. 2 in the figure) that provide the mass are unscrewed.
Side panels
When the steering column is finished, it is necessary to dismantle the side panels of the dashboard and loosen the fasteners.
To do this, use a knife or screwdriver to remove the plug (No. 1 in the figure), and then the bolt (No. 2 in the figure) securing the cross member is released 3-4 turns. In this case, it is necessary to take care of the safety of the windshield.
The next step is to dismantle the side panels of the dashboard, indicated by numbers 4 and 7, and also unscrew 4 bolts numbered 5 and 11.
Connectors
It's a small matter. All that remains is to disconnect the plug from the wiring, unscrew the nut and remove the wire to ground. It is important not to forget to disconnect the connector that goes to the antenna.
Lastly, remove the hose from the climate control, designed to drain condensate.
When everything is turned off, all that remains is to remove the Lada Vesta dashboard, but you won’t be able to do this alone, and therefore you can’t do it without an assistant.
After the panel is removed, it would be a good idea to inspect the “underside” of the dashboard. There are times when there is wiring dangling there that will simply fray in the future. Sometimes you can notice broken fasteners and the like. It’s better to fix them all so you can have peace of mind later.