Causes of pollution
The causes of clogging of the remote control are most often exhaust crankcase gases, which carry particles of burnt oil and soot. Small crankcase ventilation is connected directly to the throttle corrugation. The air entering the cylinders mixes with crankcase gases and, passing through the diaphragm, clogs it.
The throttle can also become clogged due to a poor-quality air filter or its loose fit, then dust particles can pass through the filter and clog not only the remote control, but also cause significant harm to the engine.
Node location
Opening the hood of the Priora, you won’t be able to see the throttle assembly. It is located under a plastic casing that covers the top of the engine. In addition to aesthetic value, it has the function of protecting against a heated valve cover.
After removing the casing, the air supply system will appear. It is a large rubber pipe connected on one side to the air filter box, and on the other to the intake manifold. A Priora throttle valve assembly is installed between them. It looks like an aluminum insert with a plastic black wing in the form of a sector, to which the control cable is connected (in the case of a mechanical drive).
Symptoms of a dirty throttle body
- The speed is XX;
- Unstable operation of the internal combustion engine (vibration);
- Dips when moving;
- The engine does not develop power;
- Difficulty starting;
- Increased speed XX;
All of these symptoms may indicate contamination of the throttle assembly, and if these problems are detected in your car, the first thing you need to do is clean the throttle assembly.
Maintenance frequency
Practice shows that the throttle needs to be cleaned at intervals of 40-60 thousand kilometers. The time when such a need arises can be determined by the following signs:
- Unstable speed.
- Long return to idle speed when releasing the accelerator pedal.
- Difficulty starting the engine after a long period of inactivity. Even in warm weather.
- The exhaust gases contain the smell of gasoline, indicating that the mixture is over-rich.
The manufacturer recommends cleaning every 50 thousand km. Owners of the Priora car name different numbers on thematic forums. Some people do not resort to this procedure throughout the entire use of the machine. Much depends on operating conditions: region, timeliness of replacing the air filter.
Where is the remote control on Priora
The Priora throttle assembly is located on the intake manifold housing. It is equipped with idle speed control (IAC) and damper position sensors (DPS). Heating hoses are also connected to the throttle body, which drive heated coolant through the throttle, thereby ensuring the supply of warm air to the cylinders.
Heating of the dampers was abandoned when switching to an electronic throttle; in the E-GAZ system there is no heating of the throttle, as well as other sensors that control idle speed and damper position.
Mechanical drive
The first models came with a cable drive. When you press the gas pedal, the force is transmitted mechanically.
The Priora throttle body additionally combines a position sensor for this element of the intake system and an idle speed regulator, which sets the crankshaft speed when the throttle is closed, as well as at the time of starting the engine and while connecting additional electrical equipment: headlights, air conditioning, electric heater motor salon It operates electrically. Which supplies air through the valve, bypassing the damper.
In addition, the housing is part of the crankcase cooling and ventilation system. The Priora throttle body with 16 valves differs from the throttle body of a car with 8 valves by an additional hole on the perimeter of the body on the side of the intake manifold.
Differences between E-GAS and mechanical.
E-GAS damper
The electronic damper is more modern and unpretentious; it does not have the problematic IAC and TPS sensors. All adjustments of the electronic throttle occur precisely by the position of the damper itself. Changing the position of the damper in the assembly is carried out by a worm mechanism receiving signals from the electronic gas pedal.
Mechanical damper
In a mechanical throttle, a separate sensor, called TPS, is responsible for the valve position, and the IAC is responsible for the idle speed. Changing its position is driven by a cable connected to the accelerator pedal inside the car.
Cleaning the throttle valve. 5 common mistakes when cleaning the throttle body yourself
The task of the throttle valve (hereinafter referred to as DZ) is to regulate the amount of air supplied to the intake manifold. Its position is adjusted in accordance with the position of the accelerator pedal. The damper drive can be mechanical (using a cable) or electronic (using an electric motor).
The position of the remote control is recorded by a special sensor. It transmits the relevant information to the ECU, which in turn makes a decision on the amount of fuel supplied and changing the engine operating mode. You can read more about its structure and functions in additional material on our website.
In order not to confuse the symptoms indicating excessive carbon deposits on the valve, it is better to first visually inspect it, and if there are no visible oil or coked deposits on the walls of the throttle assembly, then, with a high degree of probability, cleaning the throttle valve will not eliminate the problem.
The signs themselves look like this:
- problematic engine starting;
- uneven engine operation;
- floating speed at idle;
- freezing engine speed;
- drops in speed until a complete stop.
Many inexperienced car owners can incorrectly clean the throttle assembly, at a minimum risking not getting the desired effect, and at maximum - completely damaging and disabling the throttle body. Therefore, it is important to understand when to do the procedure, how to do it and what means to use.
Dirty throttle valve
Clean throttle
To properly clean the throttle body, DO NOT:
- Clean the damper in any unclear situation (there are even jokes about this).
- Clean the damper without removing it (the effectiveness of such cleaning is insignificant, since often it is only possible to remove carbon deposits on the damper itself, and the internal walls and air channels of the damper are not cleaned).
- When cleaning with a rag, use excessive force, which can lead to damage to both the damper itself and the nearby TPS.
- Use brushes rather than soft materials. Such an error also quite often leads to loss of performance of the remote control, since on some throttle units the inner wall and damper are coated with molybdenum for even smoother air passage. This layer is often confused with plaque and is removed. As a result, the damper begins to either “bite” or allow excess air to pass through (the speed increases).
- Forgetting to teach the throttle after cleaning. Dampers with an electronic gas pedal require proper learning of the remote control in order to set the idle speed to the required value.
Cleaning the throttle valve on Mitsubishi and Nissan requires a special approach. You need to act carefully and carefully so as not to remove the protective coating, the so-called “patch” - a sealing coating along the contour of the remote protection. And also be sure to train the damper to set new engine operating parameters).
The throttle valve should be cleaned every 30-50 thousand km.
Adhering to all the above recommendations and taking into account the main mistakes that inexperienced car owners make, no more questions should arise about how to clean the throttle valve, be it mechanical or electronic. For cleaning you need a minimum of equipment and costs, just a carb cleaner and clean rags, as well as a screwdriver for dismantling the unit.
Cleaning algorithm
Now we will give a step-by-step algorithm for properly cleaning the throttle valve.
- First of all, you need to get to the damper itself. The design is different in different engines. But as a rule, to do this you need to remove the air duct that runs from the damper to the air filter.
- Dismantle the damper. To do this, unscrew several mounting bolts (2-4 pieces), and also disconnect the necessary connectors (for example, the connector from the absorber purge valve).
- To clean, you must use a carburetor cleaner. There is a wide variety of them, and in auto stores you can easily find a product in accordance with your preferences and capabilities (we will talk about them later).
- Using a rag and the mentioned product, you must thoroughly wipe the damper outside and inside.
- You also need to clean the protective grille (if your car has one).
- Assembly of the unit is carried out in the reverse order.
Remember that you need to clean the damper thoroughly so that the metal is as light as possible. This will ensure, after its installation, an increase in the dynamic characteristics of the machine.
An easy way to clean your throttle body
The correct way to clean the throttle body
Cleaning without removal
Also, many car owners are interested in the question of how to clean the throttle valve without removing it. Such methods do exist, but you must immediately understand that high-quality cleaning is only possible by dismantling the damper.
To do this, you will need a special product - an intake tract cleaner. You can use different brands. You can also use EGR valve cleaning fluid, WD-40, and solvents for cleaning.
So, the procedure without removing the node:
- As in the previous algorithm, you need to remove the air duct to get to the damper.
- With the damper closed, spray the surface with cleaning liquid and remove the cleaned dirt using a rag.
- Open the damper and remove dirt from the side surface.
- Make sure that the cleaning agent gets into all channels. The cleaning procedure is similar using a rag.
Let us repeat once again that for proper cleaning, the throttle valve must be removed from the car. And when installing it back, it is advisable to replace the damper gasket with a new one. Fortunately, its price is low.
Cleaning the throttle
To clean the damper from dirt, it is necessary to dismantle it from the car. This will require a number of tools and a little skill in car repair.
Required tool:
- Phillips or flathead screwdriver;
- Pliers;
- Ratchet with extension head 13;
- Carburetor cleaner;
- New gasket for remote control;
All work should be performed with the negative terminal of the battery removed..
Cleaning the mechanical throttle
- We begin to dismantle the damper; to do this, we unscrew the clamp of the air filter corrugation, the clamp of the crankcase ventilation pipe and the clamp from the mass air flow sensor. We take out the corrugation.
- We unscrew the clamps of the throttle heating hoses and lift them up so that the coolant does not leak out.
- Unscrew the clamps of the remaining two hoses from the top and bottom of the DZ.
- Disconnect the TPS and IAC connectors
- Next, unscrew the two bolts securing the DZ, use a ratchet with a head set to “13” and remove the damper. We dismantle the TPS and IAC dampers already removed.
Cleaning process
- Use carburetor cleaner to thoroughly rinse all areas of contamination. Particular attention should be paid to the channels of the idle air regulator, since it is in them that a large amount of dirt accumulates.
- Then we wash the valve itself to remove carbon deposits.
- We carry out assembly in reverse order.
- When assembling, pay special attention to the condition of the sealing ring on the IAC; it should fit tightly to the body and be free of burrs and cracks. Replace it if necessary.
Cleaning the electronic throttle E-GAS
Removing the electronic damper is a little quicker and easier.
IMPORTANT: Do not turn the valve with your fingers; flushing must be done without touching the valve. Otherwise, the mechanism may be damaged, which will lead to inevitable replacement of the remote control.
- We unscrew the clamps of the air corrugation and dismantle it.
- Then remove the connector from the remote control and unscrew the three nuts securing the throttle to the intake manifold.
Cleaning process
- Use carburetor cleaner to clean the throttle from carbon deposits; the cleaned surface should shine.
- We carry out assembly in reverse order.
Removal and installation of the throttle assembly of the VAZ 2170 Priora
- Repair manuals
- Repair manual for VAZ 2170 (Priora) 2004+.
- Removing and installing the throttle assembly
Signs of a throttle valve that is not fully closing may include increased idle speed and increased fuel consumption, and if the throttle valve is not fully opening, the engine will not develop full power.
In case of these malfunctions, first try adjusting the throttle drive or replace the cable (see “Checking and adjusting the throttle drive cable” ). If this does not lead to a positive result, replace the throttle assembly.
You will need: a socket wrench (head) “13”, a screwdriver with a Phillips blade.
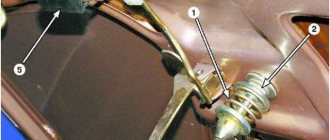
| Warning Do not remove screws 2 securing the throttle valve. If they are then poorly tightened and tightened, the loosened screw can get into the engine cylinder and damage it. The throttle valve position is adjusted at the factory, so it is not recommended to touch the throttle valve adjusting screw 1. |
1. Drain the engine cooling system (see “Replacing the coolant” ).
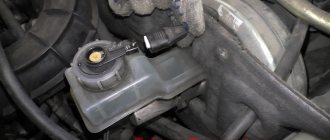
| Note If you are skilled enough, you don't have to drain the coolant. With the engine cool, release excess pressure in the engine cooling system by unscrewing and then tightening the expansion tank cap. Prepare plugs of suitable size that you can use to plug the hoses immediately after disconnecting them from the throttle assembly. The loss of coolant with this method will be insignificant. |
2. Disconnect the wire from the negative terminal of the battery.
3. Open the hood and remove the decorative engine cover (see “Removing and installing the decorative engine cover” ).
| 4. Having released the clamps, disconnect the wiring harness connectors from the throttle position sensor... | 5. ...and idle air control. |
6. Disconnect the air supply hose from the throttle assembly (see “Cleaning the crankcase ventilation system” ).
| 7. Loosen the clamp of the first throttle body heating hose... | 8. ...and remove the hose. |
| 9. Loosen the clamp of the second throttle body heating hose... | 10. ...and remove the hose. |
| 11. Loosen the fastening clamp... | 12. ...and disconnect the hose of the small branch of the crankcase ventilation system from the throttle body fitting. |
| 13. Loosen the clamp securing the adsorber purge hose... | 14. ...and remove the hose. |
15. Disconnect the throttle drive cable from the throttle assembly sector (see “Checking and adjusting the throttle drive cable” ).
| 16. Unscrew the two nuts securing the throttle assembly... | 17. ...and remove the throttle assembly from the intake manifold studs. |
18. If, when replacing the throttle assembly, the idle air control and throttle position sensor are not installed on the new assembly, replace them with the old assembly.
To do this, unscrew two screws securing them.
| Note Replace the damaged foam ring located under the throttle position sensor. |
19. Clean the dirty throttle assembly with carburetor cleaning fluid, after first removing the sensor and regulator from it. Also clean dirty regulator and sensor (do not use solvents for cleaning).
20. Install the throttle assembly and all removed parts in the reverse order of removal.
21. Adjust the throttle drive (see “Checking and adjusting the throttle drive cable” ).
↓ Comments ↓
1. Car structure
1.0 Car structure 1.1 General information about the car 1.2 Passport data 1.3 Car keys 1.4. Controls 1.5. Heating and ventilation of the cabin 1.6 Ensuring a comfortable air temperature in the cabin 1.7. Doors 1.8. Passive safety equipment on the car 1.9. Seats
2. Recommendations for use
2.0 Recommendations for use 2.1. Safety rules and recommendations 2.2 Running in the car 2.3 Operating the car during the warranty period 2.4. Preparing the car for departure
3. Problems along the way
3.0 Malfunctions along the way 3.1. The engine does not start 3.2 Malfunctions of the fuel injection system 3.3 Idle speed has disappeared 3.4. Interruptions in the operation of the 3.5 engine. The car moves jerkily 3.6 The car accelerates poorly 3.7 The engine stalled while driving 3.8. Oil pressure dropped to 3.9. Engine overheating 3.10. The battery does not recharge 3.13. Knocks in the engine 3.16. Wheel puncture
4. Maintenance
4.0 Maintenance 4.1. General provisions 4.2. Inspection work 4.3. Lubrication and filling works 4.4. Diagnostic work 4.5. Repair and adjustment work
5. Engine
5.0 Engine 5.1 Design features 5.2 Possible engine malfunctions, their causes and solutions 5.3 Useful tips 5.4 Checking compression in the cylinders 5.5 Removing and installing the decorative engine casing 5.6 Removing and installing the engine splash guard 5.7 Installing the piston of the first cylinder to the TDC position of the compression stroke 5.8 Replacing the drive belt gas distribution mechanism and tension roller 5.9 Replacing the power unit supports 5.11. Replacing engine seals 5.13. Engine cylinder head 5.15. Engine repair 5.16. Lubrication system 5.17. Cooling system 5.18. Power supply system 5.19. Design Features
6. Transmission
6.0 Transmission 6.1. Clutch 6.2. Gearbox 6.3. Front wheel drives
7. Chassis
7.0 Chassis 7.1. Front suspension 7.2. Rear suspension
8. Steering
8.0 Steering 8.1 Design features 8.2 Possible steering malfunctions, their causes and solutions 8.3. Steering column 8.4. Steering linkage 8.5. Steering gear
9. Brake system
9.0 Brake system 9.1 Design features 9.2 Possible malfunctions of the brake system, their causes and solutions 9.3 Bleeding the brake system hydraulic drive 9.4 Removing and installing the vacuum brake booster 9.5 Replacing the brake pedal axle bushings 9.6. Main brake cylinder 9.7. Front wheel brakes 9.8. Braking mechanisms of the rear wheels 9.9. Pressure regulator 9.10. Brake hoses and tubes 9.11. Parking brake
10. Electrical equipment
10.0 Electrical equipment 10.1 Design features 10.2. Battery 10.3. Mounting block (relays and fuses) 10.4. Generator 10.5. Starter 10.6. Ignition switch (lock) 10.7. Electronic engine control system (ECM) 10.8. Ignition system 10.9. Lighting, light and sound signaling 10.10. Windshield cleaner 10.11. Washer reservoir 10.12. Electric fan of the engine cooling system 10.13. Electric motor of the heating and ventilation system fan 10.15. Cigarette lighter 10.16. Instrument cluster 10.18. Electronic anti-theft remote control system 10.19. Immobilizer 10.21. Replacing sensors and switches
11. Body
11.0 Body 11.1 Design features 11.2 Possible body malfunctions, their causes and solutions 11.3 Removing and installing windshield frame lining 11.4 Removing and installing soundproofing upholstery in the engine compartment 11.5. Removing and installing bumpers 11.6 Removing and installing the fender liner and protective wing cover 11.7 Removing and installing the front fender 11.8 Removing and installing decorative sill trims 11.9. Hood 11.10. Trunk lid 11.11. Doors 11.12. Seats 11.13. Seat belts 11.14. Rear view mirrors 11.15. Interior fittings 11.16. Instrument panel 11.17. Heater 11.20. Body care
12. Applications
12.0 Appendix 12.1 Appendix 1. Tightening torques of threaded connections, Nm 12.2 Appendix 2. Fuels, lubricants and operating fluids 12.3 Appendix 3. Nominal filling volumes 12.4 Appendix 4. Basic data for adjustments and monitoring 12.5 Appendix 5. Spark plugs used on vehicles 12.6 Appendix 6. Lamps used on a car 12.7 Appendix 7. What you need to have in a car 12.8 Appendix 8. Tools used when repairing a car
13. Electrical diagrams
13.0 Electrical Diagrams 13.1 Diagram 1. Instrument Panel Harness Connections 13.2 Diagram 2. Vehicle Front Wire Harness Connections 13.3 Diagram 3. Engine Electronic Control System (ECM) Harness Connections 13.4 Diagram 4. Vehicle Rear Wire Harness Connections 13.5 Diagram 5. Light Harness Connections license plate light 13.6 Diagram 6. Left front door wiring harness connections 13.7 Diagram 7. Right front door wiring harness connections 13.8 Diagram 8. Rear door wiring harness connections
Correction of a factory miscalculation
It is quite common for a throttle assembly to come out of the factory with something that cannot even be called a defect, but can still be attributed to design errors. In theory, air should flow into the space behind the throttle, for which a channel of approximately 2.5 mm is specially made.
But the whole problem is that this channel was pressed against the wall of the receiver, thus blocking the possibility of air flow. A slight modification of the throttle assembly can help in this case.
This material will help you install engine crankcase protection yourself:
Bored channel for air flow in the throttle
To do this, just take a file and use it to make a small groove in the indicated place. 2 - 3 mm will be enough. But before doing this, it is necessary to remove the throttle.
Throttle valve for VAZ F 52 mm
- Engine Crankshaft
- Flywheel
- VAZ cylinder head
- Sports camshafts
- Sport timing valves
- Cylinder head components
- Belts | Timing gears
- Gaskets | Oil seals
- Intake system
- Throttle valve
- Clubturbo pistons
- TDMK pistons
- Federal Mogul pistons
- Piston rings
- Connecting rods
- Engine mounts
- Inserts for VAZ engines
- ACL earbuds
- Oil catchers
- Oil crankcase
- Oil pump
- Miscellaneous
- Turbo Turbo kit
- Turbochargers
- Turbo manifold
- Bypass valves
- Westgates
- Intercooler for VAZ
- Intercooler kit
- Piping kit (air ducts)
- Turbo parts
- Adapters for installing an oil cooler | sensors
- Straight pipes
- Blocking
- Vacuum booster
- Clubturbo suspension
- Silencers for VAZ
- Air temperature sensor
- Filler necks
- Moto kits Turbo
- Adapters for installing sports steering wheels
- Keychains
- Bumpers tuning for VAZ
- Hoses | tubes
- Thermal insulation
- home
- Catalog
- Engine
- Throttle valve
- Throttle valve Ф 52 mm
How to clean the throttle of a VAZ 2110?
For cleaning, you can use carburetor cleaning fluid.
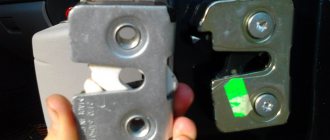
For high-quality cleaning, remove the TPS and IAC sensors and rinse those areas thoroughly. Especially, pay attention to the forced crankcase ventilation channel, especially if at the beginning, when the thickest pipe was removed, traces of oil were found in it. If this channel is heavily clogged, you can use wire (rod rod) or a knitting needle to clean it.
Ultimately, you should end up with something like this. On the left is a photo before cleaning, on the right is after.
Debugg
If you notice that the throttle has begun to perform its direct duties poorly, do not rush to go to a service station and hand over your money.
The problem with the damper can often be solved with your own hands.
Most often, a problem with the throttle occurs due to contamination, which leads to impaired functionality. To correct the situation, simply clean the element.
When Cleaning Is Required
The practice of "tens" car owners shows that on these cars the throttle becomes clogged literally just a few years after the start of active use of the car.
The biggest “pests” for the damper are particles of oil, dust and gases coming from the engine crankcase.
When the engine is running, dust mixes with air and oil, forming a kind of mixture that enters the throttle valve. Over time, this substance sticks to surfaces and accumulates on the idle rod.
Soon the thermal gap becomes covered with dirt, and access through the idle air regulator channel is significantly deteriorated. If you do nothing, the engine will begin to work incorrectly, the dynamics will drop, and the engine will respond late to pressing the gas pedal.
Signs of contamination
Problems with the throttle valve can be identified by characteristic symptoms.
Signs
Explanation
Engine has difficulty returning from high to low speeds
This happens when you take your foot off the gas pedal. Instead of a smooth return to the required parameters, the speed literally drops to the 400 rpm mark. The engine may stall and begin to shake. The speed can return to the desired level, but with difficulty
The engine is difficult to start when cold and even when operating temperature is reached
To start the engine normally, you need to turn the starter for a long time. You can identify the problem by smell. The characteristic aroma of unburned fuel will come from the exhaust pipe. Try pressing the pedal all the way down several times. This will open the throttle fully, air will flow in, and the engine will start. But in the first few minutes the engine will still stall
Troubling the motor is a rather indirect sign, since this is how the engine can behave in various types of failure. But don't rule out problems with the throttle.
Important addition
When cleaning the internal cavity, it is not recommended to change the position of the Priora throttle valve with electronic gas, since the drive gears can be damaged. The mechanical damper, on the contrary, can be rotated by the drive, completely opening access to the inside. You can also disconnect the damper from the rotation axis. It is secured with two bolts. However, you need to know how hard to tighten it back. If self-loosening occurs after assembly, the bolts will fall into the combustion chambers of the engine. To prevent this from happening, after finishing the work you need to drive 500 km, disassemble the unit again and tighten the damper fasteners.
After assembly, do not forget to add coolant to the operating level.