Front seats
The front seats can be removed regardless of the Priora body type, that is, the seats will be removed the same way on all types of cars.
In order to get started, you need to prepare the tool.
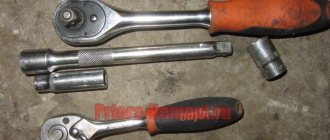
To remove the front seats of the Priora you will need:
- Ratchet;
- Torx head E10;
- Head for 10 and 13 mm;
After preparing the tool, you can begin to work.
Removal process
- Initially, you need to disconnect all wires connected to the seat, such as heated seats and the seat belt indicator. We find these connectors under the seat and disconnect them.
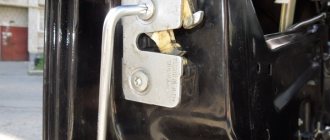
- Remove the springs pushing the seat forward numbered 1 and 2 by pulling them up from the plastic retainer.
- Next, use a 13 mm socket to unscrew the 4 nuts securing the front part of the seat.
- Then, using a torx E10 head, unscrew the 5 bolts securing the slide.
- We take out the seat through the front door of the car.
Installation is carried out in reverse order.
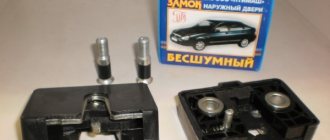
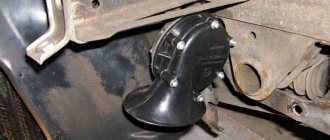
Modified shock absorbers
As a rule, the factory shock absorber does not have any effect on the ground clearance. But if you are working with an already worn-out unit, then while driving it may be subject to swinging in the forward direction, which greatly increases the possibility of damage not only to the bumper, but also to the components and parts of the Lada located under the bottom of the car.
In order to qualitatively increase the ground clearance on a Priora (this rule is also relevant for any other car), you should use only original shock absorbers, which will differ from the factory ones in a number of characteristics. So, for example, the length of the rod, the length of the spring will be increased and the quality of the spring stiffness will greatly increase. The latter is achieved by adjusting the shock absorbers - thickening the coils.
It should be noted that increasing the parameters of the shock absorber is a rather expensive way to change the ground clearance. That is why it is rarely used. However, the possibilities for working with shock absorbers are very large, since you can use not only Lada components, but also components of other cars. In addition, there are special offers from manufacturers of units that allow you to increase ground clearance.
How high the ground clearance of the Lada Priora is will depend on what kind of spring is installed on it. Since the body will be mounted on it, not only the ground clearance, but also the quality of the suspension as a whole will depend on the stiffness of the spring and the distance from its lower point to the upper one.
There are not too many options for which springs to attach to the car we are interested in. There are 2 classes in total: A and B, of which the earlier version is considered the most stringent. There are also some types of springs that are installed on the car during factory assembly. By qualitatively changing them, we can also increase ground clearance.
But do not forget that the desire to obtain excessive spring stiffness can lead to unintended consequences. So, for example, you can make the car bounce when encountering bumps and speed bumps. Spring stiffness is very useful when the machine is heavy or heavily overloaded. However, going light will degrade the performance of the suspension and prevent it from operating smoothly.
The vehicle's ground clearance is a parameter that does not happen much on our roads. Although, if you look from the other side, it is not uncommon to come across a car on the street with a lowered suspension.
Most often they decide to increase clearance due to the following cases:
- A loaded car hits the fender liners with its rear wheels or the mudguards on the ground, so they want to lift the rear of the car.
- It touches the bottom or crankcase protection on uneven roads, so they want to raise the front of the car.
In some cases, they decide to raise the rear and front suspension at the same time. It is no secret to many that after such actions some troubles may arise, wear of some components may increase, and the characteristics of the car may change. Let's try to find the answer to the question: how to increase ground clearance without negative consequences.
Rear seats
The rear seats will differ in dismantling depending on the Lada body type. Therefore, we will consider each body type.
Sedan
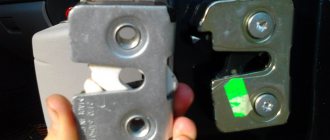
- In a sedan, the rear seat can be removed much faster than in other body types. To remove the sofa, you need to press on the locks located on the edges of the sofa and lift it up. After which the sofa can be removed from the car.
- The backrests of the rear sofa can be removed by opening the lock located behind the rear headrest. To do this, you need to pull the lock loop and tilt the backrest forward. After which the back is removed from the hooks.
Hatchback and station wagon
- In these types of bodies, the sofa is divided into two parts, each part is attached to two hinges that are screwed to the body with an M6 bolt with a 10mm head.
- To dismantle, you need to pull the loop and open the lock securing the sofa. Then unscrew the 4 bolts and remove both parts of the sofa from the hinges.
Interior
The updated Lada Priora 2013 2 received the greatest number of changes inside. The most important update to the Priora 2 interior was the upholstery material (soft-look), which to the touch resembles rubberized plastic, often used in new mobile phones and is immediately visually similar to leather.
In addition, the new 2013 Priors are distinguished by improved sound insulation and sizing, providing 71 decibels of volume at a speed of 100 km/h, which is exactly in line with competitors of European cars. Maybe this is why the old glass control panel was left on the old door panels with new upholstery, which constantly cracks while driving.
And so, the updated Lada Priora 2013 received two elongated by 40 mm. front seats with new headrests and almost sporty lateral support. They are attached to a new mechanism with an increase of 20 mm. longitudinal adjustment, in the hope of getting rid of previous unwanted feedback.
In addition, Priora 2 2013 sports a new instrument panel, seemingly optimized for understanding by lateral (peripheral) vision, plus a completely new center console with a 7-inch screen, USB socket, navigation (GPS/GLONASS) and wireless data transfer function (Bluetooth). The new Lada Kalina 2nd generation received a similar one.
An eyeglass case appeared on the ceiling, other visors with flush stamping and a retouched armrest below, because the previous one was immediately removed due to the complete lack of ergonomics. In the hands of the driver of the Lada Priora 2 2013 there will be a steering wheel similar to the Grant model, but with a plastic black or white spacer, and next to it is a new audio control unit and three wheels from the air conditioning system. The previous ones quickly failed. The metal tip erased the teeth of the plate.
Installing the trim on the driver's seat
Rear trim fastening:
- Unscrew 2 bolts.
- Remove the standard plastic trim.
- Cut off part of the plastic cladding along the intended contour.
Front trim fastening:
- Cut off both front trim fasteners, because do not allow the parts to fit tightly to the seat.
- Make a bracket (with a hole) from a suitable piece of plastic to attach the cladding. Glue it to the back of the cladding.
- We install the cladding, tightening the front part with a clamp (tie), which we insert into a homemade mount.
The seat coverings should be secured slightly higher from the floor so that the carpet can be pulled out without effort.
Installing the passenger seat trim
The installation process is similar except for one detail. Unlike the driver's side, on the passenger seat the lever handle rests against the trim, because turned the other way. To eliminate this, you will have to cut a hole for the seat lever handle.
Disadvantages of such seat coverings:
- installation will require a lot of time and effort to complete.
- It became more difficult to get rugs.
- there is no possibility to use the space under the seats for storing things (for example, a fire extinguisher).
Let us remind you that there are other seat covers for the Lada Priora, which will be much easier to attach.
Which seats fit on a Priora without modifications?
Anyone who has installed a seat from a foreign car, please share your experience
Comments 44
They offer me seats from the Accord 7. Do you think it will be difficult to install them in a Priora?
I don’t know myself from the BMW 735 in the E32 body
one of these days I’ll install a Subaru B4 for myself... while I’m preparing a neat frame for them...
From Lancer 9 2.0 to Priora we got up with some difficulties! but the impression is great
from Nissan Almera, BZ) everything is bolted and to the original fasteners) all functions are height adjustment, lumbar support, normal working slides, heating)
From paper 530 xi 2008. You buy adapters for the unp bride bucket and a similar plate on top because the bucket ones are narrower... and screw it on stupidly. I got by with 1500 without a collective farm. You can do it like this for any type of seat
The standard seats of Lada cars may not be entirely comfortable. Some people lack more developed lateral support, others want height adjustment or adjustable lumbar support. All the shortcomings can be solved in one way - installing alternative seats, for example, from a foreign car.
The front seats themselves are different for Granta and Kalina (first or second generation), but the fastenings are similar. Distance between skid mounting bolts:
- width - 450 mm;
- length - 340 mm;
- diagonally 560 mm.
Luxury trim levels have similar seat mountings, which now have height adjustment. Seats from Lada Granta Sport, Kalina Sport or Kalina Cross are also perfect. The seats of sports versions of cars are more rigid (the seating position will be higher) and have little lateral support.
If you decide to choose seats from a foreign car, then pay attention to two things:
- Overall dimensions of the seats. They should not only fit in the cabin, but also be adjustable in all positions;
- The width of the slide (the distance between the fastening bolts). If the width of the seat slides of a foreign car is 45 cm, then it becomes possible to install them on a Grant or Kalina without alterations (with minimal modifications).
We analyzed reviews from owners on the Internet and compiled a list of “which seats are suitable for Granta or Kalina without modifications” (where the seat mounts for foreign cars have a similar width of the slide). The table is updated as new information becomes available:
| Automobile model | Note |
| Mazda 6 (2008 onwards) | Width 450 mm. Lumbar support, seat lift up/down, larger pillow under the knees ( source ). |
| Kia Rio | The slides are not symmetrical; the seats move inside the cabin by 1-2 cm. |
| Hyundai Solaris | The slides are not symmetrical; the seats move inside the cabin by 1-2 cm. |
| Skoda Fabia | Width 450 mm |
| Chevrolet Lacetti | Width 450 mm |
| Hyundai Tucson | Width 450 mm |
| Honda CRV | Width 450 mm |
| Opel Vectra C | Width 450 mm |
| Renault Megane | Width 450 mm |
| Nissan Qashqai | Width 450 mm |
| Mazda CX-5 | Width 450 mm |
| Volvo V40 | No fastening measurements were taken |
| Skoda Octavia | No fastening measurements were taken |
| Peugeot 308 | No fastening measurements were taken |
| Toyota Camry | No fastening measurements were taken |
| Opel Astra H | The width at the edges of the slide is 455 mm, in order to tighten the bolts you will have to cut off the edges of the slide |
All that needs to be modified is to saw off the excess parts of the foreign car's seat slide and drill new holes for the fastening bolts. The tools you need to have are a grinder, a drill, a hammer and a file. An example of a simple installation of seats from Hyundai Solaris/Kia Rio on Kalina:
Let's sum it up
The procedure for installing more comfortable seats in the VAZ 2110 is quite acceptable. This is a good opportunity for every car owner to make their vehicle more comfortable, beautiful and enjoyable to use. But for this you need to find smart products and a good craftsman. Seats on disassembly do not always inspire confidence. Many of them are smoked, some have broken plastic adjustment knobs, frayed fabrics or altered shapes. Therefore, you should buy seats carefully, checking all the factors. It is better to agree with the seller that you will return the seat if it turns out to be of poor quality.
The process of installing a new seat on a VAZ 2110 is quite complicated. But the most difficult process will be the digestion of the fastener. If you entrust this work to a specialist, you will not experience any significant problems with further actions. The choice of chair is important. Don't go for the width of the back and leather trim. It is better to buy simple and practical products from a reputable manufacturer. Such products will serve you for a long time and will not cause trouble in the future. What kind of seats would you like to put in your car?
Useful information about seats on the Prior
Welcome! What will be included in the list of useful information, you ask? Firstly, we will walk you through the basic everyday things that a person should know about car seats, namely, we will show you clearly how to remove the headrests from the seats, and we will also show you how to correctly fold out the rear seat of a car to transport large items. cargo and some more useful information will be given about the seats.
Adjusting the position of the front seat and head restraints on the car:
Note! In fact, adjusting the seats is an integral part of any car, since when buying a new car, all people are different and in order for each person to sit comfortably in the car, it is necessary to adjust the seat exactly to it (We are talking about the front seats), but remember once and for all , it is recommended to adjust the seat only when the car is stationary (Apply only to the driver), because when adjusting the seat, for example in length, you may lose control of the car because if you do not properly fix the seat on the car, there is a possibility that it will suddenly move backwards and thus you may lose control of the car, so be careful!
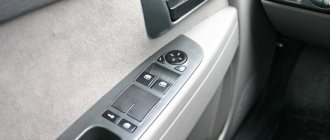
1) First, let's talk about how you can adjust the front seat of a car, so in order to adjust it, for example, in length (scientifically, longitudinally), you will need to pull up the locking lever with your hand as shown below in the photo and only after this, use your body movements to adjust the front seat as you need, but after you release the lever, move your body either forward or backward and thereby you will fix the seat and it will stand clearly in one place.
2) On the side of each of the front seats there is a handle that is made of a round shape, and thanks to this handle it will be possible to adjust not the front seat itself, but only its back, for this you need to rotate this handle in the desired direction and thereby achieve a position that is comfortable for you.
3) Now let’s talk a little about the headrests that are built into the front and rear seats of cars, so adjustment of these things is also necessary, because if, for example, a taller person is sitting in the back seat, then accordingly the headrest will need to be adjusted to his height, and in order to do this, you will need (regardless of whether the front or rear seat) grab the headrest itself with both hands and do exactly those actions that you need, for example, if you need to lower the headrest then press it from above with force and it will begin to fall a little, and if you need to lift it, then do the same operation only a little in reverse, namely, grab the lower part with both hands and, using force, lift the headrest up with your hands and it will lock itself.
Note! The headrests in the Priora are fixed using clamps that are installed on forks, which in turn are connected to the headrests themselves, so if you want to either lower or raise the headrest, then simply use force and overcome the resistance of the clamps, position the headrest in the way you need!
Rear seat layout on car:
Note! On Lada Priora cars, there are two seat backs in the back and one armrest that goes between them, so each backrest can be removed separately, for example, you will need to move a couple of long boards, then you remove one of the two backrests or simply remove the armrest that is installed in the middle, and thus you have one more free seat in the back in order to put any passenger on it!
1) In order to unfold the back of the rear seat, first figure out which backrest you will be unfolding, but they still unfold identically, so the example will be shown on the right backrest, so in order to unfold, first find a loop in the upper part, which is located in the upper part behind the seat (As shown in photo 1), then pull the loop up and thereby fold the rear seat back towards you (As shown in photo 2), and when the back is slightly reclined, unfasten all the buttons that secure the trunk trim to the seat ( For more details, also look at the photo under number 2), and to complete the removal of the backrest, simply disengage both loops that are located on the backrest itself (Photo 3) and ultimately remove the backrest from the car.
Note! Before you start removing the backrest, if the headrest bothers you, then you can remove it, to do this, as was said earlier, simply pull the headrest up with force (It is attached only to the clamps), and pull it until it is completely removed from the back of the car!