Not all owners of domestic cars like the unpleasant, loud clicking sound made by their locks when locked. Therefore, they often wonder: how to eliminate this annoying defect?
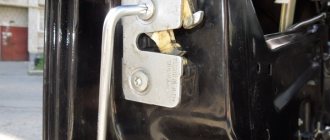
In this article we will tell you in detail how to make silent locks on a Priora with your own hands to ensure maximum comfort. The main reason for the clanging lies in the locking shackle, which is adjacent to the metal of the case. Silent mechanisms are assembled from elements made of polymers that do not vibrate.
It should be noted that Priora already leaves the assembly line with locks that use the main components with plastic inserts and bolts with silicone seals. However, despite all this, closing the door is still accompanied by a loud metallic click.
It is important to remember that installing or modifying a locking device is always accompanied by replacing the door seal with a better one. This allows you to simultaneously enhance the sound insulation of the cabin.
Where to get a silent lock
These devices suitable for Priora are easy to purchase:
- in specialized online stores;
- at the car market;
- at specialized retail outlets.
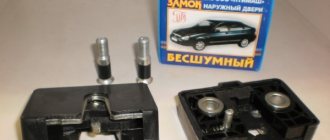
Which ones are better to buy? To reduce the hassle of installation, we advise you to look for original locks made specifically for this model produced by the Volzhsky Automobile Plant.
How much do locking devices cost? In particular, a set of four mechanisms equipped with anthers will currently cost only 750 rubles.
This option is made quite well and is free from the main drawback - clanging.
We adjust the locks on a VAZ
There are several options for modifying and adjusting silent locks; let’s look at the most popular ones.
The first method is a sealant
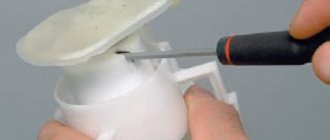
In order to proceed to the adjustment stage, it is necessary to prepare the material needed for the work: a screwdriver, glue, lithol, seals and a knife.
Required material for adjustment
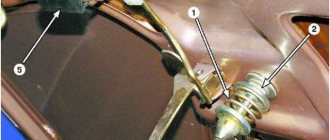
We take our silent lock and unscrew the spring from it. Next we glue the seal. We select the smallest spring and glue the seal again. Don't forget to remove any excess sealant. And finally, we lubricate everything with lithol.
The second method is a heat insulator
In the second option, we add alcohol, cotton swabs, and a piece of heat insulator to our previous set of tools. Using alcohol, degrease the entire surface. Next, cut off the required amount of heat insulation, insert it inside, glue it and cut off the excess.
Adjusting the silent lock
This method will help you soften the first click of the latch as it hits the lock.
After such an adjustment, the sound from closing your doors will not be any different from the sound that we hear when closing the doors in a foreign car.
What you should know
Domestic cars mainly have locks of the so-called figure-eight design. Actually, Priora is no exception. The above-mentioned products have one distinctive feature - in the mating part of the device, the diameter of the screws is smaller than on the original mechanism.
Each bolt is provided with a silicone gasket. Unfortunately, it is impossible to choose their color, since the manufacturer did not provide such an option. As practice shows, the most popular option is transparent seals. However, this is an insignificant problem that only pathological perfectionists will not be able to come to terms with.
Do purchased locks need to be modified? As a rule, no. But some car enthusiasts replace the springs in the mechanism because they believe that the original ones are not tight enough. In addition, the bolt is often equipped with an additional noise-absorbing pad made from a heat-shrinkable tube of suitable diameter. However, many admit that such an improvement is not particularly effective.
A pattern that is the norm
The figure-of-eight design of locks is the norm in domestic car manufacturers. Priora was no exception to this rule and received figure-eight locks from the assembly line. What exactly is the pattern?
The pattern appears at the time of purchase of the above-mentioned silent locks, which also have a figure-eight design. The only difference is the smaller thread diameter of the bolts in the mating part of the mechanism.
All Ptimash bolts have a silicone seal, the color range of which cannot be predicted
It is worth paying attention to the fact that their color can be either transparent, which is the most popular, or any other. Thus, it is not realistic to match the color of your fingers to the color of the car, but the final high-quality result more than covers this shortcoming
Preparing for installation
It is worth understanding that a lock is a mechanism designed to perform basic functions for a long time without fail and reliably protect the car from unauthorized entry. In addition, the specific nature of the placement makes it quite vulnerable to a number of negative factors. This means:
- high humidity;
- heat;
- freezing;
- dust, etc.
Therefore, before inserting the lock into the door, it must be thoroughly lubricated with a special compound. Along the way, it’s also worth processing:
- door handles;
- limiters;
- loops;
- internal constipation.
Removing and installing the front door lock of the VAZ 2170 Priora
- Repair manuals
- Repair manual for VAZ 2170 (Priora) 2004+.
- Removing and installing the front door lock
| . Lock, drive rods and front door handles: 1 – lock switch rod; 2 – lock switch; 3 – lock button rod; 4 – rod of the outer handle; 5 – external handle; 6 – pull of the internal handle; 7 – internal handle; 8 – internal lock; 9 – external lock; 10 – external lock escutcheon |
The lock, its drive rods and the front door handle are shown in.
You will need flat and Phillips blade screwdrivers.
1. Disconnect the wire from the negative terminal of the battery.
2. Remove the front door trim (see “Removing and installing the front door trim” ).
| 3. Squeeze the pad retainer... | 4. ...and disconnect the wiring harness block of the door lock gearmotor. |
| 5. Remove the three screws securing the interior door handle. | 6. Use a screwdriver to pry and disconnect the rod of the outer door handle from the lock. |
| 7. Use a screwdriver to pry and disconnect the rod from the lock switch. | 8. Remove the external lock escutcheon. |
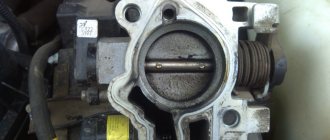
| 9. Using a Phillips screwdriver, remove the two screws securing the external lock... | 10. ...and remove the external lock. |
| 11. Remove the screw securing the internal lock. | 12. Remove the interior lock along with the interior door handle and rods. |
| 13. Remove the plastic holder from the lock lock rod and disconnect it from the lever. | 14. Remove the locking bracket and disconnect the inner handle rod from the lever. |
| 15. The length of the rods is adjusted by unscrewing or wrapping the plastic tips. When replacing the rod end, unscrew it from the rod, counting the number of turns. Screw in the new tip the same number of turns, this will maintain the required length of pull. | 16. Remove the lock switch retaining bracket. |
17. Remove the lock switch from the door.
18. Install the lock in the reverse order of removal, having first lubricated all rubbing parts with grease.
↓ Comments ↓
1. Car structure
1.0 Car structure 1.1 General information about the car 1.2 Passport data 1.3 Car keys 1.4. Controls 1.5. Heating and ventilation of the cabin 1.6 Ensuring a comfortable air temperature in the cabin 1.7. Doors 1.8. Passive safety equipment on the car 1.9. Seats
2. Recommendations for use
2.0 Recommendations for use 2.1. Safety rules and recommendations 2.2 Running in the car 2.3 Operating the car during the warranty period 2.4. Preparing the car for departure
3. Problems along the way
3.0 Malfunctions along the way 3.1. The engine does not start 3.2 Malfunctions of the fuel injection system 3.3 Idle speed has disappeared 3.4. Interruptions in the operation of the 3.5 engine. The car moves jerkily 3.6 The car accelerates poorly 3.7 The engine stalled while driving 3.8. Oil pressure dropped to 3.9. Engine overheating 3.10. The battery does not recharge 3.13. Knocks in the engine 3.16. Wheel puncture
4. Maintenance
4.0 Maintenance 4.1. General provisions 4.2. Inspection work 4.3. Lubrication and filling works 4.4. Diagnostic work 4.5. Repair and adjustment work
5. Engine
5.0 Engine 5.1 Design features 5.2 Possible engine malfunctions, their causes and solutions 5.3 Useful tips 5.4 Checking compression in the cylinders 5.5 Removing and installing the decorative engine casing 5.6 Removing and installing the engine splash guard 5.7 Installing the piston of the first cylinder to the TDC position of the compression stroke 5.8 Replacing the drive belt gas distribution mechanism and tension roller 5.9 Replacing the power unit supports 5.11. Replacing engine seals 5.13. Engine cylinder head 5.15. Engine repair 5.16. Lubrication system 5.17. Cooling system 5.18. Power supply system 5.19. Design Features
6. Transmission
6.0 Transmission 6.1. Clutch 6.2. Gearbox 6.3. Front wheel drives
7. Chassis
7.0 Chassis 7.1. Front suspension 7.2. Rear suspension
8. Steering
8.0 Steering 8.1 Design features 8.2 Possible steering malfunctions, their causes and solutions 8.3. Steering column 8.4. Steering linkage 8.5. Steering gear
9. Brake system
9.0 Brake system 9.1 Design features 9.2 Possible malfunctions of the brake system, their causes and solutions 9.3 Bleeding the brake system hydraulic drive 9.4 Removing and installing the vacuum brake booster 9.5 Replacing the brake pedal axle bushings 9.6. Main brake cylinder 9.7. Front wheel brakes 9.8. Braking mechanisms of the rear wheels 9.9. Pressure regulator 9.10. Brake hoses and tubes 9.11. Parking brake
10. Electrical equipment
10.0 Electrical equipment 10.1 Design features 10.2. Battery 10.3. Mounting block (relays and fuses) 10.4. Generator 10.5. Starter 10.6. Ignition switch (lock) 10.7. Electronic engine control system (ECM) 10.8. Ignition system 10.9. Lighting, light and sound signaling 10.10. Windshield cleaner 10.11. Washer reservoir 10.12. Electric fan of the engine cooling system 10.13. Electric motor of the heating and ventilation system fan 10.15. Cigarette lighter 10.16. Instrument cluster 10.18. Electronic anti-theft remote control system 10.19. Immobilizer 10.21. Replacing sensors and switches
11. Body
11.0 Body 11.1 Design features 11.2 Possible body malfunctions, their causes and solutions 11.3 Removing and installing windshield frame lining 11.4 Removing and installing soundproofing upholstery in the engine compartment 11.5. Removing and installing bumpers 11.6 Removing and installing the fender liner and protective wing cover 11.7 Removing and installing the front fender 11.8 Removing and installing decorative sill trims 11.9. Hood 11.10. Trunk lid 11.11. Doors 11.12. Seats 11.13. Seat belts 11.14. Rear view mirrors 11.15. Interior fittings 11.16. Instrument panel 11.17. Heater 11.20. Body care
12. Applications
12.0 Appendix 12.1 Appendix 1. Tightening torques of threaded connections, Nm 12.2 Appendix 2. Fuels, lubricants and operating fluids 12.3 Appendix 3. Nominal filling volumes 12.4 Appendix 4. Basic data for adjustments and monitoring 12.5 Appendix 5. Spark plugs used on vehicles 12.6 Appendix 6. Lamps used on a car 12.7 Appendix 7. What you need to have in a car 12.8 Appendix 8. Tools used when repairing a car
13. Electrical diagrams
13.0 Electrical Diagrams 13.1 Diagram 1. Instrument Panel Harness Connections 13.2 Diagram 2. Vehicle Front Wire Harness Connections 13.3 Diagram 3. Engine Electronic Control System (ECM) Harness Connections 13.4 Diagram 4. Vehicle Rear Wire Harness Connections 13.5 Diagram 5. Light Harness Connections license plate light 13.6 Diagram 6. Left front door wiring harness connections 13.7 Diagram 7. Right front door wiring harness connections 13.8 Diagram 8. Rear door wiring harness connections
Lock installation
To install a new locking mechanism, you will need to remove the trim from the car door. This will take a lot of time, but it will be possible to carry out a preventive inspection of other systems located in it.
In addition, you can use a knitting needle or a hairpin of sufficient length if you don’t want to bother with the sheathing. Then the inner part of the mechanism, put on it, will not fall inward when the outer one is dismantled.
The new element is installed in place. To do this, it is strung on a stud and secured with a bolt from below. Then the knitting needle is lifted and the upper fastener is screwed in. The rest of the locking devices on other doors are installed in the same way.
As you can understand, this procedure is not at all complicated - almost any car enthusiast with minimal skills can handle it.
If necessary, upon completion of installation, adjust the mechanism. The last thing required is to replace the protective plastic housing.
Other nuances
Knowledgeable people answer the question “Which are the best locks to take?” They answer that the quality of the purchased ones is not much better than the original ones, and they advise installing mechanisms from the Gazelle. True, here you will need to sharpen your tongue a little. But reviews indicate that the result in this case is simply wonderful.
To modify your original castle, you will need:
- install a foam rubber gasket between its mechanism and the door;
- cover the drive pin that opens the lock with heat-shrinkable tubing;
- fill the voids on the back of the mechanism - any sealant will do;
- the lower edge of the door is equipped with a seal (ideal option - RKI-19).
How to care for locks
First of all, care should be taken to ensure that no water gets inside. This usually happens during the car wash process. In winter, moisture in the mechanism can freeze and then it is difficult to get inside the car. It is not difficult to avoid this - it is enough to regularly treat the external parts with silicone lubricant made in the form of a spray.
In addition, approximately 4 times a year, it is necessary to lubricate the internal parts of the locking device - this allows all elements to operate smoothly and extend their service life.