Replacing the master brake cylinder
On Lada Priora cars, master brake cylinders manufactured by MANDO - Korea were most often installed from the factory.
It is worth noting that the parts from this manufacturer are of quite high quality and rarely fail, but if such a problem occurs, it is necessary to replace this part with a new one. So, in order to replace the master brake cylinder on a Priora with your own hands, you will need the following tool:
- 13mm split wrench
- 10 mm head
- Ratchet or crank
Diagnostics
To check your car for leaks, you can use the ELM327 scanner, you can read how to do this here. This scanner is capable of diagnosing your car and indicating whether it has this malfunction. But, checking with a scanner will not always be a reference, since the leak may be insignificant and the ECU simply may not notice it.
It is best to check the suction using the old proven method, or rather several, which are given below.
First way
It is necessary to unscrew the mass air flow sensor from the air filter housing. It is secured with two 10mm key bolts. We take out the mass air flow sensor and start the engine.
With the internal combustion engine running, we close the sensor hole with our hand or a bag, the car should stall and the intake corrugation should shrink. A vacuum is created in the engine, which, in the absence of air leaks, will persist for a long time and the corrugation will remain compressed.
If the corrugation on your car instantly expands or does not shrink at all, then this indicates the presence of suction.
Second way
To diagnose using this method, you will need a pump or compressor.
Here, just like in the first case, you need to unscrew the mass air flow sensor from the body and insert the bag between it. Then screw it back, thereby blocking air access to the engine.
On the receiver we find a fitting with a plug. We remove the plug and connect the pump there, pump up pressure into the receiver and listen to where the hissing will come from. To more accurately determine the location of the leak, you can use a soap solution with a spray bottle. We spray the areas of possible leakage with this solution and look for the appearance of bubbles.
Third way
This method is widely used at service stations. The search for suction is carried out using a smoke generator. This method is similar to the second, but instead of air, smoke is pumped into the receiver. If the engine has a choke, then smoke will flow out of this place.
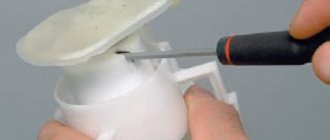
Removal and installation of GTZ on Priore
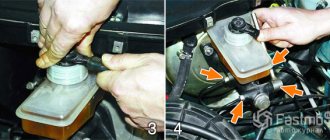
The first step is to pump out the brake fluid from the reservoir using a syringe and flexible tube. Then we disconnect the power connector chip from the tank cap, or unscrew it entirely.
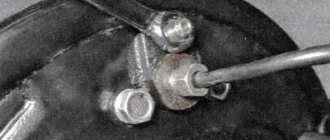
After this, unscrew the two brake pipes on the right side of the GTZ, as shown in the photo below.
The best option is to use a special split wrench designed for unscrewing brake pipes and hoses. The result of the work done is presented below.
If there is liquid left in the tank, you need to place a container or a dry cloth to drain the remaining liquid. Then we take the head with the ratchet and unscrew the two nuts securing the master cylinder to the vacuum booster.
One is higher and the second is lower. As a result, it is possible to remove the GTZ without any problems.
If it is necessary to replace the cylinder with a new one, we buy the part and install it in the reverse order. It is worth noting that when adding brake fluid to the reservoir, air may enter the system. If this happens, it is necessary to bleed the brake system through special fittings in the cylinders.
The price of a new GTZ for Priora is from 1,500 rubles for the original. It is worth noting that you can buy a high-quality spare part from a car disassembly for half the price of a new one.
What to do?
The most unpleasant thing is when the breakdown takes you by surprise, somewhere in the middle of the highway, in which case it will not be easy, repairing it on the road is not an option, and continuing to move is unacceptable and dangerous. As you can see, the reason, as a rule, is always that the line is clogged and the coolant cannot circulate through the system. In most cases, the problem is associated with rubber seals that become unusable. By cracking and deforming, they interfere with the normal operation of the pistons and bypass fluid. To avoid such a phenomenon, it is necessary approximately once every 100 thousand km. mileage, carry out diagnostics and, if necessary, change all rubber seals.
Before checking the brake master cylinder, be sure to check that other components of the brake system are in good working order.
- Perform a visual inspection of the brake caliper cylinders, as well as lines, for leaks and leaks.
- Check the level and condition of the fuel fluid in the tank.
- Start the engine and try to clamp the vacuum take-off pipe to the amplifier; if the speed has increased and there is air leakage, then the turbocharger seems to be working properly.
- The presence of drops on the GTZ body, as a rule, always indicates that it is faulty. If there is depressurization, dismantle and determine the cause of the leakage of the fuel fluid. It is also recommended to do the following: ask an assistant to press the pedal, and open the tank lid yourself and listen to the sounds. Easy pedal travel and obvious gurgling in the reservoir - there is serious wear on the cuffs; due to a loose fit, they cannot create pressure in the circuits, and liquid seeps through the cracks back into the reservoir.
You can also understand the state of the GTZ by looking at the brake pedal. Press the pedal a couple of times, then start the engine, without releasing the pedal. If the pedal has sunk to the floor or has not moved a millimeter at all, there are problems with the GTZ.
Did you like the article? Write a comment and share the link to the article with your loved ones on social media. networks!
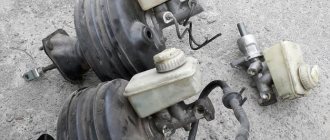
Removing the master cylinder
We carry out the work when replacing the main brake cylinder and to remove the vacuum brake booster. To gain access to the nuts securing the master brake cylinder to the vacuum booster, it is necessary to unscrew the self-tapping screw of the lower fastening of the bulkhead trim (see “Removing the bulkhead trim”). Having unscrewed the tank cap, remove the cap along with the liquid level sensor. (see “Checking the fluid level in the hydraulic brake reservoir”). Use a rubber bulb to remove liquid from the reservoir.
Using a special “13” wrench for brake pipes, loosen the tightening of the fittings of the two brake pipes.
Using a 13mm socket, unscrew the two nuts securing the cylinder to the vacuum brake booster. Carefully bending the brake pipes, remove the master cylinder from the vacuum booster studs.
Using a 13mm wrench, unscrew the fittings of the two brake pipes. We remove the tube tips from the holes of the master brake cylinder...
Learning to repair Lada Priora: dismantling and installing the main brake cylinder
interior In the current Lada Priora model, AvtoVAZ engineers were able to eliminate some errors that occurred in the tenth series.
Major changes were made to the exterior and interior, and the power unit was modernized. The brake system has not been left without attention - a larger vacuum booster has been installed. Basically, this main security unit, according to reviews from owners, does not cause serious problems and works quite reliably. However, as they say, you need to be prepared for anything, especially if it concerns security. Thus, the main brake cylinder and its replacement without the services of a service station are the main issues that should be of interest to motorists who decide to repair their Lada Priora themselves.
Your advantages when purchasing at Autocompas.ru
- Huge selection of auto parts and low prices;
- Fast delivery, usually within 24 hours;
- Warranty and right of return;
- Emphasis on proven and branded manufacturers of all price segments;
- Safe and convenient online purchase with many payment options;
- Qualified support and advice + recommendations from experts when choosing and purchasing.
Range of auto parts in stock and on order
A wide variety of manufacturers and high-quality auto parts guarantee the mobility of your car and safety on the roads. A huge assortment is constantly available from stock online. Certified and reliable aftermarket suppliers, dealers, and regional market participants provide a full range of auto parts at reasonable prices. Our knowledgeable support staff is always available to assist you in your search.
Quality of service in our online store
The service and online offers from Autocompas.ru have already won several awards and made us a leader in the Russian market in the field of sales of auto parts for foreign cars, 40+ thousand people visit the site every day and many of them become our regular customers. Satisfied customers are our goal. Rely on Autocompas.ru as a reliable supplier of auto parts.
29.11.2019
A review section has been introduced on the site, using the latest technologies, now each client can write a review from their personal account.
01.01.2019
A completely new and intuitive returns system.
23.05.2018
Global update of the “Delivery” section! Track numbers in your personal account and convenient cargo tracking.
Description of the VAZ 2170 hydraulic brake drive system
The design of the system is based on a dual-circuit circuit with diagonal distribution. That is, one circuit combines the drive mechanisms of the right front wheel and the rear left wheel, the second - the left front and rear right wheels. If one of the circuits fails, the second will be activated, which will ensure an effective shutdown.
The brake drive circuit consists of:
- brake mechanisms;
- master brake cylinder;
- vacuum booster;
- pipelines;
- tank GTZ;
- pressure regulator;
- brake pedal.
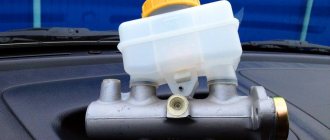
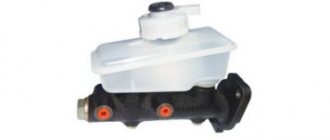
A cylinder with a two-section fluid reservoir is attached to the amplifier cover. It itself has two pistons arranged in series. During operation, the pistons wear out and cannot be repaired - only replaced.
Differences
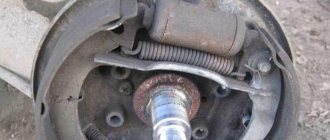
Priora pads have different designs and it is very important to know which ones are installed on your car. If the car is equipped with an ABS system, then the pads must be purchased specifically for cars with ABS; they will not fit for Priora modifications without an anti-lock brake system (ABS).
The pads have a specific design for cars with and without ABS. The difference is that the pad with the anti-lock braking system has a special hole for the ABS sensor, while the regular one does not.
You can see the differences between the pads in this photo.
Elements of the rear brake mechanism: 1 - front block of a car without ABS; 2 — front block of a car with ABS; 3 — pad spacer; 4 — upper tension spring of the pads; 5 — handbrake drive finger; 6 — pin washer; 7 — pin pin; 8 — rear block of a car with ABS; 9 — rear block of a car without ABS; 10 — hand brake drive; 11 — lower tension spring of the pads;
Main signs of GTZ breakdowns
Lada The main task of this unit is to uniformly distribute the working fluid of the hydraulic system along the contours. Therefore, the slightest imbalance leads to a decrease in braking efficiency. To determine the condition of the master cylinder or the need to replace it, experts advise paying attention to factors such as:
- readings of the warning lamp on the dashboard;
- brake oil leaks;
- cracks on the body
If at least one of these signs is detected, repairs should be started immediately. It is possible, of course, to partially restore defective parts, but practice shows that it would be more rational to install a new assembly.
Technology for replacing a faulty brake master cylinder on a Lada Priora
To work you will need a set of tools:
- a set of keys;
- rubber bulb;
- screwdrivers with flat and Phillips (PH 2) tips.
To access the mount, you must first remove the decorative trims of the windshield frame and the soundproofing upholstery.
, unscrewing the screws. Now you can get started:
- Unscrew the cap of the tank and pump out the liquid from it with a rubber bulb.
- Release the tank clamps and remove it from the GTZ.
- Use a special wrench to “13” to remove the pipelines.
- Unscrew the two nuts securing the cylinder to the vacuum booster.
- Remove the cylinder
- Install the new part in reverse order.
During installation, pay attention to the condition of the sealing ring and, if necessary, replace it. After the operation, be sure to bleed the hydraulic drive.
Getting rid of air in the brake system of the VAZ 2170
To remove air that has entered the pipelines after depressurization due to replacement, bleeding must be done. It is recommended to bleed air on wheel mechanisms in the following order:
- Right rear.
- Left front.
- Left back.
- Right front.
To bleed, you need a key “8”, a hose and a container to collect liquid. Next, the procedure is carried out step by step:
- Pour brake fluid into the reservoir to the maximum level.
- Clean the air release valve on the desired wheel mechanism.
- Remove the cap from the valve, put a hose on it, and lower the other end into a container with liquid.
- Press the brake pedal 5-6 times and then hold it down.
- Unscrew the valve a quarter turn and tighten after air bubbles escape.
- Repeat steps 5 and 6 until the bubbles completely disappear and the liquid flows out.
- Put on the cap.
- Bleed the remaining wheel mechanisms in the same way.
VUT and GTZ Priora on VAZ 2110
improve the standard brakes of a VAZ 2110 in various ways, and in this photo report we will look at how to install a Vacuum Brake Booster (VUT) and a Brake Master Cylinder (MCC) from a Lada Priora or Kalina on a “top ten” with your own hands.
Required:
- VUT and GTZ Priora or Kalina
- 2 tees from classics
- 4 nuts x 8 for attaching the GTZ and pedal assembly to the VUT (the old ones are not suitable, they are larger)
- One-face brake bleeding device.
- 2 tubes from Priora with fittings 12x1 and 10x1 on the GTZ side, and 10x1.25 on the tee side.
- Brake fluid.
The photo shows:
- On the left is the Prirovskaya tube 12x1.0, and on the right is the “tens” 10x1.25
- On the left is a VAZ 2110 10x1.25, and on the right is a Prirovskaya 10x1.0
- General view of both tubes
If you want the replacement to take place with minimal alterations, then it is better to buy a VUT, GTZ and pedal assembly from a Priora .
We dismantle the frill and remove the right half of the sound insulation of the engine compartment, the left one can simply be bent. Drain the brake fluid and unscrew the brake pipes. In the cabin, remove the terminals from the brake light end switch and unscrew the 4 nuts securing the VUT to the body.
Now you can easily
remove the VUT and GTZ .
If you couldn’t buy a prefabricated kit, then you need to install the pedal from the old VUT into the new one. Next, we assemble the VUT and GTZ into one unit and see that the pedal with standard mounting holes for the VUT will be rotated 90 degrees relative to the vertical position of the brake fluid reservoir.
Can DOT-3, DOT-4, DOT-5 or DOT-5.1 be mixed?
Differences between brake fluid classes:
- DOT 3 (glycol base) – for relatively low-speed vehicles with drum brakes or front disc brakes;
- DOT 4 (glycol base) – on modern high-speed cars with predominantly disc brakes on all wheels;
- DOT 5.1 (glycol base) - on road sports cars, where the thermal load on the brakes is significantly higher.
- DOT 5 (silicone) is practically not used on conventional vehicles.
Brake fluids DOT 3, 4, 5.1 (color from light yellow to light brown) are interchangeable, but mixing them is not recommended (it is better to completely replace them), the properties may deteriorate. DOT-5 (dark red) cannot be mixed, it only mixes with itself. In other words, brake fluids can only be mixed by color.
What brake fluid can you recommend? Is it worth changing the usual DOT-4 class for Lada to others, for example, DOT-5.1? Let us remind you that you can easily find any information about your car by its content (Niva, Priora, Kalina, Granta, Largus, Vesta, XRAY).
Keywords: lada xray brakes | Lada Vesta brakes | Lada Largus brakes | Lada Granta brakes | Lada Kalina brakes | Lada Priora brakes | Niva brakes | universal article
Brake fluid Rosdot-4 was developed specifically for cars with disc brakes, taking into account the recommendations of AvtoVAZ specialists. Rosdot-4 is currently one of the best in its class among world analogues. It is recommended to replace the brake fluid after 1.5-2 years. This is due to its high level of hygroscopicity. When using Rosdot-4, it is not recommended to add other brake fluid, as this will lead to a deterioration in the properties of Rosdot-4, and, as a result, a decrease in the efficiency of the braking system.
Brake fluid specifications
| Parameter | Meaning |
| GOST, TU | TU 2451-004-36732629-99 |
| Appearance | transparent homogeneous liquid from light yellow to light brown without mechanical impurities |
| Kinematic viscosity, mm²/sec, at -40°С, no more | 1450 |
| Kinematic viscosity, mm²/sec, at -50°С, not less | 5,0 |
| Kinematic viscosity, mm²/sec, at -100°С, not less | 2,0 |
| Boiling point of dry liquid, °C, not less | 260 |
| Boiling temperature of the moistened liquid, °C, not less | 165 |
| Stability at high temperatures, change in boiling point, °C, no more | 3,0 |
| Hydrogen ion activity indicators (pH), units. pH, within | 9,5-9,0 |
USEFUL TIPS In order to avoid exposing yourself in the future to unforeseen expenses for repairing the brake system, or even the entire Lada Granta car as a whole, promptly replace the brake fluid with fresh one. It is very hygroscopic and absorbs moisture from the air, which, in addition to causing corrosion of brake system parts, lowers the boiling point of the fluid itself, and this can lead to brake failure during frequent heavy braking. Do not reuse brake fluid that has been drained from the brake system: it is contaminated, saturated with air and moisture. If brake fluid comes into contact with wires, plastic or painted body parts, it can cause damage, so always use a clean wiping cloth when pouring. If liquid gets on these parts, wipe them immediately with a clean cloth.
1. Check the brake fluid level in the master cylinder reservoir. When the plug is removed, it should be located between the “MIN” and “MAX” marks marked on the tank body. With the plug installed, the brake fluid level should be at the lower edge of the filler neck, since the brake fluid is displaced by the level sensor float. WARNING A gradual decrease in the brake fluid level in the absence of leaks most likely indicates the need to replace the brake pads. Check the condition of the brake pads on your Lada Granta car (see “Checking the degree of wear of brake pads, brake discs and brake drums”). Untimely replacement of brake pads leads to expensive repairs (replacement of brake pads, brake discs and brake drums)!
Brake fluid is used not only to organize the operation of the braking system, but also to ensure uninterrupted movement of the clutch mechanisms, as is the case with the Lada Kalina car.
This is explained by the fact that in this model the clutch and brake mechanisms have the same operating principle. By pressing the pedal, brake fluid is injected into the brakes, as well as into the clutch mechanism, which ensures braking of the entire vehicle.