1200 rub. for the photo report
We pay for photo reports on car repairs. Earnings from 10,000 rubles/month.
Write:
To replace the brake cylinder on the rear wheel of a Lada Priora car, first of all, jack up the car and remove the wheel, then remove the brake drum (secured with two screws). Then use pliers to remove the brake pad springs and remove the rear brake pads. Then use an open-end wrench to unscrew the fastening bolts of the brake cylinder. Taking the new brake wheel cylinder, screw it in the reverse order, then install the new brake pads in the reverse order of removal. For all the details and replacement of the rear brake cylinder and rear pads, see the video instructions.
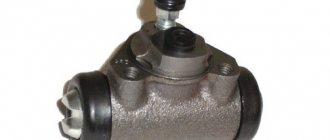
Replacing the rear working cylinder on a Lada Priora is not such a common occurrence, but it can still happen; it urgently needs to be changed if there are signs of obvious leakage of brake fluid, and if both pistons have stopped moving in the cylinder.
To work, you will need a special 10mm wrench for the fittings for bleeding the working cylinders and brake hose fittings, and a 10mm open-end wrench.
Removing the rear brake cylinder of Lada Priora:
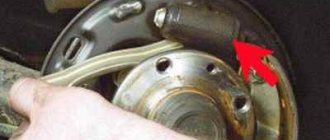
First, we prepare the car for this work. Now we remove the brake drum, remove the protection cap from the working cylinder bleeder fitting using a special 8mm wrench and unscrew the fitting.
Use a special 10mm wrench to loosen the brake pipe fitting. Turn the fitting out completely with a 10mm open-end wrench.
Now let's use a 10mm wrench and unscrew the two bolts securing the working cylinder. To prevent brake fluid from spilling out of the tube, we put the bleeder cap on it.
Remove the cylinder from the shield.
We clean the mechanism parts from rust and dirt and from oiling. Install the slave cylinder in the reverse order of removal. And install the brake drum. We bleed the Priora brake system and check the tightness of the pipes and the working cylinder.
Replacing rear brake cylinders | Priora repair
The most common reason why you have to change the rear brake cylinder on a Priora is the loss of its tightness. This problem is quite easy to detect, and everything becomes visible when the drum is removed. That is, “damp” spots or even obvious leaks of brake fluid will be clearly visible on the rubber cuffs.
What happens if the rear brake cylinder is not replaced in time?
The consequences can be different, and few of them will be pleasant:
- Brake fluid will constantly leak
- The effectiveness of the brakes will decrease due to leaks in the system, as well as due to fluid getting on the friction linings
- Brake failure in case of sudden cylinder seal failure
Of course, all this will bring a lot of trouble to the owner, and that is why the process of replacing this part should not be postponed “for later”.
Replacing the rear brake cylinder on a Priora
In order to get to this part and make the necessary repairs to your car, you need to follow some points:
Then you can start working. First of all, we apply penetrating lubricant to all threaded connections, which we will subsequently unscrew.
It’s worth saying right away that you will need the following tool for this repair:
- Special 10mm split wrench for brake pipes
- A 10mm wrench, or better yet a head and a wrench
- Penetrating lubricant
THE BETTER DISC BRAKES VS. DRUM MODIFICATIONS
The effectiveness of disc brakes versus drum brakes has been proven many times when installed on sports car models. They are installed on “foreign cars” not only because of effective braking. They are able to ensure simultaneous activation of the brake mechanisms on all wheels, and this allows improving the vehicle's handling in any road conditions.
The advantages of rear disc brakes include the following:
- Reducing the braking distance of the car several times;
- Reducing the time for brake mechanisms to operate;
- The time required to replace brake pads is reduced. the ease of their replacement is noted;
- Increases the safety of driving a vehicle;
- Uniformity is observed when the brake mechanisms of all wheels are activated;
- Reduced unsprung masses of the rear axle;
- Good removal of excess heat under extreme driving conditions;
- There is no need to periodically tighten the handbrake cable;
- The problems of pads freezing to discs in the cold season disappear.
Disc or drum brakes?
The list shows an impressive list of advantages, but there are also specific disadvantages to installing them. When manufacturing the car, the Volzhsky plant does not install the ZDT on the Priora; it’s hard to say why this is, probably to reduce production costs. By installing rear disc brakes on the Priora, technical changes are made to the design of the vehicle. This may cause problems during technical inspection.
Any design receives a comprehensive assessment during test trips at the test site. The vehicle is equipped with well-balanced and properly adjusted brake systems.
If suddenly a car gets into an accident, even if the accident was completely innocent, the owner will have problems due to unauthorized changes in the design features of the car.
Installing rear disc brakes on a Priora with your own hands is quite possible. But after its installation is completed, careful fine-tuning and configuration of the system is necessary. Doing it yourself is difficult, but possible.
It is best to contact a specialized auto center, where they will not only install it, but also issue a certificate of conformity for the new system. In some cases it does not help owners.
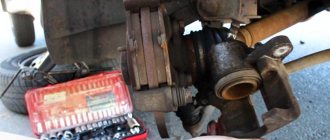
Brake cylinder repair in Lada Priora
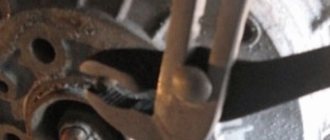
The front left brake cylinder has gone sour. I solved the problem - I shook it with a jack. For disassembly, TORX heads E12 and E14 were needed. E14 will help us remove the top bracket from the brake machine itself, and E12 will help us remove the bracket - the base of the brake - in order to get to the brake disc. I started disassembling it, and the brake system of the left front wheel gave me problems again - the bolt under the Torx E12 was licked off.
A little upset that I would have to go to a service station to remove it, after thinking about it, I realized that there was a solution. I threw two extension cords out of the window into the yard, fortunately I live on the first floor, and sawed off this ill-fated bolt with a grinder. After 15 minutes it was already removed from the bracket using a socket to remove the rear shock absorbers.
The cylinder itself was squeezed out of the brake machine with a compressor, complete with a cone-shaped nozzle for inflating probably mattresses, it was ideal for this task, although it doused me with a fountain of brake fluid due to an incomplete fit. I advise you to first squeeze the cylinder out of the brake machine, and then remove the bracket from it, otherwise the cylinder may fly out far or hurt.
Basic caliper malfunctions
Just like with a human illness, you need to be extremely careful with the running of your car, paying due attention to the signs of illness that appear. As for the braking system, malfunctions in it can manifest themselves in the following form:
- the brakes work sluggishly, you literally have to press the pedal to stop;
- when braking, the car wobbles or pulls to the right or left;
- weak shocks and vibration are heard in the brake pedal;
- the pedal became heavier;
- The braking element is jammed - it does not move away from the brake disc.
Repair of rear wheel brakes on Lada Priora
Page 1 of 2
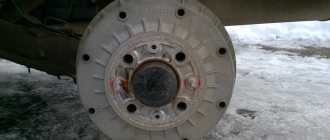
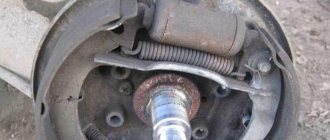
The brake mechanism of the rear wheels is drum, with a two-piston wheel cylinder and automatic adjustment of the gap between the shoes and the drum.
The automatic clearance adjustment device is located in the wheel cylinder.
| rice. 1 |
The main element of the device is a steel split thrust ring installed on the piston with an axial clearance of 1.25-1.65 mm. The thrust rings (two per cylinder) are inserted into the cylinder with tension, providing a shear force along the cylinder surface of at least 350 N, which exceeds the force of the brake shoe tension springs.
When the brake linings wear, the thrust rings shift under the action of the pistons by the amount of wear. If the cylinder mirror is damaged due to mechanical impurities in the brake fluid, or due to corrosion (presence of water in the brake fluid), the rings may “sour” in the cylinder and one or even both pistons will lose mobility. In this case, the cylinders must be replaced.
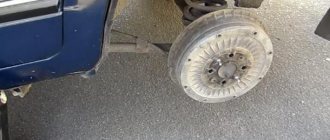
Removing and installing the brake drum Lada Priora
The maximum permissible diameter of the working surface of the drum of the Lada Priora is 201.5 mm. Replace the VAZ 2170 drum if the diameter exceeds the maximum permissible value or is equal to it.
There should be no burrs or deep marks on the working surface of the drum. Otherwise, replace the drum or grind its working surface on the machine. After grooving, grind the surface with fine-grained abrasive stones; after processing, the diameter of the drum should not exceed 201 mm. Replace the drum if cracks are found in it. You will need: a “7” wrench, two mounting blades, a hammer, a wooden spacer.
1. Engage 1st gear and install thrust blocks under the front wheels.2. Make sure that the Lada Priora parking brake lever is lowered all the way down (the car is released).3. Remove the rear wheel and clean the brake drum of the VAZ 2170 from dirt.
4. Using a 7mm wrench, unscrew the two alignment pins.
5. Apply a liquid such as WD-40 to the hub and, after waiting a few minutes, clean off any dirt and rust from the area.
6. Use a hammer to remove the drum from the hub using a wooden spacer.
7. Remove the Lada Priora drum from the hub. If this fails, knock it down with a hammer, striking through the wooden spacer on the collar on the back of the VAZ 2171 drum.
8. . or compress by driving pins or suitable bolts evenly into the two threaded holes of the drum.
9. When installing an old VAZ 2172 drum, use a file to remove the collar on its working surface, formed as a result of wear.
10. Install the Priora fret drum in the reverse order of removal. Pre-lubricate the hub seating belt with graphite grease or LSC-15 grease and bring the pads together using two mounting blades.
11. Check the ease of rotation of the Lada Priora wheel. The drum may slightly brush against the shoes of the VAZ 2172. With the car standing on the ground, press the brake pedal two or three times to bring the shoes to the drum.
Brake mechanisms Lada Priora
Brake pads replacement
Removal and installation of front brake pads Lada Priora (Lada Priora)
Removing and installing the brake disc
Replacing the front brake disc of Lada Priora
Replacing the brake cylinder
Replacing the brake wheel cylinder of Lada Priora
Replacing the brake drum
Removing and installing the brake drum Lada Priora
Rear brake pads
Replacement of rear brake pads of Lada Priora (Lada Priora)
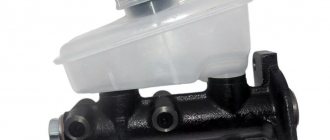
Brake slave cylinder
Removal and installation of the working cylinder Lada Priora (Lada Priora)
Replacing brake hoses
Removal and installation of front brake hoses Lada Priora (Lada Priora)
Rear brake hoses
Removal and installation of rear brake hoses Lada Priora (Lada Priora)
Removing and installing brake pipes
Replacement of brake pipes Lada Priora (Lada Priora)
Brake system components of Lada Priora
Operation and maintenance of the brake system of the VAZ 2170 Priora. Checking the brake cylinder and mechanism of the VAZ 2171 Priora, adjusting the parking brake of the VAZ 2172 Priora.
Selecting and installing rear disc brakes on Priora
Many manufacturers of modern vehicles install rear wheel drum brakes only on budget modifications. This fully applies to the VAZ model VAZ 2170 Priora. Let's try to find out whether it is possible to install rear disc brakes on the Priora.
ZTD on Priora (perforated and ventilated disc)