How does it work?
The operating principle of the system is to use a hydraulic drive. When the driver presses the pedal, pressure is generated in the system. The rod presses on the piston. This, in turn, transfers forces to the liquid.
Traffic safety depends on the proper operation of this system. Therefore, you need to be able to diagnose a malfunction in a timely manner. How to do it? Let's look further.
Instructions
So, how to replace the rear brake cylinder yourself? The VAZ needs to be placed on a flat area and the rear part must be jacked up, having first removed the wheel bolts. Next, remove the wheel itself. Getting to the brake cylinder is quite difficult. To do this we need to remove the drum and also remove the pads. In addition, the brake fluid hose is unscrewed.
How to remove the drum? Before dismantling it, you need to thoroughly clean it with a wire brush, removing all rust and dirt. After this, unscrew the 2 guide pins with a wrench. Next, remove the drum from its seat. This is done using a special puller. If this is not available, you can use 2 M8 bolts 6-7 centimeters long. We evenly tighten them with a wrench into the holes. This way the drum is compressed from the hub.
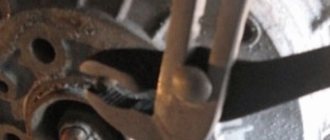
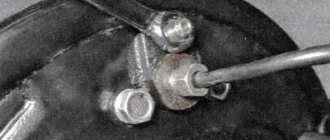
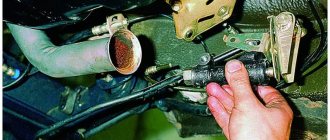
Now we need to remove the rear brake cylinder itself. So, remove the plastic protective cap and unscrew the bleeder fitting itself. To do this we need a key “8”. To remove the tube, you must use a 10mm socket. We break the tightening on the fitting and unscrew the element. Be careful - brake fluid will flow out of the tube. Wear protective rubber gloves when working. Next, unscrew the bolts securing the rear brake cylinder itself.
FakeHeader
Comments 110
Hello. What about technical inspection? They won't cower.
The car has been out of production for a long time... its receiver 2114... was not available. and there was this one. I installed it, the bolt fit... That’s the whole answer. But in fact, they know the weight of how they are doing maintenance right now
Did I understand correctly, the GTZ Kalina has a different thread than on the 99 tubes? (in my case 2108) And the diagram is as follows: Front - Inlet - adapter - tube - adapter - regulator - adapter - tee And the same thing back. Did I understand correctly?
something cleverly written hurts
So, it’s all the same... I’m starting my journey through the hemorrhoids... please tell me, have you ever thought about screwing the 3/40 into the GTZ right away? If I understood everything correctly, then in the state there are 10x1, and the regulator is 15x1. Maybe it’s easier to give the GTZ to a turner so that he can cut 15x1, of course I didn’t look at it, maybe they won’t let the shirts stretch so much in diameter... well, and the adapter right away. For some reason I already broke my head (after work, my brain doesn’t cook anymore) And with the front contour, leave the same tube just re-roll the end under 10x1.25. And if I understand correctly, the result is 4 adapters (elements)?
1 in the Nexia GTZ they look down, but in ours they look to the side, it will come out painfully grammatically 2 but the GTZ body won’t allow it to be sharpened like that 3 the front contour will go through the tee
Installation
Installation of the new element is carried out in the reverse order. Before installation, you need to thoroughly clean the brake mechanism from dirt using sandpaper. Degrease the seat with white spirit.
So, first you need to open the hood and add brake fluid to the maximum level. It is not recommended to mix different classes of products. Cars of the “tenth” family are filled with RosDot-4 class fluid. Please note that during pumping the level in the tank will drop. As soon as it drops 1.5 centimeters, you need to top it up again. Next we need an assistant. He will press the brake pedal at your command. So, unscrew the cap from the bleeder fitting and put the hose on it. We put its second end into a plastic bottle. We give the command to the assistant. He must press the pedal 5 times and at the last stage press it “to the floor”. At this time, you will observe how aired liquid flows out of the fitting.
Features of the brake system on the VAZ-2110
The brakes on the VAZ-2110 have diagonal separation of the contours.
The device of the brake system of the VAZ-2110.
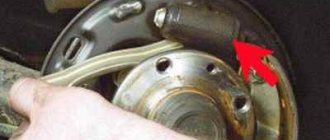
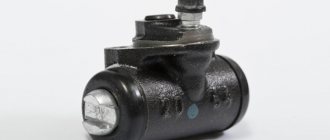
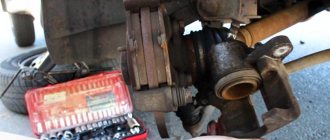
This allows if one brake circuit fails, it can only be repaired . Often car owners have to change the brake cylinder on one of the rear wheels. The first problem that novice car enthusiasts face is finding the location of this very cylinder. To see it, just remove the brake drum.
Brake cylinder location.
It is the brake cylinder that pushes the pads, forcing them to press against the walls of the drum.
Signs of a broken brake cylinder
A faulty rear wheel cylinder can be detected as follows:
- The wheel stopped braking.
- The wheel is jammed or jammed.
- The brake cylinder is leaking.
If the first two points are quite obvious, and the cylinder malfunction can be determined visually, then in the third case everything is much more complicated.
Brake fluid leaks on the inside of the wheel.
A cylinder leak will sooner or later lead to it jamming, and if this happens on the road, then major troubles cannot be avoided . To detect a leak, you need to pay attention to indirect signs. If there are visible leaks of brake fluid on the wheel, and the fluid itself runs out very quickly, you need to urgently remove the rear wheel and drum.
Examination
You should make sure that the master cylinder is the culprit for the malfunction of the brake system. This is easy to do; you don’t even have to go to a service center and spend money on it.
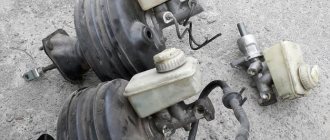
Unit location
- Press the brake pedal with the power unit off.
- Start the engine without taking your foot off the gas pedal.
- During normal operation, the gas turbine engine fails under the influence of vacuum.
- If the pedal does not fail, you will need to conduct more thorough diagnostics and restore the device to functionality.
Most likely, you will need to restore the tightness of the return regulator connection. It is located on the intake manifold amplifier housing.
Repair kit or new GTZ?
Many car owners face a question when the brake master cylinder fails: how exactly to repair the brake master cylinder. After all, there are two main options:
- Purchase a new GTZ;
- Use repair kit.
First, let's take a look at the price tags.
New GTZ entry-level quality
New high quality GTZ
Purchasing a repair kit and using it to restore the functionality of the brake cylinder entails uneven wear of old and new elements, breakage of rings and a number of other problems. In this regard, we advise you to eliminate the breakdown by completely replacing the gas turbine engine, and not by using a repair kit.
Which cylinder is best to buy for replacement?
Rear brake cylinder from Kraft.
If you definitely decide for yourself that you will not go to a service station for repairs, then the spare part necessary for repairs will need to be purchased at a car store. Since spare parts for domestic cars are inexpensive, there will be no problems when purchasing.
When purchasing, you can buy both the original, which has the article number 21050-3502040-00 , and a “non-original” from another company. Unlike spare parts for foreign cars, where the original spare part is always better, the situation with spare parts for VAZ is the opposite. It often happens that non-original spare parts turn out to be of higher quality than the original.
avtoexperts.ru
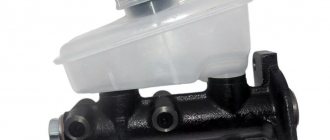
The GTZ is an integral part of the brake system, which performs one of the key tasks - converting the force applied to the brake pedal to generate pressure in the system. The GTZ interacts through the “vacuum valve” rod with the brake pedal directly. The task of the GTZ is to evenly distribute pressure across all circuits.
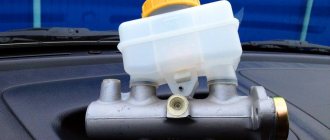
The brake cylinder is located on the brake “vacuum reservoir” cover. A brake fluid reservoir is mounted above it. The sections of the tank and the GTZ are interconnected by bypass holes, and are responsible for a specific section in the system. The reservoir itself is designed to replenish the loss of “brake fluid”. Visually, the tank has a transparent body, with a scale for monitoring the liquid level. In addition to the scale, sensors installed in the tank are used to signal the liquid level, displaying information on the “tidy”.
Types and design of GTZ
Structurally, gas turbine engines are divided into the following types:
For clarity, we will consider the design and principle of operation using the example of double-circuit GTZ. They are more popular than their predecessors. The latter were installed mostly on cars of the last century (various models of Moskvich, Zhiguli, GAZ, GAZ-53, 33 (first modification) trucks, etc. The dual-circuit system is considered more effective in terms of braking. Now it is equipped with Most of the modern cars are both domestic (Lada Kalina, Priora, “Ten” family, “Samar”, Granta, Vesta, Xray) and foreign (Renault Logan, Volkswagen Polo, KIA RIO, Hyundai Solaris, Opel Astra, Vectra, Chevrolet Lanos, Aveo, Cobalt, etc.) The advantages of a dual-circuit brake cylinder system are that if, for example, one circuit fails, the brakes on one pair of wheels are lost, but another circuit remains in the “battle” another pair of wheels, and therefore brakes, of which there are none.
The process of replacing the VAZ-2110 brake cylinder
If the cause of the non-functioning brakes on one of the rear wheels is determined, then you need to begin the replacement process. First you need to dismantle the old part. It happens like this:
- First you need to remove the rear wheel.
We unscrew the wheel by jacking up the car and placing additional support under the bottom.
It is better to unscrew the tip of the brake pipe with a slotted wrench.
It is more convenient to unscrew the brake cylinder mounting bolts using a ratchet head.
When working with fittings and tubes, the main thing is not to break the threads, otherwise you will have to change them too.
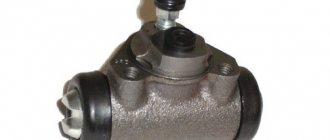
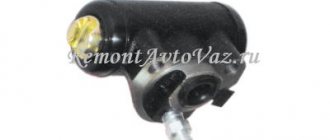
Old brake cylinder.
If the parts are difficult to unscrew, it is better to spray them generously with WD-40 . When rotating the nuts, you need to make sure that they rotate without tubes. If the tube turns together with the nut, it means it is rusty and stuck to the nut. This part is not allowed for use and must be replaced.
The process of installing a new cylinder
Before you begin the cylinder installation procedure, it is imperative to clean the entire rear wheel brake mechanism from dirt. If you really had to climb into the drum, then you need to carefully examine its condition, at the same time inspecting the pads . If worn, they must be replaced .
- If there has been a cylinder leak, then before installing it you need to thoroughly clean the pads from all traces of brake fluid . To do this, you can use a file or sandpaper. Under no circumstances should stripping machines be used, as the pad can be seriously damaged.
- The inside of the rear brake drum also needs to be cleaned of dirt, rust and degreased from traces of brake fluid . If the liquid remains in the drum, the shoe will slide during operation. Only after thorough cleaning of all mechanisms can a new cylinder be installed. The assembly procedure takes place in the reverse order of disassembly.
The new cylinder is in place and the pads are installed, all that remains is to bleed the brakes.
Leveling up
A mandatory procedure after installing a new cylinder is bleeding the brakes. If this is not done, the car will brake very mediocrely, since air will remain in the system.
Bleed the brakes and add fluid to the expansion tank.
What to look for when choosing pads
Before replacing brake pads on Kalina, you need to understand the types of plates. These elements are:
- semi-metallic;
- low steel content;
- ceramic;
- polymer.
The semi-metallic brake pads on Kalina are based on steel fiber. Thanks to this, the part has a long service life and high technical characteristics. Metal elements are characterized by a good coefficient of friction.
The only drawback is rapid wear, especially if the part is cheap or made of low-quality material.
If Kalina brake pads contain a low percentage of steel fibers, then in terms of their quality characteristics they are durable and wear-resistant. The disadvantage of the part is the low production of the brake disc.
The ceramic elements contain inclusions of shavings. These are durable plates that can last a long time and provide a good coefficient of friction. However, their quality is still significantly worse than those described above.
Polymer brake discs for Kalina are made of high-strength materials. This type of plate was developed not so long ago, but has managed to gain popularity among many motorists. Polymer materials guarantee a long service life and are highly durable. A high-quality part is expensive, but it guarantees long and successful operation.
Before purchasing brake discs for Kalina, you need to figure out which type will be most suitable. It is recommended to make purchases in trusted stores. What material the part will be made from is decided by the buyer himself.