April 30, 2020 Lada.Online 50 567 8
The fault indicator (Check Engine) on Lada 4×4 cars (VAZ 21214, 21314) is located in the instrument cluster. When the warning light turns on, it signals to the driver that the on-board diagnostic system has detected a malfunction of the ECM and the vehicle continues to move in emergency mode. To determine the cause, you should use a diagnostic tool, with which you can read error codes and decipher them according to the table below.
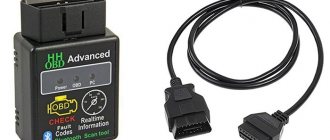
To carry out repair and maintenance work on the vehicle's engine management system, a diagnostic tool should be used. In service centers this can be a DST; for self-diagnosis, an ELM327 OBD-II scanner (price about 200 rubles, see the AliExpress catalog) and a smartphone with installed software (for example, OpenDiag), or an on-board computer installed in the car, are suitable for self-diagnosis.
Diagnostic codes of the ME17.9.7 controller
:
| Code | Description |
| P0030 | DC heater to neutralizer, circuit faulty |
| P0031 | DC heater before the neutralizer, control circuit shorted to ground |
| P0032 | DC heater before the neutralizer, control circuit closed to the on-board network |
| P0036 | DC heater after the neutralizer, the circuit is faulty |
| P0037 | DC heater after the neutralizer, control circuit short to ground |
| P0038 | DC heater after the neutralizer, control circuit closed to the on-board network |
| P0101 | Mass air flow sensor circuit, signal output from permissible range |
| P0102 | Mass Air Flow Sensor Circuit Low Signal |
| P0103 | Mass Air Flow Sensor Circuit High Signal |
| P0112 | Intake Air Temperature Sensor Circuit Low Signal |
| P0113 | Intake Air Temperature Sensor Circuit High Signal |
| P0116 | DTOZH circuit, signal output from permissible range |
| P0117 | DTOZH circuit, low signal level |
| P0118 | DTOZH circuit, high signal level |
| P0122 | TPS circuit A, low signal level |
| P0123 | TPS circuit A, high signal level |
| P0130 | The oxygen sensor before the converter is faulty |
| P0131 | DC circuit to the neutralizer, low output signal level |
| P0132 | DC circuit to the neutralizer, high output signal level |
| P0133 | DC circuit to the neutralizer, slow response to changes in mixture composition |
| P0134 | The oxygen sensor circuit to the converter is inactive |
| P0135 | Oxygen sensor to converter, heater faulty |
| P0136 | The oxygen sensor after the converter is faulty |
| P0137 | DC circuit after the neutralizer, low signal level |
| P0138 | DC circuit after the neutralizer, high signal level |
| P0140 | The oxygen sensor circuit after the converter is inactive |
| P0141 | Oxygen sensor after converter, heater faulty |
| P0171 | Fuel system too lean |
| P0172 | Fuel system too rich |
| P0201 | Cylinder 1 injector, circuit faulty |
| P0202 | Cylinder 2 injector, circuit faulty |
| P0203 | Cylinder 3 injector, circuit faulty |
| P0204 | Cylinder 4 injector, circuit faulty |
| P0217 | Engine temperature is higher than permissible |
| P0222 | TPS B circuit, low signal level |
| P0223 | TPS circuit B, high signal level |
| P0261 | Cylinder 1 injector, control circuit short to ground |
| P0262 | Cylinder 1 injector, control circuit shorted to on-board power supply |
| P0264 | Cylinder 2 injector, control circuit short to ground |
| P0265 | Cylinder 2 injector, control circuit shorted to on-board power supply |
| P0267 | Cylinder 3 injector control circuit short to ground |
| P0268 | Cylinder 3 injector, control circuit shorted to on-board power supply |
| P0270 | Cylinder 4 injector control circuit short to ground |
| P0271 | Cylinder 4 injector, control circuit shorted to on-board power supply |
| P0300 | Random/multiple misfires detected |
| P0301 | Cylinder 1, misfire detected |
| P0302 | Cylinder 2, misfire detected |
| P0303 | Cylinder 3, misfire detected |
| P0304 | Cylinder 4, misfire detected |
| P0327 | Knock Sensor Circuit Low Signal |
| P0335 | Crankshaft position sensor circuit is faulty |
| P0340 | Phase sensor is faulty |
| P0351 | Ignition coil of cylinder 1 (1-4), control circuit open |
| P0352 | Ignition coil of cylinder 2 (2-3), control circuit open |
| P0353 | Ignition coil of cylinder 3, control circuit breakage |
| P0354 | Ignition coil of cylinder 4, control circuit breakage |
| P0363 | Misfires detected, fuel supply to idle cylinders turned off |
| P0422 | Neutralizer efficiency below threshold |
| P0441 | Gasoline vapor recovery system, incorrect air flow through the control unit |
| P0444 | Canister purge valve, control circuit open |
| P0458 | Canister purge valve, control circuit short to ground |
| P0459 | Canister purge valve, control circuit shorted to on-board network |
| P0480 | Fan relay 1, control circuit open |
| P0481 | Fan Relay 2, Control Circuit Open |
| P0485 | Fan supply voltage is out of range |
| P0500 | Vehicle speed sensor is faulty |
| P0501 | Vehicle speed sensor, signal out of acceptable range |
| P0504 | Brake pedal A/B switches, signal mismatch |
| P0560 | Vehicle on-board voltage |
| P0561 | On-board voltage is unstable |
| P0562 | On-board voltage, low level |
| P0563 | On-board voltage, high level |
| P0606 | Court controller, ADC malfunction |
| P0615 | Add. starter relay, control circuit open |
| P0616 | Add. starter relay, control circuit short to ground |
| P0617 | Doi. starter relay, control circuit shorted to on-board network |
| P0627 | Fuel pump relay, control circuit open |
| P0628 | Fuel pump relay, control circuit short to ground |
| P0629 | Fuel pump relay, control circuit shorted to on-board network |
| P0645 | A/C compressor clutch relay, control circuit open |
| P0646 | A/C compressor clutch relay, control circuit short to ground |
| P0647 | Air conditioning compressor clutch relay, control circuit shorted to on-board network |
| P0691 | Fan Relay 1 Control Circuit Short to Ground |
| P0692 | Fan relay 1, control circuit shorted to on-board power supply |
| P0693 | Fan Relay 2 Control Circuit Short to Ground |
| P0694 | Fan relay 2, control circuit shorted to on-board power supply |
| P0830 | Clutch pedal switch, circuit faulty |
| P1335 | Throttle Actuator Control Monitoring, Throttle Position Out of Range |
| P1336 | Monitoring the control of the throttle valve drive, mismatch of signals from sensors “A” / “B” of the throttle position |
| P1388 | Monitoring the control of the throttle valve drive, mismatch of signals from sensors “A” / “B” of the accelerator pedal position |
| P1389 | Throttle actuator control monitoring, engine speed out of range |
| P1390 | Monitoring of throttle actuator control, incorrect response to a malfunction in the system |
| P1391 | Monitoring throttle actuator control, no response to system malfunction |
| P1545 | Throttle valve actuator, throttle position out of range |
| P1558 | Throttle valve actuator, return spring faulty |
| P1559 | Throttle valve actuator, throttle position at rest is outside the permissible range |
| P1564 | Throttle valve drive control system, throttle zero position adaptation interrupted due to low voltage |
| P1570 | Immobilizer, circuit faulty |
| P1578 | Throttle valve actuator control system, zero position adaptation value is out of range |
| P1579 | Throttle valve control system, throttle zero position adaptation interrupted due to external conditions |
| P1602 | Court controller, power supply loss |
| P1603 | Throttle actuator control monitoring, monitoring module malfunction |
| P2100 | Electric throttle actuator, control circuit open |
| P2101 | Electric throttle actuator, control circuit faulty |
| P2122 | Pedal Position Sensor A Circuit Low |
| P2123 | Pedal Position Sensor A Circuit High |
| P2127 | Pedal Position Sensor B Circuit Low |
| P2128 | Pedal Position Sensor B Circuit High |
| P2135 | Sensors “A” / “B” throttle position, signal mismatch |
| P2138 | Accelerator pedal position sensors “A” / “B”, signal mismatch |
| P2176 | Throttle valve control system, throttle zero position adaptation not performed |
| P2187 | Fuel system too lean at idle |
| P2188 | Fuel system too rich at idle |
| P2301 | Ignition coil of cylinder 1 (1-4), short circuit of the control circuit to the on-board network |
| P2304 | Ignition coil of cylinder 2 (2-3), short circuit of the control circuit to the on-board network |
| P2307 | Ignition coil of cylinder 3, short circuit of the control circuit to the on-board network |
| P2310 | Ignition coil of cylinder 4, control circuit shorted to on-board network |
For more details on each variator fault code, ask in the comments.
, we will try to answer you in more detail.
VAZ error codes - table with a list of all errors
Very often, various errors occur in VAZ cars, and in fact, it is not necessary to go to a mechanic to diagnose them; it is enough to read the error code and look at its value in the error table.
The error codes are the same and apply to the following VAZ brands:
1118 Kalina, 2104, 21041, 2105, 2107, 21074, 2109, 21093, 21099, 2110, 21102, 21103, 2111, 2112, 2113, 2114, 21114, 21124, 21 15 with engine injector 8 and 16 valves, 21150 , 21154, 2131, 2170 Priora, 2190 Granta, 2123, 21214, 2131 Niva;
Video “Briefly about replacing the camshaft sensor on a VAZ”
You can learn more about where the VAZ camshaft sensor is located and how to replace it in a garage from the video below (the author of the video is Vitashka Ronin).
The Chevrolet Niva diagnostic connector helps you obtain information about how most units work, into which special equipment is connected via Bluetooth or a cable. Therefore, if you want to conduct independent diagnostics, it is important to know where it is.
The connector in the Niva is located under the steering wheel on the right side, and the pinout itself is under the dashboard on the driver’s side. To check the on-board computer, you need to use special equipment that transmits all the necessary information to the laptop. Data transfer is carried out using a COM port into which a K-LINE type connector is installed.
When connecting, errors may appear on the laptop screen. At this moment, there is no need to worry, since the appearance of such messages may be due to a lack of communication with the device itself. You should also check whether the standard anti-theft system is installed; if so, check the adapter itself. If there is a standard location, then it is connected to the diagnostic line between the ECU and the immobilizer. And if it is missing, a plug is installed in its place. To restore communication between the contacts, a jumper is installed, as shown in the picture below:
Depending on the year of manufacture of the model, the connectors may differ from each other.
VAZ error table
- On a car with the engine turned off, disconnect the connector with contacts from the controller. Then you need to turn on the ignition, but do not start the power unit. You will need a multimeter to check the voltage between the contact elements.
- The sensor connector is equipped with five pins, counting from left to right when viewed from the side of the air flow from the filter. Between contacts 2 and 3, the nominal voltage should be 10 volts, between 3 and 4 - 5 V. If there are deviations, the user needs to diagnose the integrity of the electrical circuit for breaks and current leakage.
- At normal values, the ignition is turned off and the resistance between the “ground” and the fifth pin number is checked. The resulting parameter should be about 4-6 kOhm. If the value obtained is 0 Ohm, the sensor must be replaced; the problem may also be a short to ground. If the resistance parameter is 100 kOhm, then the cause must be sought in a break in the power supply circuit or in the engine control unit.
- regular use of low-quality fuel;
- violation of air intake tightness;
- lack of spark;
- damage or physical wear of cylindrical devices.
If replacing the fuel does not help, it is necessary to diagnose the air intake system. It is necessary to tighten the fastening clamps, change the air filter element and check the pressure in the rail (the normalized indicator is no more than 2.8 atm). It is also necessary to perform diagnostics:
- high-voltage wires connected to the defective cylinder;
- spark plugs;
- check for possible oxidation at the cable connection points.
Diagnostics of high-voltage wires is carried out using a tester; it is necessary to check the resistance. If the obtained value is more than 10 kOhm, then the cables must be replaced. You also need to check the integrity of the spark plugs and make sure that there is no carbon deposits on their tips. If the described actions did not help determine the cause, the cylinders are diagnosed. The user needs to check the compression level, which should be approximately the same in each device. If the obtained values differ by more than 0.5 atm, then the power unit needs to be tested in more detail.
What's the result?
Ease of use and accessibility allow adapters for the diagnostic connector to significantly simplify the procedure for checking a car, reading and decoding ECU errors. It is also worth noting that the error can be quickly reset without having to disconnect the battery terminals, erase a critical error, etc.
Finally, we would like to add that among the commercially available adapters, there are devices that may not read errors recorded in the ABS unit and Airbag airbag modules. In other words, information on these items may not be available. For this reason, before purchasing an adapter, it is necessary to separately clarify the possibility of reading errors from the memory of the above and other ECM modules by one or another device.
Why does the “check” light up on the dashboard? Is it possible to continue driving a car if the check engine light is on? What should you check first?
The main signs by which you can determine problems with the DPKV crankshaft position sensor. Causes of failures, breakdowns, self-check.
For what reasons may misfire of the fuel-air mixture occur in one or more cylinders? Fault diagnosis, recommendations.
Computer diagnostics of a car engine and other units: why it is necessary and what malfunctions it identifies. How to check the car yourself.
The main reasons that lead to a lean mixture. A lean mixture on carburetor and injection internal combustion engines, as well as on engines with gas equipment. Diagnostics, repair.
Operating principle of the ECU, board design and connectors. ECU data processing, CAN bus. Causes of malfunctions of the engine control unit, repair or replacement of the unit.
Chevrolet Niva error codes: decoding and description of meanings
The popular Russian-made model is very widespread in the CIS countries due to its optimal cost and increased cross-country ability, which is critically important in the conditions of domestic operation. Motorists buy cars for off-road travel and small towns, where the quality of roads leaves much to be desired.
The disadvantages of the car include weak wiring - when the load increases to the design limit, on-board electronic systems often fail, which causes software failures. Chevy Niva error codes appear on the dashboard display or are detected using special equipment, but the common thing is that they all indicate a malfunction of a specific component.
Lambda decoy
The sensor itself often fails and is quite expensive. For this reason, some motorists install the so-called DK blende into the system.
There are two ways to eliminate the problem of a constantly “jamming” lambda - mechanical and electronic. Both methods are good in certain conditions.
Mechanical "trick"
A metal tube is welded onto the sensitive area of the sensor, reducing airflow to the sensor. Consequently, the device thinks that less oxygen is coming in and the system is stabilizing.
The downside of the modification is its low efficiency. The device works stably only on old-style machines where the sensitivity of the electronics is not high.
Electric "trick"
To complete such a system, experts suggest increasing the resistance of the device by soldering an additional part into the sensor circuit. The photo shows a drawing of how this is done.
Chevrolet Niva error diagnosis
The most reliable way to identify what is wrong with a car is to diagnose electrical appliances and equipment. The procedure allows you to accurately identify breakdowns and quickly repair your car.
There are two ways to detect a problem in a car.
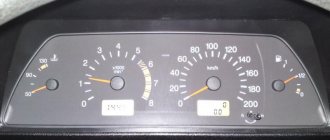
Self-diagnosis VAZ 2123
The simplest procedure allows the motorist to independently identify the damaged area and repair the damage. Thanks to the successful firmware of the on-board computer, some errors are displayed on the standard display. In this case, nothing happens on its own - you will need to perform several steps manually:
- turn off the engine and turn off the ignition;
- find the daily mileage reset button on the dashboard and press it;
- at the same time turn the key in the starting cylinder;
- if everything is done correctly, all the indicators on the dashboard will light up, and the instrument arrows will make a full circle and return to their place;
- at the same time, the firmware version of the on-board computer will be reflected on the built-in display;
- The next press of the key will display a network error.
If the manipulations are correct, one of the indicated codes will appear on the display, and each Niva Chevrolet error number will be responsible for its own section of the highway:
- 0 – error 0 Niva Chevrolet indicates that there are no problems in the on-board circuits; most likely, the breakdown is purely mechanical in nature;
- 1 – standard error of the Niva Chevrolet ECU – the processor is not working correctly;
- 2 – for a Chevrolet Niva, error 2 indicates a lack of power to the gas tank float;
- 4 – malfunction of the battery or generator; a critical excess of the rated voltage of more than 16 volts was detected in the on-board circuits;
- 8 – has the opposite meaning; on a Chevrolet Niva, error 8 indicates an excessive voltage drop in the wiring due to a deep discharge of the battery or a malfunction of the generator;
- 12 – error 12 Chevrolet Niva reports a breakdown of the control indicator;
- 13 – signal transmission from the lambda probe is disrupted, you need to check the device and main power lines;
- 14 – on Niva Chevrolet, error 14 indicates a critical antifreeze temperature, the system requires cooling, otherwise the power unit may boil;
- 15 – the motor is too cold for normal operation, usually the error disappears after a good warm-up or replacement of the sensor;
- 19 – malfunction of the DPKV, the encoding indicates an incorrect speed of rotation of the unit;
- 21/22 – the throttle position differs from the calculated values up/down;
- 23/25 – the air mixture on the intake manifold is excessively cooled or overheated;
- 24 – open circuit of the speedometer, accompanied by a lack of response of the instrument needle to the driver’s manipulations;
- 27/28 – incorrect display of the actual amount of exhaust from the calculated value;
- 33/34 – Mass air flow sensor, the indicators of the device are overestimated or underestimated, relative to the actual state of the system;
- 35 – incorrect operation of the engine at idle, you need to check the correctness of the mixture formation settings;
- 41 – the phase distribution sensor or DPRV has detected an open circuit or the data received is erroneous;
- 42 – multiple misfires were detected, the system turned off the fuel supply to the damaged cylinders;
- 43 – the detonation channel sensor generates an error;
- 44/45 – fuel mixture is too rich/lean; you need to check the fuel lines for mechanical damage;
- 49 – the vacuum gauge is out of order or overloaded;
- 51 – ROM has failed, or there is a breakdown in the power cables;
- 52 – RAM is not working correctly, damaged, no power;
- 53 – the adsorber purge valve is faulty;
- 54 – octane corrector controller is de-energized or broken;
- 55 – the calculated load on the internal combustion engine differs from the established one;
- 61 – the oxygen quantity controller in the intake system transmits incorrect data to the computer.
At the same time, you need to accurately understand that, for example, when error 10 is on the display, the Chevrolet Niva tells the driver that there are several problems (standard, unambiguous codes are summed up).
You should also know that Niva Chevrolet self-diagnosis errors do not reflect the exact location of the breakdown. Codings can only show the section of the wiring where you need to look for the cause of the malfunction. Also, these encryptions may be the result of a software failure after an unsuccessful wash or disconnection of the battery. To obtain more accurate data, the user needs to connect a special diagnostic scanner.
Characteristics and features of replacing regulators
On products of the domestic automotive industry such as UAZ and Niva, various sensors are needed to transmit information to the dashboard. Also, some of them perform additional functions. And each has its own characteristics of dismantling and installation.
Detonation
A piezoceramic element is installed in the area of the cylinder block - this is the knock sensor. Its function is to transmit a signal to the controller, which will automatically adjust the ignition timing. Thanks to this, the phenomenon will be eliminated. Also, thanks to the sensor, the controller provides a light indication of an emergency situation on the instrument panel.
The Niva knock sensor can be removed using only a screwdriver and a 13mm wrench. Remove the block by pressing the lock, then unscrew the bolt with a wrench.
Camshaft
This part is required to determine the angular position of the timing mechanism in accordance with the crankshaft. Information from it enters the engine control system. It is used to regulate fuel injection and ignition.
Experts recommend changing this part every 100 thousand km or 5 years. This is due to the fact that it is subject to constant temperature changes, which negatively affects the operation of the sensor. Unfortunately, it is quite difficult to independently determine its malfunction; this requires an oscilloscope and other equipment.
Speeds
The Niva 21214 has an electronic, also known as cableless, speed sensor. Its main function is to transmit information about the vehicle speed to the speedometer. You will find this parameter finder on the gearbox, on the rear transfer case cover.
To replace it, you will need to get to the car from below, using a hole or other method.
Idle move
The idle speed sensor, also known as the regulator (IAC), is located on the throttle valve.
Fuel level
This sensor is required to display information about how much gas you have left. In some cases, it becomes unusable and needs to be replaced.
First, you'll need to remove the floor mats and rear seat to gain access to the hatch where the gas tank is hidden. The hatch is a sheet secured with 12 screws. Unscrew them and remove the hatch completely by lifting it up and sliding it forward.
Now you can see the gas tank and fuel pump. Remove the connector from the latter by placing a rag under the draining gasoline. It is better to dismantle by draining 5-7 liters from the tank if it is full.
Diagnostics using third-party equipment
More precisely, errors on Chevy Niva can be identified by connecting additional equipment. The technique is more technically complex, but allows us to determine the cause of a breakdown or failure with minimal error. In this case, the sequence of actions is as follows:
- turn off the engine;
- find the contact connector under the dashboard, the connector is located at the bottom of the steering column;
- connect the configured computer to the ECU output;
- turn on the ignition;
- follow the program instructions.
If all actions are performed correctly, all available information and any errors in the form of encrypted codes will be displayed in the desktop window.
There are also specialized scanners designed specifically for Chevrolet NIVA. Dealer devices are connected to the place of the standard signaling unit through an output cable.
Separately, we should highlight modern devices designed to connect a smartphone to a car, while reading encodings and controlling operating modes occurs directly from the gadget’s display.
At the same time, you should know what the encodings displayed during diagnostics mean. The code consists of several elements.
- P – the motor electronics have failed;
- C – there are problems with the chassis;
- B – interior space, a problem has been detected;
- U – there are problems when establishing pairing of on-board systems.
The next element is a single digit:
- 0 – OBD 2;
- 1-2 – standard code of the manufacturer;
- 3 – reserve part of electrical equipment.
The following digit determines the exact serial number of the line in which the defect was detected:
- 0 – exhaust system device;
- 1-2 – violation of the fuel or air supply device to the engine;
- 3 – ignition does not work correctly;
- 4 – additional equipment control;
- 5 – monitoring the engine idle state;
- 7-8 – transmission and chassis design.
Mounting blocks for Lada 4?4 2022 release
The main and additional units are located in the cabin to the left of the steering wheel, under the instrument panel. The blocks contain fuses of the “Cylinder” size, ten and six fuses, respectively. The ratings and purpose of the fuses are indicated in Table 4 “Circuits protected by fuses”:
Fuse block of standard size “Standard”. The block is located on the left side under the upholstery and contains fuses that are designed to protect engine control system devices. The ratings and purpose of the fuses are shown in Table 5:
The fuse and relay box is located on the left side of the steering column under the instrument panel. The block contains two “Standard” size fuses, which are designed to protect the circuits of the electric fuel pump, electric windows and electric mirrors. The ratings and purpose of the fuses are shown in Table 6:
The fuse and relay box is located on the right side of the steering column under the instrument panel. The block contains one “Maxi” size fuse and two “Standard” size fuses, which are designed to protect the circuits of the hydraulic unit of the anti-lock braking system. The ratings and purpose of the fuses are shown in Table 7:
The most popular Niva 21214 errors and methods for eliminating them.
Engine error codes (P0000)
Note!
Chevrolet Niva on-board computer errors found in this way reflect the most accurate state of affairs at the current time.
- 0102/103 - the pulse from the mass air flow sensor is too low or high, damage to the device or its wiring may occur;
- 0112-0113 – similar indicators from the device for measuring the actual temperature of the intake manifold;
- 0116 – the level of the DTOZh signal is outside the permissible limits, urgent diagnostics of the system is required;
- 0117/0118 – is responsible for the above element and indicates that the signal level is too low/high; it is also necessary to check the sensor itself;
- 0122/0213 – excessively weak or strong impulse from the TPS, cleaning the mechanical part of the device or replacing the sensor may help;
- 0130-0132 – incorrect data transmission from DC1 installed to the catalytic converter; the part may need to be replaced or cleaned;
- 0133 – is responsible for the above element and indicates a slow response of the device to driver commands;
- 0134/0135 – breakage of the power line/breakage of the heater DK1;
- 0136 – short circuit with contact to the negative wire of DK2;
- 0137/138 – critical drawdown/exceeding the permissible norm of the signal from the oxygen sensor installed after the exhaust gas converter;
- 0140/0141 – open circuit of the wiring or breakdown of the DC2 itself;
- 0171/0172 – malfunction of the fuel supply device; the mixture is excessively lean or rich; it is necessary to check the fuel lines for damage; the fuel pump and its relay should also be diagnosed;
- 0201-204 – damage to the injector driver control wiring for each engine cylinder in series;
- 0261/0264/0267/0270 – short circuit on the body for wiring the driver of each injector in series;
- 0262/0265/0268/0271 – similar, only with a touch to the vehicle’s on-board wiring, for each cylinder, respectively;
- 0300 – the electronic control unit has detected multiple misfires, the gasoline supply is turned off;
- 0301-0304 – similarly, misfires are observed for each working chamber, respectively, the controller cuts off the flow of fuel to the damaged module;
- 0327-0328 – the knock sensor is not working correctly, a weak or too high signal is detected;
- 0335 – DPKV is out of order or its wiring is damaged, you should immediately perform physical diagnostics of the sensor;
- 0336 – the same sensor does not work correctly;
- 0337/0338 – short circuit to the body/break in the DPKV wiring;
- 0340 - therefore, error p0340 Niva shows that there are problems in the circuit of the above sensor;
- 0342 – critical reduction in the permissible impulse from the DPKV;
- 0343 - error 0343 Niva warns that the actual impulse from the DPKV is above the permissible limit;
- 0422 – obstruction of the catalytic converter has been detected, the device needs to be replaced;
- 0441 – the actual value of the flow meter differs from the calculated values;
- 0443 – the canister purge valve is faulty or there is serious damage to the power cables;
- 0480/481 – failure or damage to the wiring of the fan relay No. 1/2 of the cooling system;
- 0500 – the speedometer sensor shows incorrect data;
- 0503 – DSA pulse is interrupted or the wiring is short-circuited;
- 0506/507 – the power plant XX regulator is blocked, a low or high speed level is detected;
- 0560 – the performance of on-board systems is limited due to a critical voltage drop, usually the cause is a deep discharge of the battery;
- 0562/563 – there are voltage surges in the on-board network, up or down from the reference value;
- 0601 – error in writing or reading information for a permanent recording device;
- 0603/604 – similar for RAM;
- 0615 – there is no power to the starter relay, you need to check the safety insert and wiring;
- 0616/617 – Short circuit on the on-board network or on the car body of the starter relay wiring;
- 1135 – interruption or incorrect operation of the control wiring DK1;
- 1140 – mass air flow sensor error, the measured value differs from the calculated value;
- 1141 – disruption of the operation of power lines DK2;
- 1386 – incorrect signal from the mixture detonation channel length sensor;
- 1410 – Short circuit of the canister purge valve lines with contact with other wires;
- 1425 – similar, only with contact on the car body;
- 1426 – complete break in the lines of the canister purge valve – no pulse;
- 1501/02 – there is a short circuit in the control and power lines of the main fuel pump touching the standard wiring or body, respectively;
- 1509 – critical overload of the power plant idle speed control relay;
- 1513/514 – short circuit of the above module with contact to the wires or car body;
- 1541 – control of the electric fuel pump is lost, there is a break in the cables;
- 1570 – APS does not respond, control elements or control lines may be damaged;
- 1602 – error 1602 Niva indicates that there is no power in the controller;
- 1606 – the rough road sensor is acting up;
- 1616/617 – too weak or strong impulse from DND;
- 1640 – error in writing or reading the EEPROM system;
- 1689 – false data in the error memory, the system needs to be reset;
- 2188 - error 2188 Niva warns the user that an excessively rich fuel mixture is supplied to the engine at idle speed (the engine choke).
What and how can you check the lambda?
Catalytic converter overheating. If the lambda is faulty, an incorrect signal is sent to the ECU. This may cause the catalyst to malfunction. It overheats until it turns red and fails.
Indirect signs of sensor malfunctions are unstable operation at low speeds, increased fuel consumption and low dynamics. It must be remembered that these external signs accompany malfunctions of the injection system and malfunctions of the ignition system.
As a result of a failed sensor, the quality of the fuel mixture entering the combustion chamber deteriorates, which disrupts the smooth operation of the engine.
If you find it difficult to determine the malfunction of the exhaust system of your car, then the best way to solve the problem is to contact a car service center in Nagorny to identify the malfunction and repair the exhaust system of your car.
Chevrolet Niva error reset
The standard procedure for resetting the controller occurs only after all faults have been completely corrected, otherwise annoying encryption will appear again. The procedure is performed in two available ways.
- Disconnect the battery from the on-board network for 10-15 minutes. The controller will completely reboot and return to factory default settings.
- In the BC menu, enter the “errors” service, press the daily mileage reset button and wait for the sound signal from the car, and horizontal lines should appear on the display.
The most common Niva Chevrolet computer errors are found in 90% of car diagnostic cases. There are also a large number of rare failures that are not included in the list due to their low prevalence.
Do-it-yourself lambda decoy for Shniva
Outdated sensor models are easily deceived, and setting the resistance is quite simple. The resistor connection diagram is shown above. To install the “add-on”, the sensor wire is broken and an additional element is soldered in.
Difficulties arise with cars after 2010 release. The software of such cars has already been updated and such manipulations will not lead to a positive result. Car enthusiasts have come up with a new way to trick the controller. To do this, a special unit is soldered to the sensor, which collects data from the sensitive element and, after processing, sends it to the BC.
A similar device can be found on the Internet; along with the snag, a diagram of its connection and assembly of the entire module is supplied.
Lambda probe (oxygen sensor, DC); errors 0130–0141, 44, 45
Reg.: 12/21/2004 Threads / Messages: 3 / 674 From: Moscow, VAO Age: 34 Car: VAZ 21214 01 distributed injection
Reg.: 01/18/2005 Threads / Messages: 2 / 891 From: Saransk Age: 41 Car: VAZ 21214; Shniva; UAZ 31514: LuAZ 969
Reg.: 12/06/2004 Threads / Messages: 628 / 51730
Reg.: 12/06/2004 Threads / Messages: 4029 / 23189 From: Moscow Age: 66 Car: 21214M, 2013
Look at the article in the new section “Computer Diagnostics”. She is now the top in the news.
In general, the corresponding error code will pop up.
Reg.: 12/21/2004 Threads / Messages: 3 / 674 From: Moscow, VAO Age: 34 Car: VAZ 21214 01 distributed injection
I have this problem: there is gas in the field (GIG 3L), so it has 2 modes, automatic (with an oxygen sensor) and manual ("bypassing" the sensor), so for some reason it doesn’t matter, I started driving on gas (in automatic mode), it just flies on gasoline, so I think it could be an oxygen sensor. How to check it?
What does the Check Engine Light mean?
Sometimes it can be a very minor problem - for example, a loose gas cap or a faulty catalyst. However, you should not ignore the indicator signals under any circumstances, as this can result in serious problems.
The Check indicator may light up for various reasons.
Sometimes the cause of the indicator light may be poor fuel quality. So don’t be surprised if, after refueling at an unfamiliar gas station, you see the Check Engine light flashing.
Typically the indicator is located on the car's dashboard under the engine speed indicator. It is indicated by a schematic engine or a rectangle with the inscription Check engine or simply Check. In some cases, instead of an inscription, a lightning symbol is depicted.
Is it possible to continue driving while the light is on?
The brake pads are worn out, it's time for the next maintenance, the speed is switched incorrectly, low-quality fuel is used, the on-board voltage has dropped - all this can cause the Check indicator to light up. First of all, you should check the motor. If the reason for the signal to turn on is due to engine malfunctions, it is dangerous to continue driving.
The problem is aggravated by the fact that it is impossible to independently determine the malfunction of a modern internal combustion engine by smell or color. You should contact professionals who will use a scanner to identify the malfunction, if, of course, there is one.
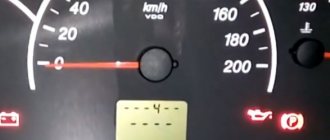
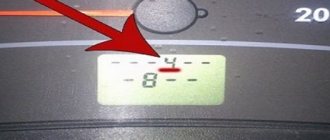
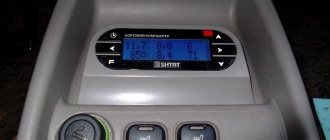
Self-diagnosis
If it is not possible to check with a special device, then this can be done using self-diagnosis, which will help to quickly identify all problems associated with the operation of the car. To do this, press the odometer button and turn on the ignition. The speedometer needle will begin to rise to the top; by pressing again, information about the firmware will appear on the screen, and by pressing again, all existing errors will appear.
Let's take a closer look at the Chevrolet Niva error codes with decoding:
During self-diagnosis, error 8 and error 14 often appear, the first informs about problems in the brake system, and the second is related to fuel consumption, quite often this is a system glitch, but in any case you need to replace the sensor responsible for these mechanisms, or reset the memory by resetting the battery terminals.
As practice shows, knowing how to perform an independent check is very useful, since this knowledge helps to quickly identify a malfunction and eliminate it in a timely manner.