Errors in the electronic control unit are the most common malfunction that can occur in the Lada Kalina. Sometimes, it is not possible to carry out diagnostics by connecting directly to the ECU. The question arises: how to carry out diagnostics then? There is an exit. Not everyone knows, but car diagnostics can be done using the dashboard.
Video about ECU self-diagnostics using the instrument panel on a Lada Kalina:
The video materials will clearly show how to diagnose the Lada Kalina using the dashboard, and also contain some explanations and recommendations
Diagnostic process
Toolbar that can be used for diagnostics
So, diagnostic measures using the dashboard are not complicated, and almost every owner of a Kalina car can handle them on their own. By following the step-by-step instructions below, you can carry out diagnostics on each generation of the VAZ 1117-1119 car.
Now let's move directly to the process of performing diagnostic operations:
- Reset the trip mileage indicator. There is a button on the instrument cluster for this.
- While holding the button, turn it to position I. Insert the key into the ignition and turn it to position 1.
- If everything was done correctly, all arrows on the instrument cluster begin to move from the initial positions (zero values) to the final positions.
- Switch the information display using the button on the windshield wiper stalk.
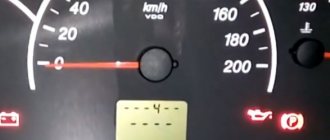
- The first screen to check is the tachometer and gauges.
- In the latter case, the software version will be displayed on the screen. Often the software version (in this case UEr 3.0 or 3.2) is displayed on the control panel screen.
- In the third case, you will see error codes that are present in the ECU. There are 8 and 4 errors in photo 6.
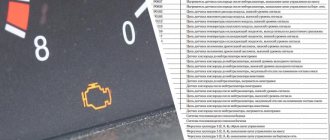
- Now let's decipher the errors that may appear on the toolbar screen:
The daily trip button is used to reset the indicator.
Insert the key into the ignition and turn it to position 1.
The group of instruments rotates from the initial control point to the final control point.
The software version (in this case UEr 3.0) is displayed on the dashboard screen.
Errors received during diagnostics. There are 8 and 4 errors in photo 6.
Decoding instrument panel readings
- 2 — the on-board network voltage exceeds the norm;
- 3 - fuel level sensor error detected. Appears when the sensor circuit is broken within 20 seconds.
- 4 - coolant temperature sensor error. Appears if an open circuit is detected within 30 seconds.
- 5 - An outside temperature sensor error has been detected in the vehicle. appears when there is no sensor reading for 20 seconds);
- 6 - detection;
- 7 - incorrect oil pressure;
- 8 - error or malfunction of the brake system;
- 9 — low battery level;
- E- error detection in the data packet stored in the EEPROM.
Now all that remains is to compare all the errors that popped up on the screen with those indicated above.
As practice shows, diagnosing Lada Kalina using the dashboard is quite easy and simple. This does not require any special tools or skills. It is worth noting that, according to the experience of many car owners, it is not always possible to fully diagnose everything, because wear and breakage of some contacts can be interpreted by the ECU in its own way.
Secondary parameters of motor operation
Engine idle speed test results
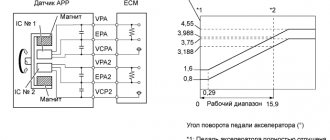
- Throttle Position (THR) value. This parameter is determined by a special sensor. If the throttle position value shows an error and malfunction, the car owner may notice some jerks with “dips” while driving. An increase in the number of idle revolutions will also indicate the presence of a problem. This parameter should be checked with the ignition on, but it is not recommended to start the engine itself. When you gradually press the gas pedal, the readings on the monitor should smoothly increase to 90%. It should be taken into account that it is impossible to achieve 100% - this is predetermined by the manufacturers. The sensor is considered operational if the procedure was successful. Idle speed should show 0%.
- Crankshaft and its rotation frequency (FREQ). The diagnostic figure will be displayed on the screen by a special crankshaft position sensor. The malfunction is easy to notice even without diagnostic equipment, because the engine simply will not start. Indicators from the sensor normally vary in the range from 800 to 840 rpm.
- Limit of uneven crankshaft rotation (LUMS_W). This figure should not exceed 4 rpm. Otherwise, you can be sure that there are misfires in the cylinders. With such a malfunction, it’s time to check the spark plugs and high voltage wires.
- Ignition timing (UOZ). Data from several sensors are combined into one indicator and calculated by the electronic control unit. The value varies from 6 to 15.
This is the way to check engine operation using a diagnostic connector and special equipment. Digital code records are formed from symbolic symbols of car faults. They can be seen on the dashboard dial.
What does error 4 mean?
Trouble code 4 indicates that the refrigerant temperature control controller is not operating properly. In most cases, this code lights up on the instrument panel when a break in the regulator wiring is detected, lasting 20-30 seconds.
- After analyzing your problem, we consulted many sources on the Internet and consulted with Lad Kalin owners. As it turns out, the number 4 often appears on the dashboard; this can be considered one of the most common errors on these cars. Replacing the antifreeze thermostat in the cooling system in some cases will help the product get rid of the error. However, according to most Kalina owners, in fact, in most cases this does not give a good result.
- If you believe the opinion of car owners, such an error, as a rule, occurs mainly in cold weather. If there are no prerequisites for refusal, then there is nothing to worry about.
- It is likely that the sensor itself has oxidized during the operation of the vehicle. As a result, poor contact is formed, which does not allow normal signal transmission. Sometimes this happens after the car has been washed. We recommend visual diagnostics of the controller - if you notice that the contact has actually oxidized, it should be cleaned.
- If cleaning contacts does not help, you need to start the dialer. It is possible that the reason for the code appearing on the instrument panel is a broken wire or short circuit. In the event of a wire break, it is enough to replace the wires or eliminate the cause of the short circuit.
If you have replaced the sensor, cleaned the contacts, but the problem has not disappeared, we recommend conducting more detailed computer diagnostics. On domestic cars, it often happens that when the control unit fails, errors may appear on the screen that actually do not exist. To figure this out, you need to read all the codes from the on-board computer and then draw conclusions.
Instructions for dismantling and repair
Dismantling the tidy may be required to perform tuning, replacing backlight bulbs or repair work. You can find out how to remove the instrument panel on a Lada Kalina from the car's operating instructions.
LED instrument lighting
Tools and materials
Before disassembling the Kalina 2 instrument panel, you need to prepare the following materials and tools:
- a set of keys;
- Phillips and flat screwdriver;
- replacement parts and bulbs.
Before carrying out work, turn off the power to the vehicle by removing the negative terminal from the battery.
Removing the Kalina torpedo
Algorithm of actions
The disassembly procedure consists of the following steps:
- Using a Phillips screwdriver, you need to unscrew two self-tapping screws.
- Next, you need to remove the trim from the instrument panel.
- At the next stage, the spring clips are removed from the clutch.
- After unscrewing two screws, you need to slide the panel towards you.
- The latch holding the block must be pryed up using a flat-head screwdriver and turned.
- Next, you need to disconnect the connectors with the wires and you can safely remove the tidy.
- To remove the glass from the instrument panel, unclip the plastic clips.
After dismantling, you can replace faulty parts and lighting tabs. If the LED warning lights on the Lada Kalina have burned out, it is impossible to replace them, since they are soldered in. In this case, you need to change the entire instrument panel of the Lada Kalina 2. The Kalina instrument panel is assembled in the reverse order.
Thus, knowing how to disassemble the panel on Kalina, you can repair it yourself if the backlight or signal lights do not light up.
DIY car diagnostics Kalina
According to the service manual, error No. 4 in the control unit indicates a malfunction of the coolant temperature sensor. According to our community members and drivers, this error is quite common and often occurs in Lada Kalina. You must understand why these errors occur and how to resolve them.
Error 4 appears in the ECU for several reasons. Let's consider all possible options:
All these reasons are quite easy to eliminate and do not cause serious concern.
How to view errors on the on-board computer?
The video shows the “self-diagnosis mode” of the Lada Kalina car, in which you can find out if there are errors:
Elimination methods
In order to eliminate the cause of error 4 in the Kalina ECU, you should do the following:
- Check the operation of the sensor. If it's dead, replace it.
- Check contact and absence of plaque. Clean the seat and replace the sensor.
- Check the on-board circuit and make sure there is contact.
- But a random error can only be cured by flashing the ECU and resetting all errors. To do this, you should contact a car service.
So the problem can be solved on your own, but practice shows that this is not always possible. Errors 4 are often enough to pop up in the cold season, when the car is parked on the street for a long time, and not in the garage.
Firmware
Now it’s worth taking a closer look at the software. Of course, the best option is to purchase licensed programs, for which you need to shell out money, and sometimes quite a lot. On the other hand, as is typical for many, you can use pirated software that is adapted for connecting to a car.
IMPORTANT! It is worth choosing the software carefully, since, as practice shows, many car enthusiasts then take the car to the station to restore the software for their version of the ECU. It is possible to ruin the control unit, it is located in the cabin
So, what programs can be used to diagnose the Lada Kalina:
- AutoCom pro CARS diagnostic program release 1.AutoCom pro CARS - car diagnostic program
- ScanMaster 2.1 in Russian for ELM327 crack. ScanMaster 2.1 with which you can carry out diagnostics
- 6.26 RUS (for ELM327 and Android).ELM327 - software for car diagnostics
- USB driver Autocom cdp pro cars USB.Autocom - a program for diagnosing the condition of a car
- Vasya Diagnostic 1.1 for KKL adapter. Vasya Diagnostic is one of a number of programs for diagnosing the condition of a car
- VAZ diagnostic program for models, Priora, Kalina, Granta. Standard program for diagnostics of the LADA family of cars
- VAG-COM USB KKL adapter. The most common program for diagnosing LADA Kalina
These are basic programs with which you can diagnose and reset errors on Kalina.
conclusions
It turned out that finding and eliminating the cause of error 4 in Lada Kalina is quite simple. Although deciphering error codes requires specialized knowledge, you can find the necessary information in this article.
The Lada Kalina car is equipped with an on-board computer that allows you to quickly diagnose any problems that may arise. Thanks to the control unit, you can find out about car breakdowns thanks to the read codes. In this article we will tell you what the most common Kalina error codes are and how to diagnose it yourself.
How does the electronic unit on Grant work?
Before making changes to the car's firmware or performing diagnostics, you need to consider the basic principles. As much as some would like to jump right into making practical changes, you need to understand how the electronic “brain” works.
Any computing system, be it an ECU or a home PC, is a storage device. A home PC contains photos, videos, games, and work software. The computer constantly stores the user’s actions, errors, and data about software failures. All this is hidden among system files hidden from view.
The Lada Granta electronic control unit is also a computer, only the tasks it is designed to solve are more specific. There is also diagnostic information here. It is stored in RAM. This memory stores all the data that comes from various sensors. Information is stored until the block calculates everything it needs for some actions, then the information is erased from memory.
When it comes to diagnostic information, the car owner must be very careful. RAM cannot operate without a power source.
Diagnostics
If you notice that something is wrong with the operation of your Lada Kalina car, it makes sense to run diagnostics on the car. As a rule, all breakdowns appear immediately after inspecting the car. You can seek help in carrying out diagnostics at a service station, where you will pay a certain amount for this service, or you can do everything yourself. Of course, with the help of specialized equipment there is a better chance of identifying a malfunction, because when checking it yourself there is a high probability of obtaining inaccurate data.
So, let's continue with the car's self-diagnosis. Do it:
- Turn off the ignition.
- Press and hold the trip mileage reset button.
- While holding the button, turn the ignition key.
- When this is done, all indicators on the instrument panel will light up, and the needles on the tachometer, speedometer, antifreeze temperature gauge and gasoline level in the fuel tank will move from zero to full on the scale. Then press the button on the steering column wiper switch. This will allow you to toggle data on the instrument panel screen. On the first one you can see the process of checking the correct operation of the dashboard. The second shows the version of the software installed on the vehicle, and the third shows error combinations.
This is the last screen where you will need to read the fault combination on the vehicle. Unique codes will appear on the display. To obtain four-digit combinations of faults, you need to use special equipment or resort to the services of service station specialists.
Engine check
Computer testing of the Kalina engine is carried out by testing components and devices to determine whether their operation corresponds to the specified operational parameters. The test is performed first with the engine off and then with the engine running. Using special equipment, the master analyzes the condition:
- electrical wiring
- spark plugs
- fuses
- valves
- sensors
- pumps
- filters
When diagnosing the internal combustion engine of a Lada, all components, assemblies, devices and mechanisms are checked in various operating modes. When faults and errors are identified, the specialist determines a method for eliminating them and then configuring the devices.
Decoding combinations
Below we will look at deciphering error codes. We do not consider all codes: we list only the most common combinations that indicate a failure.
Self-diagnosis
So, what codes can be seen during self-diagnosis.
| Code | Decoding error |
| 2 | Code 2 indicates overvoltage in the vehicle's on-board network. |
| 3 | This code indicates a faulty fuel level sensor in the fuel tank. Possible circuit break. |
| 4 | If this code appears, the car owner should pay attention to the operation of the antifreeze temperature sensor. There is also the possibility of a circuit break. |
| 5 | The outside temperature sensor is faulty. |
| 6 | The control unit (CU) has detected engine overheating. It is recommended that you resolve this issue before using the vehicle any further. |
| 7 | Provides emergency lubricant pressure in the engine. |
| 8 | If you see this code on the instrument panel, you should check the serviceability of the brake system. The on-board computer has detected an error or malfunction in its operation. |
| 9 | The on-board computer reports that the battery charge level is too low. A more thorough battery check is recommended. |
| E | The error is reported in a data packet to the EEPROM. |
Mass air flow sensor (MAF)
The mass air flow sensor on Kalina is installed in the engine compartment between the throttle valve and the air filter housing. The sensor is responsible for counting the amount of air entering the engine. According to the readings from the sensor, the fuel mixture is formed.
Signs of malfunction:
- Increased fuel consumption;
- Floating speed;
- Difficulty starting the engine;
- Poor traction;
Basic design of the self-diagnosis system
The automatic fault diagnosis system on the Lada consists of several devices. It is the information received from them that we later see as fault codes. Typically, the manufacturer does not recommend self-service to car owners and therefore the location of some of them is not disclosed.
This is done so that dishonest people cannot, for example, “twist” mileage figures or somehow change engine characteristics before selling the car. For the same reason, it is recommended that servicing of the self-diagnosis system be carried out only at official service stations that have the appropriate permission from the vehicle manufacturer.
In addition, another element of the automatic diagnostic system is the on-board computer. It is he who processes the information collected by the sensors, which we then read as Lada Kalina error codes. At the same time, there are different versions of such systems that allow, for example, to visually represent the location of detection of a particular defect.
Unfortunately, Kalina does not have such a computer, and its owner can only see a digital designation of a particular malfunction. That is why every car owner needs to remember the errors of the Kalina on-board computer by heart in order to take timely measures to eliminate this or that malfunction.
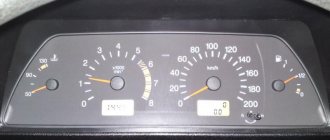
Description and location of indicators and instruments on the panel
Thanks to the tidy, the driver receives information about the condition of the car and the speed of movement.
Tidy Lada Kalina 2
A novice car enthusiast should know about the purpose of warning lights from the very first days.
Below is a description of the device:
1 - tachometer - a device showing at what frequency the crankshaft rotates; 2, 4 — direction indicators, left and right, respectively; 3 — speedometer, displays the actual speed of the vehicle; 5 — coolant temperature indicator; 6 - indicator showing the fuel level in the tank; 7 — fuel reserve warning light; 8 - button with which the daily mileage readings are reset; 9 - a lamp indicating that the emergency lights are on, during which the side lights and turn signals flash, indicating a car malfunction; 10 — electric power steering lamp. Goes off when the ignition is turned on. If it continues to light, then the EUR is faulty; 11 — high beam indicator. The light is on if the high beam is on; 12 — indicator of the applied hand brake; 13 — external lighting indicator; 14 — airbag malfunction indicator; 15 — emergency oil pressure indicator in the car system; 16 — immobilizer warning light; 17 - liquid crystal screen displaying information from the on-board computer; 18 — seat belt malfunction indicator; 19 — battery charging lamp; 20 — emergency brake fluid level indicator; 21 - electronic brake force distribution light, red light indicates a malfunction; 22 — brake pad warning light; 23 — anti-lock braking system (ABS) indicator; 24 - a constantly burning orange light indicates problems with the engine.
Which belt to buy
The efficiency of the car engine depends on the quality of the parts used in the timing mechanism drive (tensioner roller, belt). When repairing or servicing a car, it is advisable to use original parts, but in some cases, non-original spare parts for automobile components have worked well.
The article number of the original timing belt is 21126–1006040, which is produced by the RTI plant in Balakovo. Experts recommend confidently using parts from Gates, Bosch, Contitech, Optibelt, Dayco. When choosing, you should be especially careful, since under the brand name of well-known manufacturers you can buy a fake.
Recommendations
Comments 21
Does the actual mileage on the controller match the odometer reading?
How can I check it? The actual mileage is around 100 thousand. This can be seen from the generator.
The dealer scanner sees it. Probably only him... It’s bad that the mileage is reduced. It’s not clear why: the car is 2011 and should cover 100,000 km in 5 years. More expensive with a twisted mileage? Don't think.
In fact, I have a lot of questions for the former owner... I bought the car at a parking lot, where the sellers give the documents only after signing the contract (for verification, they have a document from a notary that the car is clean). After the purchase and arrival home, I checked the car at the traffic police office and saw that the car had been hit in the “right” (error on the website... left) rear door. A week later, the paint, which was not even varnished, absorbed dirt, dust, etc., and my door is now gray-yellow... Why couldn’t I say that it was beaten, painted, etc.? Do you think he wouldn’t find out? Or would he start lowering the price? Yes, it seems like we already bargained with him for almost 30 thousand... Why did he solder off Dzhekichan? Error because? And the fact that the insert is installed instead of the catcollector and gives an error (which is normal and not a problem) - isn’t that a bad thing? In short, there are a lot of questions for him)))
Warning icons on the panel
The steering wheel icon can light up in two colors. If the yellow steering wheel is on, then adaptation is required, and when a red image of the steering wheel with an exclamation mark appears, you should already be concerned about the failure of the power steering or power steering system. When the red steering wheel lights up, your steering wheel will probably become very difficult to turn.
The handbrake icon lights up not only when the handbrake lever is activated (raised), but also in cases where the brake pads are worn out or the brake fluid needs to be topped up/replaced. On a car with an electronic handbrake, the parking brake light may come on due to a glitch in the limit switch or sensor.
The coolant icon has several options and depending on which one is lit, draw conclusions about the problem accordingly. One red lamp with a thermometer scale indicates an increased temperature in the engine cooling system, but a yellow expansion tank with waves indicates a low coolant level in the system.
The washer icon indicates a low fluid level in the windshield washer reservoir. Such an indicator lights up not only when the level actually decreases, but also if the level sensor is clogged (the sensor contacts become coated due to poor-quality liquid), giving a false signal. On some vehicles, the level sensor is triggered when the washer fluid does not meet specifications.
The catalyst icon often lights up when the catalytic element overheats and is quite often accompanied by a sharp drop in engine power. Such overheating can occur not only due to poor cell throughput, but also if problems arise in the ignition system. When the catalyst fails, high fuel consumption will be added to the burning light.
The exhaust gases icon, according to information from the manual, indicates a malfunction in the exhaust gas purification system, but, as a rule, such a light starts to light after poor refueling or the presence of an error in the lambda probe sensor. The system registers misfires of the mixture, as a result of which the content of harmful substances in the exhaust gases increases and, as a result, the “exhaust gases” light comes on on the dashboard. The problem is not critical, but diagnostics are worth doing to find out the cause.
How to install and tension the timing belt
- Place the timing belt on the crankshaft pulley.
- By tensioning both branches of the belt, we put the rear branch on the pump pulley and wind it behind the tension roller.
- We put the front branch on the camshaft pulley.
- Tension the timing belt by turning the tension roller counterclockwise and inserting a screwdriver (as in the photo).
- Tighten the bolt securing the generator drive pulley and turn the crankshaft by the bolt 2 turns clockwise.
- We check the coincidence of the crankshaft and camshaft marks. If the marks do not match, repeat the operation to install the belt.
The entire process of replacing the timing belt of an 8 valve engine is also shown in the video: