Selection of material
The most popular solution is the use of glass shades. This design is transparent, allowing free passage of light. They are easy to care for and, at the same time, varied in style and color.
But glass is a fragile material and can easily break under mechanical stress. Therefore, such models are not recommended for installation in children's rooms.
An alternative to glass when searching for the best shades for modern chandeliers can be plastic products. Of course, they are not as expensive and look less presentable, but the visual similarity and variety of design skills will allow you to choose a design that is perfect for an apartment decorated in a high-tech style.
Fabric modifications will help create a cozy and homely, calm atmosphere in the apartment. They look original and will fit perfectly into the bedroom interior. However, the lampshade will be demanding to maintain - the fabric is prone to absorbing dust and odors. Over time you will have to change it.
For lovers of ethnic and oriental notes in design, there are paper products that are distinguished by their aesthetics and originality. True, they cannot boast of durability.
Purpose and design features
The lampshade is a component of the design of a ceiling chandelier. It is attached to its fittings and serves as a decorative decoration, while simultaneously providing a specified level of dispersion. When using ceiling lamps, disks mounted directly into the base of the ceiling act as shades.
In many cases, you may encounter replacement varieties of this chandelier component. Manufacturers within each model of ceiling lamp offer a set of shades, using which the buyer can choose the desired type of decor at will and change it if necessary.
Structurally, open, semi-open and closed modifications are distinguished. Closed models are close in shape to a spherical product and allow light to diffuse quite effectively, creating soft lighting throughout the room. They can easily be installed in the bedroom, creating an intimate atmosphere.
But open modifications ensure that the light flux is focused on a certain area in the room, for example, on the ceiling, on the floor or to the side, as can be seen from the photo of chandelier shades.
Parts to improve the lighting of the rear of the car
The closest “relative” of the Polo sedan in the model range of the German concern, which can boast of rear lighting, is the Volkswagen Passat. The expensive “German” Poliku still has a long way to go. But considering that the “Kaluga resident” is gradually acquiring Jetta’s character traits, everything is not so hopeless for the young “state employee”. Moreover, in the skillful hands of an experienced fish specialist, a “native” from the Kaluga plant can easily turn from an ugly duckling into a beautiful swan. Subject, of course, to the availability of financial resources.
In the cabin, one of the first steps towards transformation may be the installation of lighting on the ceiling for rear passengers. With an elegant lampshade, the sedan's spartan interior will look stylish and lively. Well, you shouldn’t forget about the practical benefits of internal equipment parts either. If, God forbid, something falls into this “Dante’s hell” (a pen, keys or other small thing), it will never return. At least until dawn.
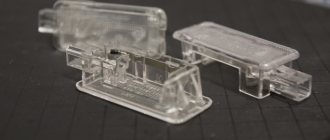
The set of parts required for installation includes:
- Courtesy light VAG (3C0947291EY20). Today a lighting device costs about 1,700 rubles.
Installation frame for fixing the device to the ceiling (1K0867599D). A branded VAG will cost about 230 rubles.
Special connector (3B0972705) with three contacts (N10335807). All together will cost 300-400 rubles.
Standard cheap male-female terminal (20-30 rubles).
Those who are used to saving on energy can replace conventional light bulbs in the ceiling with LEDs. There are three elements installed inside.
The main reasons for replacing the cartridge
It is necessary to replace the socket in a chandelier not only due to manufacturing defects, but also due to design features. If the lamp is closed, the temperature inside the bulb increases greatly. Sometimes this leads to melted wiring.
In old sockets, contact with the lamp deteriorates over time. This can cause frequent breakdowns of the latter. After incandescent lamps burn out, sometimes fumes form on the terminals, which leads to poor contact. Simple cleaning rarely brings positive results, so the holders are replaced.
Another reason for replacement is the desire of people to switch to energy-efficient LED lamps. Since they are produced with a smaller base, there is a need to change the seat in the lamp. All holders have an identical design. They differ only in the diameter of the thread.
Connecting the interior lamp of the Priora
I would like to share with you my experience of installing rear passenger lighting. Installed due to lack of light from the driver's lamp. I often had to use a flashlight to find a bag or packages left in the back seat. I’ll make a reservation that the lampshade from the Priora Luxury is not too bright, so I’ll be finalizing it later and will definitely share my experience. But for now about the installation itself.
You need to purchase: - a lamp frame (130 rubles as of January 2017) - a lamp for illuminating the rear passengers (400-450 rubles) - 3 meters of wire (a thick wire is unnecessary here, since the power consumption of both lamps does not exceed 1A) - 3 pin connector (I didn’t find a native one for sale, so I used a computer 4 Pin (I’ll specify which one later) - 3 pin connector for connecting to the lampshade
And since I replaced the “standard” front lamp with a “luxury” one, I need two 3-pin blocks. I bought one in flames for 100 rubles (wow! for what?!). Then I looked in the bins and found a suitable 3 pin connector from the computer. This header connects to the motherboard and powers the Power LED on the case.
First, I cut off the connection block for the original lamp, because... I didn't find the answer to it.
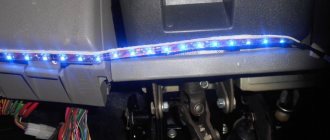
Making backlight
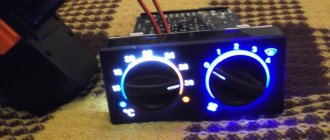
Let's start making! The cheapest Chinese RGB tape was taken as a basis, with a controller and remote control that switches color modes.
I wanted to make lighting in the front and back of the cabin, for this we need 4 pieces of tape, cut 20 cm each.
I didn’t just want to glue the tape, since it’s not waterproof, so I decided to make a protective case. I took a plastic wiring box and sawed it into equal 4 parts, 22 cm each.
Then on the second part of the box I made markings for the LEDs.
I decided to unsolder the original wires and solder in the others that I had.
We take 2 wires and twist them with the wire that comes from the controller.
We use a soldering iron and heat shrink it.
This is how we get a scan in both directions.
We make a cutout in the housing for the wire.
Solder the finished two parts to the LED strip.
We cover the contacts with hot glue.
The front part is ready, there are two more wiring left to solder, they will go to the rear seats.
I took 2 pieces of 40 cm each.
Connected three wires into one.
The following happened.
We check for functionality.
Then I put everything together and went to install everything in the car.
How to change a chandelier
In order to remove a chandelier from the ceiling surface, you will need to perform the following work, following a step-by-step algorithm:
- The first step is to prepare all the necessary tools that may be needed during the dismantling process, as well as all consumables - a regular screwdriver, an indicator screwdriver, a stepladder or chair, electrical tape, terminals, connecting blocks.
- After this, it is necessary to turn off the electrical energy in the entire room. If you turn off the power in only one room, this will not guarantee that if the phases are connected incorrectly, the switch will withstand the voltage. Flip the switch and once again make sure there is no voltage.
- Release the main body of the ceiling lighting fixture, and then remove all existing decorative elements, such as a lampshade and light bulbs.
- After this, you should carefully remove the decorative box, which allows you to hide the electrical wires from prying eyes.
The following actions vary depending on the type of fixation used (hook, anchor, bracket):
- If you need to remove a model of a lighting fixture that is attached to the ceiling surface using a hook or anchor, then you need to disconnect the wires, put them aside, and remove the lighting fixture from the fastening element.
- If strips were used during the installation process, you will need to first loosen the bolts, carefully loosen the device and remove the device.
It is recommended to immediately insulate disconnected wires, as there is a high probability that exposed wires will short-circuit and cause electric shock.
Attention! It is necessary to unscrew the lampshade on the chandelier before removing the lighting fixture, which will greatly facilitate dismantling
Connection
All the necessary contacts for connecting an additional lamp are in the front lamp. To install the wires, it is not at all necessary to remove the roof trim; just bend it slightly from the edge or move it slightly out of the door seal.
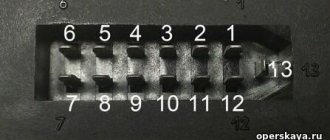
Lada Priora front lamp diagram:
- far left (red) - “mass”
- central (white) - +12V
- far right (black) - ground (door switches)
Diagram of the front lamp of Lada Granta (pre-style) and Lada Kalina:
- far left (black) - “mass”
- central (green) - ground (door switches)
- far right (red) - +12V
Diagram of the front lamp with ERA-GLONASS for Lada Granta FL:
- 11 and 14 - +12V appears after turning on the main relay (turning on the ignition, opening the doors). The power goes out 2-5 minutes after removing the ignition key.
- 15 - “mass”.
- 17 - “ground” (door limit switches), which appears for a while when the doors are opened.
The result of such a connection in the video:
Attention!
Wire colors may vary depending on vehicle equipment. Focus on the contact numbers and check the wiring with a multimeter.
Ceiling reupholstery
The ceiling is one of the weak points in a Priora car. It is easy to damage, scratch, burn and smudge. As a result, when tuning the interior of a Priora hatchback with your own hands, you must redo the ceiling.
The simplest way is to cover it with artificial suede - a self-adhesive velvet non-woven film. Tuning includes several stages:
We disassemble the interior, remove all rubber bands, seals and interior elements. To remove the ceiling, it is necessary to dismantle all racks, clips, passenger handles, visors, and other fasteners. It is necessary to disconnect the power supply to the backlights. We pull out the ceiling that is sagging
We need to be careful, so we lower all the chairs. We paste the plastic ceiling using self-adhesive tape. We install the ceiling in place.
Thus, our efforts in tuning the car will not be in vain. We will update the interior and give the car its own character.
Decor of plastic components
The sedan is equipped with a lot of plastic parts in the interior; fortunately, many of them have light colors and can be easily repainted. The process of painting plastic from an aerosol can requires not only a respirator and gloves, but also a degreasing liquid and a primer
During operation, it is important to prevent the formation of drips
Another way to improve the appearance of plastic elements is to cover them with carbon film. According to many car enthusiasts, this material is durable and looks impressive. The blanks are cut with a margin of 20-25 mm at the edges, after which the film is glued to a degreased surface. Edges and curves are blow-dried to prevent kinks and kinks.
The inexpensive Russian Lada Priora sedan has replaced the generation of the famous VAZ “nines”. Its updated design appealed to admirers of the domestic automobile industry, but still tuning the interior of cars of this class of VAZ models is necessary.
Features of interior lighting on VAZ cars
In the simplest configuration of the Lada Priora, there is only one interior lighting fixture. It is located on the ceiling at the front. They are equipped with C10W bulbs, which emit a soft but faint yellow light. Priora owners are not satisfied with such light, so they install an improved unit from the “Lux” version model.
Two lighting fixtures are fully equipped in Priora and Kalina. One is located near the driver. The second is located in the ceiling above the rear seats. Although an LED lamp is used, it shines no worse than light sources installed near the driver.
Additional cabin lighting
Lamp selection
Among the large assortment, it is easy to determine which lamps are on the Chevrolet Niva. The car is standardly equipped with a lamp with an H1 socket, 60 W for long-range lighting, and a halogen H7 standard, with a power of 55 W for low beam. The service life of each element is 3500 hours.
Optics from different manufacturers differ in brightness level and color temperature: white, yellow light. The lamps illuminate the road well in fog, rain, and snowfall.
The near-halogen lighting from Philips H7 12 55 has a precisely calibrated filament point placement, which allows for good visibility at night. Popular manufacturers of low running lights:
- Osram H7 12;
- Philips H7;
- Bosch H7 55W.
Priora interior lighting: differences between blocks, lamps and replacement rules
Interior light is very important when driving in the evening or at night. Bright lamps help the driver to easily see everything inside and minimize distractions when changing gears or changing the handbrake position.
The domestic Priora interior lighting, which differs for different trim levels, does not always satisfy owners with the quality of the lamps' glow. That is why many AvtoVAZ fans will be interested to learn about these differences and the features of replacing burnt out lamps or installing a new ceiling.
Interior lighting of Priora: what lamps are installed in “Norma” and “Lux”?
In its simplest configuration, the Lada Priora includes a single lighting unit located on the roof above the front panel. Conventional lamps marked C10W are installed in it. True, in most cases they give a soft but weak yellowish light.
That is why for Priora the ceiling lamp does not seem to be of such high quality and many owners of domestic cars want to modernize and install a unit from the improved model of the “Lux” version.
In the most expensive configuration of the Priora, two units are installed. The first is located as standard near the driver, and the second is located in the ceiling above the rear row seats. This equipment allows not only the driver, but also passengers to feel truly comfortable in the car when driving or boarding in the evening.
The Priora's LED interior lighting for rear-row passengers is in no way inferior in quality to the lighting elements installed in the front part of the cabin.
How to install new lampshades in Priora?
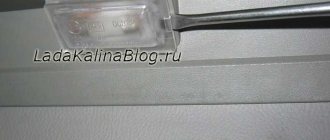
High-quality replacement of a Priora interior lighting lamp is quite simple and does not require special skills from the owner. In particular, the diffuser is attached to the base only with a pair of clips, which are quite easily pressed out with a flat screwdriver.
To carry out the work, you will need to pry the scattering cover near the mount and lightly press the clip. Next, the cover easily comes out of the gaps, and the suitable power cord is easily removed from the socket. Afterwards, the old lamp is unscrewed and a new one is installed; the lampshade is assembled in the reverse order.
Full installation of the lamp in the rear will take much more time and greater care. Since the installation is carried out in the ceiling of the car, you should carefully carry out each stage.
But first of all, the driver needs to buy a Priora Lux interior lamp for the rear row. You can purchase the product at any car dealership. The installation procedure is as follows:
1. Markings are made on the ceiling of the cabin in the place where the ceiling lamp will be installed.
2. The covering is cut out according to the outlined measurements.
3. A wire is pulled from the front lamp (under the covering, of course).
4. The rear seat illuminator is connected.
5. If necessary, a thin frame is cut out of rubber or other sealant to ensure a tight fit of the lampshade to the ceiling.
Experts also recommend replacing the front lamp on the Priora “Norma”. The procedure is quite easy to perform, since the parameters of the elements are identical.
A complete replacement of the lampshade is carried out according to a similar scheme for replacing a lamp, only instead of the old light fixture a new one will be installed (the wire is simply switched). The only thing you need to remember is that the LED elements may differ from each other. It is recommended to purchase lamps with medium brightness for the front seats, and high brightness for the rear seats.
The high-quality and bright lighting of the Priora Lux allows you to conveniently equip the Norma configuration model. The cost of the components is minimal, and the benefits obtained are quite high.
Considering the short installation time, ease of replacement and installation of the rear lamp, even a beginner can do the job. And the result obtained will be positively assessed by both the driver himself and the passengers being transported.
Product delivery options
Note! Below are the shipping methods available specifically for this product. Payment options may vary depending on the delivery method.
Detailed information can be found on the “Delivery and Payment” page.
Parcel by Russian Post
Available payment methods:
- Cash on delivery (payment upon receipt)
- Using cards Sberbank, VTB, Post Bank, Tinkoff
- Yandex money
- QIWI
- ROBOKASSA
Shipping throughout Russia. Delivery time is from 5 to 12 days.
Parcel by Russian Post 1st class
Available payment methods:
- Cash on delivery (payment upon receipt)
- Using cards Sberbank, VTB, Post Bank, Tinkoff
- Yandex money
- QIWI
- ROBOKASSA
Shipping throughout Russia. Delivery time is from 2 to 5 days. More expensive than regular delivery by Russian Post, approximately 50%. Parcel weight up to 2.5 kg
Express Parcel EMS
Available payment methods:
- Cash on delivery (payment upon receipt)
- Using cards Sberbank, VTB, Post Bank, Tinkoff
- Yandex money
- QIWI
- ROBOKASSA
Shipping throughout Russia. Delivery time is from 3 to 7 days. More expensive than regular delivery by Russian Post, approximately 100%.
Transport companies
Available payment methods:
- Using cards Sberbank, VTB, Post Bank, Tinkoff
- Yandex money
- QIWI
- ROBOKASSA
Delivery is possible to any locality where there is a representative office of the transport company. Delivery time is from 2 to 10 days. Sending large parcels is approximately 50% more profitable than by Russian Post.
Read also: New Toyota Camry 2022 big test drive
Courier delivery in Togliatti
Available payment methods:
- Cash upon receipt
- Using cards Sberbank, VTB, Post Bank, Tinkoff
- Yandex money
- QIWI
- ROBOKASSA
Delivery time from 1 to 12 hours.
Pickup from our warehouse
Available payment methods:
- Cash upon receipt
- Credit, installments
- Using cards Sberbank, VTB, Post Bank, Tinkoff
- Yandex money
- QIWI
- ROBOKASSA
Pickup times must coincide with store opening hours.
Commuting to work early in the morning and returning home late at night poses particular challenges for motorists due to limited visibility inside the vehicle. Before starting the trip, it is necessary to perform a number of mandatory operations, and the first of them is to find the ignition switch. In winter, you need to find the button to turn on the headlights, turn on the fan to heat the interior, and so on. All this will have to be done by touch and from memory, since in the dark the owner of a VAZ 2171 will face a small problem when searching for the necessary buttons and levers: the lack of sufficient visibility of the elements.
Having a flashlight with a bright LED light helps with the issue, but does not solve the problem. The daily search for working controls is mentally and physically exhausting when a button is pressed by mistake. Installing a permanent traditional source of interior lighting will not only eliminate the need to search for buttons to turn on the necessary options, but will also decorate the interior with even and pleasant light, adding some individuality to the interior of the VAZ 2172 car with warm shades of white light. Car passengers are often also deprived of a sufficient source of lighting for their seats.
Most Priora models are equipped with a standard ceiling light to illuminate the area between the driver and the front passenger seat, providing lighting for tasks inside the cabin. Interior lighting for the occupants of this vehicle can be provided with small additional lighting. To equip the interior of a VAZ 2170 with a constant lighting element above the passenger seat, it is recommended to install an interior lighting kit. The solution to the problem does not look like the simplest, but the darkness of the interior in an underground parking lot and in the dead of night depresses human helplessness when it is necessary to do something inside the car.
Installing a simple ceiling light above the passenger seats is not the latest application of energy-efficient technologies, and does not have a remote control for interior lighting. This element is for those who do not have any special preferences in the form of attractive iridescent bright blue lights located throughout the cabin from the glove box to the installation of lamps under the seats.
Removing the car dashboard
To dismantle the torpedo you will need the following tools:
In addition, you will need a bit of patience and accuracy when performing the work.
First you need to bend the rubber seals of the front doors from the A-pillars. After this, you need to remove the plastic covers of the front pillars. Each of them is held on by 3 clips. Use a slotted screwdriver as leverage. Next, you need to unscrew the screws securing the upper front (in the direction of travel) panel trim
There are 2 of them: one on the right, the other on the left, both are located near the racks. After this, you need to remove the upper front trim by carefully pulling it towards you. It is secured not only with self-tapping screws, but also with clips at the front
When removing the panel, try not to lose them. Then you need to unscrew all the screws and remove the trim on the side air ducts.
- First you need to remove the ashtray. To do this, just pull it all the way back (in the direction of travel of the car) and unscrew the 4 screws that secure it to the console.
- Then you need to pry with a screwdriver and pull out the plugs located to the right and left of the alarm button.
- After this, you need to unscrew the 2 screws located under the plugs and securing the center console from below.
- Now you should carefully pull the console towards you and disconnect all the wiring from it, having previously marked with a marker what is attached where. If you don't have a marker, you can take a picture with your phone of which wires go where.
- After dismantling the center console, you need to unscrew 2 bolts and 5 screws and remove the steering column cover.
- Then you need to unscrew 2 screws and remove the outer trim of the instrument cluster.
- Next, you need to unscrew all the instrument panel mounting nuts from above using a 10 mm wrench.
- After this, you need to tear off the lock washers on which the heater air duct is seated, unscrew the remaining screws securing the dashboard, and remove it by pulling it towards you.
Replacing lighting bulbs in Lada Priora
Replacing and connecting new lamps in the interior of the Lada Priora does not require any special skills.
The diffuser in the cabin should be secured to the base with several clips, which, if necessary, can be easily bent using a flat screwdriver. In order to perform this work, you will need to pry up the diffuser and press on the clip. Then the cover can be easily opened, and the wiring that needs to be removed is easily accessible. After this, you can replace the lamp and assemble the lampshade. Assembly is carried out in reverse order.
Installing the light in the rear will require a little more time and care. Since the installation of the lamp will be carried out in the ceiling of the car, each stage must be performed separately.
Initially, when planning this work, you need to purchase a lampshade. It can be found in any auto store in the city, and the installation procedure is quite simple:
- Markings are made on the ceiling of the cabin, in the place where the connector is located and the ceiling lamp will be mounted.
- The interior covering is carefully cut along the marked lines.
- Wiring runs from the front courtesy light under the car cover.
- The rear light is connected.
On the Lada Priora “Norma”, automotive experts also recommend changing the front lamps. These works are performed absolutely identically to those given above. When replacing, you should remember that the LEDs will differ from each other. It is recommended to install medium-brightness bulbs in the front part of the cabin, and high-brightness ones in the rear.
Taking into account the ease of installation and time efficiency, even a novice car enthusiast can cope with this work. The result will definitely be noticeable and appreciated by both the driver and passengers of the car.
Video “Installing the tail light”
This video demonstrates how to install a rear light in the interior of a Lada Kalina with your own hands (the author of the video is NBI12345).
The popular Russian car Lada Priora is available in 4 body types: sedan (VAZ-2170), station wagon (VAZ-2171), hatchback (VAZ-2172), coupe (VAZ-2173) and in several trim levels, which undoubtedly makes this car convenient for different people. Lada Priora replaced the popular and beloved Lada of the 10th family and was created for our Russian roads and our harsh climate. Safety, efficiency, ease of maintenance, suitability for our fuel - the designers took care of all this.
Lada Priora is equipped with 8-valve (81 hp) and 16-valve (98 hp) engines, with a declared service life of 200,000 km. The new engines have a lightweight connecting rod and piston group, which increases engine power by 10%. A number of trim levels are equipped with tuning options as standard: air conditioning with climate control, light and rain sensor, parking sensors, heated front seats, electric windows on all doors, electric and heated mirrors.
The body of the Lada Priora has been strengthened to improve passive safety, and the torsional rigidity of the body has also increased. The Priora is equipped with airbags: in the “Norma” configuration – a driver’s airbag, in the “Lux” configuration – driver and front passenger airbags. The “Lux” version is also equipped with seat belt pretensioners, an ABS system and a parking radar. According to the Lada Priora promotional website, when impacted at a speed of 5 km/h, only the bumper is damaged, without affecting the other structural elements of the body. The environmental friendliness of the car complies with Euro-3 standards for the Russian market and Euro-4 for the EU market.
Do-it-yourself tuning and repair of priors
To date, a large number of various improvements and bug fixes for the Lada Priora have already been implemented, and we have collected them. The main focus of the site is on topics such as do-it-yourself repair and tuning of priors, and on the topic of styling - both interior styling and exterior styling. Here you will find a high-quality selection of photographs and photo reports, materials on modifications, repairs, styling and tuning, as well as many useful tips on car maintenance and operation. You will find real answers to many questions that arise during operation, information on the modification and repair of various components. All materials related to modifications, repairs and tuning are presented “in pictures” for ease of perception and clarity.
Would you like to share your achievements? Write to us!
Many of us have made some modifications, and we undoubtedly want our work to be appreciated by other owners of the Lada Priora car. You can send us a photo report of the work done with a detailed description, we will publish your work, and it will be appreciated!
Replacing the interior light bulb of Lada Priora (VAZ Priora)
Interior lighting plays an important role in the dark: it creates comfortable conditions for the driver, makes it possible to better see the instruments, gear shift knob, etc. The interior lighting of the Priora does not always satisfy car enthusiasts. The article discusses types of lighting and provides instructions on how to install lampshades.
Features of interior lighting on VAZ cars
In the simplest configuration of the Lada Priora, there is only one interior lighting fixture. It is located on the ceiling at the front. They are equipped with C10W bulbs, which emit a soft but faint yellow light. Priora owners are not satisfied with such light, so they install an improved unit from the “Lux” version model.
Two lighting fixtures are fully equipped in Priora and Kalina. One is located near the driver. The second is located in the ceiling above the rear seats. Although an LED lamp is used, it shines no worse than light sources installed near the driver.
Instructions for installing new lampshades
To replace lighting fixtures in both the Priora and Kalina interiors, no special knowledge is required, since the procedure is simple.
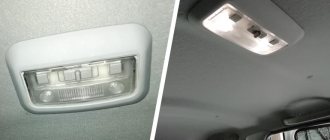
Photo gallery “Step-by-step installation of lighting shades”
To replace the light bulb, follow these steps:
- First you need to remove the protective cover. This can be done by prying it with a screwdriver from the mounting side and lightly pressing the clip. Now the cover can be easily removed from the ceiling.
- Next you need to disconnect the power wires.
- Having disconnected the old lamp, a new element is installed in its place.
- Assembly is carried out in reverse order.
Installing an additional “Lux” lighting fixture will require care and time. First of all, you need to purchase a new block, which will be placed above the rear sofa.
The installation procedure consists of the following steps:
- First, you need to apply markings to the ceiling, deciding on the place where the rear lamp will be located.
- Then, according to the markings, a hole is cut in the ceiling covering.
- Next, you need to stretch the power wire from the front light between the roof and the ceiling covering.
- At the next stage, the unit to be installed is connected.
- To ensure that the lid fits tightly to the ceiling, you can cut a frame from some kind of rubber seal.
In the Priora “Norma” configuration, it is recommended to change the front unit installed from the factory. Replacing it is easy, since the characteristics of the devices are the same.
The replacement scheme is similar to replacing a light bulb: a new element will be installed instead of the old light source. When installing LEDs, keep in mind that they differ in brightness color. For the rear light, it is better to make the LED backlight brighter, and put medium-brightness LEDs in front (the author of the video is Repair and Tuning).
After replacing the lighting unit of the Priora Norma configuration with a higher-quality luxury one, the driver becomes more comfortable in the cabin.
Simplicity of installation and low time costs make it possible to replace the standard lighting unit with a more powerful one, or equip the cabin with an additional light source. At the same time, you do not need to have in-depth knowledge of electrical engineering; even a novice driver can perform the replacement.
Price issue
The block (diode) costs 460 rubles. The front Lux package costs 535 rubles.
There are two options to improve lighting by replacing it with LED:
- Replacing a conventional lamp with an LED one. Price 50 rub.
- Replacing a lighting lamp with an LED module - 350 rubles.
- To replace the unit you do not need to remove it, just remove the glass.
- This video demonstrates how to install a rear light in the interior of a Lada Kalina with your own hands (the author of the video is NBI12345).
- The reasons why you sometimes have to remove the interior lamp on a Lada Priora car may be the following:
- Failure of its backlight lamp
- Failure of the interior air temperature sensor
- Mechanical damage to the lamp housing (for further replacement)
In order to remove the lampshade with your own hands, you will need a minimum of tools, namely:
- Torx bit t 20
- Holder
- Flat blade screwdriver
Removing and installing the lampshade
First of all, we open the upper compartment, the so-called eyeglass case, and under it you need to unscrew the two fastening screws:
After that, using a flat-head screwdriver, pry off the cover - a decorative trim, under which there is a rear-view mirror mount.
And also unscrew the two fastening screws, as shown in the photo below:
Next, carefully move the lampshade to the side, but without sudden movements, since there are several more wires going to it.
And now you can disconnect the power wires by squeezing or pressing the clamps, depending on the type of their fastening:
Replacing the lampshade or temperature sensor, as well as backlight bulbs, occurs without any problems. After all the manipulations, you can install the lampshade in its place. The entire repair will not take more than 10 minutes. The price of a new lamp is about 1,500 rubles for the whole assembly with sensors, etc. For one element no more than 500 rubles.
Removing the interior lamp of a Lada Priora car is carried out to replace a burnt-out lamp or switch, as well as when carrying out other work in which its presence will interfere with the progress of their work. Prepare a standard set of tools, de-energize the car by disconnecting the minus terminal from the battery and perform the following sequence of actions:
- First of all, you need to remove the lamp diffuser. To do this, pry it up with a small flat screwdriver and, overcoming the force of the spring clips, remove it.
- We release the lock of the interior lighting lamp and disconnect the block with the power wires.
- Replace the lampshade or make any other repairs, then perform the installation in the reverse order.
At this point, the repair work to remove the interior lamp on the Lada Priora car has been completed.
How to remove the interior lamp on a Lada Priora
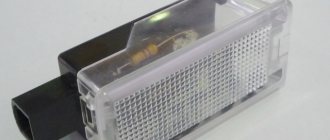
To illuminate the car interior, the manufacturer has provided a navigation lamp. In the “luxury” configuration, there is another lamp for rear passengers, which is located above their heads.
Replacing the interior light bulb
If the lamp in the lamp no longer lights up, then most likely the problem will be solved by replacing it:
- Pry off the glass of the lampshade with a flat screwdriver.
- Disconnect the block with wires.
- Remove the lampshade together with the lamp.
- Replace the light bulb with a new one.
The rear lamp is removed in the same way.
Video on the topic
To consolidate the material covered, we suggest watching a video with tips on replacing lamps in spotlights. In the first video, the author shows how to get the lamp itself; it clearly demonstrates the fastening mechanism.
The second video shows replacing the MR16 GU5.3 12V lamp from halogen to LED.
In this video, the author talks about the types of lamps and fixtures.
The latest short video shows how to replace lamps with GX53 socket
Changing lamps is quite simple, but without certain knowledge you can damage the ceiling structure
Do it carefully and follow the tips in this article
When a light bulb burns out in the house, and replacing it does not bring results, then it is necessary to change the socket in the chandelier. This breakdown is the most common; it can be easily fixed with your own hands without special knowledge and tools.