Self-diagnosis of the instrument cluster Kalina/Priora
- With the ignition off, press the “Reset” button (reset daily mileage). While holding the button, turn on the ignition.
- The instrument panel will go into self-diagnosis mode, all segment positions will light up on the display, all indicators will light up, and the arrows will travel the full path.
- Using the control button on the right steering column switch, we switch between modes (self-diagnosis, firmware version, error codes).
- To reset errors, you need to be in error mode and press and hold the “Reset” button for more than 3s.
- The diagnostic mode exits automatically after inactivity for 20-30 seconds.
Decoding error codes in the dashboard:
- 2-increased voltage of the on-board network;
- 3-fuel level sensor error (if a break in the sensor circuit is detected within 20s);
- 4-error of the coolant temperature sensor (if an open circuit of the sensor is detected within 20s);
- 5-outside temperature sensor error (if there are no sensor readings within 20s, indication on the LCD is “-C”);
- 6-engine overheating (the criterion for triggering the acoustic alarm has been met);
- 7-emergency oil pressure (the criterion for triggering the acoustic alarm is met);
- 8-defect of the brake system (the criterion for triggering the acoustic alarm is met);
- The 9-battery is discharged (the criterion for triggering the acoustic alarm is met);
- E-determination of an error in a data packet stored in EEPROM.
How to reset errors on Kalina? You can reset the errors yourself using the on-board computer, or contact a service station with special diagnostic equipment.
Let us remind you that you can find detailed photo reports in the Lada Kalina repair category.
Keywords: instrument panel Lada Kalina | dashboard of Lada Priora | on-board computer Lada Kalina | on-board computer Lada Priora | Lada Kalina engine | Lada Priora engine | ECM Lada Kalina | ECM Lada Priora
39
2
Found an error? Select it and press Ctrl Enter..
Why does it occur: reasons
The reason for the appearance of the number on the display is rarely clear without a detailed analysis of the issue; there is only general information. But, according to the experts, the options are as follows:
- The greatest probability is due to a malfunction of the coolant temperature sensor.
- Further in descending order - the circuit with this sensor could break.
- Due to external influences (accident, shock, etc.), the control unit system sometimes malfunctions and generates an error.
- Plaque on the device may contribute to loss of contact.
Such reasons will not be a serious stumbling block to free travel, and will not make your wallet noticeably empty. Each of the points is completely solvable, both independently and at a service station, you just need to allocate time and a little effort for this.
To read the errors, you need to turn on the testing mode: press the daily mileage reset button, and without releasing it, turn on the ignition.
| On the liquid crystal display (LCD) of the instrument panel, all positions of the familiar areas (segments) will light up, and the arrows of the tachometer, speedometer, coolant temperature indicator and fuel level indicator will move from minimum to maximum values and back. Thus, the serviceability of the LCD and indicators of the above sensors is visually checked |
| Next, on the right steering column switch, press the button for switching the functions of the on-board computer - the LCD will display the program version (Ver 1.0 and higher) |
Press the BC function switch button again. Error codes are displayed on the LCD (if there are errors). If necessary, you can reset error information. To do this, press and hold down the daily mileage reset button for 3 seconds.
Decoding the error codes of the standard on-board computer priors: 2 – increase in on-board network voltage; 3 – fuel level sensor error*/***; 4 – coolant temperature sensor error*; 5 – outside temperature sensor error**; 6 – engine overheating* **;7 – emergency oil pressure***;8 – brake system defect***;9 – battery discharged***;
E – error in the data packet stored in the EEPROM (non-volatile memory of the BC).
- * – an error is registered if within 20 seconds. a sensor break is detected; ** – an error is registered if there is no sensor reading within 20 seconds (indication on the LCD is “–C”);
- *** – accompanied by an acoustic signaling device.
- If you do not press the BC function switching key for 10 seconds, the instrument panel goes into operating mode.
Note: In some instrument panels, the error codes and descriptions may differ from those shown above. In my case, code 3 is an error in the coolant temperature sensor, and code 4 is an error in the fuel level sensor. In addition, the error in the fuel level sensor appears every time the gauge needle enters the red sector and a warning signal sounds
Modern Lada model
Like any modern foreign car, the Lada Priora has many different sensors installed. The condition of important vehicle systems depends on their correct operation.
The problem is that if some sensors fail, the Priora can continue to move.
Faults of this kind can lead to increased fuel consumption, unstable engine operation, and increased wear of parts, but the car will drive, and you will only find out about the fault when it means you have to make expensive repairs.
In order not to go into the engine compartment with a multimeter, the Priora has a controller that allows you to check faults using a special tester, a plug-in or built-in on-board computer. In order to diagnose the systems, just press 2 buttons and look at the error codes.
To view the error codes, you need to find the daily mileage reset button on the dashboard, press it and, holding it, turn the ignition key. The self-diagnosis mode will turn on.
https://www.youtube.com/watch?v=pHm4ZrTWaMs
All arrows on the instruments should move from minimum to maximum values and back, and all positions on the LCD display should light up.
You need to look: if any position does not light up or the arrow on any device does not move, then you should check the corresponding sensors, their networks or display for malfunctions.
Priora on-board computer
In the same mode, press any button for switching modes of the built-in BC 2 times, after which digital codes may appear on the liquid crystal display:
- 2 - very strong voltage in the BS;
- 3 - errors in the fuel level sensor system in the gas tank;
- 4 - error in the coolant temperature sensor system;
- 5 - error in the air temperature sensor system outside the car;
- 6 — motor overheating;
- 7 — emergency low oil pressure;
- 8 - malfunctions in the brake system;
- 9 - battery is low;
- E - error in the data packet stored in the EEPROM.
Many drivers ask how to reset error codes on a Lada Priora. Perhaps their built-in BC is faulty, since a working on-board computer automatically exits the diagnostic mode after 30 seconds if you do not press any control buttons.
Driver Information Panel
Checking system malfunctions using connected devices gives more accurate results, but at the same time requires deciphering special codes. For example, the monitor displays code p0441 or p0130 or error p0422.
Oh, these car manufacturers, in human language they could write “replace the oxygen sensor” instead of P0130 or “check the canister valve” instead of P0441.
But nothing can be done, the Lada Priora is also intended for export, so it is easier to write p0441 in the program than to give explanations in Russian, Kazakh, Arabic, Armenian and 10 other languages.
And then attach special tables that indicate the meaning of certain codes. Just look at them and everything will become clear. But these tables are not included with the operating instructions. Either way, you can check them out below.
All fault codes for Lada Priora car systems consist of 5 characters. Here is a breakdown of Prior's errors.
The Latin letter comes first:
- P - error in the electronic systems of the motor;
- C - error in the electronic systems of the chassis;
- B - error in interior electronics;
- U is an error in the joint operation of different systems.
Chevrolet Niva roof lights
Next comes the number:
- 0 - OBD-2 code;
- 1 - enterprise code;
- 2 - enterprise code;
- 3 - reserve code.
The system indicates an error
The next digit indicates the system in which the malfunction was found:
- 0 — exhaust;
- 1, 2 — fuel and air supply system;
- 3 - ignition;
- 4 - additional control;
- 5 — idle system;
- 6 - ESC;
- 7, 8 - transmission.
The last 2 digits indicate the serial number of the fault.
- P0030 - the oxygen sensor heater wire to the exhaust gas converter has broken;
- P0031 - the same electrical wire has shorted to ground;
- P0032 - the same wire has shorted to the on-board network (BS);
- P0036 - the wiring of the oxygen sensor heater is broken, after the converter;
- P0037 - the same wiring has shorted to ground;
- P0038 - it has shorted to BS;
- P0102 - weak signal in the mass air flow sensor network;
- P0103 - very strong signal in the network of this device;
- P0112 - weak signal in the air temperature sensor network;
- P0113 - very strong signal in the network of the same device;
- P0116 - antifreeze temperature sensor signal is out of operating range;
- P0117 - poor signal from the antifreeze temperature sensor network;
- P0118 - very strong signal from the antifreeze temperature sensor;
P0122 - poor signal in the throttle position sensor circuit;
- P0123 - very strong signal in the same circuit;
- P0130 - the oxygen sensor before the converter does not work;
- P0131 - weak outgoing signal on the network of this device;
- P0132 - signal too strong on the same network;
- P0133 - slow response to changes in mixture quality in the network of the same device;
- P0134 - oxygen sensor circuit inactive;
- P0136 - the oxygen sensor after the converter is broken;
- P0137 - poor signal in the circuit of this device;
- P0138 - signal too strong in the same circuit;
- P0140 - the same sensor circuit is inactive;
- P0141 - the oxygen sensor heater after the converter is broken;
- P0171 - there is a lot of air in the fuel mixture;
- P0172 - there is a lot of gasoline in the fuel mixture;
- P0201 - injector wire No. 1 is broken;
- P0202 - injector wire No. 2 is broken;
- P0203 - injector wire No. 3 is broken;
- P0204 - injector wire No. 4 is broken;
- P0217 - engine overheated;
- P0230 - failure in the electric fuel pump relay network;
- P0263 - injector driver No. 1 does not work;
- P0264 - the injector circuit of cylinder No. 2 has shorted to ground;
- P0266 - injector driver No. 2 does not work;
- P0267 - injector circuit No. 3 has shorted to ground;
- P0269 - injector driver No. 3 does not work;
- P0270 - injector circuit No. 4 has shorted to ground;
- P0262 - the injector circuit of cylinder No. 1 is shorted to the BS;
- P0265 - injector circuit No. 2 is shorted to BS;
- P0268 - injector circuit No. 3 is shorted to BS;
- P0271 - injector circuit No. 4 is shorted to BS;
- P0272 - injector driver No. 4 does not work.
Here we are looking for an electrical problem that has arisen.
P0261 - the injector circuit of cylinder No. 1 has shorted to ground;
Troubleshooting
There are several methods for troubleshooting the problem, but together they constitute a complete diagnosis of the car for faults in the coolant temperature sensor. After all, error number 4 gives a signal about exactly this. You can fix it like this:
- First we check the sensor to see how well it functions. It copes with the assigned tasks, there are no complaints about the speed and clarity of data transmission - let's move on to the next point. Does not respond to signals - most likely, it is completely broken and requires replacement.
- This is followed by checking for contact and absence of plaque. If a problematic connection is identified, the sensor will have to be replaced with a new one. And if the surface is covered with plaque, it is necessary to thoroughly clean the seat.
- Now you can move on to the on-board circuit, make sure that there is contact there.
- The remaining dilemmas usually lie in electronics, for this reason the car is taken to a specialist who can adjust the device. Usually in such a situation the ECU is re-flashed, which means that errors are prudently reset.
The issue of eliminating error 4 can be solved on your own, but not in one hundred percent of cases. Sometimes you have to turn to specialists to perform work that requires specific knowledge and skills. But it would be right to try to prevent a breakdown, since most often it occurs after a long period of parking in the cold in an open area (that is, not in a garage or covered parking).
Malfunctions
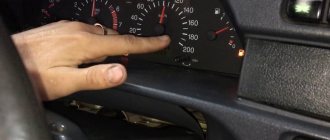
If the speedometer on a Priora stops working, then you need to check each of its components step by step. It's better to start with the device itself.
Drive unit
The drive is checked by simply disconnecting the negative terminal of the battery. After reconnecting the terminal, the on-board computer reboots the system. Next, you need to reset the odometer, hold down the reset button and turn on the ignition. The tachometer and speedometer needles should deflect to the maximum. If this does not happen, then electrical voltage is not passing through these devices.
You can conduct an additional test of the speedometer's performance. On a Priora, the speedometer may not work due to a failure of the signal receiver drive. To check you need:
- From the “+” terminal of the battery, run a wire to terminal “26” of the red connector.
- With short touches you need to simulate the arrival of signals from the EMF.
- The arrow should deflect each time terminal “26” is touched.
If there is no response to the incoming voltage, you will have to dismantle the panel and remove the instrument printed circuit board. It needs to be inspected for breaks or oxidation of soldering and tracks. The oxidation needs to be cleaned, and the broken tracks need to be soldered with jumpers. Next, perform the following test:
- Set the tester to resistance measurement mode.
- Connect the red measuring probe to terminal “26”.
- Apply the black test lead to ground.
- The pulse input should show an operating resistance of up to 3 ohms.
If these readings are not present, then the fault lies in the radio components of the drive or its motor has burned out. Without special knowledge, such breakdowns cannot be repaired on your own. You'll have to change the drive.
Fuse
The speedometer is protected by fuse “F1”. It is located in the safety block under the dashboard, on the driver's side. It is necessary to remove the element and check the condition of the internal jumper.
If it is broken, you need to replace the element with a 10 Ampere analogue. Before replacing, it is important to clean the fuse contacts from oxidation and possible carbon deposits.
After replacement, you need to check the operation of the speedometer again.
Wiring
It's just that fuses don't blow. This was preceded by a short circuit or high voltage.
It is necessary to carefully check the wiring for breaks, deformation, and lack of insulation. All defects found must be eliminated.
EMF
If the Priora's speedometer does not work, the cause may be the speed sensor. Its verification is carried out sequentially. First you need to check the condition of the connecting plug. It is necessary to open it and inspect the contacts of both parts of the socket. If dirt, moisture, or oxidation is detected, clean with a solvent. Next, you need to check whether the electrical voltage reaches the sensor itself. Necessary:
- Set the multimeter to voltmeter mode to measure DC voltage.
- Connect the red test probe to terminal “1” of the wiring cable.
- Connect the black probe to terminal “3”.
- Turn on the ignition.
The voltmeter should show a result equal to the battery voltage. If voltage is supplied, then the sensor’s ability to generate electrical impulses is checked. This test requires:
- Raise the drive wheel of the vehicle on a jack.
- Connect one end of the control wire to terminal “2” of the sensor.
- Connect the red probe of the multimeter to the second end of the control wire.
- Connect the black test lead to ground.
- Insert the plug into the EMF socket.
- Turn on the ignition.
- Rotate the drive wheel of the machine.
As electrical voltage is applied to the sensor, it must produce electrical signals. The tester defines them as a pulse voltage from 0.6 to 12 volts. If there is no response from the tester, then you will have to dismantle the EMF to check.
To dismantle, you need to loosen the air purification filter pipe. The EMF is immediately visible directly below it. Its dismantling is carried out using the “10” key. You need to unscrew the mounting bolt and turn the sensor a little. Next, you need to pry the device with a screwdriver and remove it from its seat.
Since the EMF on the Priora is of a magnetic type, metal debris from the gearbox is often magnetized to its lower part of the body.
Metal particles prevent the magnet from opening, which makes it impossible to create an electrical impulse.
You need to thoroughly clean the device body and check its functionality. To do this, you need to connect the plug with the previously described wire connected to terminal “2”.
- Connect the red probe of the multimeter to the wire.
- Connect the black probe to ground.
- Set the multimeter to DC voltage measurement mode.
- Turn on the ignition.
- Attach a screwdriver to the end of the sensor.
- It should be magnetized.
- The moment the screwdriver is disconnected from the sensor, a pulse should be created that will be visible on the multimeter display.
A more thorough test can be carried out by reinstalling the sensor and rotating the drive wheel. In this way, more accurate pulses can be obtained. You can conduct an additional test of the sensor by checking its electrical resistance.
This requires:
- Set the multimeter to resistance measurement mode.
- Connect the red probe of the tester to terminal “1”.
- Black probe with terminal “3”.
- Resistance should vary from 3 to 10 ohms.
- Then you need to bring a metal object to the sensor.
- The contacts should open and the readings on the multimeter should drop to “0”.
If the EMF does not pass the test, then it must be replaced with an exact analogue.
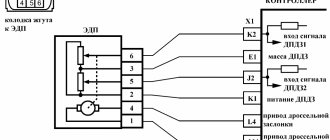
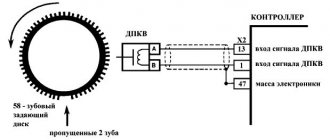
Dashboard indicator symbols
| No. on the diagram | Indicator designations |
| 1 | Tachometer. The device measures the engine crankshaft frequency (revolutions per minute). If the arrow goes beyond the red value, it means that the Lada Priora engine is operating in a dangerous mode; |
| 2 | Brake force distributor indicator. Reports defects in the operation of this node; |
| 3 | Battery charge. If the lamp lights up while the engine is running, the battery is discharged; |
| 4 | Left turn signal. The sign flashes when there is an alarm or the left indicator is on; |
| 5 | Speedometer. The device reports the speed at which your Lada Priora is currently moving; |
| 6 | Emergency lubricant pressure in the engine. If the sign lights up during operation of the power plant, it means the pressure in the system is low; it is highly not recommended to operate the engine in this condition; |
| 7 | Right turn signal (see No. 4); |
| 8 | Handbrake indicator. Lights up yellow if the Lada Priora is in the handbrake; |
| 9 | Antifreeze temperature in the cooling system. The operating temperature of the motor starts from 90° and above to the red mark. If overheating occurs, turn off the engine; |
| 10 | Gasoline level in the tank. If the fuel level approaches the minimum, the fuel pump may break; |
| 11 | Reserve gasoline level. The indicator lights up when there are less than 10 liters left; |
| 12 | Key for resetting the daily mileage and switching between display modes; |
| 13 | Alarm. If you have triggered the emergency lights, the lamp will flash along with the turn signal arrows; |
| 14 | Malfunctions in the electric amplifier. If defects appear in the EUR, the lamp will light up while the engine is running; |
| 15 | High beam designation. An active indicator indicates that you have switched to distant; |
| 16 | Outdoor Lighting. The system notifies the driver about the operation of the headlights or low beams; |
| 17 | Airbag malfunctions. If the lamp lights up after starting, then there is a high probability that the airbags will not deploy in a collision; |
| 18 | Immobilizer. An audible signal and flashing indicate that the immobilizer system is faulty; |
| 19 | Computer screen. Here you can view information from the bookmaker, as well as find out the total and daily mileage; |
| 20 | Indication of unfastened seat belts. The buzzer will signal a violation for 90 seconds; |
| 21 | The brake system is in disrepair. Most often these are worn pads or insufficient fluid in the system; |
| 22 | Disabling a specific airbag; |
| 23 | Indicator of defects in ASB operation, the braking system is operating normally; |
| 24 | Check Engine – there is a breakdown in the engines; diagnostics and subsequent repairs are urgently required. |
Private situations
General signs do not always indicate specific breakdowns. There may be exceptions.
If individual devices refuse to work, it is quite possible that this is their personal problem. You'll have to parse the specific pointer. It may have a cracked gear that needs to be replaced.
Also, why doesn’t the instrument panel of the VAZ 2114 work? If the fuel gauge and tachometer are capricious (either they function, or they don’t react at all), the contacts and the mounting block are normal - you need to do a small check.
Reset is pressed and held, and the ignition is turned on at the same time. Raised arrows indicate the need for further searches. Lifeless - that microcracks have appeared in the shield itself. You will have to remove it and examine all soldering and traces under a magnifying glass. In principle, these are all the main options. If calling all the listed components and parts did not lead to the revival of the instrument panel, your case is individual, and you will have to determine the situation in the company of an experienced auto mechanic.
Priora: why the check is blinking or on - the main reasons
The diagnostic connector will help you “talk” to the electronic control unit and find out why the check light is on. Well, before you start diagnosing, check out the list of the most common Priora “errors”:
- Low Oil Level – Low oil levels ultimately lead to increased engine wear. If the oil level turns out to be normal when checked, then it needs to be replaced and the integrity of all Priora components checked. Faulty fuel pump or fuel filter. You can’t always “hear” this, but diagnostics, replacing the filter, and checking the fuel pump will “cure” the breakdown.
- An error in the operation of the exhaust gas system - this is not something to joke about - it is better to start repairs as soon as possible.
- The ignition coil does not produce a spark / the catalytic converter is unstable.
- Wiring problems - high voltage wires can give an erroneous signal to the ECU - "Check" will light up on the dashboard.
- Malfunction of sensors - unfortunately, they very often fail. The “check” lights up due to the fault of the mass air flow sensor (MAF), two oxygen sensors (after the fuel afterburner and in the exhaust manifold), the crankshaft sensor and the camshaft sensor. In frosty weather, the “Check” may light up because three cylinders are turned on first, and then, during normal startup, it does not go away. This is due to the fact that soot particles remain on the contacts - they disappear after a few days.
- False sensor activation due to high humidity
- The engine starts running when cold and the check light comes on.
The reasons for the “Check” fire on a Priora (16 valves), as we see from the list, can be serious. There is no need to panic: when the “Check” light comes on, you need to immediately reach for the diagnostic connector. It’s funny, but earlier diagnostics were carried out in the service with special software, but today any error code can be displayed on your smartphone, deciphering it using a mobile reading device.
If this causes the spark plugs to flood, you will see the “check” blinking. Low-quality gasoline can be sold at any gas station; experienced car enthusiasts advise carrying a couple of candles with them. Sometimes the “Check” light comes on due to gasoline and the engine stalls. If he continues to work intermittently, things will be bad.
“Check” should light up when the ignition is turned on. A malfunction is also considered to be the case when the check light does not light up when the ignition is turned on, that is, the ECU does not send a system check report stating that “the system is ready for operation” - there is a problem in the wiring. You need to get rid of the chek icon not so as to “hide all the problems”, but so that the process of processing the fuel mixture occurs in order. Otherwise, you will have to seriously repair the car.
Engine detonation: what is this process and features of its manifestation
The phenomenon of detonation is familiar to many who have driven Zhiguli and Moskvich cars and filled them with AI-76 gasoline instead of the prescribed A-80. As a result, the detonation process did not take long to occur and manifested itself mainly after the ignition was turned off. At the same time, the engine continued to function, and caused surprise and even laughter on the face of an inexperienced driver. However, there is little good in this phenomenon, because with this process the CPG wears out very quickly, which leads to a decrease in engine life, and as a result, engine malfunctions appear.
On modern fuel-injected cars, detonation also occurs, and not only due to poor quality or inappropriate fuel being poured into the tank. The reasons for the occurrence of such a process are various factors, and before we get acquainted with them, we will find out what the engine detonation effect is and why it is so dangerous.
Detonation is a phenomenon in which spontaneous ignition of the mixture in the combustion chamber occurs without the supply of a spark from the spark plugs. The result of this process is unstable operation of the engine, and the consequences are not long in coming, and if this effect occurs frequently, problems with the engine may soon begin. In this process, not only the CPG comes under attack, but also the gas distribution mechanism.
To prevent the prolonged occurrence of this process, a knock sensor is used in the design of modern injection cars. It is a kind of noise eliminator that transmits information about abnormal engine operation to the electronic control unit. Next, the ECU makes an appropriate decision on the possibility of promptly eliminating the problem.
Fuel and air system error codes
| Codes | Description |
| P0030 | The control unit detected an open circuit from the oxygen sensor heating device to the exhaust gas converter. |
| P0031 | A short to ground is reported in the oxygen sensor circuit. |
| P0102 | An incorrect signal level was detected in the electrical circuit of the mass air flow control device. |
| P0116 | An incorrect signal is received from the coolant temperature monitoring device. You should check the electrical circuit and the condition of the device itself. |
| P0122 | The on-board computer receives an incorrect signal from the TPS. |
| P0130 | The oxygen level control sensor has failed. |
| P0171 | The control unit has detected an excessive amount of air in the fuel mixture. |
| P0172 | The on-board computer detected an excessive amount of gasoline in the fuel mixture. |
| P0201 - P0204 | The Lada Priora control unit detected a break in the wire of one of the four injectors. |
| P0217 | This fault code means the motor is overheating. |
| P0230 | A malfunction has been detected in the electrical circuit of the electric fuel pump relay. It is necessary to carry out a complete diagnosis of the electrical circuit to identify breaks and short circuits. |
| P0261 | There is a short circuit in the wiring of the injector of the first cylinder. |
| P0263 | The driver of the first injector has failed. |
| P0266 | There was a breakdown in the operation of the second injector driver. |
| P0269 | The control unit has registered errors in the functioning of the third injector driver. |
| P0272 | The fourth injector driver has failed. |
| P0264, P0267, P0270 | One of these combinations indicates a short circuit in the second, third or fourth injector circuit. |
How to read errors?
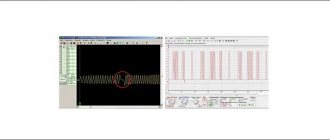
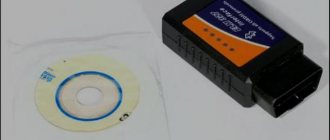
In order to read errors, you need to connect a laptop or tablet PC to the car via a special K-line cable. Let's look at what tools will be needed to connect the car to the computer and determine error codes:
- K-line cable.
K-line cable for connecting a laptop to a car
- Laptop or tablet.
- Special software.
In order to connect, you need to find a connector for the cable. It is located under the steering column. Now you need to connect the cable itself and then the USB connector. The following programs are considered optimal for use: VAG-COM USB KKL adapter; VAZ diagnostic program for models, Priora, Kalina, Grant; USB driver Autocom cdp pro cars USB; ScanMaster 2.1 in Russian for ELM327.
The reason for replacing the factory onboard one with the bk staff x1 Priora
The most common reason for replacing a standard bookmaker is limited functionality. Among such limitations is the inability to remember the mode set by the driver.
Each time, immediately after turning the key, it is necessary to set the mode. It is precisely this drawback, despite the harmonious location and ease of control using the windshield wiper blades, that forces the owners of the Lada Priora to replace the standard BC with the Priora x1 staff.
Before deciding on a replacement, you need to decide on the type of controller, since the x1 priora staff is compatible with the following controllers:
Controllers "January"
– January 5.1; – January 7.2.
Itelma controllers
– itelma VS 5.1; – itelma M7.3 (EURO-3); – itelma ME17.9.7; – itelma M74.
Bosch controllers
– bosch M1.5.4(M); – bosch М7.9.7; – bosch MP7.0.
Avtel controllers
– autotel M7.3 (EURO-3).
How to fix the problem
There are several possible ways to resolve this issue. If one solution does not suit you, move on to the next one. We will also look at what to do if none of the options for eliminating error 4 helps.
Method No. 1 (Software update)
Trying to find out what the essence of the problem might be, many initially undertake to analyze the correct operation of the receiver and its unique ID (as a rule, it is already present on the access card, and if there is no smart card, it is integrated into the system itself). Here it becomes clear that the receiver is not able to recognize its own ID number, which, in turn, makes subsequent decoding of the channel impossible. Accordingly, if error number 4 appears, then you should understand the features of ID recovery.
- If error 4 appears on tricolor TV, you need to go to channel 333. This channel is specially designed for performing service actions. It is after the transition to it that the procedure for updating the standard software is carried out.
- Then check for updates. The receiver will do this on its own. When a new software version is detected, it will prompt the user to confirm the installation. After completing this action, error 4 tricolor should disappear.
What to do next? After the receiver accepts consent, it will initially carry out the installation from the satellite, and then, after reaching the 50% mark on the progress scale, it will begin installing the downloaded files into the device’s memory. This will continue until the progress bar is filled to 100 percent.
Note! If you are connected to a satellite and you have approved the installation of the updated version, do not turn off the receiver under any circumstances! Otherwise, you will not be able to completely fix the problem. In some cases, the receiver no longer displays channels due to insufficient files in the software package or due to their corruption
After all the necessary files have been downloaded and installed, the receiver will reboot itself for the updated files to take effect. After a reboot, the system should completely resolve the problem.
In the case of some models, installation of a software update for the module is additionally required. Remember that its update occurs immediately after the main firmware is loaded into the system. The module updates much faster. Mandatory installation of these files is not always required - much depends on the behavior of the system after the main firmware update is completed. If error 4 disappears, we don’t touch anything else. When saving it, we try to additionally update the module.
Important! Sometimes a software update may not help, since there is a USB flash drive in the slot. Remove it and reboot the receiver, it should help
Method number 2 (Reset settings)
Sometimes eliminating the fourth error requires resetting the receiver to factory settings and searching for channels again. This is done very simply:
- Press the "Menu" button on your receiver's remote control.
- Select "Settings".
- Then scroll to the very end to the “About the receiver” section, “Reset settings”.
After you reset to standard settings, search for Tricolor TV channels again, and in order to watch channels with a broadcast shift relative to Moscow of +2 (+3) hours, select the “Ural” region.
Method number 3 (Contact support)
If the previous two methods of solving the problem did not help you, then you can contact Tricolor technical support. But before you call, collect the following information:
- ID number of the smart card;
- The number of your agreement with the Tricolor company;
After this, you can call online to, or choose any other method of contacting support. We hope that you can easily restore access to viewing your favorite channels by following the tips listed above.
Replacing a car speed sensor
As for its location, look for the DS in the engine compartment in close proximity to the exhaust manifold. To be honest, the place where it is installed cannot be called ideal. While the car is running, the manifold heats up. The sensor wires rub against it, which over time leads to malfunctions and short circuits. Therefore, experts recommend that the first step is to properly insulate the wiring, and also use some kind of clamps so that the wires do not come into contact with the collector. This significantly extends its service life.
If the check shows that the DS is faulty, it needs to be replaced. Repairing sensors and similar small electronic devices is a thankless task. In a garage environment, this is unlikely to be possible, and the only thing that can be done is to clean the contacts from oxidation (this can be a problem).
It doesn’t matter whether you have an injection car or a carburetor with a Europanel - the connection of the speed sensor to the instrument cluster is identical.
Replacing the VAZ speed sensor: step-by-step instructions:
- Drive into the pit - it will be more convenient to work from below - and wait until the engine cools down.
- Turn off the vehicle's power by removing the cable from the negative terminal of the battery. Do not close the hood after this, this will provide you with lighting.
- Locate the speed sensor on the transmission. Clean it and everything near it with a rag to remove any dirt.
- By pressing the spring clip, disconnect the wire block from the sensor.
- Dismantle the sensor itself by unscrewing it counterclockwise - with your fingers or an open-end wrench to “22”.
- Carefully, so as not to break anything, install a new part in place of the removed part. Connect the wire block to it and the procedure for replacing the speed sensor can be considered complete.
How to properly connect a new DS? It is important here that the device rod fits correctly into the fixing sleeve, otherwise rotation will not be transmitted to the sensor. If the sensor fits into the socket the first time, then everything is in its place, and if something prevents it from moving, then the rod did not fit into the bushing.
Main indicators
The Priora dashboard contains twenty-four visual elements. When the ignition is turned on, all warning lights on the dashboard turn on briefly. Thus, the on-board computer (in the future, possibly BC) checks their serviceability. This is not a mistake, as some novice car enthusiasts think.
On the Priora shield, from left to right, there are four largest elements in the form of graduated semicircles.
- The first scale is the tachometer scale, the purpose of which is to measure the engine speed. The values are shown in two colors: white (normal) and red (dangerous). If the instrument needle falls into the last gap, then the Priora’s engine is in danger.
- The second scale is a visualization of the car's speed - the speedometer.
- The third graduated semicircle indicates the current antifreeze temperature. If the indicator needle hits the area with red numbers, the Priora should be stopped in order to avoid boiling in the cooling system.
- The fourth semicircular scale of the Priora dashboard reflects the fuel level in the tank. When the arrow hits the area with red scale divisions, the yellow indicator lights up. It is located slightly lower and is depicted in the form of a gas station. This means that Priora has been transferred to the reserve level of gasoline consumption.
The following indicators are located at the bottom of the panel from left to right.
- Check signal, or Check Engine. This indicator lights up when a breakdown occurs in the engine and displays Priora errors on the instrument panel.
- Lights up when there is a problem with the clutch system.
- Signals that a certain airbag is disabled.
- Indicates that an accident has occurred with the brake system.
- If the passenger's seat belts are not worn, this indicator will illuminate.
- BC screen.
- It beeps and lights up if there is a malfunction in the immobilizer system.
- Airbag failure indicator.
- Indicator of the operation of external lighting devices: low beam or dimensions.
- Lights up when the high beams are turned on.
- Failure indicator in the electric amplifier.
- Alarm when the emergency lights are on.
- Reset button.
In the middle of the panel, two on the left and on the right, there are four signal elements:
- displays errors that occur in the brake force distribution system;
- battery low indicator;
- indicator of emergency, reduced lubricant pressure in the engine;
- a signal that the Priora has the handbrake on.
On the dashboard of the Lada Priora, under the speedometer, there is a functional element, which is a bot computer screen. It contains information received from sensors and devices, and indicates the mileage for the current day and for the entire period of operation of the Priora.
Types of knock sensors: design features and operating principles
On fuel-injected cars, it is impossible to manually set the ignition timing, since electronics are responsible for this process. The appropriate amount of advance depends on various factors. The ECU collects information from all sensors, and based on their readings, as well as the operating mode of the internal combustion engine, it adjusts the SOP and the composition of the fuel assembly.
To prevent a prolonged detonation process, a sensor is used. It sends a corresponding signal to the computer, as a result of which the latter has the ability to adjust the ignition timing. We will find out further what signal the device sends to the ECU, and how it detects unstable operation of the internal combustion engine.
Before you understand the peculiarities of the operation of the DD, it is necessary to inform you that such devices come in two versions:
- resonant or frequency;
- broadband or piezoceramic.
Priora cars are equipped with broadband knock sensors.
The principle of their operation is based on the piezoelectric effect. Its essence is that when the plates are compressed, an electrical impulse is formed. Below is a diagram of the operation of the broadband sensor.
The operating principle of such a device is as follows:
- When the engine is running, the sensor generates a signal with a certain frequency and amplitude, which is recorded by the ECU. Based on this signal, the controller understands that the sensor is functioning properly.
- When detonation occurs, the engine begins to vibrate and “clatter,” which leads to an increase in the amplitude and frequency of vibrations.
- Under the influence of vibrations and third-party sounds, a voltage is induced on the piezoelectric sensitive element, which is transmitted to the ECU block.
- Based on the received signal, the controller understands that the engine is operating abnormally, so a signal is sent to the ignition coil, as a result of which the ignition timing changes towards the advance (a later ignition is set) in order to prevent the development of a dangerous detonation process.
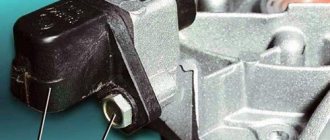
The photo below shows examples of broadband and resonant type sensors.
The broadband sensor has the shape of a washer with a central hole and output contacts through which the device is connected to the ECU. Inside the housing there is an inertial mass (weight), insulators in the form of contact washers, a piezoceramic element and a control resistor. The system works as follows:
- when the engine detonates, the inertial mass begins to affect the piezoceramic element;
- the voltage on the piezoelectric element increases (on Priora up to 0.6-1.2V), which is supplied to the connector through contact washers and transmitted via wire to the computer;
- Between the contacts in the connector there is a control resistor, the main purpose of which is to prevent the controller from detecting an open circuit after the ignition is turned on (this resistor is also called an open circuit recorder). If it fails, then error P0325 is displayed on the BC.
The photo below describes the operating principle of resonant type sensors. Such devices are used on cars, for example, Toyota.
Determining the type of knock sensor that is installed on a car is not difficult. To do this, you need to inspect the part, and by its appearance you can understand the type of device. If broadband elements have the shape of a tablet, then frequency-type products are characterized by the shape of a barrel. The photo below shows a frequency-type sensor and its device.
This is interesting! Prioras are equipped with broadband sensors that have code 18.3855. Products are produced by different manufacturers, for example, AvtoKom, Bosch, AvtoElektronika and AvtoTrade (Kaluga plant). The cost of a Bosch sensor differs from other analogues by approximately 2-3 times.
What is the effect of a DS malfunction on a Priora?
All Priora car owners are familiar with the situation when the speedometer begins to act up. The arrow either shows the wrong speed value, freezes at some position or shows no signs of life at all. The reasons for this behavior are often related to the speed sensor. Such a device affects not only the operation of the speedometer, but also the engine.
If the speed sensor on the Priora is faulty, the engine will function, but the possibility of it going into emergency mode is possible when the fuel-air mixture is prepared at average values. Even on a Priora with electric power steering, if the speed sensor malfunctions, the power will not work (or work intermittently).
This is interesting! The speed sensor on Priora is a problem for all cars of this brand. And therefore, when faced with the first signs of a malfunction, you should resort to eliminating them.
Let's immediately look at how the speed sensor affects engine operation. When the vehicle speed increases, the ECU understands that frequent fuel supply through the injectors is required. Naturally, the rapid movement of the car is also recorded by the level of throttle opening, for which the throttle position sensor is responsible.
If the car is coasting (downhill), then approximately the following picture occurs:
- the speed of the car increases, as evidenced by the DS readings;
- however, intensive fuel supply to the manifold is not necessary, since the ECU records the closed position of the throttle valve;
- Thus, the ECU understands that the car is coasting, which means that fuel consumption at such a moment is minimal.
In modern cars, DS play a very important role, and if you could drive a carburetor car with a broken cable as much as you like, then on injection cars, where the DS is presented in the form of an electrical element, such a breakdown will entail an increase in fuel consumption, as well as interrupted operation of the engine
That is why it is very important, if such a malfunction occurs, to eliminate it as quickly as possible.
Symptoms
Drivers accustomed to carburetor engines often do not react to the appearance of symptoms of speedometer failure. On injection engines, you need to pay attention to the behavior of this device. Symptoms of failure are as follows:
- The instrument needle does not work completely or partially. It can periodically turn on, tremble, freeze at a certain level.
- Complete failure of the instrument panel.
- The speedometer determines the speed limit with a large error.
- The engine is losing power.
- Fuel consumption increases noticeably.
- The stability of the power unit at idle speed is lost.
All these signs are the result of a breakdown or malfunction of the components of the speed calculation system. A detailed analysis of the reasons will be given below.
Priora error codes: complete vehicle diagnostics
All foreign cars currently have various sensors installed that monitor the operation and condition of the car. The modern Lada Priora is no exception to this series. The position and quality of many operating systems in a car depend precisely on how well these sensors perform their duties.
Their main problem is that if some sensors are turned off, the car will not disrupt its operation and can continue to move unhindered. However, the breakdown itself can be detected much later, when the negative consequences of disconnecting the sensors become apparent.
Depending on which sensor fails, fuel consumption may increase sharply, and some malfunctions in the operation of the car’s engine may also occur. In addition, a common “symptom” of sensor disconnection can be accelerated wear and tear of some elements in the car.
In order to check for certain errors on the Priora, you can use a special controller, which is built into the car specifically for this purpose. Thanks to this controller, you don't have to go into the engine compartment with a multimeter to look and identify the problem.
This controller is connected to a special tester, which is connected by manufacturers to the on-board computer. It won’t take much time to perform a full check of the car for any malfunctions in the operation of systems and sensors. You can start the process by pressing two buttons, and then all that remains is to correctly decipher the error codes.
On which cars is this problem most common?
The problem with code P0336 can occur on different machines, but there are always statistics on which brands this error is more common. Here is a list of some of them:
- Audi
- BMW
- Buick (Buick Park Avenue)
- Cadillac
- Chery (Chery Amulet)
- Chevrolet (Chevrolet Aveo, Camaro, Captiva, Cruz, Lacetti, Tahoe, Traverse)
- Citroen (Citroen C3, C4, C5)
- Daewoo (Daewoo Matiz)
- Dodge (Dodge Nitro)
- Ford (Ford Mondeo, Transit, Focus, Fusion)
- Honda (Honda Accord, Stream, Fit, Civic)
- Hummer H2
- Hyundai (Hyundai Getz, Grand Starex, H1, Santa Fe, Elantra, ix35)
- Isuzu
- Kia (Kia Optima, Picanto, Sid, Sorento, Sportage)
- Land Rover (Land Rover Freelander)
- Mazda (Mazda RX-8)
- Mercedes (Mercedes w211)
- Mitsubishi (Mitsubishi Pajero, L200)
- Nissan (Nissan Pathfinder, X-Trail)
- Opel (Opel Antara, Astra, Insignia)
- Peugeot (Peugeot 206, 207, 307, 308, 407, Partner)
- Pontiac (Pontiac Bonneville, Grand AM)
- Porsche (Porsche Cayenne)
- Rover
- Ssangyong (Sanyeng Aktion, Kyron)
- Toyota
- Volvo (Volvo xc90)
- VAZ 2107, 2110, 2112, 2114, 2115
- Gazelle Business, Cummins, Next, Sobol, ZMZ 405, UMZ 4216
- Lada Granta, Kalina, Niva, Priora
- UAZ
With fault code P0336, you can sometimes encounter other errors. The most common ones are: P0017, P0131, P0137, P0302, P0303, P0335, P0337, P0338, P0339, P0441, P2105.
Failures in the idle speed system (IAC) and ESC
- P0500 - speed sensor is broken.
- P0506 - very low engine speed at idle.
- P0507 - too high speed at idle.
- P0511 - the XX regulator network is faulty.
- P0560 - BS voltage is below the minimum threshold.
- P0562 - very low voltage in the BS.
- P0563 - very high voltage in the BS.
- P0601 - ROM checksum error.
- P0615 - the wires of the additional starter relay are broken.
- P0616 - the same wires are shorted to ground.
- P0617 - they shorted at the BS.
- P0627 - the fuel pump relay wires are broken.
- P0628 - the same wires are shorted to ground.
- P0629 - they shorted it to the BS.
- P0645 - break in the wiring of the air conditioning compressor clutch relay.
- P0646 - the same wiring has shorted to ground.
- P0647 - she shorted to BS.
- P0650 - Malfunction indicator light circuit does not operate.
- P0654 - Tachometer control circuit is faulty.
- P0685 - the main relay electrical wire is broken.
- P0686 - the same electrical wire has shorted to ground.
- P0687 - he shorted it to the BS.
- P0691 - the electrical wiring of the fan control relay is shorted to ground.
- P0692 - the same wiring has shorted to the BS.
So, when self-diagnosis is carried out and error 4 lights up on the panel, then most likely the car has a problem with the coolant temperature sensor. Many people immediately ask the question “Which sensor should I change?”, but first you need to find out what exactly the problem is.
Note that in order to start self-diagnosis, you need to press and hold the daily mileage reset button + turn on the ignition. After a few seconds, the on-board computer displays an error code.
It is noteworthy that codes in different firmware versions may indicate different problems. Therefore, we recommend that you stock up on an up-to-date reference book. In our case, the software version is 1.0.
How other error codes are deciphered:
- code 2 indicates that there is high voltage in the on-board network;
- code 3 indicates a fuel level sensor error;
- error number 5 indicates incorrect operation of the outside temperature sensor;
- code 6 is engine overheating;
- code 8 - problems with the brake system;
- error number 9 indicates that the battery is discharged;
- P0441 - high or low air flow through the valve;
- P0443 - faulty canister purge valve control circuit;
- P0480 - cooling fan relay failure No. 1;
- P0481 - failure of the cooling fan relay No. 2;
- P0500 - incorrect vehicle speed sensor signal;
- P0503 - intermittent car speed sensor signal;
- P0506 - low idle speed if the idle speed control is blocked;
- P0507 - high idle speed when the idle speed control is locked.
You can get acquainted with all error codes in more detail if you purchase a special book or on the official website of the manufacturer.
Private situations
General signs do not always indicate specific breakdowns. There may be exceptions.
If individual devices refuse to work, it is quite possible that this is their personal problem. You'll have to parse the specific pointer. It may have a cracked gear that needs to be replaced.
Also, why doesn’t the instrument panel of the VAZ 2114 work? If the fuel gauge and tachometer are capricious (either they function, or they don’t react at all), the contacts and the mounting block are normal - you need to do a small check.
Reset is pressed and held, and the ignition is turned on at the same time. Raised arrows indicate the need for further searches. Lifeless - that microcracks have appeared in the shield itself. You will have to remove it and examine all soldering and traces under a magnifying glass. In principle, these are all the main options. If calling all the listed components and parts did not lead to the revival of the instrument panel, your case is individual, and you will have to determine the situation in the company of an experienced auto mechanic.
Diagnostics and decoding of codes on Lada Priora
Like any modern car, the Lada Priora is equipped with dozens of various sensors, the functioning of which determines the condition of the main vehicle systems. Diagnostics of the machine for errors allows you to detect all sensor faults in order to eliminate breakdowns. Now you will learn how Priora error codes are deciphered and how to independently diagnose the on-board computer (hereinafter referred to as BC).
Various breakdowns of sensors and other devices can cause increased gasoline consumption, incorrect engine operation, and increased wear of car system components. Despite the presence of errors, the VAZ Priora will drive until the driver has to make expensive repairs because of them.
VAZ Priora car
So that the motorist does not suddenly have to face the need for repairs, a special controller is installed on the VAZ Priora, with the help of which the driver can diagnose breakdowns. This can be done either using special additional equipment or an on-board computer installed in the car.
In fact, to carry out diagnostics, the car owner will only need to press a few buttons and count combinations of faults.
For example, you do not have a special tester, so we will look at diagnosing the vehicle for errors using the on-board computer. The BC is built into the dashboard and can be used to read combinations of faults. To do this, you need to activate the auto test mode.
First, turn off the ignition. After this, hold down the daily mileage reset button and turn on the ignition
Please note: the button must be held down. There is an LCD indicator on the vehicle's dashboard, keep an eye on it. When you turn on the ignition, all icons will start to light up, and all arrows (speedometer, tachometer, antifreeze temperature sensor, gasoline level status) will begin to move to the maximum values and back
That is, if all the arrows behave as described here, this means that the sensors and indicators are functioning correctly.
Now you need to find the button for switching BC functions - it is located on the right steering column switch. By clicking on it, the software version (1.0 and higher) will be displayed on the screen. Click on this button again. Combinations of faults will begin to appear on the screen. If necessary, you can reset error data here. To do this, press and hold the daily mileage reset button for about three seconds.
The appearance of a fault combination on the LCD screen during self-diagnosis
How to check on the on-board computer
To carry out a check on the on-board computer, you need to insert the ignition key and simultaneously hold down the button that resets the daily mileage. When the correct actions are performed, all elements on the LCD will light up. And the arrows (speedometer, tachometer, etc.) will begin to quickly and continuously move from zero to the maximum indicator and back. Already here you can see how good the LCD indicator and sensors are.
Next, you can use one of the buttons that switches the functions of the bookmaker. As a result, a set of numbers will appear on the display indicating the version of the program currently installed. Now you need to apply pressure on the key again, then the error codes that are available in this car will appear there.
If you need to reset information from the LCD, it is best to press the button for three seconds, which resets information about mileage during the day. Now it's time to return the light to the sensors and use one of the BC keys. Due to the lack of impact on the system, after about half a minute the instrument panel will return to working condition.
Error 0422
The efficiency of the Priora 16 neutralizer has fallen below the normal level - this is what error p0422 reports to the owner of the Lada Priora 16 valves. As practice shows, codes 0422 pop up quite rarely. If code 0422 appears on the on-board computer screen, then you need to perform the following steps:
- We examine the catalytic collector. Its body and filling must be in good condition;
- If damage is found, the catalytic collector should be replaced with a serviceable one;
- If the catalytic converter is not the cause of the message, then the remaining actions to eliminate p0422 must be entrusted to specialists from the service center.
Causes of 4 errors
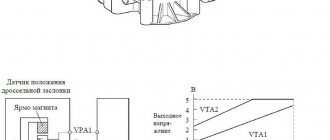
Error 4 came on on the on-board computer screen ( marked with a red arrow )
There are several reasons why error 4 appears in the ECU. Let's consider all possible options:
- The coolant temperature sensor has failed.
In the process of replacing and repairing the coolant sensor on Kalina
Checking the wiring and voltage supply to the sensor
All of these reasons are fairly easy to fix and are not a cause for serious concern.
How to view errors on the on-board computer?
The video shows the “self-diagnosis mode” of the Lada Kalina car, in which you can find out if there are any errors:
Elimination methods
In order to eliminate the cause of error 4 in the Kalina ECU, you should perform the following operations:
- Check the sensor for functionality. If it “died”, then it should be replaced.
- Check if there is contact and if there is any plaque. Clean the seat and replace the sensor.
- Check the on-board circuit and make sure there is contact in it.
- But a random error will have to be treated only by flashing the ECU and resetting all errors. To do this, it is recommended to contact a car service.
Thus, you can solve the problem yourself, but as practice shows, this does not always work out. Error 4 occurs quite often in the cold season, when the car is parked in the fresh air for a long time, and not in the garage.
Malfunctions of auxiliary systems and ignition
P0300 - no spark in all cylinders; P0301 - no spark in cylinder No. 1; P0302 - no spark in cylinder No. 2; P0303 - no spark in cylinder No. 3; P0304 - cylinder No. 4, no spark; P0326 - knock sensor readings are outside the permissible limit; P0327 - poor signal in the circuit of the same device; P0328 - signal too strong in the same circuit; P0335 - crankshaft sensor circuit is faulty; P0336 - crankshaft sensor readings are outside the permissible limit;
Camshaft sensor location
P0337 - crankshaft sensor shorted to ground;
P0338 - the network of the same device is interrupted; P0342 - weak signal in the phase sensor network; P0343 - the signal in the network of this device is too high; P0346 - the readings of the same device are out of the permissible limit; P0351 - break in the wiring of the ignition coil of cylinder No. 1; P0352 - open circuit of coil No. 2; P0353 - break in the wiring of coil No. 3; P0354 - open circuit of coil No. 4; P0363 - lack of spark and fuel supply in faulty cylinders; P0422 - the converter is broken; P0441 - incorrect air flow through the canister purge valve; P0444 - the canister valve wire is broken; P0445 - it has shorted to ground or BS; P0480 - open circuit in fan relay wiring; P0481 - fault in the same wiring.
What does code P0336 mean?
The P0336 code means that the ECU has detected a problem with the crankshaft position sensor or its circuit. Sensor A indicates the primary crankshaft position sensor in a system that may use multiple crankshaft position sensors for different functions.
The control unit uses input signals from the camshaft sensor(s) and camshaft sensor(s) to monitor engine position and revolutions per minute (RPM), control ignition and fuel delivery.
Each sensor has its own electrical circuit to provide the control unit with an individual input signal.
Since the crankshaft rotates at twice the camshaft speed, it is very important that the ECU can differentiate between the intake and exhaust of the engine. The crankshaft position and speed are compared with the camshaft speed and position to prevent engine damage.
The most common DPCV design uses an electromagnetic Hall sensor located in close proximity (usually only a few millimeters) to the crankshaft pulley.
The pulley teeth are located very close to the sensor. When the crankshaft rotates, the teeth pass the sensor and complete an electromagnetic circuit. When the grooves (between the teeth) pass the DPKV, the chain is briefly interrupted.
Since the crankshaft rotates very quickly, the process of closing/opening the circuit occurs in milliseconds. This sequence of signals is in the form of a wave. This pattern is recognized by the control unit as the position of the crankshaft. DPKV and all camshaft position sensors work almost the same.
When the engine is running, the ECU constantly compares input signals from the crankshaft and camshafts. If the crankshaft position is not within the camshaft(s) tolerance limits for a specified period of time, a P0336 code will be stored and the Check Engine Light may illuminate.
p1558
This error usually occurs on cars with a 127 engine. It is associated with the throttle valve, the quality of which in this power plant leaves much to be desired. P1558 does not interfere with normal engine operation, but you can still try to fix it. Some people solve the problem by flashing it, but we offer a simpler method.
Remove the throttle valve, and then remove the cover - this can be done using a hexagon. We find a plastic gear inside - this is the working part. Lubricate the gear thoroughly and reassemble in reverse order. Most likely, error p1558 will disappear after these manipulations.
Low voltage in the car's on-board network - how to deal with it?
The operation of a modern car often presents surprises in the form of unnoticed and slow-moving problems. It often happens that a person buys a car with a problem and does not notice it for years. This can lead to rapid failure of many components and assemblies, increased fuel consumption, and a decrease in the quality and comfort of the trip. All this suggests that you should always diagnose the car during the next maintenance. If there is no diagnostics, then the quality of operation will remain at a low level. Car owners often carry out repairs, maintenance and diagnostics of only the main components of the car. If peripheral equipment does not work efficiently, it will be extremely difficult to find the causes of problems in your car. And problems with the main nodes themselves will happen constantly and regularly.
Low voltage in the on-board network of a car is one of the common problems that causes all components and organs of your car to malfunction. This is a problem that always has an unpleasant effect on all components of the machine. There are several ways to identify this problem and also get rid of it. Today we will talk about how this problem affects your car, what effects it has on all the important parts and components. Then we will look at the reasons for the problem and possible ways to correct the situation. It is also worth considering the consequences of a long trip in a car with low voltage in the on-board electrical network. All this will help you better understand all the features of the problem and give it due attention.
How can you tell if your car has low voltage?
A low voltage problem may not be visible to the naked eye. But the car owner may experience a number of inconveniences and not even realize their real cause. You can often find questions on forums about how to deal with too weak operation of the climate system fan. They also ask about other problems that are inextricably linked to the quality of the electrical network. It is worth paying attention to the following manifestations of problems in the car:
- dim and uneven light from the headlights, which does not allow the car to be operated normally; often a voltage drop is the cause of this problem in the car;
- dim lighting of the instrument panel, flashing when the speed increases and decreases, incomprehensible operation of the lighting elements, including the interior lamp and all light sources in the car;
- inadequate operation of sensors that are vital for your car, incorrect indicators on the driver’s operating panel, strange device operating parameters;
- lack of power supply for the engine, which is expressed in its intermittent operation, low speeds and the possibility of stalling at any time at idle with no load;
- failure of the on-board computer systems, radio, odometer and other electronic systems and modules in your car; this can really depend on the electrical network.
A voltage drop below 10 Volts on consumers can damage the vital organs of the car, so their interruptions in operation are quite understandable. You should always pay attention to the important features of the operation of these nodes so as not to lose sight of possible problems. It is the poor quality of operation of electrical appliances that is the first step for correct diagnosis of equipment. Complex problems with electricity customers may be an even clearer indication of problems.
What causes power problems in a car?
Another issue that is worth considering is the possible consequences of low voltage in the vehicle's on-board network. Of course, one of the consequences is poor performance of the headlights, which has a very bad effect on the comfort and safety of the trip. You won't even be able to listen to music if the voltage is extremely low. But these consequences can be bypassed without paying due attention to them. But real problems with the car may arise as follows:
- triggering of the insurance mechanisms in the car and blocking the engine - many on-board computers have a blocking function if the voltage in the network is too low;
- increased fuel consumption - when the electricity level is low, the computer can increase engine speed to obtain additional volts in the on-board network;
- reduction in the comfort of car operation due to inadequate operation of the climate system functions, windshield blowing, heating and other important options in the car;
- rapid failure of the battery, which will cause increased costs, because the battery is not charged when the voltage level in the network is less than 12.5 Volts, and this will be a problem;
- additional load on the generator, increasing its rotation speed and brush wear, which will cause rapid failure of this unit, which is often expensive.
As you can see, most elements of the electrical circuit in a car can fail due to such a small problem. But in reality, all this can be avoided if you find and eliminate the cause of the problem. Next, we will look at possible causes, find out their origin and give specific recommendations on how to get rid of such an annoying and unpleasant problem. You should immediately stock up on a notepad and write down points to check.
Causes of low voltage in the electrical network
To understand the need for repairs, you need to know the main components that can affect the operation of the electrical network. Increasing the voltage in the on-board network using any artificial methods will only bring additional problems. Often problems are caused by inept actions of the car owner or the company where you service the car. Let's look at the main causes of on-board electrical problems and voltage drops:
- installation of additional consumers that can take up too much electricity, these are subwoofers, various car refrigerators, kettles and other means of comfort;
- incorrect connection of self-installed consumers in the network, even a radio with incorrect installation can cause a strong drop in voltage;
- malfunctions in the generator system, which become the main cause of low voltage in the network; these problems can be combated by repairing or replacing the generator;
- cheap and low-quality wiring - in many budget cars, from the very birth, problems with the electrical network begin at the factory due to poor quality wiring;
- handicraft interventions in the operation of the system, installation of various additional relays, instruments and devices to improve the quality of the electrical network - all this does not help.
Instead of solving the problem with the help of inept intervention, you will only end up with more problems and troubles for your car. So it’s worth taking into account all the features of the car’s electrical network, the factory parameters of this system and other factors. Without experience and knowledge, it is better not to get into the electrical wiring system and consumers. Otherwise, there will definitely be problems, and fixing them may turn out to be too expensive and unpleasant for the car owner.
How to fix problems with low power levels in a car?
High-quality car operation is a pipe dream for many owners of budget or old vehicles. In fact, the problem may be hidden in an incorrectly installed relay or a poorly pressed generator mass to the machine body. To identify such a problem, you should contact specialists at a service station and find the real cause of your troubles. You can perform self-checks only in the following areas:
- The tester can measure the voltage at the battery terminals and at the generator outputs while the engine is running - this will provide information about the state of the electrical network and its operation;
- to check the wiring, you can carry out a measurement operation on the headlight bulbs - there the voltage should be a maximum of half a volt lower than at the battery terminals;
- you can also turn off all independently installed devices to free the network from their influence and look at the result, then proceed by elimination;
- the voltage in the on-board network and its changes can often be checked using the on-board computer, this will help to effectively measure losses and the moment of voltage reduction;
- check the battery itself for complete discharge - often problems with the electrical network are associated precisely with poor battery performance, which requires constant charging.
Each machine has individual methods for controlling current in the electrical network. For one manufacturer, the priority is the comfort of the owner, for another - the reliability of the trip. This is how the power of the electric current is distributed in accordance with these values. Therefore, high-quality diagnostics at a service station will help identify real problems in the electrical network. It is practically impossible to do anything here on your own, except perhaps return the wiring to its factory condition and remove previously installed devices. We suggest watching a short video on how to fix the problem of poor on-board voltage on a Priora:
Let's sum it up
In modern cars, wiring problems are quite common. This is a problem that can actually cause significant trouble. You need to be aware that you should not go on a long journey in a car with electrical problems. Also, you should not continue to operate the machine when such problems have been discovered. And if in one car we are talking about a simple feature of the generator, then in another case it will be important to take into account all the technical aspects of the electrical wiring, each consumer and other factors. Only specialists can deal with these problems.
The cost of repairing the electrical network at a good service station will depend on the causes of the breakdown. Sometimes it is enough for specialists to replace a failed relay to correct the situation. Otherwise, it is necessary to repair the generator, change or remove certain electrical consumers from the system. Therefore, the final costs depend on the problems identified during diagnosis. It is important to remember that any problems should be corrected quickly enough, otherwise problems with the vital organs of your car may occur. Have you ever encountered such problems?
avto-flot.ru
PRINCIPLE OF OPERATION OF CARS WITH ECM (ELECTRONIC ENGINE CONTROL SYSTEM)
Cars with conventional carburetor engines have been replaced by cars in which fuel enters the cylinders through a system of nozzles (injectors). And sparking occurs not in the distributor (distributor), but in a special ignition module. This rather complex system is controlled by a special intelligent unit. You could say it's a computer. It is he who sends signals to trigger all actuators. Therefore, the entire ECM system can be divided into three parts.
- Computer (ECU).
- Actuators (injectors, spark generators, etc.).
- Sensors (Air, oxygen, throttle opening, crankshaft position, etc.)
What to do when error code p0336 appears - crankshaft sensor
If the crankshaft sensor shows an error, it is advisable not only to inspect the quality of the DPKV connection, but also the crown (condition of the teeth), and also measure the sensor with a multimeter.
It should be noted that the error code p0336 is quite serious as it interferes with the normal operation of the machine. Therefore, it is possible to use a machine with a similar problem, but it is not advisable until it is eliminated. Diagnosis of failures that could potentially lead to the formation of an error is performed according to the following algorithm:
- Using a scanner, you need to read the errors in the ECU memory. Often code p0336 is accompanied by other errors of similar meaning.
- If one error 0336 is detected, then it is necessary to check the electronic unit for false positives. This is done by deleting information from its memory, and then re-interrogating the RAM after a short period of engine operation. If the error appears again, you need to continue diagnostics.
- Check the crankshaft position sensor. To do this, you need to dismantle it, and then use an electronic multimeter switched to ohmmeter mode to check the value of the internal resistance. So, for a working crankshaft sensor, the corresponding value should be in the range of about 500...750 Ohms (depending on the specific sensor and may differ slightly). If the resistance is very different, it means the sensor is faulty and must be replaced. It also makes sense to check the output voltage generated by the sensor while the engine is running and running normally. The corresponding value must be at least 0.3 Volts. You need to measure the voltage between the signal wire and ground, or at the terminals of the controller block (in this case, you need to have an electrical diagram of the car, in particular, the numbers of the corresponding terminals).
- Check the wires going from the control unit to the crankshaft sensor. You need to start with a visual inspection. In particular, inspect whether they are broken, especially at the fracture sites, and whether the insulation is damaged (melted). Next, using an electronic multimeter switched to the “testing” mode, you need to determine the integrity of the wires and the presence of a possible short circuit. So, you need to ring each wire, and also check the insulation value in pairs between each pair of wires and the “ground” (housing). Particular attention must be paid to ensure that the wiring harness is not located close to the exhaust manifold and spark plugs, as this may damage the insulation. If this is the case, you need to use zip ties and secure the wires along their mounting lines. If the wires are damaged or torn, it is advisable to replace them with new ones. As a last resort, you can try to repair them using heat-resistant electrical tape or heat shrink. But replacement would be preferable.
- Check the sensor connector (chip) for corrosion and quality of contact. Also see if there is water or various debris in it. It is desirable that the chip have a latch that ensures constant contact and protects it from external influences. If there is debris or corrosion, the contacts need to be cleaned. If a chip is broken, replace it.
- Check the crankshaft gear. In particular, is there any debris, foreign small objects, or corrosion on it. Are all the teeth in order and is the reference mark intact? It is also useful to check the fastening elements of the wheel to the shaft. In rare cases, it may become loose. If necessary, it must be tightened or replaced. If a gear is mechanically damaged, in most cases repair is impossible, so the entire assembly is replaced with a new one. If the gear wheel “dangles” on the shaft, this can lead to mechanical damage to the crankshaft sensor, which is why it often needs to be replaced (you need to check it).
- Check the gap between the crankshaft position sensor and the gear. For different car models, this value will vary slightly, but in most cases this distance is within 0.5...1.5 mm. You need to find out the exact information in the manual for a specific car.
Why does this error occur?
An error check usually indicates a possible problem with the motor. Translated from English, Check Engine literally means “check the engine.” When it lights up, you should use a dipstick to measure the oil level in it, listen to see if there are any malfunctions in its operation (knocking or instability of speed, tripping). The reasons are as follows:
- Lack of oil.
- Interruptions in operation associated with the ignition system or throttle valve.
- Knocks already indicate more serious troubles and wear of parts.
- Poor contact of one of the sensors, malfunction of the sensor and even its breakdown.
- There is a problem with the car's on-board computer.
Instructions on how to check the K-line
| Those who have an on-board computer (OB) installed in their car know how useful this thing is. It happens that the message “broken K-line” appears on its screen, this means that the bookmaker is not working properly and it will no longer show some of the parameters. Do you know how to check k-line and find out the cause of the disease? |
Most often, the solution to the problem really lies in breaking the K-line wire. That is, the wire has simply moved slightly out of the block (the APS block of the immobilizer, or the BC block) and there is no longer any contact. If you have checked all the contacts, but the on-board computer still does not see the K-line wire, then you can proceed as follows: 1) Check the voltage on the K-line. We set the multimeter to the mode for measuring constant voltage, connect the red probe to the K-line, and the black probe to ground to any point on the body. The readings on the device should be 12+-2V. You cannot use a lamp to check the voltage, because it has a load.2) If on your VAZ the connector with the APS is disconnected, then check for the presence of a jumper in the APS block between pins 9 and 18. 3) The problem may be in the immobilizer (the K-line signal comes, but disappears after the immobilizer). Check for the presence of a K-line on pin 18 of the APS block. Using the same method, you can check whether there is a break between the APS block and the BK block. 4) Crosstalk or a broken wire. Try replacing the wire from the BC to the diagnostic connector with a new, shorter one. You can also check the k-line in a service center using computer diagnostics, or by connecting a known working on-board computer to the car (see how to connect the BC). And if the k-line does not work and at the same time there are problems with starting the engine, then start checking the additional VAZ fuses. xn--2111-43da1a8c.xn--p1ai
Other manufacturers
For your VAZ-2170, you can consider analogs to the standard BC that will meet your requirements:
- BC STATE x1 – 1400 – 1500 rubles. Looks like a small button. Placed instead of a plug. The display occupies more than 70% of the front area, and under it there are two small mode switching buttons. Will show all the necessary information on errors, consumption, speed.
- State Matrix - about 3,500 rubles. Beautiful display, full functionality, but no GPS navigation.
- Unicomp About 4,200 rubles. A full-fledged computer that will show and do everything you need.
Source