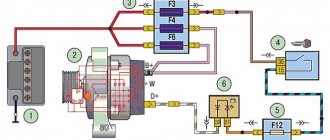
Priora fuel system
Lada Priora cars use forced injection, which has already become a classic in the automotive industry. Power system composition:
• fuel tank; • the pump and filter are located in the tank; • fuel line; • pressure regulator; • Fuel rail; • four nozzles; • throttle; • intake manifold; • electronic engine control system.
The work is based on the fact that when the ignition is turned on, the electric fuel pump starts working, increasing the pressure in the rack. In addition, when the engine is started by the starter, the electronic control unit opens and closes the injectors, and the air-fuel mixture enters the combustion chambers according to the operating diagram.
As soon as fuel enters the combustion chamber, a spark is formed between the spark plug electrodes. The fuel ignites and the engine starts. The injectors are electromagnetic valves, and the control unit is responsible for their operation. He is also responsible for the quality of the mixture, the ratio of air and gasoline. Sometimes problems arise and you have to disassemble the fuel system for repairs.
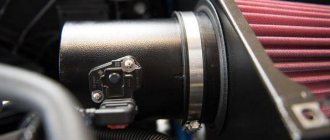
Cold intake, Honda
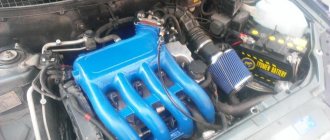
Many Accord car owners are faced with the problem of severe car failures on a hot engine. To fix the problem, most drivers decide to install a cold air intake on their car. For installation, you need to purchase additional gaskets for the manifold. You can also facilitate the flow of cold air by turning off the collector heating. The heating is turned off by sawing off the part of the manifold where the idle air valve was located and where the antifreeze flowed through the channels. Having removed the manifold on the right side of the head, it is necessary to make a thread in the channel in order to eventually install a plug there. After cutting the thread, all chips must be removed. The existing hole in the collector must immediately be sealed with epoxy glue or welded using argon welding. You can saw off the excess part using a grinder. Then we install the parts in their places. In addition, the intake pipe must be routed under the wing. A specially curved tube of the required diameter can be ordered specifically for the Accord. A zero-resistance filter is also installed under the wing instead of the existing resonator.
Removing the intake manifold
We remove it to replace or repair the ramp and injectors. It would be a good idea to polish the intake manifold; this will make it easier for fuel to flow into the combustion chambers. As a result, the power will increase. It is necessary to begin work by reducing the pressure in the fuel system. This can be done by removing the fuse on the fuel pump and starting the engine.
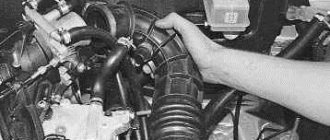
Wait until the engine stops on its own. This will mean that there is no gasoline left in the system and that the pressure has dropped. Now disconnect the battery and begin disassembling the system elements. First you need to remove the decorative cover, which is located at the top of the engine. Attaches in three places. Then proceed to disassemble the air filter. Remove the tubes that go to it.
Having freed up space, you can begin to remove the throttle valve. There will be no problems disassembling it, the main thing is not to unscrew the shock absorber mounting screws. Otherwise, if it is not screwed on and secured well, it may fall and hit the engine. Then you will have to carry out large-scale repairs, which can be compared to the main one. After removing the throttle body, you can begin removing the intake manifold. Installation is carried out in reverse order.
To seal the joint between the cylinder head flanges and the intake manifold, as well as between the throttle unit flanges and the intake manifold, O-rings are installed in the grooves of the intake manifold pipes.
If the seal of these rings is broken, the motor runs unevenly (“triple”).
When air leaves the intake manifold, a clicking noise may occur from the exhaust pipe.
In addition, there are interruptions in engine operation and loss of power. During this breakdown, the engine consumes more gasoline.
You will need: flat-blade and Phillips-blade screwdrivers, wire cutters or a knife, keys “10”, “13”.
1. Lift the hood and disconnect the cable from the negative terminal of the battery.
2. Remove the decorative engine cover.
3. Remove the throttle body from the intake manifold (see “Removing and installing the throttle body”).
Remove the inlet o-rings.
Remove the gasket with a screwdriver
. and remove the gasket on the throttle body mounting flange.
Install new O-rings into the manifold grooves.
Cover the intake ports with a rag and clean the O-ring seat before installing the intake manifold
Install the removed parts in the reverse order of removal.
The intake manifold, or as it is commonly called the receiver, is a device that ensures a uniform flow of purified air into the cylinder head. The Priora receiver is subject to tuning and modifications, we will talk about this in this article.
In addition, the receiver accumulates air and dampens its vibrations, ensuring smooth engine operation due to a uniform (drip-free) supply of air masses. When the unit operates correctly, a highly saturated air-fuel mixture is ensured, and lower fuel consumption is achieved when the engine is running.
TEST No. 1
For maximum accuracy, measurements were taken on one day. First on a standard receiver, then it was replaced with a 21179 receiver, and again for tests. The test results are presented in the graph (black – receiver 21126; red – receiver 21179):
https://www.drive2.ru/users/stmel/
Neither Cycle Filling (CN) nor Mass Air Flow (MAF) have changed much. The central frequency has only shifted a little to the top (4500-7000 rpm), and this is logical, because compared to the standard receiver, the channels of the 21179 receiver are slightly shorter (460 MHz at 4600 rpm and 5200 rpm, respectively). The owner believes that the lows (XX-2500 rpm) and the middle (2500-4500 rpm) remained the same, both in terms of graph and feel. But at the top the car rides more confidently.
Reasons for replacing the Lada Priora receiver
There are many types of intake manifolds, such as those made from different metals or composite materials. However, the Priora's receiver is entirely made of plastic. This material prevents excessive heating of the manifold due to a hot car engine.
This improves the air flow characteristics, which has a positive effect on the proportions and quality of the air-fuel mixture. However, plastic also has a major drawback - fragility. As a result, numerous failures occur both due to the fault of the car owner and due to low temperatures at which the plastic loses its drag coefficient.
The most common damage can be caused by: - road traffic accidents (even minor ones); — accidental impacts during any repair work in the engine compartment; - other reasons;
If your car's radio has holes through it or any other leaks, it will need to be repaired (if possible) or replaced. If the part is faulty, air leakage will occur due to improper operation of the engine.
Featured Posts
Good day.
The client installs a direct-flow exhaust and an enlarged tuning receiver on the Priora. Although the engine hardware will not be redesigned.
The question is this. What calibrations in Chiptuner 7 need to be adjusted for the increased volume of the receiver? ECU Bosch 7.9.7+ engine 1.6 16kl
If anyone can give me some advice.
Modified on January 11, 2012 by kirill726
Well, finally a competitor has appeared in my city
Sergey, now you’ll have to get up earlier for work......lyrics..
The author doesn’t need any prior receiver and doesn’t need to edit anything, it’s not the right block.
But don’t Vit, with such knowledge of a competitor for five years I can still sleep peacefully
I know this very well myself. Simplicity: the client has stuck to his guns and doesn’t want to understand anything. The engine is stock, the ECU is BOSCH, there is no sense in the receiver.
And as far as competition is concerned, there is enough work for everyone. Moreover, my workshop is in Armavir.
As far as I understand Sergei Fedorenko????
Since the client is stubborn, let him run the stock firmware))) or edit it himself
It’s just that there is January, but the client doesn’t feel sorry for the money for it, although it’s easier to set up.
It’s just that there is January, but the client doesn’t feel sorry for the money for it, although it’s easier to set up.
From personal experience, such clients will then get bored))) this is not this, then this is not that...
Kirill, I know where you are, but the mistakes are unforgivable... we need to catch up.
Get rid of such clients, otherwise it will be a problem for you...
Modified on January 11, 2012 by SergeyF
Sergey, I can also tell from your work.....
Tell me, I’m really curious, did you really redo something after me? It seems that I don’t have a single VAZ that hasn’t been repaired since the days of carbs.
A lyrical digression - recently Kalina was diagnosed with Yubileiny - it’s impossible to fix!
Modified on January 11, 2012 by SergeyF
He who does not work is not mistaken.
You will make a machine, for example, on ignition, and the next day his DF will die.....
Of course, this also happens, but there would be no need to pour RD08 software into the M73 into the previous hardware with the 95080 seal... it was wobbling at XX, the seven almost lost the engine until it crawled, and it’s also not worth pouring what was flooded there.
Modified on January 11, 2012 by SergeyF
Good day.
The client installs a direct-flow exhaust and an enlarged tuning receiver on the Priora. Although the engine hardware will not be redesigned.The question is this. What calibrations in Chiptuner 7 need to be adjusted for the increased volume of the receiver? ECU Bosch 7.9.7+ engine 1.6 16kl
If anyone can give me some advice.
From the exhaust it is more or less clear what kind of receiver it is. Increased volume is not an indicator, which one exactly? And I’ll tell you approximately what your client will get as a result.
He won't get anything from Bosch
He won't get anything from Bosch
What did Bosh do wrong?
Math model and lack of visibility of the necessary calibrations
Good day.
The client installs a direct-flow exhaust and an enlarged tuning receiver on the Priora. Although the engine hardware will not be redesigned.The question is this. What calibrations in Chiptuner 7 need to be adjusted for the increased volume of the receiver? ECU Bosch 7.9.7+ engine 1.6 16kl
If anyone can give me some advice.
try to twist the flow pulsations, but you need to have information on SS - use
at the same time an alphameter.
Anatoly, here the pulsations are still not an analogue of the cyclic correction..., there’s nothing special there
Math model and lack of visibility of the necessary calibrations
For such tuning you don’t need a lot of calibrations
How to remove the receiver on a Priora
Tools that may come in handy: - 10 heads; - key 13; - Screwdriver.
To remove the intake manifold you will need:
- Due to the fact that in the subsequent steps of the instructions there will be manipulations with electrical wiring, it is necessary to remove the negative terminal of the battery.
- The next step is to remove the plastic casing (cover) from the motor housing. This is done so that it does not interfere with you while working.
- Next, you need to remove power from the four ignition coils and disassemble them. To do this, remove the contact parts. Take a 10 mm socket (or a wrench of the same size) and remove the retaining bolt on each coil. Simply pull the coils upward with the required force. Now they can be removed. There is no need to remove the candles themselves; they will not interfere with removal. On the other hand, it is advisable to take advantage of the situation and check its condition (gap and spark quality).
Tuning the Priora 126 engine for 20-30 thousand rubles
In the comments they asked a question about Priora. What can be done for 20-30 thousand rubles. with a motor to make it go better.
Let's first consider the situation for 30,000, and then the minimum for 20,000.
For 30,000 you can bore the channels, throw in the shafts , change the throttle valve, injectors and calibrate the engine.
Now let’s look at how much each position costs. First, let's go through the material. 16-valve shafts cost from 6500 and above. I would eventually install some turbo shafts. Because the engine will spin no more than 7000, the engine is quite low and in the future it will seem to you that the increase is not enough, you will get tuning disease and will continue to charge the engine. In order to have the most important foundation for development, you buy turbo shafts, say 9.6, and 10.1 for the intake and exhaust. In principle, a small overlap is very good for a low-end motor. They cost approximately 6800 from the manufacturer. By the exhaust. Install a spider that simply replaces the catalyst. It costs around 1500 rubles. You can also change the throttle valve . It costs about 1000 rubles, with a diameter of 54 for a standard receiver. Further, Bosch 107 injectors cost from 2000 rubles, depending on the store where you buy them. You will also need consumables in the region of 1000 rubles. There are all sorts of gaskets. Valves, light T-shaped ones, cost from 3500 depending on who the manufacturer is. This is all the material you have to buy. Now let's look at the work. Boring of channels starts from about 3500. Removing and installing the cylinder head head and assembling and disassembling it around 5000. You can find it cheaper, it doesn’t require high qualifications. Lay the shafts, i.e. make a cut for cams from 1000 rubles. It is advisable to have a more experienced person do this. Calibrate the motor. Naturally, when you have done all this, bored out the channels, installed valves, exhaust, throttle valve, injectors, now you can tune the engine, otherwise the car won’t really drive, there will be failures with an enriched mixture. In general, calibration costs from 5000. A fairly simple configuration. Don’t skimp on this because the calibrators will determine everything optimally.
Let's consider the option for 20,000 rubles.
We simply bore out the channels and install the spider exhaust we talked about. We change the injectors because the standard ones are not enough in any case. We also take into account work expenses. You need to remove, install, calibrate. Basically everything.
In the first case, the costs were 30,500 rubles, in the second case, 19,000. In the first case, you will get about 140 hp, in the second case, about 120 hp. with normal torque and resource. Also in the first case with shafts. I recommend bottom shafts. There are no sliding gears required. It will be possible to install factory ones if the phases are made a little wider, naturally the ride will be a little better, but there will be costs for sliding gears. Why exactly this motor configuration, why do I recommend doing this? In a sense, you have prepared the foundation and the engine is almost ready. All that remains is to change the piston, intake manifold and install the turbine. If you are not a supporter of turbo, but a supporter of aspirated engines. You just need to change the hard springs, install a normal Opel direct-flow exhaust, a receiver and you will get a motor with more powerful performance. There is a standard Priorovskaya piston. All work was done head on.
Also, for this motor, I would recommend that you change the main pair. At least do some work on the box. Just change the main pair 4.1 or 4.3. Make the gear shorter because the operating speed has increased from 5600 to 6600. Make the gear ratios shorter. The easiest way is to place the main pair. What kind of cars can you make? Well, I think you will do everything with 2-liter naturally aspirated ones. If you want something more, you need to look further. Either make a more angry aggressive atmosphere, or make it more turbo. For atmosphere, of course, the shafts will need to be changed. Put more revving ones.
So that's all in a nutshell. If you have any questions, ask them in the comments. Dispute always gives birth to truth. It is advisable not to insult each other and not to be clever.
I wanted to immediately explain why we are installing a throttle valve of a larger diameter, although it would be logically more correct to install a factory one. The fact is that when you squander the channels, the lows will increase. Naturally, to increase power you need to install a larger damper. Your low end will already be emphasized more than on a regular stock, and the throttle will already emphasize the high end. Why do we install the usual 4.1 spider, which simply replaces the standard spider with a catalyst. Because it is cheap and cheerful and makes the purging better and leaves practically only one exhaust because we install ordinary turbo downstream shafts, which are not critical in terms of exhaust due to the fact that the overlap angles are small. Our complex is completely interconnected. In our case, a bored channel helps to raise the bottom, and narrow phases on the shafts also help to raise the bottom. We align the entire shelf of moments. The factory receiver to the bottom also remains, the regular exhaust is matched to the shafts. In principle, the motor turns out to be quite good. That's why I recommended all of these positions. Another advantage of turbo shafts is that they can always be sold. Nowadays turbo has become very fashionable. If you sell atmospheric shafts, then there is better, but there is walking. The turbo shafts are all more or less the same in principle. There are not many of them on sale, and they are in demand.
Installing a receiver on a Priora
As a rule, installation is carried out in a mirror image of removal, but during its manufacture it is necessary to pay maximum attention so as not to damage the receiver body. It is extremely important to guide the parts being installed into the connecting pins of the cylinder block, after which the manifold is directed to the mounting points on the engine.
Small but important points for installation:
- Always clean or lubricate the seals located at the contact points between the crankcase and the cylinder block;
- Tighten the nuts well at the joints of the elements.
TEST No. 3
Another Priora owner also decided to check the cyclic filling of receivers 21126 and 21177, all other things being equal.
https://www.drive2.ru/users/alexei2878225/
The chart comments like this:
Somewhere one is in the lead, somewhere else. But in general, we can talk about increasing power, because The peak torque moved to 300 rpm. 21126 98 hp, max torque at 4500, 21127 max torque at 4800.
Which receiver is better for Priora?
There is no clear answer to this question. Each situation is individual. However, a comparison can be made between plastic and aluminum receivers.
Advantages of aluminum products:
- increased strength and wear resistance;
- increased engine power due to design features, larger volume of supplied air;
- Some models are easier to install and therefore easier to remove.
In addition, the shape of the collector itself, which should not contain sharp edges or transitions, plays an important role in ensuring increased power. The most important difference between plastic and metal is the strength and durability of the latter. Therefore, we can recommend installing metal types of intake manifolds on Lada Priora cars.
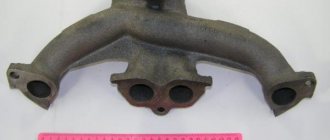
Operations performed when replacing the cathode collector on a VAZ 2170 2171 2172 Lada Priora
The nuts securing the manifold to the head are difficult to access. In addition, the manifold flange is sealed with a metal-reinforced gasket. The gasket must be replaced each time the connection is disassembled. Before removing the manifold, it is necessary to remove the intake manifold - this will facilitate access to its mounting.
1. Remove the decorative engine cover (see “Removing and installing the decorative engine cover on the VAZ 2170 2171 2172 Lada Priora”). 2. Remove the cable from the negative terminal of the battery. 3. Disconnect the exhaust pipe of the additional muffler from the manifold, while unscrewing the nuts securing the inlet pipe flange to the manifold flange and remove the inlet pipe flange from the studs of the manifold flange (see "Replacing the additional muffler on a VAZ 2170 2171 2172 Lada Priora"). 4. Remove the air filter (see “Removing and installing the air filter on the VAZ 2170 2171 2172 Lada Priora)”).
5. Remove the air supply tube and three tubes of the crankcase ventilation system (see “Cleaning the crankcase ventilation system on a VAZ 2170 2171 2172 Lada Priora)”).
6. Disconnect the four ignition module wiring harness blocks and move the harness to the side. Remove the ignition modules (see “Removing and installing ignition coils on a VAZ 2170 2171 2172 Lada Priora)”).
7. Remove the throttle valve (see “Removing and installing the throttle valve on the VAZ 2170 2171 2172 Lada Priora”). 8. Remove the intake manifold (see “Replacing the cylinder head cover gasket on a VAZ 2170 2171 2172 Lada Priora)”).
9. Disconnect the control and diagnostic oxygen concentration sensors from the engine wiring harness...
10... and disconnect the cable holders of the control and diagnostic oxygen concentration sensors from the heat shield of the steering mechanism.
11. Unscrew the three nuts securing the steering gear heat shield to the engine shield and remove it.
12. Unscrew the two nuts securing the water pump inlet bracket, unscrew the bolts securing the manifold to the bracket for its fastening, unscrew the eight nuts securing the manifold to the head and remove the manifold. Disconnecting the manifold from the cylinder head and troubleshooting are described in detail in the subsection “Replacing the manifold gasket on a VAZ 2170 2171 2172 Lada Priora)”.
13. Remove the manifold gasket from the cylinder head pins.
Warning The manifold and intake pipe gasket must be replaced with a new one each time the connection is disassembled.
14. Clean the block head and manifold flanges from the remains of the old gasket and carbon deposits. Unscrew both oxygen sensors from the manifold and install them on the new manifold.
16. Install the manifold and all removed parts and assemblies in the reverse order of removal.
Helpful Hints To avoid the gasket sticking and improve its tightness, it is recommended to lubricate the gasket on both sides with a thin layer of graphite grease before installation. Lubricate the exhaust manifold mounting studs with graphite grease.
Determining whether the engine is sucking in air
Before you start removing more than half the engine parts to get to the manifold, you should check other parts of the air system.
And after that, carry out a complete tuning of the car. First of all, you need to inspect all the hoses and gaskets located on the cylinder block. The most common method of finding air leaks is to spray the hoses with plain water; if there is a hole in one of them, the engine speed will decrease when water enters.
Detailed instructions for removing the intake manifold on a new Priora
It is necessary to remove parts from a cooled engine. It will take about an hour, provided that you have at least a little understanding of the injection system. The following sequence of actions must be followed:
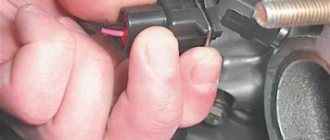
- First of all, you need to remove the throttle. There is no need to completely remove it, just move the assembly connecting it to the manifold to the side. You also need to remove the throttle valve to thoroughly clean everything;
- disconnect the drive throttle cable from the manifold;
- disconnect the connectors from each other to remove the wires from the ignition coils;
- on the camshaft, disconnect the sensor wires;
- disconnect all canister wires;
- disconnect the brake booster vacuum hose going to the manifold;
- then unscrew the clamp and remove the ventilation pipe;
- Unscrew the self-tapping screw of the oil level indicator guide tube;
- remove the dipstick with the guide tube;
- using sockets and a ten-size wrench, unscrew the nuts and bolts securing the exhaust module and coils from cylinders 1-2-3;
- remove the coils;
- then you need to unscrew the collector fasteners;
- slide it forward and remove the manifold.
Review of the exhaust system of Lada Priora
The exhaust gas exhaust system on the Lada Priora performs the following functions:
- exhaust gas discharge;
- suppression of noise when the engine is running;
- neutralization of dangerous toxic substances in exhaust gases.
The basis of the Priora exhaust system includes:
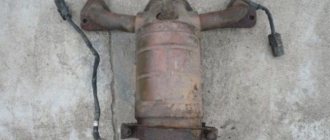
- 1. Exhaust manifold with converter;
- 2. Resonator;
- 3. Main muffler;
- 4. Additional muffler;
- 5. Connecting pipes.
The manifold is used to drain exhaust gases from the cylinders into the exhaust pipe. The tightness of the connections is ensured by a seal with a two-layer metal gasket between the block head and the exhaust manifold. The mount of the exhaust manifold with the cylinder head on one side is connected to the catalyst on the other. Connecting the collector and the neutralizer into one block allows you to reduce the heating time to the operating temperature of the latter, which significantly increases the efficiency of the neutralizer.
Installation of oxygen concentration sensors at the inlet and outlet of the catalytic converter ensures constant monitoring of the quality of exhaust gases. The connection between the suction pipe and the collector has a heat-resistant gasket in the form of a metal-asbestos gasket. And the metal compensator connecting the additional muffler to the intake pipe acts as a vibration damper from the engine to the body and the entire exhaust system.
The exhaust system is connected by attaching it to the body brackets using 4 rubber shock absorber rings. On the main muffler, the suspension cushion has a reinforced structure due to the increased load on it.
TEST No. 2
Acceleration was measured using a special Drag-On device. As a result of the races, a table of measurements was compiled on different configurations (the last measurement on the receiver was made on light forged wheels, all the rest on conventional stamping):
https://www.drive2.ru/users/stmel/
On the standard receiver, acceleration to 100 mph was 9.2 seconds, on the 21179 receiver - 9.1 seconds (different disks could affect the result). A noticeable difference is felt at a distance of 400 m. Receiver 21126 - 16.5 seconds, and on 21179 - 16.0 seconds.
What is a “spider” for Priora and what is it for?
Tuning the exhaust system of the Lada Priora includes replacing the exhaust manifold with a similar sports version, called the “spider”. The main difference between the original manifold and the crosspiece is that the latter has a larger diameter and the same length as the pipes, which facilitates the rapid release of exhaust gases from the cylinders into the exhaust pipe.
This crosspiece design prevents exhaust gases from flowing back into the combustion chamber, increasing engine power and performance. In addition, the manifold performs the function of purging the combustion chamber and filling it with a combustible mixture due to the pressure created at the outlet of the exhaust gases.
To tune the Priora exhaust system, a ready-to-install Stinger direct exhaust kit is often used with additional components perfectly connected to each other. As a rule, the tuning kit includes the following parts:
- new muffler with nozzle;
- spider;
- Stinger Sport resonator with a tube diameter of 51 mm.
The need to install a “spider” on Priora arises when:
- long car acceleration time;
- indicators of low engine power;
- failure of the old exhaust system, where installing a spider on a Priora is considered an alternative to the old one.
There are many modifications of “spiders” from different manufacturers on the tuning parts market. Some models are produced without oxygen sensors, which requires flashing the engine ECU.
There is a spider with a long and a short tube, which is indicated by the corresponding numbers 4-2-1 and 4-1. These designations reflect the shape of the spider's tubes, that is, 4 tubes merge into 2, and then into 1, in the second option, respectively, 4 tubes are combined into one at once, which significantly reduces the length.
The most popular among motorists has become the long 4-2-1 spider, which, unlike the short one, shows good results in a wide range of turns. The 4-1 short spider is best suited for boosted engines running 6-10k rpm.
Comparative characteristics
So that you can understand which group of pistons is better, consider the comparative characteristics of all three manufacturers with photos:
- Let's start with STI products. Forged STI pistons are produced in Togliatti and they are made by hot pressing. As reviews from consumers who have already installed STI show, these forged pistons largely reduce the efficiency of the engine. This is due to the fact that STI parts have a lower compression ratio and a larger combustion chamber. It should also be noted that the alloy of STI pistons contains less silicon, as a result of which the strength of the components at high temperatures will be lower.
In addition, as a result of the reduced nickel content in the alloy, the service life of the element can be significantly reduced. With all this, STI plugless pistons are more expensive than STK and Avtramata.
Avtramat cast pistons are produced in Kharkov, Ukraine. In the production of pistons, an alloy identical to the original parts on Priora is used. However, unlike the latter, Ukrainian-made products can have deep countersinks, and this is an undoubted advantage of the Avtramat compared to standard pistons. In this case, we are talking about safety in the event of a timing belt break. As for the compression ratio, in the case of the Avtramat it has not changed.
Installation of “spider” 4-2-1 on Lada Priora: step-by-step instructions and price
To install the new collectible "spider" you will need:
- flat screwdriver;
- 13mm head with extension;
- WD-40 lubricant.
It is recommended to carry out work in the following sequence:
- 1. Remove the auxiliary muffler from the manifold by bending the edges of the plate and unscrewing the three fastening nuts on the pipe, after making sure that the Priora exhaust system has cooled down;
- 2. Remove the protective shield and locking plate;
- 3. Gradually remove the old factory manifold from the cylinder head. First of all, you need to separate the pads from the oxygen sensors. Then unscrew the cylinder block mounting bolts and remove the bracket. Unscrew the eight nuts connecting the manifold and the block head and remove it;
- 4. Free the head holes from carbon deposits, lubricate the open fingers with graphite grease;
- 5. Place the 4-2-1 spider on the open pins and mount the exhaust system in the reverse order;
- 6. Make sure that the spider does not touch the wiring and housing parts, which can lead to their deformation when exposed to high heat.
Before installing a spider on a Priora, you should pay attention to the cost of this design. The price range for various modifications of spiders varies from 2 to 7 thousand rubles, taking into account consumables and labor. The installation process takes no more than an hour.
Product delivery options
Note! Below are the shipping methods available specifically for this product. Payment options may vary depending on the shipping method. Detailed information can be found on the “Delivery and Payment” page.
Parcel by Russian Post
Available payment methods:
- Cash on delivery (payment upon receipt)
- Using cards Sberbank, VTB, Post Bank, Tinkoff
- Yandex money
- QIWI
- ROBOKASSA
Shipping throughout Russia. Delivery time is from 5 to 12 days.
Parcel by Russian Post 1st class
Available payment methods:
- Cash on delivery (payment upon receipt)
- Using cards Sberbank, VTB, Post Bank, Tinkoff
- Yandex money
- QIWI
- ROBOKASSA
Shipping throughout Russia. Delivery time is from 2 to 5 days. More expensive than regular delivery by Russian Post, approximately 50%. Parcel weight up to 2.5 kg
Express Parcel EMS
Available payment methods:
- Cash on delivery (payment upon receipt)
- Using cards Sberbank, VTB, Post Bank, Tinkoff
- Yandex money
- QIWI
- ROBOKASSA
Shipping throughout Russia. Delivery time is from 3 to 7 days. More expensive than regular delivery by Russian Post, approximately 100%.
GC
- Throttle valve - without mechanical drive.
- Additional oil channels are made in the cylinder head for the phase regulator. Lightweight valves are from Mahle.
- The catcollector is supplied by the Russian company Ecoalliance. The diameter of the input channels has been increased to 39 mm. The oxygen sensor bears the Bosch emblem.
- The crankshaft has an increased crank radius.
- The working volume of the cylinders has increased due to the larger piston stroke.
- A reliable high-performance water pump is purchased from the Korean company GMB.
- For the first time, a VAZ engine has an imported GMB oil pump with increased performance.
- A new automatic timing belt tensioner was used - with two rollers, from the German company INA.
- Lightweight connecting rod and piston group - manufactured by Federal Mogul.
- The fuel rail is from Continental. The injectors have increased productivity, the spray pattern is optimized for the working process of the new engine.
The 1.8 liter engine is not very different in appearance from the current VAZ sixteen-valve engines. But this is a new motor, and of our own design. Main parameters:
- working volume - 1774 cm³
- power - 122 hp
- torque - 170 Nm at 3750 rpm.
The new motor is designed for Vesta, XRAY and Largus models. There is an additional area on the cylinder block for applying the serial number. It is clearly visible when the power unit is installed longitudinally in the engine compartment. Got the hint? There is no official information yet, but it is easy to guess that we are talking about Niva. The cylinder block is unified with that used on the current 1.6-liter VAZ-21126, -21127 and -21129 engines. Same height and same diameter of the cylinders. The differences are in the additional channels of the lubrication system, which ensure the operation of the phase regulator, and additional channels of the cooling system.
Main technical characteristics of VAZ engines: 21124,21126,21129,21179 and their comparison
Boring a VAZ-21179 leads to sad results. There are no repair pistons, and an attempt to line the block, due to additional drilling done between the cylinders, for better cooling of the block, is not possible.
Comparison of technical characteristics of VAZ engines: 21124,21126,21129,21179
| Motor name | VAZ-21124 | VAZ-21126 | VAZ-21129 | VAZ-21179 |
| piston stroke | 75.6 | 75.6 | 75.6 | 84 |
| compression ratio | 10.3 | 11 | 10.5 | 10.3 |
| cylinder diameter | 82 | 82 | 82 | 82 |
| number of valves | 16 | 16 | 16 | 16 |
| torque | 131N.m. at 3700rpm | 145N.m. at 4000rpm | 148/4200 | 170/3700 |
| Petrol | 95 | 95 | 92 | 92 |
| Euro | 3 | 4 | 5 | 5 |
| Consumption | 8.9l | 8 | 6.9l | 7.2l |
| Power | 89hp | 98hp | 106hp | 120hp |
| Controller | JANUARY 7.2 | M 7.9.7 or JAN 7.2. | M86 VAZ-21129 Vesta, manual transmission Euro 5 | M86 VAZ-21179 Vesta, AMT |
| Candles | AU17DFMRV | A17DFMRV | BCPR6ES NGK | Q20PR-U11 Denso |
Comparison of engine 21179 with base 21126
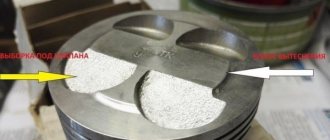
The VAZ 21124 engine, unlike 21222, 21126, 21129 and 21179, does not bend the valve; for this purpose there are holes on the bottom of the piston. It can be used with standard shafts or sports ones with moderate lift,
Starting with engine 21126, the piston was reduced, thinner rings were installed, and the connecting rod was lightened. The 21126 engine is already equipped with a new automatic timing belt tensioning mechanism with rollers of a new design.
Many car owners with this engine had their timing belt break and valves and connecting rods bent at very low mileage, due to poor quality pumps assembled at TZA. Pumps or rollers jammed, which led the car owner to significant expenses (from 30 to 50 thousand rubles). At the same time, the belt could easily cover its 150-200 thousand km.
A special two-layer metal cylinder head gasket with a thickness of 0.45 mm was also installed.
At 21179, we increased the working volume to 200 “cubes” and installed a phase shifter at the inlet. Thus, the base 21126 was increased from 98 to 120 horses. Naturally, it was necessary to somehow reduce the thermal load. To do this, it was necessary to make additional cooling channels in the cylinder head, which AvtoVAZ did an excellent job with. 21179 has a new cylinder head with increased fluid flow. But to reduce the temperature in the cylinder block, they did it in a simpler way. The block had the usual oblique drilling between the cylinders. Is the question still open? Will the gasket between the cylinders often burn out due to additional holes?
This practice has already been used on ZMZ engines. When from a 406 engine with 98 hp. made 405,135 hp. We also machined a jumper into the block. The result was disastrous. The cylinder head gasket burned out very often and many drivers began to seal these jumpers with cold welding. So, West drivers from 21179, get ready and stock up on cold welding (just kidding).
Subsequently, ZMZ completely changed the cylinder block and the new engines 405 and 409 already came without a jumper between the cylinders. The plant admitted its mistakes, but more than one thousand gazelle drivers have experienced these factory mistakes. AvtoVAZ cannot yet replace the old cylinder block from 21126 with a new one developed by the designers, due to the too high costs of changing the production cycle. I think in the future they will be forced to replace the unit.
At 21179, the crankshaft was lightened by 40%. Now its stroke will not be 75.6 as it was on 21129, but 84, so the pistons and connecting rods are no longer interchangeable with 21126.
The oil channel plugs on the crankshaft were removed and a neck-to-neck lubrication system was used.
The main bearings do not have a full groove for oil passage, but have a variable profile.
The intake manifold and valve covers are completely plastic.
A rubber gasket was used in the crankshaft damper to dampen torsional vibrations.
There is a new flywheel for the clutch with a diameter of 215 mm, not 220, as was previously the case.
The pump produced by TZA was completely replaced by an imported supplier, apparently Korean.
Europeans make all their engines through one place, and Russian managers, thanks to peripheral capitalism, are good at adopting this experience. When some talkers say that the Russians cannot do anything, this is pure lies and propaganda. We still have great specialists in the automotive industry, but they are caught in the grip of the current economic situation, where it is practically impossible to apply their knowledge and projects. What the USSR did in 1939, the Germans were able to repeat only in the 90s. An example is the V-2 diesel engine with 4 valves per cylinder with two camshafts, which was installed on the T-34 and could even run on sunflower oil. Those designers who then developed an engine that was an order of magnitude superior in its performance to the German engines on the Tiger and Panther tanks need to erect a monument.
Source
Results
In some cases, installing ready-made kits not only requires experience, but also takes a long period of time, since installation requires searching for the most convenient mounting location in the engine compartment. It is worth noting that installing a zero-resistance filter is justified only when the engine is completely modified. Otherwise, the opposite effect will be observed - a drop in power.
So, we have found out the advantages and disadvantages of this type of tuning. As you can see, you can install a cold start yourself, saving significant money.
History of origin
Motor 21179 was already in the minds of the engineer much earlier than you can imagine. Even at the end of the USSR, developers began to think about the Lada C project and its power units. Even then, engineers “knew” this motor by its features and power characteristics. But the difficult economic situation of that time and the collapse of the USSR forced the engineers to completely forget the Lada-Ts project.
And now, after a long time, when Boo Anderson comes to the post of general manager of AvtoVAZ, the project is raised and developed again.
The main task was to create an engine with good low-end torque, which AvtoVAZ lacked for a confident, comfortable ride. “Tractor” 8-cl engines have long since become obsolete, but the new 16-cl engines had a more “sporty” character. The situation was corrected by the then 21127 engine, now 21129, which is installed on Vesta, Xray, and other AvtoVAZ models. Due to the intake receiver with variable geometry installed on it, the torque from the bottom began much earlier, unlike the Prioromotor (21126), and its shelf was much further, right up to the cutoff. But with the start of production of a sedan with a larger mass - the Vesta, and the Xray hatchback - the need for low-end engines reappeared.
The engine was run in and tested for a long time. As a result, during the testing process it turned out that the rings were already stuck at 4t.km., as a result, the heat zone was increased and the problem disappeared.
Nissan HR16DE engine with 110 hp power. It copes well with its task on front-wheel drive. But if you have all-wheel drive, it will strain, get hot, eat a lot and not drive.
Another factor in the creation of the 21179 motor is economics and politics. Because the Nissan engine, although it is assembled here, still belongs to Nissan. And in the event of an unfavorable economic situation, an increase in exchange rates, the cost of its production and sale may simply be unprofitable.
Start of production of motor 21179
Back in 2014, there were rumors about the possible production of a 1.8 liter engine with phase shifters. And yet it became a reality. Previously, OPP and its subsidiary Super-Auto were already engaged in the construction and installation of a 1.8 liter engine with index 21128, which was installed in Priora Sport. But that engine did not have a special resource.
Birth pangs
The VAZ-21179 engine did not appear out of nowhere. The entire previous history of its emergence is a series of active design work and periods of oblivion. It all started in the early 2000s with plans to create a new model at VAZ, belonging to class “C” - the “Silhouette” project. A heavier car required a more powerful engine.
The existing 16-valve 1.6-liter engines were not suitable for this purpose. It should be said that in the line of VAZ engines there was a power unit with a volume of 1.8 liters. We are talking about unit 2130, which was installed on all-wheel drive vehicles: the five-door Niva and the Nadezhda minivan.
However, it was designed exclusively for “tractor” traction and had a power of only 85 horsepower. Therefore, they began to develop a new engine for the Silhouette project. Then management plans changed, and the developments were archived.
In 2008, they returned to the previous idea again, but they decided not to attempt a completely new unit, but to limit themselves to a deep modernization of the old 1.6-liter due to a lack of funding. One of the planned innovative solutions was the use of a variable valve timing system.
Since VAZ engineers had no experience in this area, it was decided to enter into a contract with the English concern Ricardo, which has the necessary competencies, to carry out calculation and research work. Also, at one time, thanks to cooperation with Porsche, a rather successful engine for the V8 was created, which became the prototype for all subsequent front-wheel drive models.
Work was stopped several times, then resumed again, as VAZ, like the entire Russian economy, was going through difficult times. And suddenly, completely unexpectedly, in March 2016, a new VAZ engine with the index 21179 was put into mass production.
Design nuances
The 21179 engine bears little resemblance to the basic version 21127, as both the design and appearance have changed:
- phasing of intake valves within ±30 degrees;
- hollow camshafts with cams using powder metallurgy;
- vortex air supply into the combustion chamber;
- cylinder cooling system (jacket);
- improved configuration and cylinder head gasket volumes;
- ShPG Federal Mogul;
- Korean pump;
- inclined drilling of oil channels in the crankshaft journals;
- polymer cylinder head cover and solid aluminum pan;
- flywheel for clutch 215 mm, which is recommended by the manufacturer.
Motor gaskets
ShPG from Federal Mogul
History of origin
Motor 21179 was already in the minds of the engineer much earlier than you can imagine. Even at the end of the USSR, developers began to think about the Lada C project and its power units. Even then, engineers “knew” this motor by its features and power characteristics. But the difficult economic situation of that time and the collapse of the USSR forced the engineers to completely forget the Lada-Ts project.
And now, after a long time, when Boo Anderson comes to the post of general manager of AvtoVAZ, the project is raised and developed again.
The main task was to create an engine with good low-end torque, which AvtoVAZ lacked for a confident, comfortable ride. “Tractor” 8-cl engines have long since become obsolete, but the new 16-cl engines had a more “sporty” character. The situation was corrected by the then 21127 engine, now 21129, which is installed on Vesta, Xray, and other AvtoVAZ models. Due to the intake receiver with variable geometry installed on it, the torque from the bottom began much earlier, unlike the Prioromotor (21126), and its shelf was much further, right up to the cutoff. But with the start of production of a sedan with a larger mass - the Vesta, and the Xray hatchback - the need for low-end engines reappeared.
The engine was run in and tested for a long time. As a result, during the testing process it turned out that the rings were already stuck at 4t.km., as a result, the heat zone was increased and the problem disappeared.
Nissan HR16DE engine with 110 hp power. It copes well with its task on front-wheel drive. But if you have all-wheel drive, it will strain, get hot, eat a lot and not drive.
Another factor in the creation of the 21179 motor is economics and politics. Because the Nissan engine, although it is assembled here, still belongs to Nissan. And in the event of an unfavorable economic situation, an increase in exchange rates, the cost of its production and sale may simply be unprofitable.
Start of production of motor 21179
Back in 2014, there were rumors about the possible production of a 1.8 liter engine with phase shifters. And yet it became a reality. Previously, OPP and its subsidiary Super-Auto were already engaged in the construction and installation of a 1.8 liter engine with index 21128, which was installed in Priora Sport. But that engine did not have a special resource.