Dimensions of wheel bearings for Lada Granta
Bearings Lada Granta (VAZ-2190, 2191)
In the list, numbers are indicated only with significant additional designations (for example, A - reinforced, Ш - noise requirements, etc.), if there are other modifications that are less suitable, numbers for VAZ are indicated fully.
Topic: Differences between VAZ 2108 and 2190 Grant. Replacing the rear wheel bearing. Catalog number 2108-3104020 or 256706 There are a lot of manufacturers CRAFT FENOX RTBB12313O7 HOLA NB722 took this TRIALLI CS 256 WEBER BR 2108—4020 VPZ-15 CHINA SPZ-4
To the heap, change the oil with flushing, and small things! candles, filters, lamps. In stock: VAZ 2191 Lada Granta liftback
But her rear lights and bulbs are different. In the first part, a small mistake was made, the rear light bulbs are not dual-mode, but there is one bulb for the stop and one for the marker.
Text without photos because we are watching a video
The rear bearings are the same as 2108 (all front-wheel drive), the hubs are the same, the pads are 1118 2170 with ABS, and we have grants with ABS like this
ABS rotor VAZ 1118-2170 rear wheel 1118-3538400 + ABS sensor
The rear brake cylinder is like a figure eight. There are also small differences in the fastening of the rear wheel hub axle 2108-31104055 (hexagon), as well as in the front suspension; different bolts are used for the balls and for fastening the caliper bracket with an E-12 head, which require a slightly different tool. We disassemble/assemble like a figure eight/nine
The rest is the same, the same “nine” Have a nice weekend! Feel free to visit me in PM aka garage (advice/repair), Blog (personal opinion), Matiz on 16 discs Motya
Other items Cabin filter GB-9831/C Fuel filter GB320 (2123-1117010) fit according to book 2190-1117010
It all started when I noticed a hum at a speed of >130 km/h. Then this hum began to appear at 100 km/h. It ended up that the car began to hum already at 60 km/h.
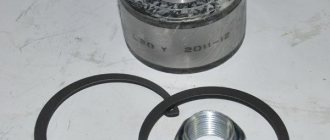
As a replacement, I decided to take something proven, namely SKF. I found three models suitable for Kalina/Granta: ● VKBA 1414; ● VKBA 1315; ● VKBA 3441.
The first two options cost more than 2 thousand rubles per piece, and the last one costs only 950:
Source
Replacement procedure
Lubricate So, we have determined that this cannot be done with a little blood, and the car really needs to replace the bearing. Therefore, we adhere to a clear procedure and begin work.
- Remove the brake drum. There should be no problems with this, since it is fixed quite simply on the rear wheel.
- Pry up the hub cap using a flathead screwdriver and remove it.
- Now, using a narrow chisel, straighten the collar of the nut, which was jammed in two places at once. Don’t be afraid, it wasn’t you who did something, such a jam is provided at production so that the element does not fly out of its rightful place.
- Use a 30mm socket to unscrew the fastening nut.
- Remove the unscrewed nut and also dismantle the thrust washer.
- Arm yourself with a three-legged or two-legged puller, which will allow you to remove the hub from its place.
- If you don't have a three-jaw tool, press out the hub using two bolts or screws. As the practice of craftsmen has shown, bolts for fastening the head of a power unit are excellent for these purposes.
- Screw the screws into the opposite holes for fastening the wheel and rest their ends against the heads of the bolts securing the hub axle to the rear suspension beam of your car.
- Try to tighten the screws evenly to allow the hub to press out. There is no need to remove the pads.
- As a rule, the inner race of the bearing should remain on the hub axis.
- Secure the ring using a puller, then remove it.
- If you don’t have a puller, you will have to additionally dismantle the brake pads and use a chisel to mix the ring to the axle.
- Next, the ring moves. Two mounting blades will help you with this.
- Do not be afraid that after processing with a chisel, some kind of defects or nicks will form on the hub axis. This is not terrible, but it is highly recommended to process them with a needle file.
- Arm yourself with pliers, thanks to which you can carefully remove the retaining ring.
- Using a piece of suitable pipe, also carefully knock out the bearing, leaning on the inner ring.
- Another option is to press it out using a wheel bearing puller.
- Clean and effectively lubricate the hub into which the new rear wheel bearing is pressed with a puller or vice. The pressing force must be applied to the outer ring. It will be most convenient for you to do this using the outer ring from an old bearing.
- Install the new retaining ring in its proper place.
- Using light blows on the inner ring, press the bearing onto the axle. Drive until deep enough to fit the nut.
- Full pressing is carried out with the nut already on.
- Be sure to use only the specified torque to tighten the fastener.
- Press the collar of the nut into the two grooves of your hub axle to restore the element to its original appearance.
This procedure cannot be called incredibly complicated, but you will have to “tinker” in your garage. But this is better and more cost-effective than going to a service station and entrusting your car to unknown specialists.
https://masteravaza.ru/hodovka/stupica/zamena-zadnego-podshipnika-stupicy-vaz-2110-541 https://auto-self.ru/podshipnik-zadney-stupicy-vaz-2110-kogda-nuzhno-menyat -i-polnyy-process-zameny/ https://remontautohelp.ru/vaz-2110-vaz-2112-zamena-zadnego-stupichnogo-podshipnika-svoimi-rukami-video-instrukciya/ https://umelyeruki.info/avto /zamena-podshipnika-zadnej-stupicy-vaz-2110/ https://luxvaz.ru/vaz-2110/72-zamena-podshipnika-zadney-stupicy.html
Replacing the front wheel hub bearing
If the bearing fails, replace it. There are two ways to replace a bearing. The first is by removing the steering knuckle assembly, the second is without removing it from the car. The work is shown on the right wheel bearing. The wheel bearing of the left wheel is replaced in the same way. We carry out work on an inspection ditch or overpass. We remove the wheel.
Using a screwdriver as a lever, remove the hub protective cap. We install the wheel and tighten the two bolts that secure it. We lower the car onto its wheels.
With a beard, we straighten the collar of the hub bearing nut, which is dented in two places. Apply the parking brake, engage first gear and replace the wheel chocks.
Use the “30” socket to loosen the hub bearing nut. The nut is tightened with a lot of torque, so the socket and screwdriver must be strong enough to transmit the necessary force. We rest against the front of the car (exactly both front wheels, because otherwise the anti-roll bar will interfere with disassembly, pressing the suspension elements upward). We remove the wheel. Unscrew the wheel bearing nut completely...
. and remove the washer. Remove the front wheel brake disc (see “Removing the front wheel brake disc”). Disconnect the right wheel drive from the hub (see “Removing the front wheels”). In order not to disturb the wheel angles, the bearing can be replaced without removing the steering knuckle. To do this, we connect the ball joint to the fist...
... And compress the hub by hitting it through a soft metal drift. The hub can also be compressed using the front brake disc.
We pass M12 × 1.25 mm bolts, about 130 mm long, through two diametrically opposite holes in the disk and screw them into the holes of the hub to a depth equal to its thickness. By sharply hitting the bolt heads with a disk, we press the hub. If it was not possible to remove the hub in this way, remove the steering knuckle. To do this, unscrew the nuts of the bolts securing the shock absorber strut to the steering knuckle, remove the bolts (see “Removing and disassembling the shock absorber strut”). Disconnect the ball joint and remove the steering knuckle.
How to find out about problems with the hub?
Instructions for replacing the rear wheel bearing on a VAZ 2114 with your own hands
The hub is an important part of any vehicle. It has a hole created to allow it to be attached to an axle or shaft, and the main purpose of this part is to transmit torque from the crankshaft to the wheel, due to which the latter begins to rotate and the car starts to move. Along with the hub, an equally essential element of the chassis assembly is the hub bearing, presented in the form of a double-row ball or single-row roller bearing. Together they are aimed at observing safety measures while the car is moving, so it is clear that failure of any part of them cannot guarantee this.
Today, the rear wheel hubs of any vehicle are subject to significant vertical and axial loads, and on vehicles with rear- or all-wheel drive, high torque is added to this.
Unknowingly, the car owner himself can contribute to the rapid wear of the wheel bearing during the process of replacing wheels. When tightening the fastening bolts, you may not calculate the force and tear them off, but this does not mean at all that you should not fix the wheel rim well
In this matter, it is important to find a “golden mean” and then you will not have to think about the possible consequences. To tighten the bolts, it is best to use an electric wrench, as it better “feels” the limit of permissible force
It affects the rapid wear of the bearing unit (rear wheel) and moisture and dust entering it from the road.
Penetrating into the hub, dust acts as an abrasive substance, gradually squeezing out the lubricant through the sealing parts, as a result of which the hub bearing is destroyed by heat.
It is not difficult to notice the need to replace the wheel bearing; you will be informed about this by a characteristic knock coming from the rear of the body, which intensifies when driving on uneven roads or when hitting bumps and holes. If the car moves on a flat surface, a hum occurs and, although this is not noticeable, the brake drum gets very hot. Also, when turning the steering wheel, quite often an uncharacteristic braking is noticeable - another sure sign of a faulty bearing.
Usually, to determine the cause of bearing failure, just a visual inspection is not enough; the condition of adjacent parts, the quantity (quality) of lubricant and the conditions of use of the vehicle should also be taken into account.
Among the main factors influencing rear wheel bearing failure are:
Reducing the service life of parts due to long-term operation in extreme conditions (the average service life of this type of bearings is calculated at approximately 1,000,000 km, which in reality often does not correspond to this indicator);
Unreliability of lubricants: their excess (lack) or poor quality (70% of cases);
Contamination when moisture or solid particles of various debris get inside the part (18% of cases);
Incorrect wheel installation: incorrect adjustment, excessive force, over-tightening of the bushing, overheating, inaccurate clearance, etc.
To avoid costly damage and take precautions, manufacturers recommend checking wheel bearings every time you replace brake pads, regardless of the age of the vehicle.
Replacing the front wheel bearing of a Lada Granta - detailed instructions with photos and
- ➡️ Replacing the wheel bearing with a new one
- ➡️Diagnostics of the front wheel bearing
- ➡️ Preparatory activities before renovation
- ➡️ Tips and advice from experts
- ➡️ Removing the old Granta wheel bearing
- ➡️ Features of choosing bearings
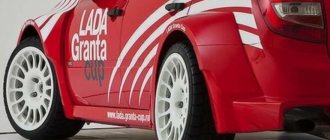
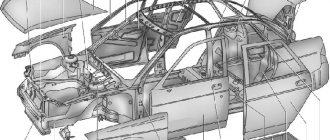
Wheel bearing failure is a common occurrence in the operation of domestic cars. For example. Let's consider the Lada Granta car (Lada Granta, 2190, 2191, Sport, Liftback, Sedan) produced by VAZ, created on the basis of the Lada Kalina; in terms of dimensions, the car belongs to the “C” class.
The front suspension is borrowed from Kalina, but modernized. In terms of reliability, these models are not much different.
Wheel bearing replacement continues. Grants without special tools, experience or knowledge.
Replacing the front bearing and CV joint of a VAZ
Removing a faulty bearing Grants and disassembling the front hub
How to change a bearing without wasting time and money? Follow the instructions!
- We jack up the car and immediately rotate the wheel holders that we remove.
- Park the car on a level surface with sufficient lighting.
- Loosen the boots on the steering wheel you are replacing.
- Then we find and loosen the fasteners on the brake caliper.
- Unlock the hub nut, then loosen it with a socket wrench.
- Having gained access to the brake disc, unscrew the mounting bolts.
- Then remove the previously loosened hub nut.
- We remove the caliper, place it on the steering rod or hang it on a cable.
- We disassemble the brake disc, then unscrew the protective casing.
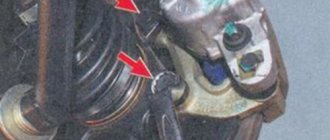
- Let's move on to unscrewing the two bolted connections on the rack. Use WD-40 for easy disassembly.
- After unscrewing the steering knuckle fasteners, remove it from the CV joint.
- Having disconnected the strut from the steering knuckle, unscrew the bolts of the Grant ball joint.
- We secure the structure in a vice, then select the head to remove the hub.
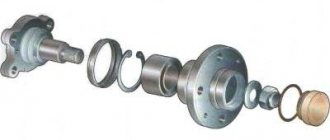
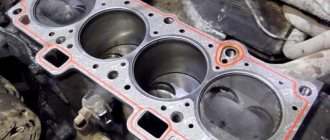
- The steering knuckle housing contains the front wheel bearing hub and ball bearing, which must be removed.
- We hit the spindle and disassemble the hub. As a result, the inner ring of the hub bearing will remain on the support pin, and the outer ring with the cage and balls will remain in the steering knuckle.
- To remove the outer part of the hub ball bearing, first remove the snap ring. We use screwdrivers or pliers.
- To remove the outer part of the hub ball bearing, first remove the snap ring. We use screwdrivers or pliers.
- Then we use an extractor and carefully press the product from the drive shaft to the end. This completes the disassembly.
- Let's start removing the inner race from the hub. To do this, first carefully move the element with a chisel a couple of millimeters.
READ McLaren Saber hypercar revealed; A total of 15 units will be produced
Bearing in the front hub
Replacing the rear hub of a VAZ 2109 and all about it
The process of replacing the front wheel bearing is labor-intensive and requires certain knowledge and skills. So, you will need quite a lot of tools: a set of large heads, screwdrivers and keys, as well as a medium-sized crowbar and two jacks. It is worth noting that the process of replacing a bearing with and without ABS is almost no different. For cars without ABS there is no hole for the speed sensor.
At the first stage, remove the wheel: engage the handbrake and first gear, unscrew the hub nut (key “30”). Loosen the four screws, and then use the jack.
Replacing a Renault Logan wheel bearing is not complete without removing the wheel arch liner. First, remove the bumper shield (two pistons and three screws). Then you need to get to the point marked by the arrow.
All fender liner mounting points
When the piston at the “important point” is removed, go through the remaining elements. These are four screws (1 and 2), two pistons in the front, as well as a self-tapping screw and pistons near the mudguard. In configurations with ABS, the following actions are carried out: disconnect the connector, remove the cord from the grooves (see
photo), disconnect and remove the sensor
In configurations with ABS, the following steps are carried out: disconnect the connector, remove the cord from the grooves (see photo), disconnect and remove the sensor.
The cord must be taken out of three grooves
All that remains is to remove the steering knuckle. But this operation is a long one.
Removing the brake discs
Let's try to remove the pads: move the bracket outward, unscrew the nut on the lower pin (key "13"), lift the bracket. The finger is kept from turning with a key “17”.
Down with the pads
We take out the pads, then remove the brake mechanism. To do this, use an 18mm wrench to unscrew the two screws. They hold the mechanism on the fist.
To prevent the disc from turning, you can temporarily tighten any screw that secures the wheel. A wedge is placed between the hub shoulder and the screw.
How to remove the steering knuckle
The tie rod end needs to be disconnected from the knuckle. To do this, use a 21 wrench to loosen the locknut, holding the tip itself by the flats (see photo).
Down with the rod tip
The most difficult thing will be to knock out the finger: loosen the nut with a 16mm wrench, and hold the finger itself with a Torx T30 wrench. Then we hit the end of the lever with a hammer. The pin must be pressed out completely, and the nut must be unscrewed at the end.
Let's move on to the suspension arm. The structure of the front suspension allows you to easily remove the stabilizer stud: use a 13mm wrench to unscrew the nut, holding the cap with a T40 wrench (see figure).
We only use a screwdriver and a wrench
Then, using a 16mm wrench, unscrew the nut of the coupling bolt. The “tie” is located at the bottom, and the “cheeks” of this tie can be opened with a screwdriver. The point is to bring the support down from the fist.
The simplest thing left is to unscrew the two screws on the stand. To do this, use the “18” key.
Attaching the steering knuckle to the strut
Removing the bearing
Using a vice and a thin mandrel, you will need to knock out the hub (see figure). In this case, the bearing is destroyed.
The old bearing will be destroyed
The outer bearing race is then knocked out of the knuckle. But first remove the retaining ring.
Let's consider all the steps in order:
- We separate the hub and fist (mandrel d=36.5);
- Using circlip pliers, remove the ring from the knuckle recess;
- We use a d=65 mandrel to knock out the outer ring.
Each step has a photo.
We got rid of the bearing by half
Now let's remove the extra part from our hub.
First, remove the washer covering the rubber seal. Next, move the bearing ring using a hammer and chisel.
Down with the other half of the bearing
At the last stage you will have to use a puller.
Bearing installation
First, the bearing is pressed in, then the retaining ring is installed, and then the hub is pressed in. In this case, a screw puller or a hammer and mandrels are used.
Tips for the ABS version
For trim levels with ABS, there are rules:
- Before installing the bearing, the sensor ring is installed. The legs of the ring “look” inward;
- Grooves 1 and 2 must match (see photo);
- The magnet on the bearing should “look” inside the fist.
Subtleties of crimping
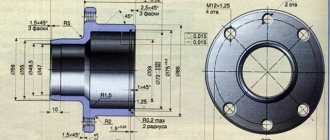
The Renault Logan wheel bearing puller looks the same as the puller for AZLK-2141. The drawing is presented below.
Special tools from the AZLK plant
When working, follow two rules:
- When you press the bearing into your fist, cup 3 (72 mm) presses on the bearing;
- If the hub is being pressure tested, cup 4 (62 mm) is used.
In the first case, the spacer rests on the fist. In the second, it puts pressure on the hub.
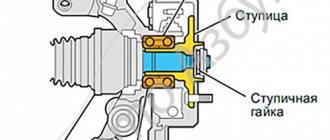
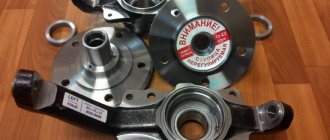
Where are the front and rear hubs on the Lada Grant? Description, purpose
The front hub joint is located on the front left (right) side of the drive shaft. The rear pin is located in the left (right) rear suspension block.
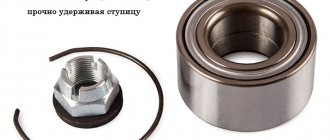
The main purpose of a bearing is to hold the hub securely so that the wheel can rotate. Structurally, the front (rear) hubs consist of:
- insulating rings;
- external and internal metal clamps;
- a separator in which metal balls and rollers are located;
- special filler – graphite-based lubricants.
Diagnosis of wheel bearing failure Grants
The front wheel bearing on a Grant is not the most vulnerable part of the suspension, but failure is possible after eighty thousand km or due to external and internal factors.
A front hub malfunction is determined by the following symptoms:
- Vibrations, wheel runout, friction noise (typical of a failed ball bearing);
- Noise from the wheel when driving (damaged ball bearing parts: rolling elements, raceways or cage);
- Front wheel play (faulty ball bearing or insufficiently tightened hub nut).
The same signs of malfunction are characteristic of the rear wheel bearing on the Grant.
Observe the characteristic noise when the hub assembly breaks:
Diagnostics of the front wheel bearing is as follows:
- Check the axial play (play) according to the instructions.
- The front of the car is raised;
- Manually turn the wheel and check the noise;
- Be sure to check the diagnostics.
- If you hear a noise or notice other signs, replacing your Granta front wheel bearing is imminent.
Diagnostics of the VAZ front wheel bearing
Checking the wheel bearing
The condition of the wheel bearings should be checked not only at intervals determined by the manufacturer, but also during each vehicle diagnosis. During inspection, it is necessary to determine the correct rotation of the wheel, which should not have free axial displacement (play). For this purpose, you need to act in the following sequence:
We lift the rear wheel on a jack and give it torque by hand, while there should be no extraneous noise or “murmuring” of the rollers;
We spin the car wheel clockwise, checking it for extraneous noise.
Alternately, in different planes, we loosen the wheel perpendicular to the hub axis. We act with both hands at the same time.
Checking for play is done by rocking the wheel in a vertical plane.
In the horizontal plane, play is less common, but diagnosing this malfunction is mandatory
In the first case, a check is made for the presence of corrosion “shells” and the cleanliness of the roller track, in the second, the wear of the treadmills is checked, where even a small play should not be noticed.
An example of wear on the running part of the outer race of the bearing
Preparatory stage before replacing the hub mechanism
Required materials and tools:
- chisel;
- wooden stand;
- wheel wrench;
- new wheel bearings;
- hydraulic jack (mechanical;
- English keys;
- pliers;
- crank, injectors;
- stationary vice;
- hammer;
- two handles and a glass stripper. The exact dimensions of the extractors are indicated in the operating instructions;
- rags;
- Phillips flat-blade screwdriver;
- caliper for measuring diameter;
- additional lighting if work is carried out at night.
- type of fat “CV joint – 4”;
- wire brush;
Review of manufacturer prices for front and rear hinges
How to choose and buy quality parts
Service center specialists strongly advise purchasing consumables and components exclusively from specialized stores, representative offices, and official dealers.
To a lesser extent, it is necessary to use the services of unverified suppliers who sell spare parts at unusually low prices.
When purchasing, check the catalog numbers with the current data specified in the operating instructions for the technical device. If you do not have such a brochure, contact a specialist.
Comments
TOP materials of the week
TOP products in the store (more)
Who services your Lada Priora?
Lada.Online
Lada (“Lada”) is a brand of cars produced by JSC AVTOVAZ. Previously, it was used only for export cars, and for the domestic market, cars were produced under the Zhiguli brand. In 2004, the management of AVTOVAZ announced the transition to the Latin alphabet for the official spelling of the names of all cars produced by the plant: Lada - instead of "VAZ" and "Lada".
Lada.Online is the largest Russian-language automotive resource with a daily audience of thousands, which is dedicated primarily to cars of this brand, the domestic automotive industry and the automotive world in general.
This site is not the official LADA website.
© 2022 Lada.Online. Copying of material is permitted only with a link to the source.
Source
Replacing the rear wheel hub of a Lada Granta
- We park the car around the perimeter of the repair site and secure the first row of wheels with wedges.
- Using a wheel wrench, we break the nuts, jack up the car, and remove the wheel.
- Unscrew the screws securing the brake drum to the structure.
- Remove the hub cap and remove it from the axle grooves.
- We fix the structure in a stationary vice. Gently tap the outer edge with a chisel.
- If necessary, use WD-40 fluid to remove deposits and rust.
- We disassemble the loop, use a vice, although some craftsmen use special pullers. In general, whoever is more comfortable with it.
- Using a metal mandrel, remove the inner ring.
- To finally squeeze out the loop, use a hammer and chisel, gently tapping along the outer perimeter of the frame.
Replacing the rear wheel bearing of a Lada Granta with your own hands
Note to the driver. Before starting installation work, clean the surface of debris and dirt. Apply a thin layer of oil and evenly lubricate the outer joint race.
- We install the new hinge and press it lightly into the cavity.
- Pull the loop evenly until it touches the outer edge.
- We fix the retaining ring and set the hub to its original position.
Installation in a regular place. Assembly of the structure
- Apply a thin layer of graphite grease, put the unit on the shaft and secure it with a nut.
- Complete the tightening with a torque wrench (tightening torque 30 Nm).
- We contrast the nut with a chisel and put on the cap.
Replacing the front wheel bearing of Lada Granta
Sooner or later, any car owner will be faced with the problem of failure of the front wheel bearing on a Grant. It's okay if the product is replaced on time when the first signs are detected.
worse, if the driver ignores signs indicating a faulty element, which can lead to a serious accident. The main purpose of wheel bearings is to support and ensure proper rotation of the wheels.
Structurally, the product consists of two metal rings, between which there are rollers or spheres, an insulating material that prevents debris from entering and lubricant leaking out of the product.
Symptoms of a problem
Front hub problems are identified by the following:
- sounds of scraping metal;
- extraneous and unnatural noise from the wheel during rotation;
- wheel eccentricity, vibrations of varying intensity;
- the resulting play of the front wheel.
Causes of breakdowns
The service life of the product is quite long and amounts to about one hundred thousand kilometers in difficult operating conditions. However, in real “combat” conditions, the elements fail long before the due date. Here are 3 important factors that can significantly reduce bearing life:
- Aggressive environment. Due to the fact that the element is located in the center of the wheel, it is constantly in contact with moisture, water, dust, and dirt. In winter it is exposed to cold temperatures, in summer it is exposed to warm temperatures.
- Bad road conditions. The fact is that when driving on an uneven surface, wheel bearings take on a large load, sudden impacts, and exposure to high and low temperatures. Over time, the metal components of the product become brittle and begin to deteriorate.
- High operating temperatures. The rotation process is accompanied by the natural release of heat; constant heating and cooling occurs (especially in winter conditions), which has a detrimental effect on strength and durability.