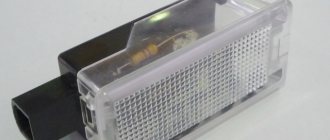
Glove box
We open the glove box and on the left side we see this small lamp that needs to be removed. To do this, insert a flat-head screwdriver into the groove on the right side of the cover, as shown below:
And we insert the screwdriver until the lid opens, after which we remove it from there. The result of this action is shown in the picture below:
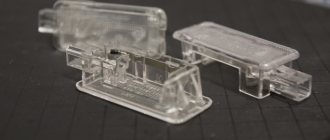
And to get to the light bulb, you need to remove the upper white base; to do this, press on the plastic latch of the lamp cover (in the picture above this latch is clearly visible in the left corner), and pull up the base:
Now you can easily remove the light bulb and install a new one. Then we put everything in the reverse order of removal. At the same time, you can eliminate some extraneous sounds that arise in the glove compartment area from this particular plastic part. I made everything as simple as possible, glued small pieces of sound insulation along the edges, and inserted halves of matches into the wire plugs.
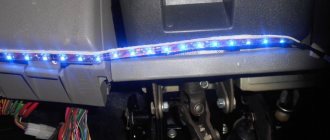
Additional interior lighting of the Priora in the rear pillar trims
The problem of lack of light for rear passengers can be solved in another way. For example, using two lamps in the glove compartment or trunk.
Then unclip the clips and remove the plastic covers on the back of the struts. Cut holes in them for the lampshades, and install them.
Trunk
Here everything is done in almost the same order. We open the trunk and on the left side we see the lamp itself, which can be removed in the same way as in the glove box, but in this case there is no need to remove it, since there is access to the lamp itself from the reverse side.
Since access to the lamp is free, replacing it will be even easier than in the glove compartment, simply by spreading the contacts, removing it, and putting the new one back.
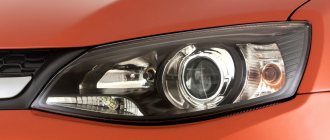
Replacing any of the lamps in the headlight unit of a Lada Priora is not at all difficult. Our step-by-step illustrated instructions will help you cope with this task. There are differences in the procedure for replacing lamps in the headlights of cars manufactured before and after 2013, which we will show.
LADA > Priora
Attention! High and low beam lamps are halogen. You should not touch their glass flasks, as fingerprints will darken when the flask is heated. You can remove dirt from the flask with a clean rag soaked in alcohol.
Replacing headlight bulbs on a car manufactured after 2013
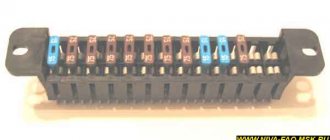
Where are the fuses on the Priora?
- The main mounting block of the Priora is closed with a lid and located at the driver’s left foot. To open it, you need to turn three latches 90° and unclip the lid.
- The fuse box is under the hood, which is located near the expansion tank.
- Another mounting block, which is located near the left foot of the front passenger. To gain access to the fuses and relays, unscrew several screws with a Phillips screwdriver.
Below is a description of each fuse and relay block in order.
Instructions for installing new lampshades
To replace lighting fixtures in both the Priora and Kalina interiors, no special knowledge is required, since the procedure is simple.
Photo gallery “Step-by-step installation of lighting shades”
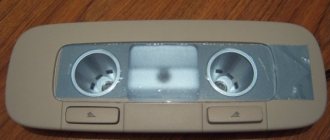
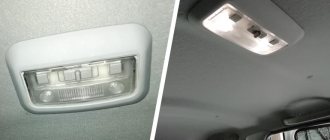
To replace the light bulb, follow these steps:
- First you need to remove the protective cover. This can be done by prying it with a screwdriver from the mounting side and lightly pressing the clip. Now the cover can be easily removed from the ceiling.
- Next you need to disconnect the power wires.
- Having disconnected the old lamp, a new element is installed in its place.
- Assembly is carried out in reverse order.
Installing an additional “Lux” lighting fixture will require care and time. First of all, you need to purchase a new block, which will be placed above the rear sofa.
Lighting connection diagram
The installation procedure consists of the following steps:
- First, you need to apply markings to the ceiling, deciding on the place where the rear lamp will be located.
- Then, according to the markings, a hole is cut in the ceiling covering.
- Next, you need to stretch the power wire from the front light between the roof and the ceiling covering.
- At the next stage, the unit to be installed is connected.
- To ensure that the lid fits tightly to the ceiling, you can cut a frame from some kind of rubber seal.
In the Priora “Norma” configuration, it is recommended to change the front unit installed from the factory. Replacing it is easy, since the characteristics of the devices are the same.
The replacement scheme is similar to replacing a light bulb: a new element will be installed instead of the old light source. When installing LEDs, keep in mind that they differ in brightness color. For the rear light, it is better to make the LED backlight brighter, and put medium-brightness LEDs in front (the author of the video is Repair and Tuning).
After replacing the lighting unit of the Priora Norma configuration with a higher-quality luxury one, the driver becomes more comfortable in the cabin.
Simplicity of installation and low time costs make it possible to replace the standard lighting unit with a more powerful one, or equip the cabin with an additional light source. At the same time, you do not need to have in-depth knowledge of electrical engineering; even a novice driver can perform the replacement.
Price issue
The block (diode) costs 460 rubles. The front Lux package costs 535 rubles.
Priora fuse box diagram
| Fuse no. | Current strength, A | "Standard" and "Norm" | “Norma” with air conditioning and “luxury” |
| F1 | 25 | Engine cooling radiator fan | Reserve |
| F2 | 25 | Heated rear window | Mounting block, rear window heating relay (contacts). Electrical package controller, contact “10” of XP2 block. Rear window heating element. |
| F3 | 10 | Right headlight, high beam | Right headlight, high beam lamp. Instrument cluster, headlight high beam indicator. |
| F4 | 10 | Left headlight, high beam | |
| F5 | 10 | Sound signal | Mounting block, horn relay. Sound signal. |
| F6 | 7.5 | Left headlight, low beam | |
| F7 | 7.5 | Right headlight, low beam | |
| F8 | 10 | Alarm signal | Mounting block, alarm relay. Alarm sound. |
| F9 | 25 | Priora heater fuse | Reserve |
| F10 | 7.5/10* | Interior lighting, instrument panels, brake light | Instrument cluster, pin “20”. Brake light switch. Brake light bulbs. Interior lighting unit. Interior lighting. The door sill light on the right front door. Additional brake signal. |
| F11 | 10/20* | Wiper | Mounting block, high speed windshield wiper relay. Switch for cleaners and washers, contact “53a”. Wiper and washer switch, contact “53ah”. Heated rear window switch. Mounting block, rear window heating relay (winding). Windshield wiper motor. Rear window wiper motor (2171,2172). Windshield washer motor. Rear window washer motor (2171,2172). Airbag control unit, pin “25”. |
| F12 | 20/10* | Terminal 15 devices | Instrument cluster, pin “21”. Electrical package controller, contact “9” of block X2. Electromechanical power steering control unit, contact “1” of block X2. Reversing light switch. Reversing lamps. Parking system control unit, contacts “11” and “14”. |
| F13 | 15 | Cigarette lighter fuse Priora | |
| F14 | 5 | Left headlight, parking light, license plate light, trunk light | Side light lamps (left side) Instrument cluster, main light indicator License plate lights Trunk light Electrical package controller, pin “12” of block X2 |
| F15 | 5 | Right headlight, parking light | Side light lamps (right side) Glove compartment lamp |
| F16 | 10 | Terminal 15 ABS | Hydraulic unit, contact "18" |
| F17 | 10 | Left fog lamp | |
| F18 | 10 | Right fog lamp | |
| F19 | 15 | Seat heating | Seat heating switch, contact "1" Front seat heaters |
| F20 | 5/10* | Immobilizer control unit | Recirculation switch (switch on) Mounting block, relay for low beam headlights and parking lights (automatic lighting control system) Heater electric fan relay Automatic lighting control switch Windshield wiper and external lighting control unit, contacts “3”, “11” Automatic climate control system controller installation, pin “1” Automatic window cleaning system sensor (rain sensor), pin “1” |
| F21 | 7.5/5* | Rear fog lights | Light switch, contact "30" Diagnostic block, contact "16" Clock Automatic climate control system controller, contact "14" |
| F22 | -/20* | Reserve | Windshield wiper motor (automatic) Mounting block, windshield wiper relay and windshield wiper high speed relay, (contacts) |
| F23 | -/7.5* | Reserve | Windshield wipers and external lighting control unit, pin “20” |
| F24-F30 | Reserve | ||
| F31 | 30 | Electrical package control unit | Electrical package controller, terminal “2” of block X1 Electrical package controller, terminal “3” of block X1 Driver’s door module, pin “6” Threshold light of the left front door |
| F32 | Reserve | ||
Product delivery options
Note! Below are the shipping methods available specifically for this product. Payment options may vary depending on the shipping method. Detailed information can be found on the “Delivery and Payment” page.
Parcel by Russian Post
Available payment methods:
- Cash on delivery (payment upon receipt)
- Using cards Sberbank, VTB, Post Bank, Tinkoff
- Yandex money
- QIWI
- ROBOKASSA
Shipping throughout Russia. Delivery time is from 5 to 12 days.
Parcel by Russian Post 1st class
Available payment methods:
- Cash on delivery (payment upon receipt)
- Using cards Sberbank, VTB, Post Bank, Tinkoff
- Yandex money
- QIWI
- ROBOKASSA
Shipping throughout Russia. Delivery time – from 2 to 5 days. More expensive than regular delivery by Russian Post, approximately 50%. Parcel weight up to 2.5 kg
Express Parcel EMS
Available payment methods:
- Cash on delivery (payment upon receipt)
- Using cards Sberbank, VTB, Post Bank, Tinkoff
- Yandex money
- QIWI
- ROBOKASSA
Shipping throughout Russia. Delivery time – from 3 to 7 days. More expensive than regular delivery by Russian Post, approximately 100%.
Transport companies
Available payment methods:
- Using cards Sberbank, VTB, Post Bank, Tinkoff
- Yandex money
- QIWI
- ROBOKASSA
Delivery is possible to any locality where there is a representative office of the transport company. Delivery time – from 2 to 10 days. Sending large parcels is approximately 50% more profitable than by Russian Post.