The gasket ensures the tightness of the fuel pump and fuel tank. For cars of the Tenth Lada family equipped with an injection engine.
Applicability: VAZ 2110, 2111, 2112.
Material: rubber. Article: 21103-1101138.
The fuel pump is the main element of the car's fuel system. Its role is to select gasoline from the tank and supply it to the engine under pressure. Any malfunction of this unit leads to interruptions in the operation of the power unit, or its stop. Replacing the pump on VAZ 2110–2112 cars is possible without a trip to a car service center.
What kind of fuel pumps are installed on VAZ 2110/2112 cars
VAZ 2110/2112 cars, depending on the year of manufacture and the type of engine installed, may differ in the method of supplying fuel to the cylinders.
Table: features of fuel supply systems to engine cylinders depending on vehicle modification
| Model/ modification | Year of issue | Engine volume, cm3 | Number of valves, pcs | Injection system |
| VAZ 21100 | 1996–2000 | 1500 | 8 | Carburetor |
| VAZ 21101 | since 2004 | 1600 | 8 | Injection |
| VAZ 21102 | since 2004 | 1500 | 8 | |
| VAZ 21103 | since 2001 | 1500 | 16 | |
| VAZ 21103M | since 2001 | 1500 | 16 | |
| VAZ 21104M | since 2001 | 1600 | 16 | |
| VAZ 21120 | 1999–2008 | 1500 | 16 | Injection |
| VAZ 21121 | 1999–2008 | 1600 | 8 | |
| VAZ 21122 | 1999–2008 | 1500 | 8 | |
| VAZ 21124 | 2004–2008 | 1600 | 16 | |
| VAZ 21128 | 2004–2008 | 1800 | 16 | |
| VAZ 21123 | 1999–2009 | 1600 | 16 |
Only the first modifications of the VAZ 2110 were equipped with a carburetor injection system. From the factory they were equipped with mechanical fuel pumps of the DAAZ brand (catalog number 2108–1106010). Previously, they had proven themselves well on cars of the Sputnik and Samara series.
A mechanical fuel pump was installed in the engine compartment of the VAZ 2110 to the right of the engine valve cover, and was driven by the camshaft.
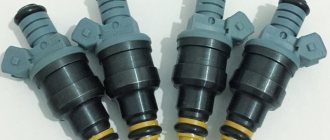
All injection VAZ 2110/2112 are equipped with submersible fuel modules. The design of such a module includes:
- electric fuel pump;
- coarse filter;
- fuel level sensor.
The fuel module is installed directly into the vehicle tank. In other words, the gas pump is completely immersed in gasoline. Injection VAZ 2110/2112 were and are equipped with electric fuel pumps of domestic, joint or imported production. These are products of the Utes, Pekar, Saratov plant, as well as the world famous one, the pumps of which are equipped in all modern VAZs. The catalog number of the stock electric pump is 2112–1139009. There are also modifications whose numbers have two additional digits: 02 or 03. Depending on them, products may differ in length and diameter.
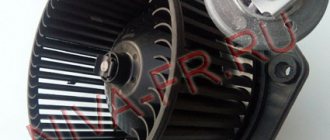
Not only the engine, but also the fuel pump is the heart of the car
Do-it-yourself replacement of the VAZ 2110 fuel pump
Based on the name, the concept of a gasoline pump is made up of two components - gasoline and a pump. This refers to the pump that pumps gasoline.
If you compare a car with the human body, the gas pump is the heart; it pumps gasoline, ensuring the vital functions of the entire mechanism. Without this part, the car becomes an ordinary pile of metal, not intended for anything.
As a rule, the gas pump can be located in several places, often it all depends on the model of the car and the brand of the gas pump. Often it, with all its mechanical structure, is located on the side of the fuel tank.
Regarding electric fuel pumps, they are located inside this tank. In addition, certain models may be located in the engine compartment, in other words, on the engine of the car.
Since the fuel pump is considered an important element of the entire vehicle design. Its task is to continuously supply fuel from the gasoline tank to the fuel system of the car itself, providing it with the required pressure.
Types of fuel pump
Replacing the fuel pump VAZ 2110 injector
There are two types of fuel pumps:
- Electric, which are used in cars equipped with an injection engine;
- Mechanical, which are installed in cars with a carburetor.
A mechanical fuel pump is a simple device, it is quite resistant to breakdowns and is easy to repair. It is worth noting that modern cars have an injection engine, for this reason mechanical fuel pumps are already falling out of use.
Electrical mechanisms are checked by the electronic systems of the machine; they accurately dose the required dose of fuel under a given load.
Such mechanisms differ in their mode of action, they can be:
The driver does not need to understand this issue, since the car manufacturer in any case indicates what kind of fuel pump is needed for the engine of this car. Of course, it is best to buy the same fuel pump that was previously installed, but this is not always possible.
Note! The new part must match the parameters of the old part as closely as possible.
When purchasing any gasoline pump, you need to do a careful inspection; you also need to check the housing for integrity, smoothness, cleanliness and roughness. It is recommended to install a new fuel pump at a service center, since errors may be made when working independently.
In the worst case, not only the pump, but also the motor may break.
Design features of fuel pumps for carburetor and injection fuel injection systems
Mechanical fuel pumps, which were installed on the first modifications of the VAZ 2110/2112, have a simple design. It is based on a set of membranes made of special rubberized fabric that is resistant to the chemical action of gasoline. The pump body has two valves: inlet and outlet. The membranes are driven by a rod (pusher). It is driven by a cam mechanism rotated by a camshaft.
Such a mechanical fuel pump can serve for decades until the drive rod wears out or one of the membranes breaks. And even then, if this happens, you can replace these elements in half an hour.
The first modifications of the VAZ 2110 with a carburetor injection system were equipped with mechanical fuel pumps
With an electric fuel pump, things are much more complicated. Its design is based on a small electric motor. It is no different from a regular one, although it works completely immersed in gasoline. The pressure in the system here is created not by a membrane (although there are such pumps), but by a specially shaped impeller mounted on the electric motor shaft.
The service life of the electric fuel pump is 150–200 thousand km. But it can fail much earlier. The main cause of breakdowns when the resource is not used up is additives added to gasoline, as well as various kinds of mechanical impurities. The former destroy the brushes and commutator, while the latter clog the valve mechanisms.
Signs of a faulty fuel pump VAZ 2110/2112
Signs of pump malfunction appear the same, regardless of its design and type of injection system. These include:
- difficulty starting the engine;
- unstable engine operation at idle speed (vibration, tripping, stopping of the power unit);
- failures during acceleration in motion;
- reduction in power and traction qualities of the engine;
- absence of the characteristic sound of a fuel pump starting (for injection engines);
- presence of traces of fuel leakage (for carburetor power units).
Determining a fuel pump malfunction on your own is quite problematic, because the first three signs, which are the main ones, may indicate other problems in the fuel system, such as:
- fuel filter clogged;
- problems with sensors for mass air flow, throttle position, oxygen level, etc.;
- clogging of one or more nozzles;
- failure of the pressure regulator.
In addition, similar symptoms are observed when problems with ignition occur. It can be determined that the cause of the listed symptoms is the fuel filter by checking the device.
How to Test a Mechanical Fuel Pump
To check a mechanical fuel pump, you will need the following tools and tools:
- screwdriver with Phillips bit;
- slotted screwdriver;
- key (head) 10;
- key to 13;
- 2 clean dry plastic bottles with a volume of 2 liters;
- a piece of hose (50 cm) of the same diameter as the fuel one;
- 1–1.5 liters of gasoline;
- caliper (ruler);
- stopwatch (clock).
Let's start with performance. A working VAZ 2110 mechanical fuel pump with a obviously clean filter should pump at least 1 liter of fuel per minute. The verification algorithm is as follows:
- We lift the hood and find the pump.
- Using a screwdriver, unscrew the screw of the pump outlet hose clamp. Loosen the clamp and remove the hose from the pump fitting.
A performance test involves measuring the amount of fuel pumped over a specified period of time.
If the amount of fuel pumped in 1 minute is less than 1 liter, the fuel pump is faulty
If the amount of fuel pumped per minute is less than a liter, the pump is faulty. The reasons for this may be:
- faulty valves;
- rupture of one or more membranes;
- clogging of the pump grid;
- wear of the drive rod (pusher).
We carry out further checks in the following order:
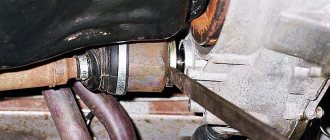
- Disconnect both fuel line hoses from the pump.
Disconnect the inlet and outlet hoses
When you press the manual pumping lever, you should feel a vacuum at the inlet fitting, and a pressure of air at the outlet
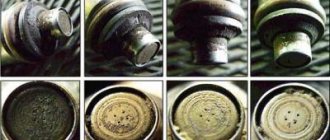
The mesh filter should not show signs of damage or deformation
Unscrew the two nuts and remove the fuel pump from the studs.
To disassemble the pump you need to unscrew 6 screws around the circumference of the housing.
The length of the pusher should be 82.4 mm
Features of repairing a gas tank for an injection VAZ 2110
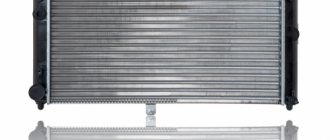
The VAZ 2110 car is a small class sedan that is still produced at various factories in several countries around the world. This model is one of the first to have an injector system under the hood. The injection system made it possible to achieve a high maximum speed with a small engine volume and low consumption. The start of serial production of this particular model paved the line between the classic Zhiguli and the new generation of cars from AVTOVAZ.
Gas tank “tens”
The VAZ 2110 injector has a 43-liter gas tank, which is quite enough for long trips. The fuel tank is made of good metal, which can be welded perfectly if something happens. However, the fact is that in the classic series the tank was located in the trunk, and although it occupied a certain place there, it did not succumb to corrosion and other environmental influences. Starting with the 08 model, they decided to place the gas tank in the rear of the car under the bottom. This added aesthetics and space to the trunk, however, the tank now directly interacted with the environment. In addition, if you move when fully loaded, you can mechanically damage the tank, for example, by jumping into a hole and hitting it on the asphalt.
Removing the tank
If it so happens that the injector on your VAZ 2110 is rotten (considering what services sprinkle on the roads in winter, this is no wonder) or was punctured, then you need to start repairs by removing the gas tank correctly. For this we will need a set of tools and an inspection hole or overpass. Next, all the work is analyzed point by point. You can find out where everything is located in the car manual, so we won’t dwell on this.
- We disconnect the fuel sensor simply by removing the wires from the connectors.
- Remove the hose from the sensor fitting.
- Find the bolts securing the clamps and unscrew them.
- Remove the tank vent pipe.
- Remove the mass from the fuel level sensor and remove it from the tank.
- Carefully remove the tank itself.
Fuel tank VAZ 2110
Of course, it is advisable that the tank is completely empty, because you will need to remove it from under the car with outstretched arms, and every liter of gasoline will create an extra burden on you.
Tank repair
First of all, we must assess the condition of the tank, whether it is worth repairing, and whether it is still suitable for repair. It may be much easier and cheaper to just buy a new gas tank. We only consider welding as a repair, since no glue patches will help if the VAZ 2110 injector tank is rotten or completely broken.
First you need to thoroughly rinse the tank and dry it so that there is no gasoline vapor left in it, otherwise there will be an explosion during work. If you do not have experience as a welder, it would be advisable to visit a specialist.
But, if you are familiar with this and have all the tools, then you can cope very quickly. We can only give small recommendations, including the fact that it is necessary to weld the tank only by autogenous welding using argon as a coolant. You need to start and end the seams before and after a few centimeters near the patch. This is necessary so that delamination along the seam does not occur later. In principle, the cooking tank can last as long as the entire machine will last; it will never be any worse because of the presence of a patch.
Mechanical replacement
If you find problems with the fuel pump, you can try to repair it yourself, or replace it with a new one. In the first case, it is better to buy a repair kit. It includes all the elements of the device that can fail: valves, gaskets, diaphragms and pusher.
If you decide to replace the pump assembly, it is even easier.
After dismantling the faulty device, you need to:
- Install new gaskets and pusher.
- Place the pump in place and secure it with nuts.
- Connect the fuel line hoses and secure them with clamps.
- Press the manual primer lever several times to fill the pump with fuel.
- Start the engine and check its operation.
A new fuel pump is installed on new gaskets
Video instructions for replacement
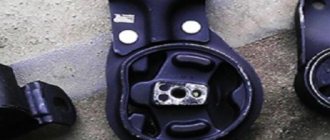
› Logbook › 076: Replacing the fuel pump motor. PEKAR. As it turned out, it was completely in vain)
So, where did it all start?
We left our daughter with my grandmother and went with my wife to the store. As soon as I parked, I was about to turn off the car, waiting for the fan to stop, when the car suddenly stopped on its own.
Not understanding anything, I try to start it. Nevermind. It twists and turns, but does not grab at all. After thinking a little, I sent my wife home))
My first thought was that the timing belt might have jumped... since I recently took it off/on when replacing the pump. I took off the cover and rolled the car forward in gear a little. The marks matched. So it's not a belt)
I replaced the spark plugs with spare ones, it didn't help)
I checked for the presence of a spark, brought the wire with a spark plug to the body, while a random passerby turned the starter. There is a spark.
I started thinking about the fuel supply. I changed the fuel pump motor a year ago, or almost exactly 20,000 km. back. The fuel pump was the cheapest, so it could have been that))
In short, after some time, when turning the key, the fuel pump stopped buzzing altogether.
During the investigation, I found wires in the cabin that were not in very good condition))
Along the way, I changed all the fuses and relays on the ECU, the fuel pump, and apparently on the fan too))
Zero effect. The fuel pump does not pump.
And then, like a brilliant diagnostician, I conclude that the problem is in the fuel pump and the motor needs to be replaced)) As it turned out later, I was wrong ((
Checking the electrical circuit
Unlike a carburetor engine, where the fuel pump is mechanically driven, on the injection VAZ 2110/2112 a special relay and fuse are responsible for the operation of this device. Therefore, before moving on to diagnosing the pump itself, it is necessary to check the indicated elements. If any one of them is faulty, the pump will not work at all.
Turn on the ignition without starting the engine and listen. When the fuel pump is running, it emits a characteristic “whistle” when started. If it is not there, it means that either the pump itself has failed, or one of the elements of its power supply circuit has failed.
The pump relay and fuse are located in an additional mounting block located inside the vehicle's center console. It can be accessed by removing the plastic trim (near the front passenger's left foot). It is secured with several screws. Under the cover you will find three relays and three fuses. Typically, the fuel pump circuit protection elements are located centrally.
Causes of malfunction
Before proceeding with the replacement, it is necessary to determine the reasons why the fuel pump on the VAZ 2110 does not work. There may be several of them.
- Age. Over time, as mileage increases, the pump wears out, fuel supply efficiency deteriorates, and the device stops working.
- Regular driving with an empty tank. This puts a lot of stress on the pump, which cannot withstand it and breaks.
- Filter is dirty. Sometimes replacing the fuel pump filter on a VAZ 2110 solves the problem . The presence of contaminants in it stops the fuel supply, so an air-fuel mixture does not form and the car does not start.
- Sudden and frequent stops of the engine.
- Low performance and loss of engine power.
- Refueling at dubious gas stations whose fuel contains a lot of dirt.
Checking the fuel rail pressure
But even the fact that the fuel pump starts pumping when the ignition is turned on does not mean that it is working properly. The main indicator of its operation is the pressure in the system. You can check it using a regular pressure gauge with a measurement limit of 5–7 atmospheres, which is used to measure tire pressure. In addition, you will need a piece of gas-resistant hose with an internal diameter of 9 mm and two clamps of the appropriate size.
The verification procedure is as follows:
- We relieve the pressure in the system. To do this, disconnect the negative terminal from the battery. We remove the plastic lining of the additional mounting block, which contains the relay and fuse for the gasoline pump. We remove the fuse from the socket. Connect the removed terminal to the battery. We start the engine and let it run until it stalls. After that we put the fuse in place.
- On the fuel rail we find a fitting specially designed for measuring pressure. Using the wheel valve cap, unscrew the spool valve from the fitting.
The fitting is designed specifically for measuring pressure
A regular tire pressure gauge is suitable for measuring fuel pressure in the rail.
For engines with a volume of 1500 cm 3 it should be 2.8–3.2 atmospheres, and for power units with a volume of 1600 cm 3 – 3.6–4 atmospheres. If the device indicators are lower, the pump is unsuitable for further use.
Step-by-step instruction
Working with the mesh takes no more than half an hour, since the driver does not need to disassemble half of the VAZ 2114 car to get to this unit. To work, you will need a standard set of screwdrivers and wrenches. As additional materials, you may need WD-40, which will help unscrew stuck bolts, as well as rags for wiping the body of the VAZ 2114. If you plan to completely replace the pump, then you need to completely drain the gasoline from the fuel tank. It is not recommended to work with fuel in the tank. Replacement proceeds as follows:
- The negative terminal is removed from the battery. This is done in order to de-energize the car.
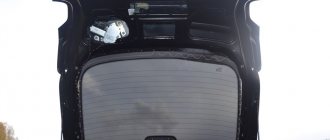
- Under the rear row of passengers, you need to unscrew the plastic protection, as shown in the photo below.
You need to remove the fuel pump carefully, since the float that determines the fuel level is very fragile.
If desired, you can find a supported pump. To determine whether replacement is needed or not, the unit must be thoroughly inspected. But checking the fuel pump yourself is quite problematic, so before changing it, you can take the car to a car service center and check the pressure in the fuel rail.
Performance check
Checking its performance will help make sure that the fuel pump has failed. For this you will need:
- screwdriver with Phillips bit;
- a piece of gas-resistant hose (50–80 cm) with a clamp;
- key to 17;
- empty 2 liter plastic bottle;
- a piece of insulated wire;
- stopwatch.
Performance testing is carried out as follows:
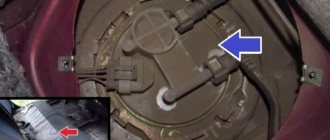
- We remove the back seat. We lift the carpet and find the gas tank hatch under it. Unscrew the two screws (diagonally).
- Once you remove the hatch, you will see the top of the fuel module. Using a 17 wrench, unscrew the nut of the outlet fitting. We put a hose on it and secure the connection with a clamp. We lower the other end of the hose into an empty bottle.
- Disconnect the pump power connector. Using a piece of wire, we supply power to the positive contact of the device from the corresponding battery terminal. We connect the negative one to ground.
- We begin counting the time from the moment the pump starts.
A working fuel injection pump for a VAZ 2110/2112 should pump 1.5 liters of fuel in one minute. If this indicator is lower, the pump must be replaced.
Pump replacement
Most modern cars are equipped with fuel pumps, which are located inside the fuel tank itself. Because of this, getting to it is quite difficult and such placement raises a lot of questions.
In the case of the VAZ 2114, you can raise the rear seat, under which there is a rectangular hatch. By opening it, you will have access to the pump, a sensor with a float and a coarse filter - a mesh. That is, if necessary, you can easily replace a filter or other element.
There are two fuel wires going to the fuel pump:
- The server. With its help, passing through a fine filter, the ramp and injectors are fed;
- Back. Fuel is returned through the pressure regulator to provide continuous power to the engine.
Now let's talk directly about how to remove and replace a failed fuel pump.
- Be sure to disconnect the negative terminal from your car's battery.
- It is advisable to empty the fuel tank.
- When removing the fuel module, you will be able to get to the bottom of the fuel tank, and therefore have a chance to clean it of all kinds of sediment.
- Release the pressure inside the fuel line. This will prevent a whole jet of fuel from hitting your face or inside the car. To do this, use the measuring nipple on the fuel rail and a thin screwdriver.
- Remove the rear seat to gain access to the hatch that leads us to the fuel module.
- Unscrew the two fasteners holding the hatch cover.
- Disconnect the electrical connector from the module.
- Using a 17mm wrench, unscrew the fuel lines that are connected to the pump. Do this carefully so as not to lose the O-ring. Then move the pipes to the side so that they do not interfere with you.
- Using a 7 mm socket, you need to unscrew the 8 fastening nuts. They hold the pressure plate that holds the entire module in place.
- Remove it carefully through the hole in the fuel tank, but before doing this, do not forget to release the fuel level sensor float.
- If there is a new module, install it in the exact reverse order.
- If only one of the elements needs to be replaced, then you will have to disassemble the fuel module into elements.
- Even a beginner will not have any problems disassembling the module, since the assembly can be disassembled into elements quite easily.
- Perform the reassembly procedure, fill with fuel and check the system for operation.
Replacement process
Pay attention to the type of pump installed. On the new pumps, the mounting system is slightly different. Therefore, for work you will need a ratchet and a 10 mm socket. With their help, the ring is dismantled in a circle and the clamps provided on the fuel line are pressed out.
The procedure for replacing the fuel pump should not cause serious problems. But still be careful, careful and consistent. You work with fuel, and therefore must follow all safety precautions.
This gasket is necessary to seal (tightly) the fuel pump and fuel tank.
This gasket is necessary to seal (tightly) the fuel pump and fuel tank.
This gasket is necessary to seal (tightly) the fuel pump and fuel tank.